React使用过程知识点随手记
React使用过程知识点随手记.txt
- 0.create-react-app新建项目
- 1.弹出配置
- 2.添加路由模块
- 3.修改webpack配置,让引入模块支持src写法
- 4.如何修改react的默认访问端口3000
- 5.export和export default的区别
- 6.react中dangerouslySetInnerHTML使用
- 7.react-native-uuid使用
- 8.yarn打包及部署到生产环境.
- 9.history.push(跳转到其他页面)
- 10.react中解决this指向问题的四种方法
- 11.解决vscode单击新文件时覆盖旧文件问题
- 12. lodash工具库
- 13.Js自动登陆示例(普通javascript)
- 14.函数组件编写示例
- 15.React中实现下载的代码
- 16.axios使用
- 17.如何通过函数传递参数
- 18.antd中modal底部定义按钮
- 19.antd中modal点击遮照层禁用关闭
- 20.React路由传参常见的几种方式
- 22.React中使用antd
- 21.node-sass很难装上,可尝试下面的安装方式
- 22.path-to-regexp进行路则正则匹配
本人主要使用后端Java语言,也对前端react有兴趣,作为一个新手,未能进行系统的前端学习,因此,此文只能将使用React过程的一些零散的步骤过程记录下来,以便查询,如有错误,请指正。
react入门学习官网:https://reactjs.org/docs/getting-started.html
0.create-react-app新建项目
如:create-react-app accdemotest
npm&yarn&reactjs环境及支持create-react-app命令,可参考npm&yarn&reactjs环境安装并搭建我的第一个helloword项目
1.弹出配置
新建了create-react-app项目后,默认的配置较少,通过yarn eject或npm run eject弹出配置,执行成功后将多出config和scripts两个文件夹。
npm run eject
2.添加路由模块
yarn add react-router-dom
官网文档地址:https://reactrouter.com/web/guides/quick-start
3.修改webpack配置,让引入模块支持src写法
引入组件时,如果想通过指定到项目里面的src目录下的写法,需要设置webpack.config.js的src参数,否则没有加的话,会报错。
##在webpack.config.js中加入
'src': path.resolve(__dirname,'../src'),
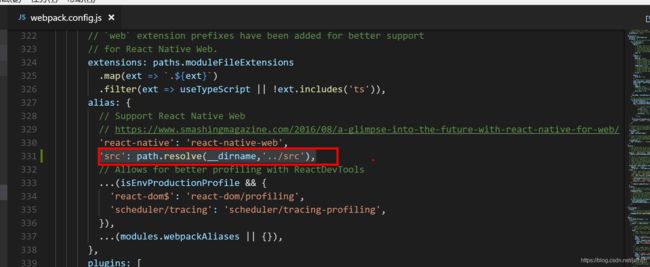
注:不加以上配置的话,编绎会报错,如下
加上配置后编绎不再有问题。
4.如何修改react的默认访问端口3000
yarn start 启动后,默认的访问端口号是3000,如果希望改它,通过start.js中的配置属性来完成修改。
如果找不到start.js,通过npm run eject先弹出配置,然后再操作,
const DEFAULT_PORT = parseInt(process.env.PORT, 10) || 3000;

5.export和export default的区别
##export与export default都可用于导出常量、函数、文件、模块等
##在一个文件或模块中,export、import可以有多个,export default仅有一个
##通过export方式导出,在导入时要加{ },export default则不需要
##比如以下写法,没有export default:
import React, { Component } from 'react';
export class Welcome extends Component {
  render() {
    return <h1>hello, {this.props.name}</h1>;
  }
}
以上的写法,没有default,在引入时写成
import Welcome from 'src/components/Welcome.js'会报错,只能写成:
import {Welcome} from 'src/components/Welcome.js'
##又比如以下写法,通过export default写的:
import React, { Component } from 'react';
class Welcome extends Component {
  render() {
    return <h1>hello, {this.props.name}</h1>;
  }
}
export default Welcome
以上的写法,通过export default暴露,在引入时写成
import Welcome from 'src/components/Welcome.js',编绎正常,并且,可以在引入时随便改名称,如下,将组件的名称改成了Welcometest这样的写法。
import { Component } from 'react';
import Welcometest from 'src/components/Welcome.js'
class App extends Component {
  render() {
    return (
      <div>
        <Welcometest name="john" />
      </div>
    );
  }
}
export default App;
6.react中dangerouslySetInnerHTML使用
带有html标签的字符串内容,默认是会保留原有的标签样式,并不会正确展示,如果需要通过html标签渲染效果,可以使用dangerouslySetInnerHTML,示例代码如下:
import { Component } from 'react';
class App extends Component {
  render() {
    let htmlStr = "span content test>";
    return (
      <div>
        <div>{htmlStr}</div>
        <div dangerouslySetInnerHTML={{__html:htmlStr}} />
      </div>
    );
  }
}
export default App;
效果如下加了dangerouslySetInnerHTML后的能进行相应的样式显示:

7.react-native-uuid使用
- ##安装install
npm install react-native-uuid 或 yarn add react-native-uuid
- ##Create a UUID
import uuid from 'react-native-uuid';
uuid.v4(); // ? '64b777b6-2746-410c-ae07-fe599bbef0f6'
8.yarn打包及部署到生产环境.
采集yarn build和nginx进行生产环境的前端代码部署,步骤如下:
- ##打包,
打包完成后将在源码目录下多出build文件夹,即为打包后的部署文件夹
yarn build
- ##部署到nginx,
放在某个目录,然后通过nginx代理出来,nginx配置示例如:,重启nginx后通过http://ip:8443/访问。
    server {
        listen       8443;
        server_name  localhost;
        location / {
            root /home/testuser/fe/build;
            proxy_connect_timeout 30;
            proxy_http_version 1.1;
            proxy_send_timeout 60;
            proxy_read_timeout 60;
            try_files $uri $uri/ /index.html = 404;
        }
    }
9.history.push(跳转到其他页面)
一种跳转到其他页面的写法,通过history.push过去,并且通过参数传过去,在另一个页面可以直接获取使用
##跳转页面通过
##传参数
this.props.history.push({pathname:'/detail',datas:{tmpAuthCode: 'xxxxxxxx', clientType: "dingTalkScanningCode"}});
##不传参数
this.props.history.push('/detail');

##到跳转页面后,想接收参数时:
console.log(this.props.location.datas);
10.react中解决this指向问题的四种方法
- ##行间定义事件后面使用bind绑定this
	run(){
	    alert("第一种方法!")
	}
  	<button onClick={this.run.bind(this)}>第一种</button>
- ##构造函数内部声明this指向
	constructor(props) {
		super(props);
		this.state={
			//数据
		}
		this.run = this.run.bind(this);
	}

 	run(){
        	alert("the second method!")
 	}

 	<button onClick={this.run}>the second method</button>
- ##声明事件时将事件等于一个箭头函数
	run = ()=> {
    	alert("第三种方法!")
  	}

	<button onClick={this.run}>第三种</button>
- ##行间定义事件使用箭头函数
 	run(){
    	alert("第四种方法!")
  	}

	<button onClick={()=>this.run()>第四种</button>
我喜欢用第三种
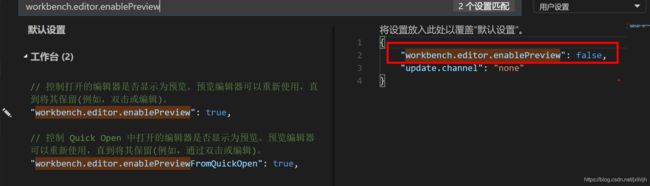
11.解决vscode单击新文件时覆盖旧文件问题
将workbench.editor.enablePreview设置为fasle
"workbench.editor.enablePreview": false,
12. lodash工具库
lodash是一套工具库,内部封装了很多字符串、数组、对象等常见数据类型的处理函数。
官网地址:https://www.lodashjs.com/
示例:如字符串转数组,然后判断数据中有没有
.indexOf(.split(localStorage.roleIds, ‘,’), record.id+‘’ ) == -1
13.Js自动登陆示例(普通javascript)
<!DOCTYPE html>
<html>
<body>
    <form action="http://116.11.11.114:8180/Home/Login" id="frm" method="post" style="display: none;">
        First name:<br>
        <input type="text" name="account" value="user">
        <br>
        Last name:<br>
        <input type="text" name="pwd" value="123456">
        <br><br>
        <input id="submit" type="submit" value="Submit">
    </form>
</body>
<script>
    document.getElementById("submit").click();
</script>
</html>
14.函数组件编写示例
实现了一个按钮权限的控制组件,通过传入一个唯一的按钮编码,通过后端程序控制此按钮的授权,前端通过接口查询当前用户是否具有此按钮的权限,来显示或不显示。
import React, { Fragment } from "react";
import api from "src/api";
import axios from 'axios';
import { message } from 'antd';
import { useEffect, useState } from 'react';
/***
 * 传入一个buttonUniqueCode参数,判断是否显示组件的childRen,主要用于权限按钮控制
 */
export const AuthShow = props => {
    const [show, setShow] = useState(false);

    //获取按钮权限数据,并设置到show变量中
    const getButtonAuthData = () => {

        api.sysButton.checkCurrentUserButtonAuthByCode({
            data: {
                buttonUniqueCode: props.buttonUniqueCode,
            },
        })
        .then(res => res.data)
        .then(json => {
            if (json.success) {
                setShow(json.data);
            } else {
                message.error(json.message);
            }
        })
        .catch(err => console.error(err));

    };

    useEffect(() => {
        getButtonAuthData();
    },[]);

    return show != true ? (
        <Fragment></Fragment>
    ): (
        <Fragment>
            {props.children}
        </Fragment>
    )
};
其中的
useEffect(() => { getButtonAuthData(); },[]);加上[]的作用是让组件只加载一次,这个位置的参数数组是函数执行的依赖,空数组只会在渲染的时候执行一次,如果没有加依赖,每次组件重新渲染都会执行
##在需要进行按钮控制的地方进行引用控制,比如:
<AuthShow buttonUniqueCode='useManageInsert'>
    <Button onClick={() => showModal('mail')}>
        <Icon type="folder-add" />
        新增用户
    </Button>
</AuthShow>
15.React中实现下载的代码
在react中可以有三种实现下载的方式,仿a标签的Get方式,仿form表单的post方式,以及axios的post异步下载blob的方式,如下:
- 第1种下载方法,blob方式
downloadFile = () => {
    console.log("dowload file start..");
    //==================第1种下载方法,blob方式,要后台全返回数据才能在浏览器中下载,会让用户感觉没有响应==============
    let params = {};
    let url = "/test/fileDownload/downloadTest";
    axios.post(url, params, {
        headers: {}
    }).then(function (response) {
        const blob = new Blob([response.data]);
        const disposition = response.headers['content-disposition'];
        console.log(disposition);
        let fileName = disposition.split('filename=')[1];
        const linkNode = document.createElement('a');
        linkNode.download = fileName; //a标签的download属性规定下载文件的名称
        linkNode.style.display = 'none';
        linkNode.href = URL.createObjectURL(blob); //生成一个Blob URL
        document.body.appendChild(linkNode);
        linkNode.click();  //模拟在按钮上的一次鼠标单击
        URL.revokeObjectURL(linkNode.href); // 释放URL 对象
        document.body.removeChild(linkNode);
    }).catch(function (error) {
        console.log(error);
    });
}
- 第2种下载方法,仿a标签方式下载,适用于Get请求
downloadFile = () => {
    console.log("dowload file start..");
    //==================第2种下载方法,虚构造出a标签进行点击下载,适用于Get方式下载,很快能出现下载条。==============
    const url = "/test/fileDownload/downloadTest";
    const eleLink = document.createElement('a');
    eleLink.style.display = 'none';
    eleLink.href = url;
    document.body.appendChild(eleLink);
    eleLink.click();
    document.body.removeChild(eleLink);
}
- 第3种下载方法,虚构出form表单方式下载,适用于Post请求
downloadFile = () => {
    console.log("dowload file start..");
    //==================第3种下载方法,虚构造出form表单,进行仿form提交方式下载,适用于Post方式下载,很快能出现下载条。==============
    let form = document.createElement('form');
    form.style.display = 'none';
    form.action = "/test/fileDownload/downloadTest";
    form.method = 'POST';
    document.body.appendChild(form);
    let params = {};
    for (var key in params) {
      var input = document.createElement('input');
      input.type = 'hidden';
      input.name = key;
      input.value = params[key];
      form.appendChild(input);
    }
    form.submit();
    form.remove();
}
16.axios使用
axios 是一个基于 promise 的 HTTP 库,可以用在浏览器和 node.js 中
#1.安装axios
yarn add axios
或指定版本安装如:
yarn add axios@^0.18.0

#2.引入axios
import axios from 'axios';

#3.使用axios如:
axios.get('/commonFile/batchGetCommonFiles?subjectId=1&subjectType=1')
.then(res => {
    this.setState({
        hasSavedFileList: res.data.data
    });
})
.catch(err => console.error(err));
其他react使用过程知识点会不断整理记录并持续更新.....
17.如何通过函数传递参数
比如在button中的onclick中要调用一个函数并传递参数,使用()=>开头的写法进行调用
##比如
<Button onClick={()=>{this.handleCreate(0)}} style={{ marginRight: 5 }}>保存草稿</Button>

##函数定义如:
handleCreate = (publishStatus) => {
	console.log(publishStatus);
}
18.antd中modal底部定义按钮
示例
< Modal title="创建知识"
    visible={visible}
    //onOk={()=>{this.onCreate(1)}}
    onCancel={this.onCancel}
    // footer={false}
    destroyOnClose={true}
    width={1000}
    bodyStyle={{ height: 600 }
    }
    className="knowledge-model"
    maskClosable={false}
    footer={[
        <Button onClick={this.onCancel}>
        取消
        </Button>,
        <Button onClick={()=>{this.onCreate(0)}}>
        保存草稿
        </Button>,
        <Button type="primary" onClick={()=>{this.onCreate(1)}}>
        发布知识
        </Button>,
    ]}
>
19.antd中modal点击遮照层禁用关闭
默认是开启的,会常常让用户不小心点到,这样填写的东西就没有了,建议是关闭的
<Modal
    maskClosable={false}
>
20.React路由传参常见的几种方式
params
路由:
<Route path='/Inbox/:id' component={Inbox} />

声明式导航:
<NavLink to={'/Inbox/01008'} >铅笔</NavLink>
编程式导航:
this.props.history.push( '/Inbox/'+'01008' )

取值:this.props.match.params.id
优势 : 刷新,参数依然存在
缺点 : 只能传字符串,并且,如果传的值太多的话,url会变得长而丑陋。
query
声明式导航:
<Link to={{pathname:'/Inbox',query:{id:'01009'}}} >铅笔</Link>
编程式导航:
this.props.history.push( {pathname:'/Inbox',query:{id:'01009'}} )
取值:this.props.location.query.id

优势:传参优雅,传递参数可传对象;
缺点:刷新地址栏,参数丢失(不管是hash方式,还是Browser模式都会丢失参数)
state
声明式导航
<Link to={{pathname:'/Inbox',state:{id:'01009'}}} >铅笔</Link>
编程式导航
this.props.history.push({pathname:'/Inbox',state:{id:"01"}});

取值:this.props.location.state.id

优势:传参优雅,传递参数可传对象
缺点:刷新地址栏,(hash方式会丢失参数,Browser模式不会丢失参数)
search
声明式导航
<Link to='/Inbox?a=1&b=2' >铅笔</Link>
编程式导航
this.props.history.push({pathname:'/Inbox',search:'?a=1&b=2'})

取值:this.props.location.search
用location.search所获取的是查询字符串,需要进一步的解析
22.React中使用antd
https://3x.ant.design/docs/react/use-with-create-react-app-cn
以上为3版本的使用链接,4版本的也一样,没有变化
yarn add antd或指定版本安装yarn add antd@^4.24.13
- 修改 src/App.js,引入 antd 的按钮组件。
import React from 'react';
import { Button } from 'antd';
import './App.css';

const App = () => (
  <div className="App">
    <Button type="primary">Button</Button>
  </div>
);

export default App;
- 修改 src/App.css,在文件顶部引入 antd/dist/antd.css。
@import '~antd/dist/antd.css';
现在应该能看到页面上已经有了 antd 的蓝色按钮组件
高级配置,antd css按需引入:
先安装react-app-rewired customize-cra
yarn add react-app-rewired customize-cra
yarn add babel-plugin-import
或指定版本安装:
yarn add react-app-rewired@^2.2.1
yarn add customize-cra@^1.0.0
yarn add babel-plugin-import@^1.13.8
修改package.json:
/* package.json */
"scripts": {
-   "start": "react-scripts start",
+   "start": "react-app-rewired start",
-   "build": "react-scripts build",
+   "build": "react-app-rewired build",
-   "test": "react-scripts test",
+   "test": "react-app-rewired test",
}
然后在项目根目录创建一个 config-overrides.js 用于修改默认配置。
config-overrides.js内容如:
const {
    override,
    fixBabelImports,
} = require('customize-cra');

module.exports = override(
    fixBabelImports('import', {
        libraryName: 'antd',
        libraryDirectory: 'es',
        style: 'css',
    }),
);
然后移除前面在 src/App.css 里全量添加的 @import ‘~antd/dist/antd.css’; 样式代码,重新启动测试即可。
21.node-sass很难装上,可尝试下面的安装方式
yarn add node-sass@npm:dart-sass
22.path-to-regexp进行路则正则匹配
比如路由/example/liutest/:id,如何判断请求的路由路径满足此规则,通过path-to-regexp来实现,匹配成功,返回一个数组,如果匹配失败,返回null
import pathToRegexp from 'path-to-regexp';

    let path1 = "/ztcxt/example/liutest/1";
    let path2 = "/ztcxt/example/liutest/1/2";
    console.log(pathToRegexp('/ztcxt/example/liutest/:id').exec(path1)); //匹配成功,返回一个数组
    console.log(pathToRegexp('/ztcxt/example/liutest/:id').exec(path2)); //匹配不成功,返回null