openldap-sasl身份认证镜像
背景
在这篇文章中,AD域信息同步至openLDAP我们使用了SASL将身份验证从OpenLDAP委托给AD”这种方案,本文主要来构建此方案的docker镜像。
sasl官网:Cyrus SASL
bitnami/openldap镜像地址:containers/Dockerfile
bitnami/openldap镜像集成 sasl文档说明(主要在14.5章节):[OpenLDAP Software 2.5 Administrator’s Guide](https://www.openldap.org/doc/admin25/guide.html#Using SASL)
其他镜像参考:openldap-sasl-proxy-authorization-docker
sasl验证原理
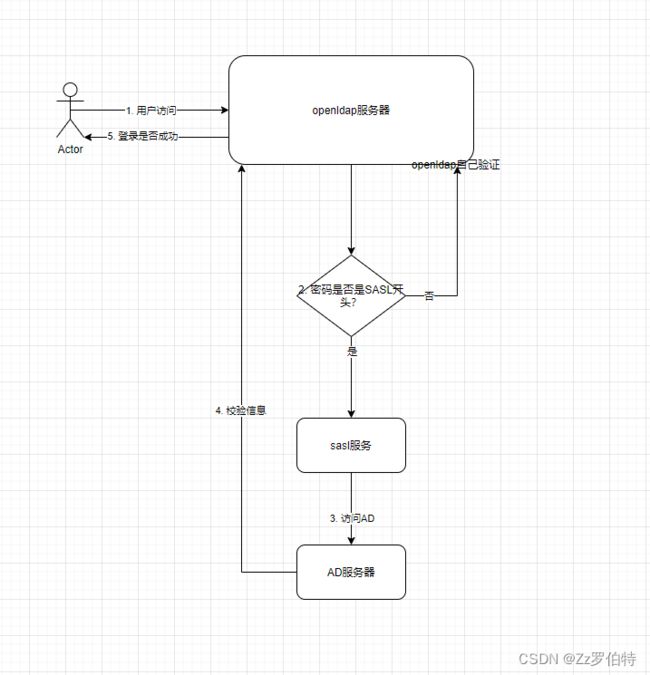
在openldap中,如果用户的userpassword包含{SASL}那么这种用户在访问openldap的时候,其身份验证就会呗sasl截取,去AD验证了,如果不包含,则走openldap自己的验证
其流程为:
/etc/saslauthd.conf为sasl的配置文件
其中,{SASL}的密码被拦截后,会去配置文件中的ldap_filter字段去AD服务器进行条件匹配,如果符合要求,则会验证密码;
OpenLDAP docker 部署
镜像
热度比较高的有两个镜像:osixia/openldap、bitnami/openldap
osixia/openldap:
集成了 TLS 安全认证,默认开启
个人维护
6个月前更新
bitnami/openldap:
没有做签名认证
团队维护
7天前更新
两者都没有做 SSL 安全认证,没有开 memberOf 功能,没有开账号安全策略,没有设置用户自主改密码
综合两者的优缺点,最终选择了 bitnami/openldap,没做的功能自己做
目录树
├── sh
│   ├── docker                     # 部署需要的文件
│   │   ├── entrypoint.sh           # entrypoint.sh文件
│   │   ├── saslauthd.sh            # sasl文件
├── Dockerfile                      # dockerfile
详情
Dockerfile文件
FROM bitnami/openldap:2.6.3

LABEL maintainer="xxxx"

ENV OPENLDAP_VERSION="2.6.7" \
    SASLAUTHD_VERSION="2.1.28" \
    LDAP_AD_SERVERS="ldap://ad.example.com:389/" \
    LDAP_AD_SEARCH_BASE="CN=DomainUsers,DC=example,DC=com" \
    LDAP_AD_TIMEOUT="10" \
    LDAP_AD_FILTER="(sAMAccountName=%U)" \
    LDAP_AD_BIND_DN="CN=admin,CN=Users,DC=example,DC=com" \
    LDAP_AD_PASSWORD="ADpassword"

USER root

COPY sh/docker/saslauthd.sh     /opt/bitnami/scripts/openldap/saslauthd.sh
COPY sh/docker/entrypoint.sh    /opt/bitnami/scripts/openldap/entrypoint.sh

RUN chmod +x /opt/bitnami/scripts/openldap/saslauthd.sh
RUN chmod +x /opt/bitnami/scripts/openldap/entrypoint.sh

RUN sed -i s@/deb.debian.org/@/mirrors.163.com/@g /etc/apt/sources.list

RUN apt-get clean \
    && apt-get update \
    && apt-get install -q -y sasl2-bin \
    && apt-get clean \
    && rm -rf /var/lib/apt/lists/* /tmp/* /var/tmp/*

RUN chmod g+rwX /opt/bitnami
entrypoint.sh文件
#!/bin/bash

# shellcheck disable=SC1091

set -o errexit
set -o nounset
set -o pipefail

# Load libraries
. /opt/bitnami/scripts/liblog.sh

if [[ "$1" = "/opt/bitnami/scripts/openldap/run.sh" ]]; then
    info "** Starting LDAP setup **"
    /opt/bitnami/scripts/openldap/setup.sh
    info "** LDAP setup finished! **"
fi
# 执行 sasl 相关文件
sh /opt/bitnami/scripts/openldap/saslauthd.sh
echo ""
exec "$@"
saslauthd.sh文件
#!/bin/bash
cat > /etc/saslauthd.conf << EOF
ldap_servers: ${LDAP_AD_SERVERS}
ldap_search_base: ${LDAP_AD_SEARCH_BASE}
ldap_timeout: ${LDAP_AD_TIMEOUT}
ldap_filter: ${LDAP_AD_FILTER}
ldap_bind_dn: ${LDAP_AD_BIND_DN}
ldap_password: ${LDAP_AD_PASSWORD}
ldap_deref: never
ldap_restart: yes
ldap_scope: sub
ldap_use_sasl: no
ldap_start_tls: no
ldap_version: 3
ldap_auth_method: bind
EOF

sed -i 's/MECHANISMS="pam"/MECHANISMS="ldap"/' /etc/default/saslauthd
sed -i 's/START=no/START=yes/' /etc/default/saslauthd
echo "chmod -R 777 /var/run/saslauthd" >> /etc/init.d/saslauthd

echo "mech_list: plain EXTERNAL" >> /usr/lib/sasl2/slapd.conf
echo "pwcheck_method: saslauthd" >> /usr/lib/sasl2/slapd.conf
echo "saslauthd_path: /var/run/saslauthd/mux" >> /usr/lib/sasl2/slapd.conf

/etc/init.d/saslauthd start
echo "==========saslauthd start =========="
Docker命令
构建镜像
# 进入与Dockerfile同级的目录执行
docker build -t openldap-sasl2:v1.0 -f Dockerfile .
docker启动
docker run -d --name openldap2 -p 389:1389 \
-u root \
--restart=always \
-e LDAP_ADMIN_USERNAME='admin' \
-e LDAP_ROOT='dc=abc,dc=com' \
-e LDAP_ADMIN_PASSWORD='123456' \
-e LDAP_AD_SERVERS='ldap://xx.xx.xx:389' \
-e LDAP_AD_SEARCH_BASE='OU=users,DC=def,DC=com' \
-e LDAP_AD_TIMEOUT=10 \
-e LDAP_AD_FILTER='(|(cn=%u)(userPrincipalName=%u)(sAMAccountName=%u)(telephoneNumber=%u))' \
-e LDAP_AD_BIND_DN='CN=admin,CN=Users,DC=def,DC=com' \
-e LDAP_AD_PASSWORD='111111' \
openldap-sasl2:v1.0
进入容器
docker exec -it 容器id /bin/bash
验证sasl服务(账户为AD用户以及AD密码)
testsaslauthd -u [email protected] -p 22222
验证openldap服务(账户为openldap用户以及openldap密码)
ldapwhoami -x -H ldap://127.0.0.1:1389 -D cn=admin,dc=abc,dc=com -w 123456
给openldap添加用户
cat >> user1.ldif <<EOF
dn: uid=user01,ou=users,dc=abc,dc=com
objectClass: person
objectClass: organizationalPerson
objectClass: inetOrgPerson
objectClass: top
uid: user01
cn: user01
sn: user01
userpassword: {SASL}[email protected]
givenname: user01
mail: [email protected]
EOF


ldapadd -x -H ldap://127.0.0.1:1389 -w "123456" -D "cn=admin,dc=abc,dc=com" -f user1.ldif
使用AD的密码去验证用户
ldapwhoami -x -H ldap://127.0.0.1:1389 -D uid=user01,ou=users,dc=abc,dc=com -w 22222
动态查询docker日志
docker logs -f -t --since="2023-02-23" --tail=50 97
AD搜索语句
ldapsearch -x -H ldap://xxx.xx.xx.xx:389/ -D CN=admin,CN=Users,DC=def,DC=com -w 111111 -b "ou=xxx,ou=xxxx,ou=xxx,dc=def,dc=com" "([email protected])"
踩坑点
运行docker容器报错
standard_init_linux.go:228: exec user process caused: no such file or directory。
这是由于编码环境是Windows系统,而容器运行或镜像编译环境是Linux系统,换行格式不同造成的
解决方案:
可以使用代码编辑器(以VScode为例),修改文件格式。在打开文件时,软件右下角会有“选择行尾序列选项”,把CRLF(Windows)更改为LF(Linux)就好了。
docker使用entrypoint执行时报permission denied错误
在Dockerfile中使用指令ENTRYPOINT来执行项目下entrypoint.shshell文件,如下:
ENTRYPOINT ["./entrypoint.sh"]
时报错提示:
Exec: "./entrypoint.sh": permission denied
很明显问题在于用户没有文件的执行权限。
解决方案:
添加:
RUN chmod +x /opt/bitnami/scripts/openldap/xxx.sh
sasl验证的时候日志报错(Failure: cannot connect to saslauthd server: Permission denied)
明显是个权限问题
解决方案
在saslauthd.sh文件中添加
echo "chmod -R 777 /var/run/saslauthd" >> /etc/init.d/saslauthd
sasl验证的时候报错(Invalid credentials (49))
这种情况分为两种:
- 仔细核对dn以及密码,确保密码正确;
- 编码问题,有可能是window和linux系统编码不一致,所以在linux输入!!!!!!!!!(这个问题极其蛋疼)
参考文献
OpenLDAP docker 部署
