django,flask项目docker部署(uwsgi)——关于项目上线的杂七杂八
目录
- 环境准备
-
- 更新系统的软件包
- 安装软件管理包和可能使用的依赖
- 安装Python
- 配置pip源
- 安装uwsgi
- 安装nginx
- 部署一个前后端分离的项目
-
- 上线前配置
- 导出项目环境
- uwsgi与nginx后台项目配置
- 静态资源迁移
- nginx动静分离
- 重启服务
- 重点
- 各种问题
-
- Command “python setup.py egg_info“ failed with error code 1 in /tmp/pip-build-*
- Django在linux中报Incorrect timezone setting: Asia/ShangHai
- 解决pip3 install mysqlclinet 报错 OSError: mysql_config not found
- 部署一个前后端不分离的项目
-
- 配置静态文件根目录并迁移静态文件
- 配置nginx
- 配置uwsgi并启动
- 添加静态文件路由
- 用supervisor托管nginx后单机nginx--uwsgi--django就部署完成了
- Q&A
-
- re_path(r'^static/(?P
.*)$', static.serve, {'document_root': settings.STATIC_ROOT}, name='static'),和urlpatterns += static(settings.STATIC_URL, document_root=settings.STATIC_ROOT) 有什么区别吗? - STATIC_ROOT的作用
- re_path(r'^static/(?P
- docker部署django api
- docker部署flask api
环境准备
更新系统的软件包
yum update -y
安装软件管理包和可能使用的依赖
yum -y groupinstall "Development tools"

yum install openssl-devel bzip2-devel expat-devel gdbm-devel readline-devel sqlite-devel psmisc libffi-devel
安装Python
1)前往用户根目录
>: cd ~

2)下载Python
>: wget https://www.python.org/ftp/python/3.6.7/Python-3.6.7.tar.gz

# 也可以本地终端,给服务器上传
# >: scp -r 本地Python-3.6.7.tar.gz ssh [email protected]:服务器路径
# >: scp -r C:\Users\dell\Desktop\pkg\Python-3.6.7.tar.gz ssh [email protected]~

3)解压安装包
>: tar -xf Python-3.6.7.tar.gz

4)进入目标文件
>: cd Python-3.6.7

5)配置安装路径:/usr/local/python3
>: ./configure --prefix=/usr/local/python3

6)编译并安装
>: make && sudo make install

7)建立软连接:终端命令 python3,pip3
>: ln -s /usr/local/python3/bin/python3.6 /usr/bin/python3
>: ln -s /usr/local/python3/bin/pip3.6 /usr/bin/pip3

8)删除安装包与文件:
>: rm -rf Python-3.6.7
>: rm -rf Python-3.6.7.tar.gz
配置pip源
1)创建pip配置路径
>: mkdir ~/.pip

2)进入目录编辑配置文件:填入下方内容
cd ~/.pip && vim pip.conf

[global]
index-url = https://pypi.douban.com/simple
[install]
use-mirrors =true
mirrors =https://pypi.douban.com/simple/
trusted-host =pypi.douban.com
安装uwsgi
1)在真实环境下安装
pip3 install uwsgi

2)建立软连接
ln -s /usr/local/python3/bin/uwsgi /usr/bin/uwsgi
安装nginx
1)前往用户根目录
>: cd ~

2)下载nginx1.13.7
>: wget http://nginx.org/download/nginx-1.13.7.tar.gz

3)解压安装包
>: tar -xf nginx-1.13.7.tar.gz

4)进入目标文件
>: cd nginx-1.13.7

5)配置安装路径:/usr/local/nginx
>: ./configure --prefix=/usr/local/nginx

6)编译并安装
>: make && sudo make install

7)建立软连接:终端命令 nginx
>: ln -s /usr/local/nginx/sbin/nginx /usr/bin/nginx

8)删除安装包与文件:
>: cd ~
>: rm -rf nginx-1.13.7
>: rm -rf nginx-1.13.7.tar.xz

9)测试Nginx环境,服务器运行nginx,本地访问服务器ip
>: nginx
>: 服务器绑定的域名 或 ip:80
部署一个前后端分离的项目
上线前配置
# 关闭测试环境
DEBUG = False
ALLOWED_HOSTS = [
    'xxx.xxx.xxx.xxx'  # 公网ip地址
]

CORS_ORIGIN_ALLOW_ALL = True  # 允许所有跨域


# 静态文件配置:上线后还有额外配置,见下方 后台样式问题
STATIC_URL = '/static/'


# 后台http根路径
# BASE_URL = 'http://127.0.0.1:8000'
BASE_URL = 'http://xxx.xxx.xxx.xxx:8000'
# 前台http根路径
# LUFFY_URL = 'http://127.0.0.1:8080'
LUFFY_URL = 'http://xxx.xxx.xxx.xxx:80'
# 订单支付成功的后台异步回调接口
NOTIFY_URL = BASE_URL + '/order/success/'
# 订单支付成功的前台同步回调接口
RETURN_URL = LUFFY_URL + '/order/pay/success/'


REST_FRAMEWORK = {
    # 渲染模块
    'DEFAULT_RENDERER_CLASSES': [
        'rest_framework.renderers.JSONRenderer',
        # 'rest_framework.renderers.BrowsableAPIRenderer',
    ],
    # ...
}
导出项目环境
1)进入本地项目根目录
>: cd 项目根目录

2)本地导出项目环境
>: pip3 freeze > packages.txt

3)如果环境中有特殊的安装包,需要处理一下xadmin
packages.txt中的
	xadmin==2.0.1
要被替换为
	https://codeload.github.com/sshwsfc/xadmin/zip/django2
uwsgi与nginx后台项目配置
1)进行uwsgi服务配置,内容如下
>: vim /home/project/luffyapi/luffyapi.xml

<uwsgi>
   <socket>127.0.0.1:8888</socket> <!-- 内部端口,自定义 -->
   <chdir>/home/project/luffyapi/</chdir> <!-- 项目路径 -->
   <module>luffyapi.wsgi</module>  <!-- luffyapi为wsgi.py所在目录名-->
   <processes>4</processes> <!-- 进程数 -->
   <daemonize>uwsgi.log</daemonize> <!-- 日志文件 -->
</uwsgi>

4)去向Nginx配置目录,备份配置,完全更新配置:填入下方内容
>: vim /usr/local/nginx/conf/nginx.conf

events {
    worker_connections  1024;
}
http {
    include       mime.types;
    default_type  application/octet-stream;
    sendfile        on;
    server {
        listen 80;
        server_name  127.0.0.1:80; # 改为自己的域名,没域名修改为127.0.0.1:80
        charset utf-8;
        location / {
            root /home/html; # html访问路径
            index index.html; # html文件名称
            try_files $uri $uri/ /index.html; # 解决单页面应用刷新404问题
        }
    }
    # 新增的server
    server {
        listen 8000;
        server_name  127.0.0.1; # 改为自己的域名,没域名修改为127.0.0.1:80
        charset utf-8;
        location / {
           include uwsgi_params;
           uwsgi_pass 127.0.0.1:8888;  # 端口要和uwsgi里配置的一样
           uwsgi_param UWSGI_SCRIPT luffyapi.wsgi;  #wsgi.py所在的目录名+.wsgi
           uwsgi_param UWSGI_CHDIR /home/project/luffyapi/; # 项目路径
        }
    }
}
静态资源迁移
1)编辑线上配置文件
>: vim /home/project/luffyapi/luffyapi/settings/prod.py


2)修改static配置,新增STATIC_ROOT、STATICFILES_DIRS
STATIC_URL = '/static/'
STATIC_ROOT = '/home/project/luffyapi/luffyapi/static'
STATICFILES_DIRS = (os.path.join(BASE_DIR, "static"),)

3)退出编辑
>: esc
>: wq

1)项目目录下没有 static 文件夹需要新建
>: mkdir /home/project/luffyapi/luffyapi/static

2)完成静态文件迁移
>: python /home/project/luffyapi/manage_prod.py collectstatic
nginx动静分离
1)修改nginx配置
>: vim /usr/local/nginx/conf/nginx.conf

events {
    worker_connections  1024;
}
http {
    include       mime.types;
    default_type  application/octet-stream;
    sendfile        on;
    server {
        listen 80;
        server_name  127.0.0.1:80; # 改为自己的域名,没域名修改为127.0.0.1:80
        charset utf-8;
        location / {
            root /home/html; # html访问路径
            index index.html; # html文件名称
            try_files $uri $uri/ /index.html; # 解决单页面应用刷新404问题
        }
    }
    server {
        listen 8000;
        server_name  127.0.0.1:80; # 改为自己的域名,没域名修改为127.0.0.1:80
        charset utf-8;
        location / {
           include uwsgi_params;
           uwsgi_pass 127.0.0.1:8888;  # 端口要和uwsgi里配置的一样
           uwsgi_param UWSGI_SCRIPT luffyapi.wsgi;  #wsgi.py所在的目录名+.wsgi
           uwsgi_param UWSGI_CHDIR /home/project/luffyapi/; # 项目路径
        }
        # 新增的配置静态文件
        location /static {
            alias /home/project/luffyapi/luffyapi/static;
        }
    }
}

2)退出
>: esc
>: :wq
重启服务
1)关闭 uwsgi,重新启动 uwsgi
>: pkill -f uwsgi -9
>: uwsgi -x /home/project/luffyapi/luffyapi.xml

2)关闭 nginx,重新启动 nginx
>: nginx -s stop
>: nginx
重点
# 1、真实环境和虚拟环境都要安装uwsgi,将真实环境下的uwsgi建立软连接

# 2、redis服务一定要后台启动:redis-server

# 3、uwsgi启动django项目一定要进入虚拟环境下,因为环境都是安装在虚拟环境中

# 4、服务器的日志都会被记录在于uwsgi配置文件 luffyapi.xml 同目录下的 uwsgi.log 中
各种问题
Command “python setup.py egg_info“ failed with error code 1 in /tmp/pip-build-*
一般出现这个问题是由于pip版本太低或者pip有问题的原因:
此时需要升级pip:

# pip3执行
pip3 install --upgrade pip
# pip执行
pip install --upgrade pip
# 如果上面升级失败,可以试试
python -m pip install --upgrade --force pip
Django在linux中报Incorrect timezone setting: Asia/ShangHai
设置系统时区:比较新的linux发行版(ubuntu 16.04和centos7)均支持一个方便的命令timedatectl
在这里插入代码片
1、使用timedatectl命令,查看当前的时区
[root@localhost ~]# timedatectl status
Warning: Ignoring the TZ variable. Reading the system's time zone setting only.
      Local time: 三 2019-05-29 19:17:22 UTC
  Universal time: 三 2019-05-29 19:17:22 UTC
        RTC time: 三 2019-05-29 19:17:22
       Time zone: n/a (UTC, +0000)
     NTP enabled: yes
NTP synchronized: no
 RTC in local TZ: no
      DST active: n/a
2、使用timedatectl命令,设置时区为东八区
# timedatectl list-timezones  | grep "Asia/S"
Asia/Sakhalin
Asia/Samarkand
Asia/Seoul
Asia/Shanghai
Asia/Singapore
Asia/Srednekolymsk
# timedatectl set-timezone "Asia/Shanghai"
3、查看当前的时区状态
# timedatectl status
Warning: Ignoring the TZ variable. Reading the system's time zone setting only.
      Local time: 三 2019-05-29 23:23:59 SCT
  Universal time: 三 2019-05-29 19:23:59 UTC
        RTC time: 三 2019-05-29 19:23:59
       Time zone: Asia/Shanghai (SCT, +0400)
     NTP enabled: yes
NTP synchronized: no
 RTC in local TZ: no
      DST active: n/a
解决pip3 install mysqlclinet 报错 OSError: mysql_config not found
支持mysql_config是需要安装下面的软件的:
gcc
gcc-c++
python3-devel  (注意如果是python3安装的是python3-devel)
mariadb-devel   (centos7中叫把mysql-devle叫mariadb-devel)
libffi-devel
openssl-devel
yum install gcc gcc-c++ python3-devel mariadb-devel libffi-devel openssl-devel
如果还不行,最终大招:
import pymysql

pymysql.install_as_MySQLdb()
部署一个前后端不分离的项目
首先要明确一个观点:在 DEBUG=True 时,Django会自动为你提供静态文件,所以 static(settings.STATIC_URL, document_root=settings.STATIC_ROOT) 才会被添加到 urlpatterns 中。而在 DEBUG=False 时,Django就不再为你提供静态文件,这时候需要使用 web 服务器如 Nginx 或 Apache 等来处理静态文件。因此,当你在生产环境下部署时,需要将静态文件服务的配置转移到 web 服务器上。
配置静态文件根目录并迁移静态文件
# settings.py
STATIC_ROOT = os.path.join(BASE_DIR, "mystatic")

STATIC_URL = '/static/'

STATICFILES_DIRS = [
    os.path.join(BASE_DIR, 'static'),
]
迁移静态文件:
python manage.py collectstatic
此时你就会在static的根目录下看到一个"mystatic":

这个"mystatic"就是用来做动静分离的。
配置nginx
user root;
worker_processes auto;
error_log /code/nginxServer/error.log;
pid /run/nginx.pid;


events {
    worker_connections 1024;
}

http {
    log_format  main  '$remote_addr - $remote_user [$time_local] "$request" '
                      '$status $body_bytes_sent "$http_referer" '
                      '"$http_user_agent" "$http_x_forwarded_for"';

    access_log  /code/nginxServer/access.log  main;

    sendfile            on;
    tcp_nopush          on;
    tcp_nodelay         on;
    keepalive_timeout   65;
    types_hash_max_size 2048;

    include             /etc/nginx/mime.types;
    default_type        application/octet-stream;

    # Load modular configuration files from the /etc/nginx/conf.d directory.
    # See http://nginx.org/en/docs/ngx_core_module.html#include
    # for more information.
    include /etc/nginx/conf.d/*.conf;

    server {
        listen       80 default_server;
        listen       [::]:80 default_server;
        server_name  localhost;
        # root         /usr/share/nginx/html;

        # Load configuration files for the default server block.
        include /etc/nginx/default.d/*.conf;

        location / {
           include uwsgi_params;
           uwsgi_pass 127.0.0.1:8888;  # 端口要和uwsgi里配置的一样
           uwsgi_param UWSGI_SCRIPT GeneralSaaS.wsgi;  #wsgi.py所在的目录名+.wsgi
           uwsgi_param UWSGI_CHDIR /code/GeneralSaaS/; # 项目路径
        }
		# 动静分离
        location /static/ {
            alias /code/GeneralSaaS/mystatic/;
        }


        error_page 404 /404.html;
            location = /40x.html {
        }

        error_page 500 502 503 504 /50x.html;
            location = /50x.html {
        }
    }


    server {
        listen       443 ssl http2 default_server;
        listen       [::]:443 ssl http2 default_server;
        server_name  localhost;
        # root         /usr/share/nginx/html;

        ssl_certificate "/code/tmp/server.crt";
        ssl_certificate_key "/code/tmp/server_nopwd.key";
        ssl_session_cache shared:SSL:1m;
        ssl_session_timeout  10m;
        ssl_ciphers HIGH:!aNULL:!MD5;
        ssl_prefer_server_ciphers on;

        # Load configuration files for the default server block.
        include /etc/nginx/default.d/*.conf;

        location / {
           include uwsgi_params;
           uwsgi_pass 127.0.0.1:8888;  # 端口要和uwsgi里配置的一样
           uwsgi_param UWSGI_SCRIPT GeneralSaaS.wsgi;  #wsgi.py所在的目录名+.wsgi
           uwsgi_param UWSGI_CHDIR /code/GeneralSaaS/; # 项目路径
        }
		# 动静分离
        location /static/ {
            alias /code/GeneralSaaS/mystatic/;
        }


        error_page 404 /404.html;
            location = /40x.html {
        }

        error_page 500 502 503 504 /50x.html;
            location = /50x.html {
        }
    }

}
配置uwsgi并启动
<uwsgi>
   <socket>127.0.0.1:8888</socket> <!-- 内部端口,自定义 -->
   <chdir>/code/GeneralSaaS/</chdir> <!-- 项目路径 -->
   <module>GeneralSaaS.wsgi</module>  <!-- GeneralSaaS为wsgi.py所在目录名-->
   <processes>4</processes> <!-- 进程数 -->
   <daemonize>uwsgi.log</daemonize> <!-- 日志文件 -->
</uwsgi>
启动uwsgi:
uwsgi -x GeneralSaaS.xml
添加静态文件路由
方式一:添加一条路由:
re_path(r'^static/(?P.*)$' , static.serve, {'document_root': settings.STATIC_ROOT}, name='static')
方式二:使用django提供的静态服务:
from django.conf import settings
urlpatterns += static(prefix=settings.STATIC_URL, document_root=settings.STATIC_ROOT)
用supervisor托管nginx后单机nginx–uwsgi–django就部署完成了
Q&A
re_path(r’^static/(?P .*)$', static.serve, {‘document_root’: settings.STATIC_ROOT}, name=‘static’),和urlpatterns += static(settings.STATIC_URL, document_root=settings.STATIC_ROOT) 有什么区别吗?
- 没区别,django官方推荐后者,而且debug=True时,django默认给配置了。
- 建议本地调试配置
debug=True,上线就做静态文件迁移,然后动静分离。 - 静态文件迁移就是把staic目录copy一份再把django admin后台的静态文件放那,然后供nginx代理。
STATIC_ROOT的作用
-
STATIC_ROOT 变量是用于指定静态文件收集的目录。
-
在 Django 中,STATICFILES_DIRS 是一个用于指定静态文件所在目录的列表,不应该将 STATIC_ROOT 包含在其中。因为STATICFILES_DIRS会被复制到STATIC_ROOT中,禁止循环复制。
docker部署django api
- 前后端分离的项目可以不进行静态文件相关的配置,如:静态文件迁移,uwsgi静态文件映射…
- 如果数据库使用mongodb,也免去了数据库迁移操作
- 编写Dockerfile
FROM python:3.11

WORKDIR /app

# 安装django和uwsgi
RUN pip install -i https://pypi.douban.com/simple/ django==2.2.7
RUN pip install -i https://pypi.douban.com/simple/ uwsgi

# copy代码
COPY . /app/
# 暴露端口
EXPOSE 8888
# 执行
CMD ["uwsgi","--ini","uwsgi.ini"]
- 编写uwsgi.ini
[uwsgi]
# 用作uwsgi协议nginx连接时使用
socket = 0.0.0.0:10000
# 工作目录
chdir = /app/
wsgi-file = dj/wsgi.py
processes = 2
threads = 1
# 缓冲区
buffer-size = 65536
# 日志文件
logto = /app/uwsgi.log
# 用作直接做http
http = 0.0.0.0:8888
- 修改settings
# SECURITY WARNING: don't run with debug turned on in production!
DEBUG = False

ALLOWED_HOSTS = ["*"]
- docker打包
docker build -t myapp:0.0.1 .

- 运行:
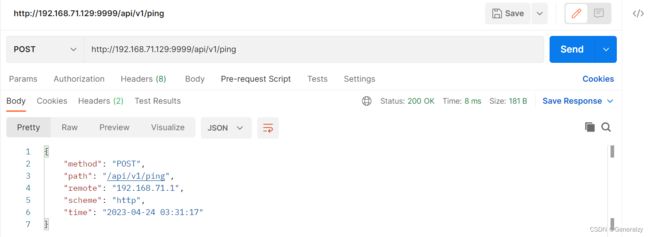
docker run --name djapp -p 8888:8888 myapp:0.0.1 - 访问我预留的
/api/v1/ping接口:
docker部署flask api
- main.py
from flask import Flask

from web.view import web_bp

# app
app = Flask(__name__)
# 注册一个视图蓝图
app.register_blueprint(web_bp)

if __name__ == '__main__':
    app.run(host="0.0.0.0", port=9999)
- 编写Dockerfile
FROM python:3.11

WORKDIR /webApp

# 安装flask和uwsgi
RUN pip install -i https://pypi.douban.com/simple/ flask
RUN pip install -i https://pypi.douban.com/simple/ uwsgi

# copy代码
COPY . /webApp/
# 暴露端口
EXPOSE 9999
# 执行
CMD ["uwsgi","--ini","uwsgi.ini"]
- 编写uwsgi.ini
[uwsgi]
socket = 0.0.0.0:7777
chdir = /webApp/
wsgi-file = main.py
processes = 4
threads = 1
# flask的app
callable = app
# 缓冲区
buffer-size = 65536
# 日志文件
logto = uwsgi.log
# 用作直接做http
http = 0.0.0.0:9999
- 构建
docker build -t flaskapp:0.0.1 .

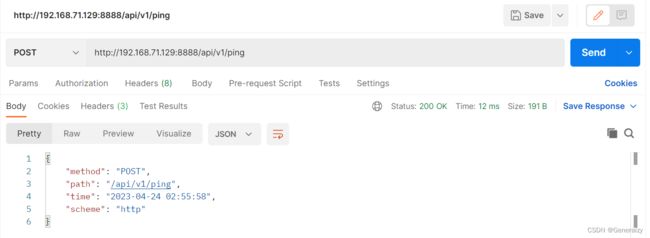
- 执行并访问预留的
api/v1/ping,docker run --name flaskapp1 -p 9999:9999 flaskapp:0.0.1