ESP32 IDF开发 应用篇⑯ SmartConfig一键配网

ESP32 IDF开发 应用篇⑯ SmartConfig一键配网

    • 1、博主写这篇技术文章的目的:
    • 2、概述
    • 3、SmartConfig 特点
    • 4、SmartConfig API的介绍
    • 5、软件设计
    • 6、实例

别迷路-导航栏
快速导航找到你想要的(文章目录)

此篇文章如果对你有用,请点赞收藏,您的支持就是博主坚持的动力。

1、博主写这篇技术文章的目的:

(1)、了解 什么是SmartConfig;
(2)、SmartConfig的编程方法;

2、概述

在前面章节连接wifi我们都是直接在程序中写入ssid和password,但在实际项目中是不允许直接写入代码中。
当你拿到一块WiFi模块,如果需要连上网络,则需要将SSID名称、密码设置到模块当中。一般有几种方式:
(1)、一种就是通过串口接到输入设备,通过串口输入AT指令(SSID名称和密码),但是前提是该模块本身烧入了AT固件,很明显不符合Arduino core for ESP32开发;
(2)、一种就是设备提供一个AP热点,手机连上这个热点,然后通过手机把家里的WiFi的SSID和密码配置到设备上,最后手机再切换回家里的WiFi(这里就是博主后面会讲到的Web配网)。这种配网成功率可以说是100%,缺点是配置过程复杂,做出的产品不易操作。
(3)、SmartConfig 模式,采用 UDP 广播模式(UDP 接收 IP 地址是 255.255.255.255)。WiFi设备先 scan 环境下 AP,得到 AP 的相关信息,如工作的 channel,然后配置 WiFi 芯片工作在刚才 scan 到的 channel 上去接收 UDP 包,如果没有接收到,继续配置工作在另外的 channel 上,如此循环,直到收到 UDP 包为止。随意此种办法的致命缺点是成功率只有 70%,而且有些路由器不支持;优点显而易见,一键完成。

3、SmartConfig 特点

SmartConfig 又名快连,当前设备在没有和其他设备建立任何实际性通信链接的状态下,
一键配置该设备接入 WIFI。

4、SmartConfig API的介绍

这里介绍大部分SmartConfig库的使用更详细的请参考:
更多API 参考esp-idf\components\esp_wifi\include\esp_smartconfig.h

#include “esp_smartconfig.h”

SmartConfig使用大体分为三步:
(1)、设置SmartConfig的协议类型

/**
   * @brief 设置SmartConfig的协议类型。
   *
   * @注意如果用户需要设置SmartConfig类型,请在调用之前进行设置
   * esp_smartconfig_start。
   *
   * @参数类型从smartconfig_type_t中选择。
   *
   * @return
   *-ESP_OK:成功
   *-其他:失败
   */
esp_err_t esp_smartconfig_set_type(smartconfig_type_t type);

(2)、启动SmartConfig配置ESP设备以连接AP。

/**
   * @brief 启动SmartConfig,配置ESP设备以连接AP。 您需要通过手机APP广播信息。
   *设备从空中嗅探包含目标AP的SSID和密码的特殊数据包。
   *
   * @注意1.可以在站点或softAP站点模式下调用此API。
   * @注意2.无法完成之前无法两次调用esp_smartconfig_start,请致电
   * esp_smartconfig_stop首先。
   *
   * @param config指向smartconfig的指针开始配置结构
   *
   * @return
   *-ESP_OK:成功
   *-其他:失败
   */
esp_err_t esp_smartconfig_start(const smartconfig_start_config_t *config);

(3)、停止SmartConfig

/**
   * @brief 停止SmartConfig,释放esp_smartconfig_start占用的缓冲区。
   *
   * @attention 无论是否成功连接到AP,都应调用此API以释放它
   * smartconfig_start占用的内存。
   *
   * @return
   *-ESP_OK:成功
   *-其他:失败
   */
esp_err_t esp_smartconfig_stop(void);

其他API函数

/**
   * @brief 设置SmartConfig进程的超时时间。
   *
   * @注意时间从SC_STATUS_FIND_CHANNEL状态开始。 如果超时,SmartConfig将重新启动。
   *
   * @param time_s范围15s〜255s,偏移:45s。
   *
   * @return
   *-ESP_OK:成功
   *-其他:失败
   */
esp_err_t esp_esptouch_set_timeout(uint8_t time_s);
/**
   * @brief 设置SmartConfig模式。 默认普通模式。
   *
   * @注意1.请在API esp_smartconfig_start之前调用它。
   * @注意2.快速模式下有相应的APP(电话)。
   * @注意3.两种模式兼容。
   *
   * @param enable false-disable(默认); 启用
   *
   * @return
   *-ESP_OK:成功
   *-其他:失败
   */
esp_err_t esp_smartconfig_fast_mode(bool enable);

5、软件设计

①、初始化设置wifi sta模式注册wifi联网回调函数

 ESP_ERROR_CHECK(esp_event_handler_register(WIFI_EVENT, ESP_EVENT_ANY_ID, &event_handler, NULL));
ESP_ERROR_CHECK(esp_event_handler_register(IP_EVENT, IP_EVENT_STA_GOT_IP, &event_handler, NULL));

②、注册SmartConfig回调函数

ESP_ERROR_CHECK(esp_event_handler_register(SC_EVENT, ESP_EVENT_ANY_ID, &event_handler, NULL) );

事件SC_EVENT在SmartConfig中已经定义:wifih回调事件参考:
【ESP32 IDF开发 应用篇⑬ 连接Wifi回调函数esp_event_handler_register专题】
/** @brief smartconfig 基本event声明 */
ESP_EVENT_DECLARE_BASE(SC_EVENT);
③、等待wifi连接失败,创建SmartConfig任务事件,并且启动SmartConfig

 ESP_ERROR_CHECK( esp_smartconfig_set_type(SC_TYPE_ESPTOUCH) );
    smartconfig_start_config_t cfg = SMARTCONFIG_START_CONFIG_DEFAULT();
    ESP_ERROR_CHECK( esp_smartconfig_start(&cfg) );

④、然后打开手机esptouch APP输入ssid和password点击连接连接,esp32调用回调函数获得手机端广播来的ssid和password,保存在nvs中并连接

else if (event_base == SC_EVENT && event_id == SC_EVENT_GOT_SSID_PSWD) //获得SSID 和 password
{
。。。
}

在于手机交互过程中会发生多个事件:

/** Smartconfig event 声明 */
typedef enum {
    SC_EVENT_SCAN_DONE,                /*!< ESP32 station smartconfig 已完成扫描AP */
    SC_EVENT_FOUND_CHANNEL,            /*!< ESP32 station smartconfig 找到了目标AP的信道 */
    SC_EVENT_GOT_SSID_PSWD,            /*!< ESP32 station smartconfig 得到了SSID和密码 */
    SC_EVENT_SEND_ACK_DONE,            /*!< ESP32 station smartconfig 已发送回手机 */
} smartconfig_event_t;

⑤、最后设置成功之后应答手机端触发应答事件,并且关闭SmartConfig

else if (event_base == SC_EVENT && event_id == SC_EVENT_SEND_ACK_DONE)
{
。。。。
}
esp_smartconfig_stop();

⑥、重启之后系统直接从nvs中读取ssid和password直接链接wifi ,不用每次都使用SmartConfig配置。

6、实例

复制idf_wifi sta工程改名字为 idf_wifi_SmartConfig(因为本例程是基于idf_wifi sta)即可 文件名字改为 idf_wifi_SmartConfig.C makefile文件也改成 PROJECT_NAME := idf_wifi_SmartConfig即可,然后复制一下代码测试。

/**********************************************************************
*               文件名:            idf_wifi_udp.c
*               创建人:            
*               创建日期:           
*               修改人:
*               修改日期:           
*               版本号:            V1.1
*               备注:
*               公司:
********************************************************************/
#include 
#include 
#include 
#include "freertos/FreeRTOS.h"
#include "freertos/task.h"
#include "freertos/event_groups.h"
#include "nvs.h"
#include "esp_log.h"
#include "nvs_flash.h"

#include "esp_system.h"
#include "esp_wifi.h"
#include "esp_event.h"
#include "lwip/err.h"
#include "lwip/sys.h"

#include "esp_smartconfig.h"

static const char *TAG = "WIFI_SmartConfig";

//NVS
const char *WIFI_LIST = "WIFI_LIST"; 
nvs_handle_t WIFIHandle;   
const char *WIFI_DATA = "WIFI_DATA"; 

#define WIFI_CONNECTED_BIT      BIT0
#define WIFI_FAIL_BIT           BIT1
#define WIFI_SMARTCONFIG_BIT    BIT2
//事件标志组
EventGroupHandle_t xCreatedEventGroup_WifiConnect = NULL;

static int retry_num = 0;

#define SmartConfig_TASK_STACK_SIZE     8192
#define SmartConfig_TASK_PRIO           2
//任务句柄 
static TaskHandle_t xHandleTaskSmartConfig = NULL;

static void vTaskSmartConfig(void *pvParameters);

/***********************************************************************
* 函数:  
* 描述:   wifi 回调函数
* 参数:
* 返回: 无
* 备注:
************************************************************************/
static void event_handler(void* arg, esp_event_base_t event_base,int32_t event_id, void* event_data)
{
    ESP_LOGI(TAG, "event_base: %s  ; event_id : %d",event_base,event_id);
    if (event_base == WIFI_EVENT && event_id == WIFI_EVENT_STA_START) 
    {
        esp_wifi_connect();//开始连接
    } 
    else if (event_base == WIFI_EVENT && event_id == WIFI_EVENT_STA_DISCONNECTED) //wifi断开时
    {
        if (retry_num < 2) //重新连接次数
        {
            esp_wifi_connect();
            retry_num++;
            ESP_LOGI(TAG, "retry to connect to the AP");
        } 
        else 
        {
            xEventGroupSetBits(xCreatedEventGroup_WifiConnect, WIFI_FAIL_BIT);
            xEventGroupClearBits(xCreatedEventGroup_WifiConnect, WIFI_CONNECTED_BIT);
        }
        ESP_LOGI(TAG,"connect to the AP fail");
    } 
    else if (event_base == IP_EVENT && event_id == IP_EVENT_STA_GOT_IP)//获得IP
    {
        ip_event_got_ip_t* event = (ip_event_got_ip_t*) event_data;
        ESP_LOGI(TAG, "got ip:" IPSTR, IP2STR(&event->ip_info.ip));
        retry_num = 0;
        xEventGroupSetBits(xCreatedEventGroup_WifiConnect, WIFI_CONNECTED_BIT);
        xEventGroupClearBits(xCreatedEventGroup_WifiConnect, WIFI_FAIL_BIT);
    }
    else if (event_base == SC_EVENT && event_id == SC_EVENT_GOT_SSID_PSWD) //获得SSID 和 password
    {
        smartconfig_event_got_ssid_pswd_t *evt = (smartconfig_event_got_ssid_pswd_t *)event_data;
        wifi_config_t wifi_config;
        esp_err_t err;
        //复制ssid和password到wifi_config结构体中
        bzero(&wifi_config, sizeof(wifi_config_t));
        memcpy(wifi_config.sta.ssid, evt->ssid, sizeof(wifi_config.sta.ssid));
        memcpy(wifi_config.sta.password, evt->password, sizeof(wifi_config.sta.password));
        wifi_config.sta.bssid_set = evt->bssid_set;
        if (wifi_config.sta.bssid_set == true) {
            memcpy(wifi_config.sta.bssid, evt->bssid, sizeof(wifi_config.sta.bssid));
        }
        //将ssid和password写到nvs中保存
       err = nvs_open(WIFI_LIST, NVS_READWRITE, &WIFIHandle);
       if (err != ESP_OK) ESP_LOGE(TAG, "opening NVS Error (%s)!\n", esp_err_to_name(err));
        //将结构体写入到nvs中
        err = nvs_set_blob (WIFIHandle, WIFI_DATA,&wifi_config.sta,sizeof(wifi_config.sta));
        if(err==ESP_OK) 
        {
            printf("wifi SSID:%s\n", (char *)wifi_config.sta.ssid);
            printf("wifi PASSWORD:%s\n", (char *)wifi_config.sta.password);
        }
        //提交,必须提交才能写入NVS
        err = nvs_commit(WIFIHandle);
        if(err!=ESP_OK) ESP_LOGE(TAG, "nvs_commit Error");
        nvs_close(WIFIHandle);
        //重新连接
        ESP_ERROR_CHECK( esp_wifi_disconnect() );
        ESP_ERROR_CHECK( esp_wifi_set_config(ESP_IF_WIFI_STA, &wifi_config) );
        ESP_ERROR_CHECK( esp_wifi_connect() );
    }
    else if (event_base == SC_EVENT && event_id == SC_EVENT_SEND_ACK_DONE)
    {
        xEventGroupClearBits(xCreatedEventGroup_WifiConnect, WIFI_FAIL_BIT);
        xEventGroupSetBits(xCreatedEventGroup_WifiConnect, WIFI_CONNECTED_BIT);
        //一定要等待应答完成才esp_smartconfig_stop,否则手机端将收不到ip信息
        xEventGroupSetBits(xCreatedEventGroup_WifiConnect, WIFI_SMARTCONFIG_BIT);
        ESP_LOGE(TAG, "wifi connect ok!\n");
    }
}

esp_err_t Get_wifi_config_Data(wifi_config_t *wifi_config)
{
    size_t len;
    esp_err_t err;
    err = nvs_open(WIFI_LIST, NVS_READWRITE, &WIFIHandle);
    if (err != ESP_OK)
    {
        ESP_LOGE("nvs", "opening NVS Error (%s)!\n", esp_err_to_name(err));
    } 
    //获得结构体的长度
    err = nvs_get_blob(WIFIHandle, WIFI_DATA, NULL, &len);
    if (err == ESP_OK ) ESP_LOGI(TAG, "get ssid len size = %d", len);   
    err = nvs_get_blob (WIFIHandle, WIFI_DATA,&wifi_config->sta, &len);//
    if(err==ESP_OK)
    {
        printf("wifi SSID:%s\n", (char *)wifi_config->sta.ssid);
        printf("wifi PASSWORD:%s\n", (char *)wifi_config->sta.password);
    }
    //关闭
    nvs_close(WIFIHandle);
    return err;
}
/***********************************************************************
* 函数:  
* 描述:   wifi sta初始化代码相对比较固定,
* 参数:
* 返回: 无
* 备注:
************************************************************************/
void wifi_init_sta(void)
{
    ESP_ERROR_CHECK(esp_netif_init());//初始化TCP / IP堆栈和esp-netif
    ESP_ERROR_CHECK(esp_event_loop_create_default()); //创建默认event loop
    esp_netif_create_default_wifi_sta();//创建默认的WIFI STA。

    wifi_init_config_t cfg = WIFI_INIT_CONFIG_DEFAULT();//给wifi_init_config_t结构体初始化系统默认的数据
    ESP_ERROR_CHECK(esp_wifi_init(&cfg));//使用默认的参数初始化wifi

    //注册wifi 连接过程中回调函数
    ESP_ERROR_CHECK(esp_event_handler_register(WIFI_EVENT, ESP_EVENT_ANY_ID, &event_handler, NULL));
    ESP_ERROR_CHECK(esp_event_handler_register(IP_EVENT, IP_EVENT_STA_GOT_IP, &event_handler, NULL));
    ESP_ERROR_CHECK(esp_event_handler_register(SC_EVENT, ESP_EVENT_ANY_ID, &event_handler, NULL) );
    //设置账户和密码
    wifi_config_t wifi_config;
    Get_wifi_config_Data(&wifi_config);

    ESP_ERROR_CHECK(esp_wifi_set_mode(WIFI_MODE_STA) );//设置为sta模式
    ESP_ERROR_CHECK(esp_wifi_set_config(ESP_IF_WIFI_STA, &wifi_config) );
    ESP_ERROR_CHECK(esp_wifi_start() );//启动
    //等待wifi连接成功
    EventBits_t bits = xEventGroupWaitBits(xCreatedEventGroup_WifiConnect,  // 事件标志组句柄 
                                 WIFI_CONNECTED_BIT|WIFI_FAIL_BIT,// 等待bit0和bit1被设置 
                                 pdFALSE,                           //TRUE退出前bit0和bit1被清除,这里是bit0和bit1都被设置才表示“退出”
                                 pdFALSE,                           //设置为pdTRUE表示等待bit1和bit0都被设置
                                 portMAX_DELAY);                    //等待延迟时间 
    if (bits & WIFI_CONNECTED_BIT)
    {
        ESP_LOGI("wifi", "wifi connect ok!\n");
        
    }
    else if (bits & WIFI_FAIL_BIT)
    {
        ESP_LOGE("wifi", "wifi connect fail!\n");
        xTaskCreate(vTaskSmartConfig,                       // 任务函数 
                    "vTaskSmartConfig",                     // 任务名
                    SmartConfig_TASK_STACK_SIZE,            // 任务栈大小,单位 word,也就是 4 字节 
                    NULL,                                   // 任务参数
                    SmartConfig_TASK_PRIO,                  // 任务优先级
                    &xHandleTaskSmartConfig); 
    }
}
/***********************************************************************
* 函数:  
* 描述:   主函数
* 参数:
* 返回: 无
* 备注:
************************************************************************/
void app_main()
{    
    //初始化NVS
   esp_err_t ret = nvs_flash_init();
    if (ret == ESP_ERR_NVS_NO_FREE_PAGES || ret == ESP_ERR_NVS_NEW_VERSION_FOUND) {
      ESP_ERROR_CHECK(nvs_flash_erase());
      ret = nvs_flash_init();
    }
    ESP_ERROR_CHECK(ret);

    ESP_LOGI(TAG, "ESP_WIFI_MODE_STA");
    //创建事件标志组,用于等待wifi连接
    xCreatedEventGroup_WifiConnect = xEventGroupCreate();
    //WIFI sta初始化
    wifi_init_sta();
}

static void vTaskSmartConfig(void *pvParameters)
{
    EventBits_t uxBits;
    ESP_ERROR_CHECK( esp_smartconfig_set_type(SC_TYPE_ESPTOUCH) );
    smartconfig_start_config_t cfg = SMARTCONFIG_START_CONFIG_DEFAULT();
    ESP_ERROR_CHECK( esp_smartconfig_start(&cfg) );
    for (;;)
    {
        uxBits = xEventGroupWaitBits(xCreatedEventGroup_WifiConnect,    // 事件标志组句柄 
                                     WIFI_CONNECTED_BIT|WIFI_SMARTCONFIG_BIT,     // 等待bit0和bit1被设置 
                                     pdFALSE,               //TRUE退出前bit0和bit1被清除,这里是bit0和bit1都被设置才表示“退出”
                                     pdTRUE,                //设置为pdTRUE表示等待bit1和bit0都被设置
                                     portMAX_DELAY);     //等待延迟时间 
        if(uxBits & WIFI_CONNECTED_BIT) 
        {
            ESP_LOGI(TAG, "WiFi Connected to ap");
        }
        if(uxBits & WIFI_SMARTCONFIG_BIT) 
        {
            ESP_LOGI(TAG, "smartconfig ok");
            esp_smartconfig_stop();
            vTaskSuspend(NULL); 
        }
        
    }
}

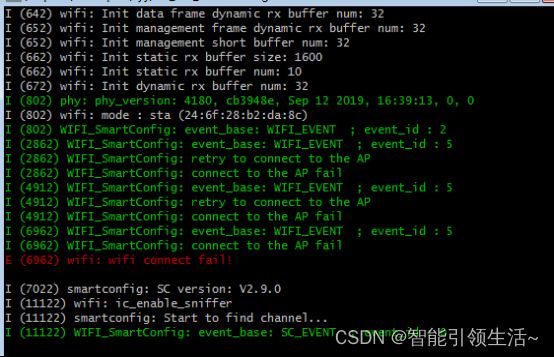
7、调试结果
首先下载EspTouch app软件
下载链接:链接:https://pan.baidu.com/s/1Ds_cKtzL0CVbLXCKltxqHA
提取码:m5zf
运行代码,打开EspTouch

ESP32 IDF开发 应用篇⑯ SmartConfig一键配网_第1张图片
点击确定之后开始SmartConfig

ESP32 IDF开发 应用篇⑯ SmartConfig一键配网_第2张图片
ESP32 IDF开发 应用篇⑯ SmartConfig一键配网_第3张图片
所有文章源代码:https://download.csdn.net/download/lu330274924/88518092
你可能感兴趣的:(ESP32,IDF小白到大师实战,单片机,嵌入式硬件)