编译tensorflow CPU版本的C++库以及C++中调用Keras模型
- 需要软件及版本号
- 编译c++版本的tensorflow库
- keras模型转化
- c++环境下调用模型
摘要:
最近要将keras训练的模型部署在c++的工程中自己找了很多的资料,第一次尝试遇到了很多的坑,用了差不多一个星期终于能实现在c++的环境中调用keras训练出的模型,其实还是主要是将keras的H5模型转化成tensorflow的pb模型,然后编译c++的tensorflow调用pb模型。
1.需要软件及版本号:
- vs2015;
- python3.6.7;
- tensorflow-1.13.1;
- bazel0.20.0;
- keras2.14
- msys2-x86_64-20190524.
- opecv4.1.1
2. 编译过程:
编译过程主要是参考:https://blog.csdn.net/atpalain_csdn/article/details/97945536?utm_medium=distribute.pc_relevant_right.none-task-blog-BlogCommendFromMachineLearnPai2-2.nonecase&depth_1-utm_source=distribute.pc_relevant_right.none-task-blog-BlogCommendFromMachineLearnPai2-2.nonecase
对于怎么安装VS2015,msys2,bazel参考上面链接,上面很详细,注意版本号的问题有时候差一点都不能编译通过,这里python版本一定是3.6.7,我的刚开始是3.6.5尽然都没有编译成功。主要讲一下不同的点,让大家少采坑,最烦的就是配置环境。
2.1 下载tensorflow库:
进入tensorflow-v1.13.1源码的https://github.com/tensorflow/tensorflow/tree/v1.13.1的页面 ,点击页面右侧绿色按钮Clone or download,然后点击Download ZIP进行下载,如下图所示。

也可以通过git clone https://github.com/tensorflow/tensorflow.git下载,前提你要装git,下载时间也许会很长,请耐心等待。
进入tensorflow-windows-build-script-master的github页面,下载tensorflow-windows-build-script-master.zip(此链接可直接下载)。
以上两个 .zip 文件下载完成后,在D盘新建一个文件夹,命名为 tensorflow-1.13.1 。
将下载好的 tensorflow-1.13.1.zip 解压到刚刚新建的文件夹下,重新命名为 source;
将 tensorflow-windows-build-script-master.zip 解压到任意位置,然后把其中的 patches 和 build.ps1 文件,复制到新建的 D:\tensorflow-1.13.1目录下,如下图所示:

将 patches 下的 eigen_half.patch 复制到 tensorflow-1.13.1\source\third_party 下:

将 patches 下的 tf_exported_symbols_msvc.lds 复制到 tensorflow-1.13.1\source\tensorflow 下:

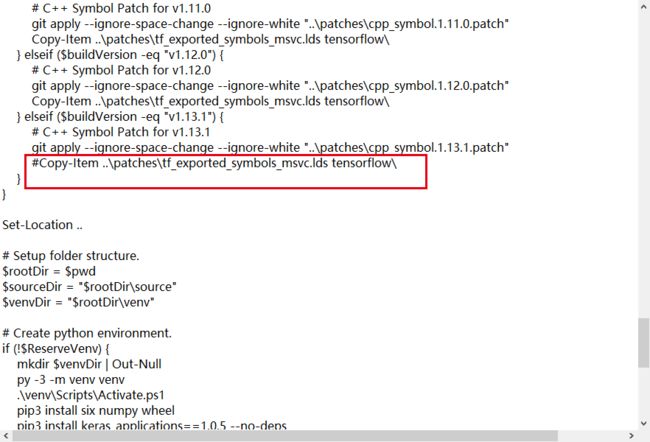
用文本编辑器打开 build.ps1 文件,将以下语句注释掉:
Copy-Item …\patches\tf_exported_symbols_msvc.lds tensorflow\
防止编译时出现Copy-Item命令的问题。
位置在 build.ps1 的180行,如下图所示:
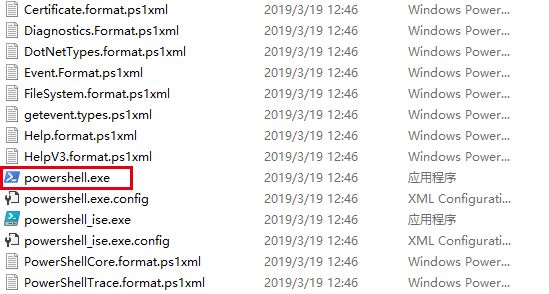
在路径C:\Windows\SysWOW64\WindowsPowerShell\v1.0打开exe文件。
cd到你自己的路径下:
比如: cd D:\Myproject\c++_tensorflow\tensorflow-1.13.1
输入:GPU版本:
$parameterString = "--config=opt --config=cuda --define=no_tensorflow_py_deps=true --copt=-nvcc_options=disable-warnings //tensorflow:libtensorflow_cc.so --verbose_failures"
CPU版本:$parameterString = "--config=opt //tensorflow:libtensorflow_cc.so --verbose_failures"
然后输入以下命令,执行 build.ps1 脚本文件:
.\build.ps1 -BazelBuildParameters $parameterString -BuildCppAPI -ReserveSource
执行命令时出现 UnauthorizedAccess 错误,说明可能是 powershell 的执行策略受限,输入以下命令查看当前执行策略:
Get-ExecutionPolicy
我这里显示的是Restricted(受限的),所以需要输入以下语句来取消限制:
Set-ExecutionPolicy Unrestricted
询问是否改变执行策略,输入 y,回车。
修改好后,可以再次输入:
Get-ExecutionPolicy
查看当前执行策略是否已经取消限制。
执行策略的问题解决以后,重新执行 build.ps1 脚本文件:
.\build.ps1 -BazelBuildParameters $parameterString -BuildCppAPI -ReserveSource
如果你编译的是CPU版本,可以选这默认的设置,或者按照下图设置:
开始编译大概要等待两个多小时吧,编译完成记住你生成的路径,参考如下:
C:\Users\xxx\_bazel_xxx\o7ajrvfo\execroot\org_tensorflow\bazel-out\x64_windows-opt\bin\tensorflow
2.3 文件整理配置:
新建project文件夹,然后在目录下再新建三个目录,dll与lib,include
根据编译结束时显示的动态库所在位置,找到生成的库 libtensorflow_cc.so 和 liblibtensorflow_cc.so.ifso。
将 libtensorflow_cc.so 更名为 tensorflow_cc.dll,放到刚才创建的 dll 目录下;
将 liblibtensorflow_cc.so.if.lib更名为 tensorflow_cc.lib,放到刚才创建的 lib 目录下。
接下来主要是include文件夹:
2.3.1) 在include目录中新建名为 _bin 的文件夹。参考以下路径,打开 _embedded_binaries 目录,将下图红框中的文件复制到 _bin 文件夹中:
C:\Users\xxxx\_bazel_xxx\o7ajrvfo\install\_embedded_binaries

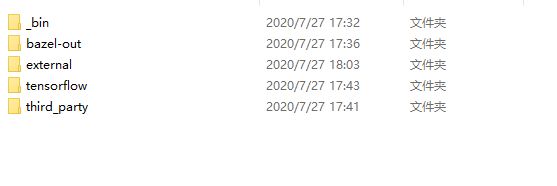
2.3.2) 参考以下路径,将下图红框中的 bazel-out 文件夹复制到 include 目录下:
C:\Users\xxx\_bazel_xxx\o7ajrvfo\execroot\org_tensorflow

2.3.3) 参考以下路径,将 protobuf_archive 文件夹复制到 include 下的 bazel-out\x64_windows-opt\genfiles\external 目录中:
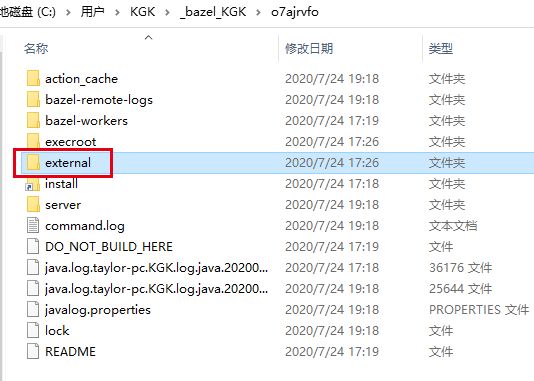
C:\Users\xxx\_bazel_xxx\o7ajrvfo\external
2.3.4) 将 D:\tensorflow-1.13.1\source 下的 tensorflow 和 third_party 复制到 include 目录下:

2.3.5) 参照以下路径,将下图红框中的 external 文件夹复制到 include 目录下:
C:\Users\xxx\_bazel_xxx\o7ajrvfo
2.3.6) 参照以下路径,将 embedded_tools 文件夹下的所有文件复制到 include 下的 external\bazel_tools 目录中(没有则新建一个文件夹):
C:\Users\xx_bazel_xxxx\o7ajrvfo\install\_embedded_binaries\embedded_tools
2.3.7) 将 D:\tensorflow-1.13.1\source 下的 tensorflow 复制到 include 下的 external\org_tensorflow 目录中(如果 external 里面没有就新建一个文件夹org_tensorflow ):

至此,调用tensorflow所需的库及包含的目录准备完毕!
3 Keras模型转换:
3.1)H5转成pb文件:
自己要配置好keras模块,建议使用anaconda安装环境,非常方便。
这里主要是注意自己的模型输入和输出节点名称:我的输入是"input_1:0",输出是:“dense_1/Softmax:0”
代码如下大家借鉴:
from keras.models import load_model
import tensorflow as tf
from keras import backend as K
from tensorflow.python.framework import graph_io


def freeze_session(session, keep_var_names=None, output_names=None, clear_devices=True):
    from tensorflow.python.framework.graph_util import convert_variables_to_constants
    graph = session.graph
    with graph.as_default():
        freeze_var_names = list(set(v.op.name for v in tf.global_variables()).difference(keep_var_names or []))
        output_names = output_names or []
        output_names += [v.op.name for v in tf.global_variables()]
        input_graph_def = graph.as_graph_def()
        if clear_devices:
            for node in input_graph_def.node:
                node.device = ""
        frozen_graph = convert_variables_to_constants(session, input_graph_def,
                                                      output_names, freeze_var_names)
        return frozen_graph


"""----------------------------------配置路径-----------------------------------"""
epochs = 41
h5_model_path = './model_{}.h5'.format(epochs)#这里是模型路径和名字
output_path = '.'                              #保存路径
pb_model_name = 'model_{}.pb'.format(epochs)

"""----------------------------------导入keras模型------------------------------"""
K.set_learning_phase(0)
net_model = load_model(h5_model_path)

print('input is :', net_model.input.name)#这里是模型输入的名称,可以记录一下
print('output is:', net_model.output.name)#这里是模型输出名称

"""----------------------------------保存为.pb格式------------------------------"""
sess = K.get_session()
frozen_graph = freeze_session(K.get_session(), output_names=[net_model.output.op.name])
graph_io.write_graph(frozen_graph, output_path, pb_model_name, as_text=False)
这里模型转化之后,出于严谨的态度我们要测试对比一下H5模型与Pb模型在效果的差别:
3.1.1) Pb模型测试:
这里是批量测试,测试一个文件夹的图像:
import tensorflow as tf
import numpy as np
import cv2,os,shutil
from keras.preprocessing.image import load_img, img_to_array
"""-----------------------------------------------定义识别函数-----------------------------------------"""

def image_number(dir_path):
    path = []
    for dir, file, images in os.walk(dir_path):
        for image in images:
            imagepath = os.path.join(dir, image)
            path.append(imagepath)
    return path
def recognize(folder_path, pb_file_path,label,save_image):
    with tf.Graph().as_default():
        output_graph_def = tf.GraphDef()
        # 打开.pb模型
        with open(pb_file_path, "rb") as f:
            output_graph_def.ParseFromString(f.read())
            tensors = tf.import_graph_def(output_graph_def, name="")
            #print("tensors:", tensors)

        # 在一个session中去run一个前向
        with tf.Session() as sess:
            init = tf.global_variables_initializer()
            sess.run(init)
            op = sess.graph.get_operations()
            # 打印图中有的操作
            #for i, m in enumerate(op):
                #print('op{}:'.format(i), m.values())

            input_x = sess.graph.get_tensor_by_name("input_1:0")  # 具体名称看上一段代码的input.name
            print("input_X:", input_x)

            out_softmax = sess.graph.get_tensor_by_name("dense_1/Softmax:0")  # 具体名称看上一段代码的output.name
            print("Output:", out_softmax)

            # 读入图片
            images = image_number(folder_path)
            for imgs in images:
                image = load_img(imgs, target_size=(100, 100))
                image = np.array(image, np.float32) / 255.
                img = np.reshape(image, (1, 100, 100, 3))
                # img=np.reshape(img,(1,28,28,1))
                print("img data type:", img.dtype)
                img_out_softmax = sess.run(out_softmax,
                                           feed_dict={input_x: img})
                print("imgs_path:",imgs,"img_out_softmax:", img_out_softmax)
                for i, prob in enumerate(img_out_softmax[0]):
                    print('class {} prob:{}'.format(i, prob))
                prediction_labels = np.argmax(img_out_softmax[0])
                predictlabel = label[prediction_labels]
                if not os.path.exists(save_image + "\\" + str(predictlabel)):
                    os.mkdir(save_image + "\\" + str(predictlabel))
                shutil.copy(imgs, save_image + "\\" + str(predictlabel))

    return

pb_path = r'D:\\Myproject\\c++_tensorflow\\TA00\\model_41.pb'
folderpath= r'D:\Myproject\images\Work'
save_image=r"D:\Myproject\test_result\work"
label=["black","bubble","fm","gorogoro","removedtrace","scratch","string","tenten"]
recognize(folderpath,pb_path,label,save_image)
3.1.2) H5模型测试:
import tensorflow as tf
import numpy as np
import keras
from tensorflow.keras.preprocessing.image import load_img, img_to_array
import os,shutil
def image_number(dir_path):
    path = []
    for dir, file, images in os.walk(dir_path):
        for image in images:
            imagepath = os.path.join(dir, image)
            path.append(imagepath)
    return path
def predict_val(model,image,label):
    image=load_img(image,target_size=(100,100))
    image=np.array(image,np.float32)/255.
    image=tf.expand_dims(image,axis=0)
    predict_value=model.predict(image,batch_size=None,steps=1)
    prelist=[]
    for x in predict_value[0]:
        prelist.append(x)
    print(prelist)
    max_index=np.argmax(predict_value[0])
    pre_maxval=np.max(predict_value[0])
    print_label=label[max_index]
    return print_label,pre_maxval
model_path=r"D:\Myproject\model-41.h5"
testimage=r"D:\Myproject\images"
save_image=r"D:\Myproject\c++_tensorflow"
label=["black","bubble","fm","gorogoro","removedtrace","scratch","string","tenten"]
image_list=image_number(testimage)
model=keras.models.load_model(model_path)
for im in image_list:
    predictlabel,maxvalue=predict_val(model,im,label)
    if not os.path.exists(save_image+"\\"+str(predictlabel)):
        os.mkdir(save_image+"\\"+str(predictlabel))
    shutil.copy(im,save_image+"\\"+str(predictlabel))
对于以上结果进行对比,查看不同的模型效果差异,对于我个人的模型来说,预测标签结果没有差异,但是因为精度的问题,对于每一项的预测概率值,有点不一样,但对于最终判定结果没影响。
4.c++环境配置以及代码测试:
4.1 VS环境配置:
在VS2015新建一个工程:属性管理器release|x64,点击属性,VC++目录,包含目录,添加如下路径
前面两个路径是opencv配置路径,按你自己的路径配置,仅供参考。不会配置opencv,参考文章:https://blog.csdn.net/qq_36163358/article/details/85231723
然后点击库目录添加如下路径:主要是OpenCV库,和你上面生成.lib库
最后是点击连接器,输入,附加依赖项,根据你的opencv版本设置后面的数字,比如411代表opencv4.1.1
这里是release版本,不需要opencv_world411d.lib,如下:
以上是vs2015的项目属性配置。
4.2)c++代码推理过程(批量测试):
网上能找到很多参考代码,但是几乎全是单张图片预测的代码,此外一些代码完全跑不通,自己结合别人的代码修改成批量测试,批量测试好处就是,只要导入一次模型,对于一个文件夹里面的所有“.jpg”图像进行AI 模型的判定,不需要导入一次模型判定一张图片。以下代码供大家参考学习。
还有一点就是我模型在tensorflow1.14 GPU版本训练的,同样可以在c++编译的tensorflow1.13.1上完成推理过程。至于其他的版本不太清楚。
参考注释大家应该能看得懂,主要是模型输入和模型的输出节点名称。
#include
#include
#include"tensorflow/core/public/session.h"
#include "tensorflow/core/platform/env.h"
#include
#include
#include
#include
#include

using namespace cv;
using namespace tensorflow;
using namespace std;

void getAllFiles(string path, vector&files, string fileType) {

	//文件句柄
	intptr_t hFile = 0;
	//long hFile = 0;
	struct _finddata_t  fileInfo;
	string p;

	if ((hFile = _findfirst(p.assign(path).append("\\*" + fileType).c_str(), &fileInfo)) != -1) {
		do {
			files.push_back(p.assign(path).append("\\").append(fileInfo.name));
		} while (_findnext(hFile, &fileInfo) == 0);

		_findclose(hFile);//关闭句柄

	}

}

int main()
{
	const std::string folder_path = "C:\\Users\\KGK\\Desktop\\training\\loss";
	const std::string model_path = "D:\\Myproject\\MyPractice\\c++_python_keras\\c++_python_keras\\model.pb";
	const std::string label[8] = {"defect", "dust","ok" };
	Session* session;
	Status status = NewSession(SessionOptions(), &session);
	if (!status.ok()) {
		std::cerr << status.ToString() << endl;
		return -1;
		}
	else {
		cout << "Session created successfully" << endl;
		}
	tensorflow::GraphDef graph_def;
	status = ReadBinaryProto(Env::Default(), model_path, &graph_def);
	if (!status.ok()){
		std::cerr << status.ToString() << endl;
		return -1;
		}
	else {
			cout << "Load graph protobuf successfully" << endl;
		}

		// 将graph加载到session
	status = session->Create(graph_def);
	if (!status.ok()) {
		std::cerr << status.ToString() << endl;
		return -1;
		}
	else {
			cout << "Add graph to session successfully" << endl;
		}

	vector temp;
	getAllFiles(folder_path, temp, ".jpeg");

	for (int i = 0; i < temp.size(); i++) {

		cout << temp[i] << endl;
		double start = clock();
		cv::Mat img = cv::imread(temp[i],1);
		cv::cvtColor(img, img, cv::COLOR_BGR2RGB);//颜色转换BGR到RGB
		resize(img, img, cv::Size(256, 256));
		int height = img.rows;
		int width = img.cols;
		int depth = img.channels();
		// 图像预处理
		img.convertTo(img, CV_32FC3);
		img = (img)/255.0;
		// 取图像数据,赋给tensorflow支持的Tensor变量中
		const float* source_data = (float*)img.data;
		tensorflow::Tensor input_tensor(DT_FLOAT, TensorShape({ 1, 256, 256, 3 })); //这里只输入一张图片,参考tensorflow的数据格式NHWC
		auto input_tensor_mapped = input_tensor.tensor(); // input_tensor_mapped相当于input_tensor的数据接口,“4”表示数据是4维的。后面取出最终结果时也能看到这种用法

		for (int i = 0; i < height; i++)
		{
			const float* source_row = source_data + (i * width * depth);
			for (int j = 0; j < width; j++)
			{
				const float* source_pixel = source_row + (j * depth);
				for (int c = 0; c < depth; c++)
				{
					const float* source_value = source_pixel + c;
					input_tensor_mapped(0, i, j, c) = *source_value;
					//printf("%d");
				}
			}
		}
		std::vector> inputs = {
			{ "input_1:0", input_tensor }, };
		std::vector outputs;

		// 运行会话,计算输出"x_predict",即我在模型中定义的输出数据名称,最终结果保存在outputs中
		status = session->Run(inputs, { "dense/Softmax:0" }, {}, &outputs);

		double end = clock();
		cout << "time = " << (end - start)/ CLOCKS_PER_SEC << "\n";
		if (!status.ok()) {
			std::cerr << status.ToString() << endl;
			return -1;
		}
		cout << "Output tensor size:" << outputs.size() << std::endl;
		for (std::size_t i = 0; i < outputs.size(); i++) {
			cout << outputs[i].DebugString() << endl;
		}
		Tensor t = outputs[0];                   // Fetch the first tensor
		auto tmap = t.tensor();        // Tensor Shape: [batch_size, target_class_num]
		int output_dim = t.shape().dim_size(1);  // Get the target_class_num from 1st dimension
												 // Argmax: Get Final Prediction Label and Probability
		int output_class_id = -2;
		string predict_label = "label";
		double output_prob = 0.0;
		for (int j = 0; j < output_dim; j++)
		{
			cout << "Class " << j << " prob:" << tmap(0, j) << "," << std::endl;
			if (tmap(0, j) >= output_prob) {
				output_class_id = j;
				output_prob = tmap(0, j);
				predict_label = label[j];

			}

		}

		cout << "Final class id: " << output_class_id << std::endl;
		cout << "Defect type:" << predict_label << std::endl;
		cout << "Final class prob: " << output_prob << std::endl;
		// 输出结果

	}
	system("pause");
}
代码有了开始生成解决方案。大概率会出现报错:

解决办法如下:
双击错误提示,跳转到有max问题的文件: logging.h 和 tensor_shape.h,分别进行以下修改:
1)logging.h:
将第250行的
if (TF_PREDICT_FALSE(v2 >= std::numeric_limits::max())) 改成如下代码
if (TF_PREDICT_FALSE(v2 >= (std::numeric_limits::max)())) 2)tensor_shape.h:
将108-111行的
static const int64 kMaxRep16 = std::numeric_limits::max() - 1;
static const int64 kMaxRep32 = std::numeric_limits::max() - 1;
static const uint16 kUnknownRep16 = std::numeric_limits::max();
static const uint32 kUnknownRep32 = std::numeric_limits::max();
修改成如下:
static const int64 kMaxRep16 = (std::numeric_limits::max)() - 1;
static const int64 kMaxRep32 = (std::numeric_limits::max)() - 1;
static const uint16 kUnknownRep16 = (std::numeric_limits::max)();
static const uint32 kUnknownRep32 = (std::numeric_limits::max)();
修改好后我们重新生成项目,如果上面的步骤都没有问题,将会生成解决方案。然后运行。结果如下:
time是一张图片判定时间。Final class id: 判定类别的序列号 Final class prob: 类别概率值。


