字符串函数详解
一.字母大小写转换函数.
1.1.tolower

结合cppreference.com
有以下结论:
1.头文件为#include
2.使用规则为
#include
#include
int main()
{
	char ch = 'A';
	printf("%c\n",tolower(ch));//大写转换为小写
	return 0;
} 3.用于大写转换为小写.
1.2.toupper
结合cppreference.com

有以下结论:
1.头文件为#include
2.使用规则:
#include
#include
int main()
{

	char ch = 'a';
	int ch2 = 'a';
	printf("%c\n", toupper(ch));
	printf("%c\n", toupper(ch2));

	return 0;
}
注意:仔细会发现,char类型也可以实现,这是因为其在内存中也是通过ASCII码值实现的!!!
3.用于小写转换大写
二.字符串比较函数.

结合cppreference.com
有以下结论:
1.头文件为#include
2.规则:
定义两个字符串,我们这假设为s1,s2;如果s1
问题来了???咋比较?难道比较字母顺序吗?准确的说是比较ASCII码表,例如:A--65,a--97;来个题目帮助大家理解:
#define _CRT_SECURE_NO_WARNINGS 1
#include
#include
int main()
{
	char arr1[] = "Hello world!";
	char arr2[] = "Hello World!";
	int result = strcmp(arr1, arr2);
	if (!result)
	{
		printf("arr1==arr2\n");
	}
	else if (result < 0)
	{
		printf("arr1arr2\n");
	}

	return 0;
}
注意:ASCII码中大写和小写谁大???
结果如下:

三.字符串长度获取.

结合cppreference.com
有以下结论:
1.头文件为#include
2.使用规则:
求字符串长度,到\0停止(不包括\0),而sizeof是包括\0的
#define _CRT_SECURE_NO_WARNINGS 1
#include
#include
int main()
{
	char arr[] = "hello world!";
	printf("%d\n", sizeof(arr));
	printf("%d\n", strlen(arr));
	return 0;
}
结果:

四.字符串连接函数
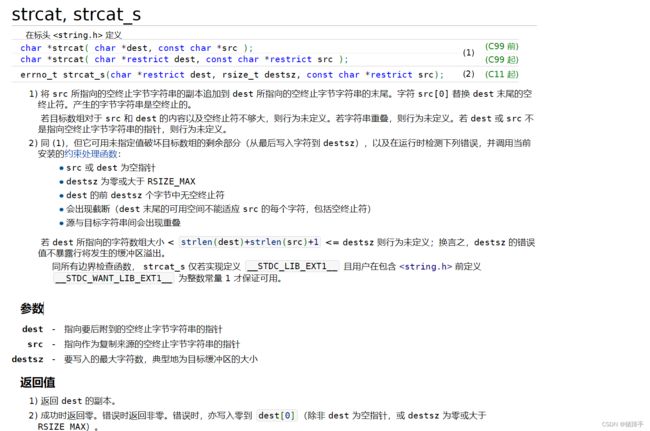
以下结论:
1.strcat函数是将两个字符数组中的字符串连接起来
2.作用是将指针src所指的字符串添加到dest指针所指的字符串的结尾处,相当与覆盖\0,并且会在整个字符的末尾添加\0,
3.注意:两个指针所指向的空间不能有重叠,并且dest指针指向的空间必须有足够大的空间来容纳src指针指向的字符串.
例如:
#define _CRT_SECURE_NO_WARNINGS 1
#include
#include
int main()
{
	char dest[300] = "Hello ";//[]里面一定要确定好大小,不然缓冲区可能溢出
	char src[] = "World!";
	strcat(dest, src);
	int sz = strlen(dest);
	for (int i = 0; i < sz; i++)
	{
		printf("%c", dest[i]);
	}
	printf("\n");
	return 0;
} 
五.字符串复制函数.
5.1.strcpy函数
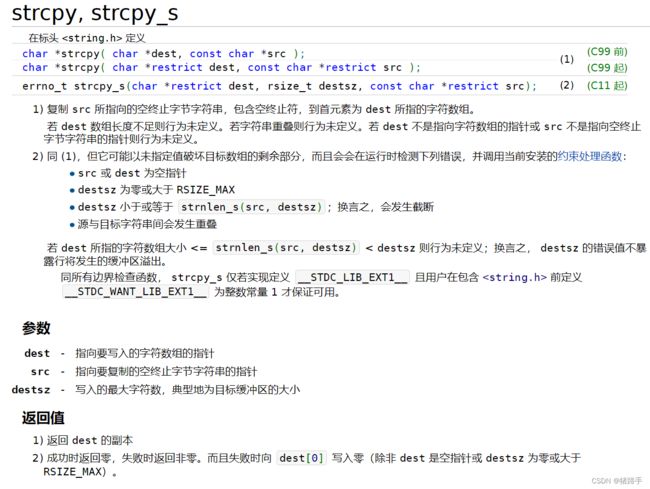
结论如下:
1.头文件为#include
2.使用规则:将指针src所指向字符串内容复制给dest指针所指向的字符串数组中
3.注意:
1.两个指针所指向的空间不能有重叠,并且dest指针指向的空间必须有足够大的空间来容纳src指针指向的字符串.
2.字符串数组dest必须以数组名形式出现,而src可以是字符串数组名,也可以是字符串常量
看代码:
#define _CRT_SECURE_NO_WARNINGS 1
#include
#include
void Print(char* dest, int n)
{
	for (int i = 0; i < n; i++)
	{
		printf("%c", dest[i]);
	}
	printf("\n");
}
int main()
{
	char dest1[200] = { 0 };//注意空间大小
	char dest2[200] = { 0 };
	char src[] = "Hello World!";
	strcpy(dest1, src);
	strcpy(dest2, "hello world!");
	int sz1 = strlen(dest1);
	int sz2 = strlen(dest2);
	Print(dest1, sz1);
	Print(dest2, sz2);


	return 0;
}
结果:

3.赋值运算符不能将一个字符串常量或者字符串数组赋给另一个字符数组,赋值运算符只能对字符数组中的单个字符变量进行赋值!
5.2.strncpy函数

结论如下:
1.头文件为#include
2.对比strcpy函数,strncpy函数更多的是将字符串中的一部分放入dest指针所指向的字符数组中,第三个参数就是用来实现截取作用的
看代码理解:
#define _CRT_SECURE_NO_WARNINGS 1
#include
#include
int main()
{
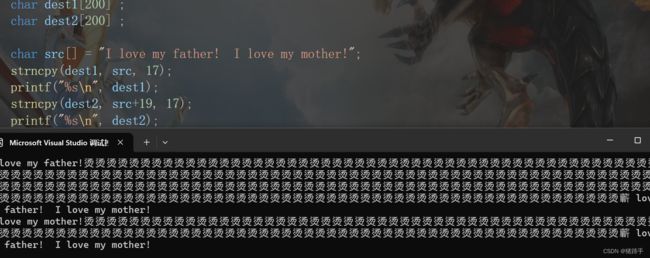
char dest1[200] = { 0 };
char dest2[200] = { 0 };
char src[] = "I love my father! I love my mother!";
strncpy(dest1, src, 17);
printf("%s\n", dest1);
strncpy(dest2, src+19, 17);
printf("%s\n", dest2);
return 0;
} 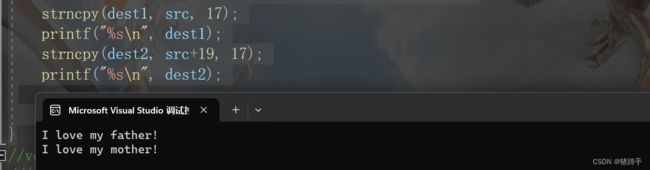
注意:dest数组要初始化为\0,不然可能出现乱码,原因是因为strncpy函数在复制字符串时不会自动将\0添加到目标字符串后面。
如下:
六.字符串追加字符函数.
strncat函数
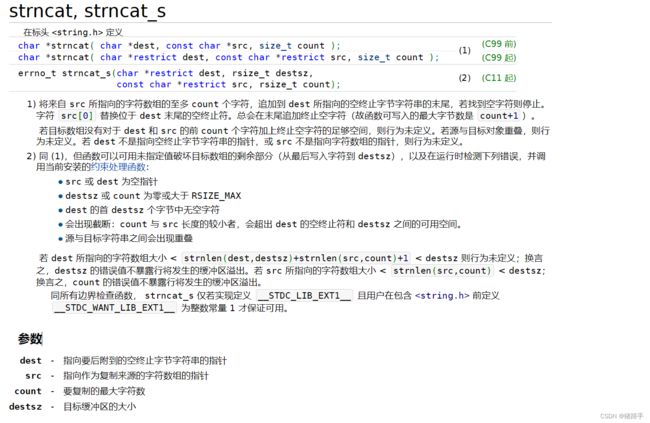
结论如下:
1.头文件为#include
2.使用规则:将src指针所指向的数组中至多count+1个字节数放入dest指针所指向的数组
大体上和五中的函数作用相同
最后,学习加油!!!