教程 Re:Zero ROS (七/完) —— 建图&定位&导航 - 代价地图&路径规划
**前情提要:已经建立了odom与base_footprint的关系,并可使用按键检验 **
《教程 Re:Zero ROS (六)—— 获取&编写&检验 -> odom坐标系》
https://blog.csdn.net/Lovely_him/article/details/107948765
教程 Re:Zero ROS (七/完)
—— 建图&定位&导航 - 代价地图&路径规划
1. slam_gmapping 建图
- 0)本篇大部分内容都是中科院教程中讲到过的,建议先看完中科院最后两课——第九、十课的9个视频,初步了解、建立关于这些功能包的概念。
- 1)实现,确保你电脑的ros内已经安装了
slam_gmapping。如果是Ubuntu16.04/kinetic则可以直接安装在电脑内,版本不一样则可能无法直接安装在电脑上,则需要到git下载源代码到工程内编译。如果你跟着第二篇教程安装了完整的ros桌面包,应该就已经安装了slam_gmapping。 - 可以在ros安装目录下寻找搜索有没有相关的关键词的功能包,或是使用安装工具的搜索指令搜索相关软件包(软件包/功能包,一个意思)。
slam_gmapping
https://wiki.ros.org/slam_gmapping
ros-perception /slam_gmapping
https://github.com/ros-perception/slam_gmapping
- 2)如果安装了功能包,在launch启动节点就可以用了,同时配置一些参数,如下。其实大部分参数都是默认的,写出来只是方便之后调试,具体每个参数的含义可以到wiki-ros内查找。你我目前需要修改的3个参数分别是
scan_topic、base_frame、odom_frame分别指激光雷达消息、机器人底盘坐标、里程计坐标。根据中科院的教程中的说明,slam_gmapping 只用到了tf树中的odom与base的关系,和激光雷达消息。然后(主要)返回tf树内map与odom坐标的关系与一张map地图。
gmapping/param
https://wiki.ros.org/gmapping
slam_gmapping参数介绍
https://blog.csdn.net/Csdn_Darry/article/details/78272464
  <arg name="scan_topic"  default="scan" />
  <arg name="base_frame"  default="base_footprint"/>
  <arg name="odom_frame"  default="odom"/>

  <node pkg="gmapping" type="slam_gmapping" name="slam_gmapping" output="screen">
    <param name="base_frame" value="$(arg base_frame)"/>
    <param name="odom_frame" value="$(arg odom_frame)"/>
    <param name="map_update_interval" value="0.2"/>
    <param name="maxUrange" value="20.0"/>
    <param name="maxRange" value="25.0"/>
    <param name="sigma" value="0.05"/>
    <param name="kernelSize" value="1"/>
    <param name="lstep" value="0.05"/>
    <param name="astep" value="0.05"/>
    <param name="iterations" value="5"/>
    <param name="lsigma" value="0.075"/>
    <param name="ogain" value="3.0"/>
    <param name="lskip" value="0"/>
    <param name="minimumScore" value="200"/>
    <param name="srr" value="0.01"/>
    <param name="srt" value="0.02"/>
    <param name="str" value="0.01"/>
    <param name="stt" value="0.02"/>
    <param name="linearUpdate" value="0.5"/>
    <param name="angularUpdate" value="0.436"/>
    <param name="temporalUpdate" value="-1.0"/>
    <param name="resampleThreshold" value="0.5"/>
    <param name="particles" value="80"/>
    <param name="xmin" value="-25.0"/>
    <param name="ymin" value="-25.0"/>
    <param name="xmax" value="25.0"/>
    <param name="ymax" value="25.0"/>

    <param name="delta" value="0.05"/>
    <param name="llsamplerange" value="0.01"/>
    <param name="llsamplestep" value="0.01"/>
    <param name="lasamplerange" value="0.005"/>
    <param name="lasamplestep" value="0.005"/>
    <remap from="scan" to="$(arg scan_topic)"/>
  node>
- 3)真么多参数,如果直接塞进launch并不美观。所以我们将它放到另一个launch文件内(记得添加
标签),然后在car_odom.launch内载入。注意,这个和第五篇教程内的导入控制器参数时,的情况不一样。这次是启动一个节点,内含节点的参数,需要使用.launch后缀。而上次是纯参数,使用.yaml后缀。robot_gmapping.launch.xml就是存放“启动slam节点”代码的文件。
car_odom.launch
<launch>

    <include file="$(find carpack_control)/launch/car_control.launch" />


    <node name="odom_gazebo" pkg="carpack_move" type="odom_gazebo.py"/>

    <node name="odom_imu" pkg="carpack_move" type="odom_imu.py"/>

    <node name="odom_text" pkg="carpack_move" type="odom_text.py"/>


    <include file="$(find carpack_move)/launch/include/robot_gmapping.launch.xml" />

launch>
-
4)在看中科院的例程时,我发现launch还可以改成后缀为
.launch.xml(文件开头可以不添加) ,且载入方式不变。因为后缀不是.launch,所以不能直接启动。这就实现了必须载入到其他launch才可以使用的情况,避免单独启动时发生错误。这一点在第三篇时就讲过了。所以最终工程结构是如此。 -

-
5)编译无误后,启动
car_odom.launch和car_rviz.launch文件,建图需要在rviz中完成。如果打开rviz可能看不到Map地图,就是因为没有添加Map地图。在左下角add内找到Map添加即可,添加后左上角选择File -> Save Config保存rviz配置,以便下次打开时也有Map。 -

 - 6)接下来就是控制按键,走完全程后,地图就建好了。注意别撞墙,不然会建图错误,最后结果可能错位。这部分教程在另一位dalao帖子内也有简述。建图结束后使用指令保存地图(实现准备好文件夹)。最后工程结构如下。
 -
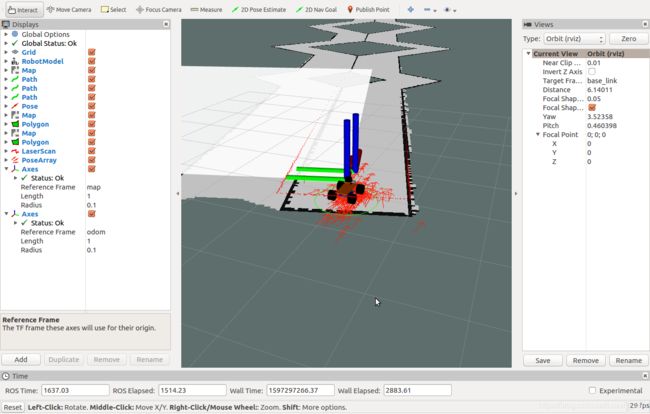
注意!如果在建图时出现
map地图瞬移一小段位置(视觉表现为一卡一卡的),那其实是因为odom定位偏了,发送了坐标上的跳变。所以小车相对地图的位置发生跳变,又因为地图是靠激光雷达传感器扫描的,如果偏太多时已经扫描过的地方就会和刚扫描的地方对不上,形成错位。(我写的那个odom定位就偏得挺厉害的,最夸张的时候大概能偏一两个格子单位。)
rosrun map_server map_saver -f ~/car_ws/src/carpack_move/map/map_runway
rosrun map_server map_saver -f <路径/文件名>
在ROS下搭建仿真模拟环境,编程控制小车完成定位导航仿真
https://blog.csdn.net/qq_41133375/article/details/106494744
-


-
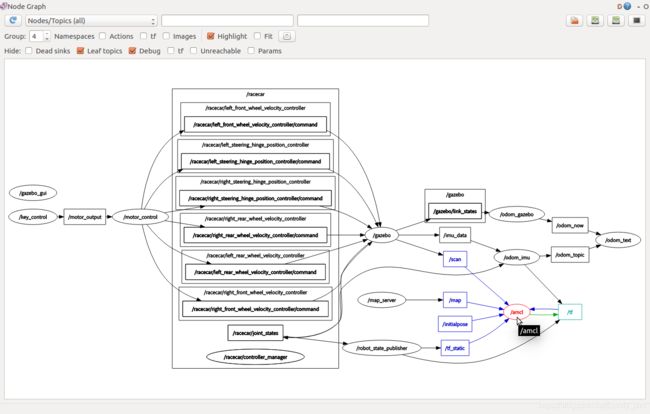
7)最后,我们打开tf树图和节点图查看一下。对比之前,多了一级
map是由/slam_gmapping节点维持的关系。节点图显示了/slam_gmapping节点既向tf树发布消息也订阅tf树,符合预期想法。除了rqt_graph图内显示的4个话题外,/slam_gmapping节点还发布了其他话题和服务。可以通过wiki-ros查询其作用与使用方法。至此slam实践完毕。 -


2.map_server 提供地图 & amcl 定位
- 0)在编写前,请确认Ubuntu的ros内有没有安装相应的功能包。可以在ros安装目录下寻找搜索有没有相关的关键词的功能包,或是使用安装工具的搜索指令搜索相关软件包。
map_server
https://wiki.ros.org/map_server/
amcl
https://wiki.ros.org/amcl/
- 1)
/map_server节点用于提供地图文件。上一节我们已经使用/slam_gmapping完成建图,rviz内的地图也是由/slam_gmapping提供。这是在不知道地图,需要建图的情况下使用的。如果已知地图,则需要使用/map_server节点加载地图,向tf树发送map与odom之间的关系。之前的教程也说过,不能同时发送不同数据同一对象的tf消息给tf树,不然tf坐标关系会发送不连续的跳变。而且/slam_gmapping和/map_server都会提供/map话题,那么订阅该话题的节点则会连续的收到两幅地图,一幅已经建好的map,一幅还没建好的map。表现为rviz内Map一闪一闪的。
car_odom.launch
<arg name="map_file" default="$(find carpack_move)/map/map_runway.yaml"/>
<node name="map_server" pkg="map_server" type="map_server" args="$(arg map_file)" ns="slam"/>
- 2)
amcl功能包是提供定位功能的,在中科院的教程视频中由详细提到,建议去查看。使用方法依旧是开启节点,配置参数。依旧大部分参数都是默认的依旧只需要修改开头的几个参数,分别是激光雷达的消息、 tf 树坐标系的名称,还有小车模型的起始位置。 - 如果你有留意,起始位置都是一样的(废话)。这个是因为这个坐标刚好在起跑线中,没有超过起跑线,所以是比赛要求,如果是自己编程时可以把所有起始坐标改为(0,0,0)。
robot_amcl.launch.xml
<launch>
    <arg name="use_map_topic"   default="True"/>
    <arg name="scan_topic"      default="/scan"/>
    <arg name="initial_pose_x"  default="-0.5"/>
    <arg name="initial_pose_y"  default="0.0"/>
    <arg name="initial_pose_a"  default="0.0"/>
    <arg name="odom_frame_id"   default="odom"/>
    <arg name="base_frame_id"   default="base_footprint"/>
    <arg name="global_frame_id" default="map"/>

    <node pkg="amcl" type="amcl" name="amcl">
      <param name="use_map_topic"             value="$(arg use_map_topic)"/>

      <param name="odom_model_type"           value="diff"/>
      <param name="odom_alpha5"               value="0.1"/>
      <param name="gui_publish_rate"          value="10.0"/>
      <param name="laser_max_beams"           value="810"/>
      <param name="laser_max_range"           value="-1"/>
      <param name="min_particles"             value="500"/>
      <param name="max_particles"             value="5000"/>
      <param name="kld_err"                   value="0.05"/>
      <param name="kld_z"                     value="0.99"/>
      <param name="odom_alpha1"               value="0.2"/>
      <param name="odom_alpha2"               value="0.2"/>

      <param name="odom_alpha3"               value="0.2"/>
      <param name="odom_alpha4"               value="0.2"/>
      <param name="laser_z_hit"               value="0.5"/>
      <param name="laser_z_short"             value="0.05"/>
      <param name="laser_z_max"               value="0.05"/>
      <param name="laser_z_rand"              value="0.5"/>
      <param name="laser_sigma_hit"           value="0.2"/>
      <param name="laser_lambda_short"        value="0.1"/>
      <param name="laser_model_type"          value="likelihood_field"/>

      <param name="laser_likelihood_max_dist" value="2.0"/>
      <param name="update_min_d"              value="0.1"/>
      <param name="update_min_a"              value="0.2"/>
      <param name="odom_frame_id"             value="$(arg odom_frame_id)"/>
      <param name="base_frame_id"             value="$(arg base_frame_id)"/>
      <param name="global_frame_id"           value="$(arg global_frame_id)"/>
      <param name="resample_interval"         value="1"/>

      <param name="transform_tolerance"       value="1.0"/>
      <param name="recovery_alpha_slow"       value="0.0"/>
      <param name="recovery_alpha_fast"       value="0.0"/>
      <param name="initial_pose_x"            value="$(arg initial_pose_x)"/>
      <param name="initial_pose_y"            value="$(arg initial_pose_y)"/>
      <param name="initial_pose_a"            value="$(arg initial_pose_a)"/>
      <remap from="/scan"                     to="$(arg scan_topic)"/>
      <remap from="/tf_static"                to="/tf_static"/>
    node>
launch>
-
3)再新建
robot_amcl.launch.xml文件存放上列代码。然后,在car_odom.launch内载入。最后工程结构如下。编译(其实ros不会编译launch文件,所以修改后不编译也可以)无误后启动launch文件,打开gazebo与rviz,查看效果。 -

car_odom.launch
<launch>

    <include file="$(find carpack_control)/launch/car_control.launch" />


    <node name="odom_gazebo" pkg="carpack_move" type="odom_gazebo.py"/>

    <node name="odom_imu" pkg="carpack_move" type="odom_imu.py"/>

    <node name="odom_text" pkg="carpack_move" type="odom_text.py"/>


    <arg name="map_file" default="$(find carpack_move)/map/map_runway.yaml"/>
    <node name="map_server" pkg="map_server" type="map_server" args="$(arg map_file)"/>


    <include file="$(find carpack_move)/launch/include/robot_amcl.launch.xml" />

launch>
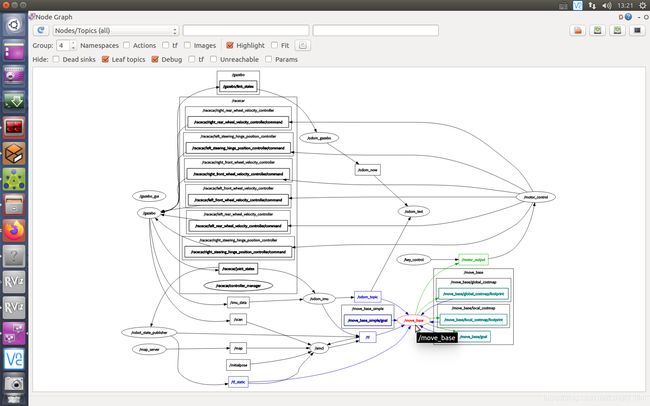
- 4)再次打开rviz时,会发现之前完成的map地图已加载进入。我们再打开节点图与tf树图,和之前的对比一下,可以发现tf树内的
map与base_footprint关系已经变为由/amcl节点提供,然后在节点图内可以发现/map话题也改为由/map_server节点提供。 - 至此,定位功能已经完成,你可以使用按键操控小车,查看其在rviz 内的运动情况。如果把gazebo比作现实世界,则rviz则是ros世界体现的ros程序内的运行情况。特别是翻车后rviz内依旧会运动,即使这个地图模型已翻天覆地。这是因为odom是通过编码器来计算的,如果轮子空转,那odom坐标就“起飞”了。建议学习者之后尝试使用激光雷达、摄像头等里程计一起计算odom坐标,尽量做到精准。

3.Move base 导航
- 0)咦哟咦哟!终于到这一节了,前面做了一大堆铺垫(加载模型、计算odom、建图、定位等)都是为了这一节。在学习前,依旧需要确认你是否由安装相关的软件包。
move_base节点功能是包涵在Navigtion软件包功能内的。我记得我当初安装ros桌面包时这个软件包是没有安装完全,所以跟着北邮学长教程做实验时总是开启不了导航功能。Navigtion是ros最基本的功能之一,请一定要安装完全。Navigtion下还扩展了很多其他小的插件(软件包?),下面教学中用到的几个都要安装。(因为安装途径和方法众多,所以我没有放指令,请自行百度。)
navigation
http://wiki.ros.org/navigation/
ROS 学习篇(八)机器人的导航功能--navigation
https://blog.csdn.net/tansir94/article/details/83720740
- 1)首先,和
slam与amcl一样,建立.launch.xml文件存放内容,然后在启动launch文件中引用。操作完成后工程结构如下。 
car_odom.launch
<include file="$(find carpack_move)/launch/include/move_base.launch.xml"/>
move_base.launch.xml
<launch>
    <arg name="odom_topic"      default="/odom_topic" />
    <arg name="laser_topic"     default="/scan" />
    <arg name="cmd_vel_name"    default="/motor_output" />

    <node pkg="move_base" type="move_base" respawn="false" name="move_base" output="screen">
        <remap from="/odom"            to="$(arg odom_topic)"/>
        <remap from="/scan"            to="$(arg laser_topic)"/>
        <remap from="/cmd_vel"         to="$(arg cmd_vel_name)"/>
    node>
launch>
- 2)目前需要配置的参数只有3个,分别是
odom消息的话题,即之前我们编写的/odom_topic话题;激光雷达消息的话题,即由gazebo节点发布的/scan话题;发布控制输出的话题,这个是move_base节点发布的/cmd_vel话题,是根据路径规划的结果返回控制车模的线速度和角速度(或者是角度)。 /cmd_vel话题发布的msg类型属于geometry_msgs/Twist消息,和之前编写的motor_control控制器节点接受的motor_output话题消息类型一致。可以直接将move_base节点发布的话题/cmd_vel与motor_control节点订阅的话题motor_output相连接。所以值重映射端口,因为节点/软件包内已经写好功能,我们只需要修改个参数就可以了。- 全部修改完成后,启动gazebo与rviz。查看效果。(基本都是看rviz,gazebo只是展示给外人看的效果,调试还是得看rviz,但是看rviz又得开gazebo。所以2个launch是采取分开的。你也可以修改一下,将gazebo剥离,只开rviz启动调试。)

 - 3)通过节点图可以看到,
move_base节点直接向话题发布消息,达到控制小车的目的。节点还发布和订阅了很多他话题,其作用在wiki-ros内有详细说明,其中还讲到很多其他配置参数,我们一会再介绍与配置。先打开rviz,添加一些显示配置。- 点击左下角的
add -> By topic后可以在界面内找到,多了/move_base节点发布的很多内容。我们都加载进rviz,方便我们之后调试实验时查看效果。
move_base
http://wiki.ros.org/move_base

- 4)以下这段属于大概介绍,之后再详细讲解每个所用到的
move_base插件。 /move_base -> /NavfnROS -> /plan这个是全局规划插件发布的话题,全局规划路径。因为我们还没有配置参数,所以使用的是默认的NavfnROS全局规划插件。/move_base -> /TrajectoryPlannerROS -> /global_plan这个是局部规划插件发布的话题,跟随全局路径的局部规划路径,而下面那个/local_plan是跟随/global_plan路径的更小一级的局部规划。即模型小车计划下一个所要到达的坐标点,根据这个可以推算出/cmd_vel所需的控制消息。(根据资料的个人理解)/move_base -> /current_goal这个是发布的话题,小车导航移动的目标点,和订阅的目标点/move_base_simple话题差不多,两者都比较少用。这2个话题都只会显示静态的,相对于小车坐标的目标点消息,我还没找到哪里修改相对于地图坐标,以前试过一次,忘记怎么修改了。/move_base -> /global_costmap分别是/costmap全局代价地图和/footprint设定的小车体积,默认参数是一个小圆圈,绿色显示的。这个是由全局代价地图插件生成的,之后介绍代价地图时再细讲。/move_base -> /local_costmap分别是/costmap局部(动态)代价地图和/footprint设定的小车体积,和全局(静态)代价地图那个一样,因为其实两者是加载了同一份默认参数。这个是由全局代价地图插件生成的,之后介绍代价地图时再细讲。- 还有2个没在上一张截图内的
/LaserScan激光雷达消息与/PoseArray(我一直以为这个是,在下拉设置配置里可以选择其显示的是哪个话题的msg消息。move_base发布的,今天一留意才发现原来是是amcl发布的) - 最后再把我们最主要的2个坐标系位置加载进rviz,在
add -> By display type内寻找Axes添加2次,然后在配置中分别设置为tf树的map与odom。然后就能看到2个飘的很厉害的坐标原点了。在跑的时候可以观察其偏移情况,直接反映了定位效果。 - 所有都设置好后保存rviz配置,然后退出。虽然最后map代价地图好像有点乱,那是因为使用的都默认参数。最后刷新节点就发现多了很多在使用的话题。因为我把未使用和调试相关的节点话题都隐藏了,所以rviz和终端的节点&话题,还有那些只有订阅或是发布的话题都会被隐藏。现在它们都被rviz订阅了,用于显示在rviz内。所以又重新刷新出来了。

4. 配置move_base参数 -> move_base_params
- 1)上面的操作后,剩下就全是配置参数的事了。只要再配置亿点点参数就可以大功告成了。因为参数只有亿点,所以我专门开个新的文件、新的文件夹存放。命名为
move_base_params.yaml,然后加载进/move_base。具体操作与工程结构如下。 
- (掌握往节点内添加参数文件的方法,之后不会全部展示)
move_base.launch.xml
<launch>
    <arg name="odom_topic"      default="/odom_topic" />
    <arg name="laser_topic"     default="/scan" />
    <arg name="cmd_vel_name"    default="/motor_output" />

    <node pkg="move_base" type="move_base" respawn="false" name="move_base" output="screen">
        <rosparam file="$(find carpack_move)/param/move_base_params.yaml" command="load" />
        <remap from="/odom"            to="$(arg odom_topic)"/>
        <remap from="/scan"            to="$(arg laser_topic)"/>
        <remap from="/cmd_vel"         to="$(arg cmd_vel_name)"/>
    node>
launch>
- 2)在新的
move_base_params.yaml参数文件内填入以下内容,每个参数的具体含义可以查看以下链接。
Setup and Configuration of the Navigation Stack on a Robot
http://wiki.ros.org/navigation/Tutorials/RobotSetup
move_base参数配置
https://blog.csdn.net/L_smartworld/article/details/88661411
【↑↑↑ 含 move_base 多个插件的参数介绍 ↑↑↑】
move_base_params.yaml
# Move base node parameters. For full documentation of the parameters in this file, please see
#
#  http://www.ros.org/wiki/move_base
#
shutdown_costmaps: false

controller_frequency: 5.0
controller_patience: 2.0


planner_frequency: 10.0
planner_patience: 10.0

oscillation_timeout: 10.0
oscillation_distance: 0.1

# local planner - default is trajectory rollout
base_local_planner: "teb_local_planner/TebLocalPlannerROS" #"dwa_local_planner/DWAPlannerROS"   #   #dwa_local_planner/DWAPlannerROS

base_global_planner: "global_planner/GlobalPlanner" #alternatives: "navfn/NavfnROS", carrot_planner/CarrotPlanner,

clearing_rotation_allowed: false

#We plan to integrate recovery behaviors for turtlebot but currently those belong to gopher and still have to be adapted.
## recovery behaviors; we avoid spinning, but we need a fall-back replanning

recovery_behavior_enabled: true
max_planning_retries: -1

#recovery_behaviors:
  #- name: 'dwa_local_planner'
    #type: 'dwa_local_planner/DWAPlannerROS'
  #- name: 'conservative_reset1'
    #type: 'clear_costmap_recovery/ClearCostmapRecovery'
  #- name: 'aggressive_reset1'
    #type: 'clear_costmap_recovery/ClearCostmapRecovery'
  #- name: 'clearing_rotation1'
    #type: 'rotate_recovery/RotateRecovery'
  #- name: 'super_conservative_reset2'
    #type: 'clear_costmap_recovery/ClearCostmapRecovery'
  #- name: 'conservative_reset2'
    #type: 'clear_costmap_recovery/ClearCostmapRecovery'
  #- name: 'aggressive_reset2'
    #type: 'clear_costmap_recovery/ClearCostmapRecovery'
  #- name: 'clearing_rotation2'
    #type: 'rotate_recovery/RotateRecovery'

#super_conservative_reset1:
  #reset_distance: 3.0
#conservative_reset1:
  #reset_distance: 1.5
#aggressive_reset1:
  #reset_distance: 0.0
#super_conservative_reset2:
  #reset_distance: 3.0
#conservative_reset2:
  #reset_distance: 1.5
#aggressive_reset2:
  #reset_distance: 0.0
- 3)其中重点需要说明的就是
base_local_planner和base_global_planner指定了全局规划器和局部规划器,如果不填写的话就是默认的NavfnROS和TrajectoryPlannerROS。该参数指定的格式:teb_local_planner/TebLocalPlannerROS和global_planner/GlobalPlanner,前面是插件的名字,斜杠后接参数文件的命名空间,即指定加载哪个参数文件。可以根据插件名字在wiki-ros查看相关插件的配置参数
teb_local_planner
http://wiki.ros.org/teb_local_planner
global_planner
http://wiki.ros.org/global_planner
- 还有就是
controller_frequency&planner_frequency是关于控制和刷新频率的,(频率虽越快越好,都是实际其他部件的频率其实是由上限的,比如map与odom间定位的刷新频率为20Hz左右,而odom与base_footprint间计算的刷新频率为50Hz左右,对比我平时跑智能车时2ms中断来算频率都有200Hz。)参数的频率设置高了也没关系,只是运行时会报出警告提示:更新频率跟不上。 - 4)完成后启动gazebo与rviz查看效果。在左下角的
add -> By topic内查看,可以发现之前的NavfnROS已经变为了GlobalPlanner,表示我们已经成功改变了参数,将全局路径规划器更改为GlobalPlanner。然后把rviz左边显示栏中的其中一个Map -> topic改为/move_base/GlobalPlanner/potential却发现警告错误,提示因为没有指定map。这是我们还没开始配置插件GlobalPlanner的参数,没有给它指定对应的/map话题,即没有提供地图文件。 
- 打开节点图也能看到之前的
NavfnROS已经变为了GlobalPlanner。(需要在节点图内取消Leaf topic选项才能显示未被使用话题) 
5.配置 代价地图 参数 -> costmap_common_params
-
1)在讲路径规划器前还需要先配置代价地图,分别为全局(静态)代价地图
global_costmap与局部(动态)代价地图local_costmap,还有通用的代价地图参数costmap_common_params。先分别创建对应的文件和修改.launch.xml文件。 -
-
2)共有3个参数文件,其中
costmap_common_params.yaml为通用参数文件,需要加载2次,然后分别挂载不同的命名空间。(我还没试过分开2个文件,分开配置不同的数据会不会好一点呢?)然后加载局部(动态)代价地图local_costmap和全局(静态)代价地图global_costmap参数。其实这个加载顺序无影响,因为肯定是全部加载完才运行的(类似c语言头文件那样?)。
move_base.launch.xml
<rosparam file="$(find carpack_move)/param/costmap_common_params.yaml" command="load" ns="global_costmap" />
<rosparam file="$(find carpack_move)/param/costmap_common_params.yaml" command="load" ns="local_costmap" />
<rosparam file="$(find carpack_move)/param/local_costmap_params.yaml" command="load" />
<rosparam file="$(find carpack_move)/param/global_costmap_params.yaml" command="load" />
- 3)关于代价地图的参数配置,很主要!最主要的2类参数配置就是代价地图和路径规划。代价地图影响路径规划,路径规划影响小车实际运作
(会不会翻车)。关于其各个参数的作用可以通过以下链接学习。
【↓↓↓ 非常详细 ↓↓↓】
学习costmap代价地图
https://blog.csdn.net/weixin_42005898/article/details/100051838
costmap_2d
http://wiki.ros.org/costmap_2d/
- 4)以下是
costmap_common_params.yaml通用参数文件内容。用于设定3种不同图层的参数,在帖子学习costmap代价地图内由详细说明,推荐先阅读帖子。 footprint就是小车的大概轮廓。可以参数名表示多边形轮廓。obstacle_layer设定障碍地图层,常用。inflation_layer设定膨胀地图层,常用。static_layer设定静态地图层,常用。注意是否需要修改map话题名字。observation_sources参数指订阅的传感器话题,我只用了基本的激光雷达,在之前的节点图中可以看到/move_base还没有订阅/scan话题的,开启并指定话题名称后应该就订阅了。(下文验证)obstacle_range参数和raytrace_range参数很重要,在局部(动态)代价地图中会用到这2个参数。
costmap_common_params.yaml
#---standard pioneer footprint---
#---(in meters)---
#footprint: [ [0.254, -0.0508], [0.1778, -0.0508], [0.1778, -0.1778], [-0.1905, -0.1778], [-0.254, 0], [-0.1905, 0.1778], [0.1778, 0.1778], [0.1778, 0.0508], [0.254, 0.0508] ]
footprint: [ [0.30,0.25], [-0.30,0.25], [-0.30,-0.25], [0.30,-0.25] ]

transform_tolerance: 1
map_type: costmap

obstacle_layer:
  enabled: true
  obstacle_range: 8.0
  raytrace_range: 5.0
  inflation_radius: 0.25
  track_unknown_space: false
  combination_method: 1

  observation_sources: laser_scan_sensor
  laser_scan_sensor:
    data_type: LaserScan
    topic: scan
    marking: true
    clearing: true
    #obstacle_range: 0.2
    #raytrace_range: 8.0
    #inf_is_valid: true
    min_obstacle_height: 0.1
    max_obstacle_height: 0.3

inflation_layer:
  enabled:              true
  cost_scaling_factor:  20  # exponential rate at which the obstacle cost drops off (default: 10)
  inflation_radius:     0.35  # max. distance from an obstacle at which costs are incurred for planning paths.

static_layer:
  enabled:              true
  map_topic:            "/map"
- 5)以下是全局(静态)代价地图的参数文件内容,注意
global_frame参数是地图(地图坐标),相对的robot_base_frame参数为小车底盘坐标。中间跨了一级里程计坐标,比较特殊。 - 重点,plugins内选择加载什么图层。我早期学习时不知道局部(动态)代价地图需要加载
obstacle_layer障碍图层,导致无法壁障,因为无法获取动态障碍,只能一直跟随全局路径规划。全局(静态)代价地图就不需要动态障碍图层了(之前试了一下,好像没什么效果就注释掉了)。注意添加的格式,标签type的内容是规定好的,而标签name的内容则是上一个文件——costmap_common_params.yaml内的参数命名空间的名字。不过按照推荐命名规范,应该也能猜到了,就是去掉下划线改大小写的区别。 - 需要注意的就是
static_map参数,如果这个参数改成false时,还开启了obstacle_layer图层,则相对于建图效果——在已有的地图上扫描到新的障碍,将新的障碍加进行的地图内——白色自由区域变为障碍。(如果我没记错的话。建议自己实践一下。)
global_costmap_params.yaml
global_costmap:
   global_frame: /map
   robot_base_frame: /base_footprint
   update_frequency: 2.0
   publish_frequency: 0.5
   static_map: true
   rolling_window: false
   transform_tolerance: 0.1
   origin_x: -0.5
   origin_y: 0
   plugins:
     - {name: static_layer,            type: "costmap_2d::StaticLayer"}
     - {name: voxel_layer,             type: "costmap_2d::VoxelLayer"}
     - {name: inflation_layer,         type: "costmap_2d::InflationLayer"}
     #- {name: obstacle_layer,     type: "costmap_2d::ObstacleLayer"}
- 6)以下是局部(动态)代价地图参数配置,注意
global_frame参数是里程计坐标,和全局(静态)代价地图的global_frame参数不一样! 重要,plugins插件参数选择也不一样,局部(动态)代价地图不需要加载static_layer静态图层,需要加载obstacle_layer动态图层。这个至关重要,不然就无法利用obstacle_layer/observation_sources内的激光雷达来动态避障。
local_costmap_params.yaml
local_costmap:
   global_frame: /odom
   robot_base_frame: /base_footprint
   update_frequency: 5.0
   publish_frequency: 5.0
   static_map: false
   rolling_window: true
   width: 7
   height: 7
   resolution: 0.050000
   origin_x: -5.0
   origin_y: 0
   transform_tolerance: 0.1
   plugins:
    - {name: voxel_layer,      type: "costmap_2d::VoxelLayer"}
    - {name: inflation_layer,     type: "costmap_2d::InflationLayer"}
    - {name: obstacle_layer,     type: "costmap_2d::ObstacleLayer"}
- 7)完成好参数的配置后检查launch,无误后就可以启动gazebo与rviz查看实验效果。启动后就可以发现,之前局部代价地图(那个白色半透明矩形框)是在小车左上角的,配置好参数后位于小车中心了。还有全局代价地图也显示出来了,半透明黑色。因为加载了膨胀图层,沿边界膨胀了一圈。
- 然后点击rviz上方工具栏内的
2D New Goal,为move_base添加一个全局路径规划的目标点。这个操作相当于往/move_base_simple/goal话题发送了一个一次消息。用户可以写一个.py文件,往/move_base_simple/goal话题发送目标点,坐到持续导航。这种功能一般用于探索未知区域,没有正在的目标点只能手动一步步探索。 
- 8)给了目标点后,全局路径规划与局部路径规划就开始干活了,即是我还没配置参数,它自己本身也有默认参数。
/move_base节点也按预期设定好的发送控制消息,小车动起来啦!能看到小车跟着局部路径规划、全局路径规划行走。看不到下图的绿线效果(路径规划),是因为没有设置好显示对象。之前我们添加配置时选择的是默认的路径规划器生成的话题。改了move_base_params.yaml内的base_global_planner参数后,话题名称变了,所以要手动修改。修改完后别忘记保存rviz配置。在下拉的设置里除了可以修改显示的对象,还可以修改显示的颜色、粗细等,请积极探索。 另外我想看看不修改路径规划器 能不能跑完全程,没想到第一个拐弯就卡主了。也可能是因为我代价地图的参数调得太离谱了。这些参数都是我比赛时用的参数。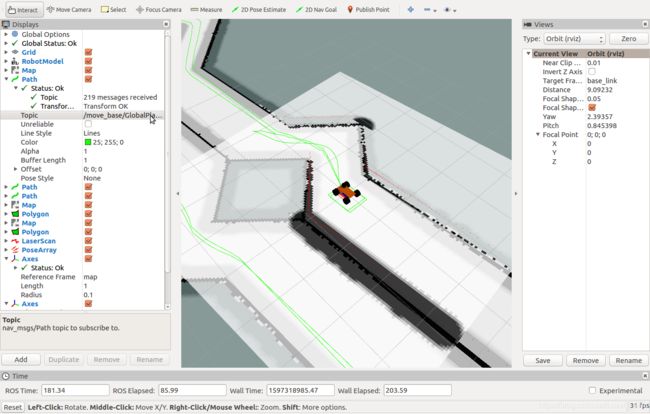
- 9)查看节点图可以发现,
/move_base已经订阅了激光雷达的话题,这是因为局部(动态)代价地图添加obstacle_layer障碍层插件,该插件内订阅了/scan话题。 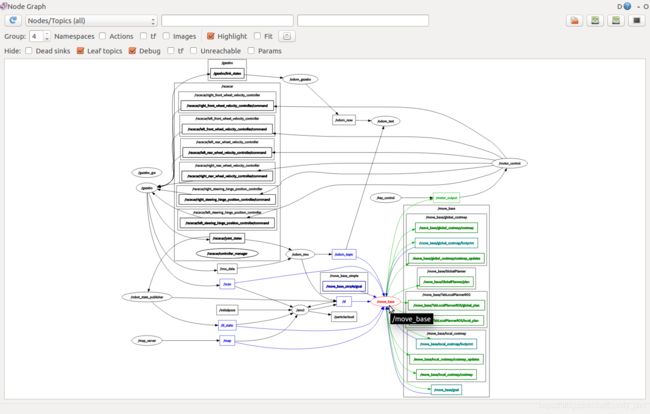
- 10)最后再说一句,你可能会看到一大堆警告。翻译后可以得知就是因为频率不满足要求
(居然花了1秒多,我电脑又卡 )。你可能还会看到他警告,比如有过不了的障碍、翻车时,路径规划器都会发出警告,甚至错误。别慌,先翻译看看是工程问题,还是参数问题。 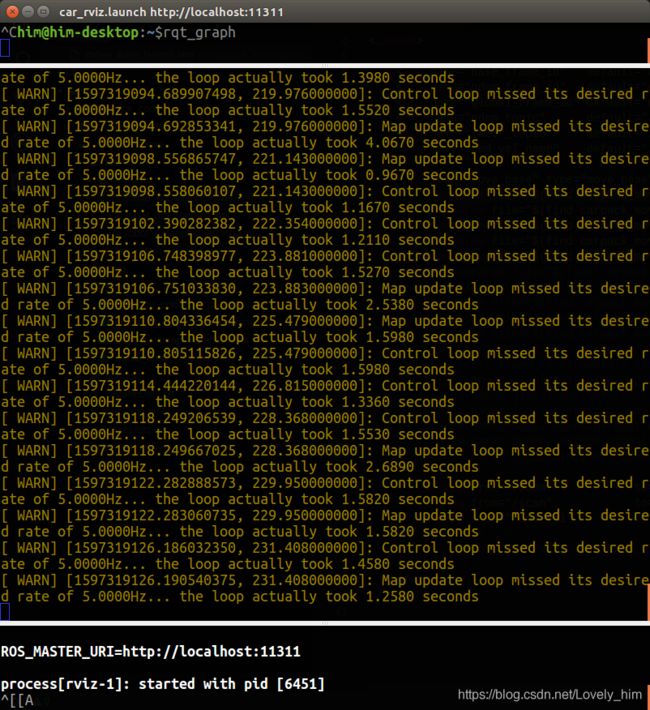
6. 配置 全局路径规划器 参数 -> global_planner_params
- 0)可能有人会疑惑:
NavfnROS插件与GlobalPlanner插件有什么不同。其实我也不是很清楚……在中科院的教程中只简单说明GlobalPlanner插件比较常用。在下面的帖子中有较详细的解释说明,可以参考一下。
ROS: global_planner 整体解析
https://blog.csdn.net/heyijia0327/article/details/45030929
global_planner
http://wiki.ros.org/global_planner
- 1)创建新的
global_planner_params.yaml参数文件,并将参数文件加载进/move_base节点内。最后工程结果如下。 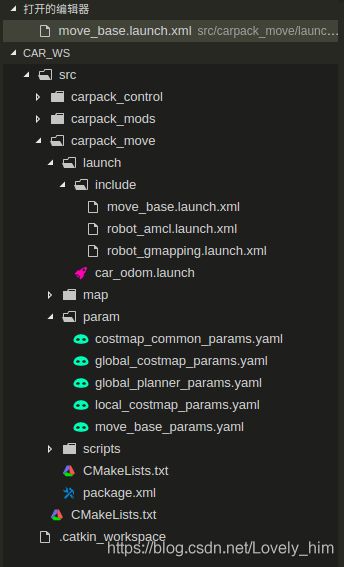
move_base.launch.xml
<rosparam file="$(find carpack_move)/param/global_planner_params.yaml" command="load" />
- 2)将下列参数内容复制粘贴。查找每个参数的具体作用还是wiki-ros最好用,你会发现大部分帖子都是照搬翻译wiki-ros的内容而已。配置好后就可以直接启动gazebo与rviz查看效果了。全局路径规划参数影响不大,只要不太贴边就可以了,定位不准还贴边走,随时翻车;其次就是如果开了
use_grid_path沿网格走就直接全局路径生成失败,因为赛道太小,不能沿网格走。
global_planner_params.yaml
GlobalPlanner:                                  # Also see: http://wiki.ros.org/global_planner
  old_navfn_behavior: false                     # Exactly mirror behavior of navfn, use defaults for other boolean parameters, default false
  use_quadratic: true                           # Use the quadratic approximation of the potential. Otherwise, use a simpler calculation, default true
  use_dijkstra: true                            # Use dijkstra's algorithm. Otherwise, A*, default true
  use_grid_path: false                          # Create a path that follows the grid boundaries. Otherwise, use a gradient descent method, default false

  allow_unknown: false                           # Allow planner to plan through unknown space, default true
                                                #Needs to have track_unknown_space: true in the obstacle / voxel layer (in costmap_commons_param) to work
  planner_window_x: 0.0                         # default 0.0
  planner_window_y: 0.0                         # default 0.0
  default_tolerance: 1.0                        # If goal in obstacle, plan to the closest point in radius default_tolerance, default 0.0

  publish_scale: 100                            # Scale by which the published potential gets multiplied, default 100
  planner_costmap_publish_frequency: 0.0        # default 0.0

  lethal_cost: 200                              # default 253
  neutral_cost: 50                              # default 50
  cost_factor: 1.0                              # Factor to multiply each cost from costmap by, default 3.0
  publish_potential: true                       # Publish Potential Costmap (this is not like the navfn pointcloud2 potential), default true

  visualize_potential: true
- 3)启动成功,再给一次目标点试试看。结果……还是第一个弯道卡主了。而且配置完全局路径规划器的参数后好像没什么变化。表示默认参数就差不多够用了……

7. 配置 局部路径规划器 参数 -> teb_local_planner_params
- 0)关于
teb_local_planner_params规划器与dwa_local_planner_params规划器的区别我也不太清楚,另一位参赛大佬写过调参心得,各位可以参考一下。 - 其中有一点至关重要! 关于
weight_optimaltime参数的,这个参数决定了局部路径规划与全局路径规划的贴合程度。如果……如果这个参数过大(默认为1,我设置0.2)就无法避障,因为大多数障碍都是放在全局路径规划上的,如果局部规划和全局规划太贴合就也会直接穿过障碍。 - 全局路径只是提供大概方向,局部路径规划才是真正控制小车的路径。局部规划会根据全局规划和局部(动态)代价地图(的障碍图层),规划出小车可以行走的路线,然后将控制消息发送至话题。
智能车竞赛——TEB轨迹规划算法的参数调试
https://www.guyuehome.com/9811
- 1)新建参数文件,修改
.launch.xml文件。如下。 
<rosparam file="$(find carpack_move)/param/teb_local_planner_params.yaml" command="load" />
- 2)将下列参数复制粘贴。完成后就可以直接启动gazebo和rviz看看效果。因为参数我都配置好了。赶紧在终点给个目标点,然后,终于可以过第一个弯了。慢慢观察,不出意外的话是能跑完全程的。至此,本系列就差不多结束了。
- 【什么?我还没讲解每个参数的作用?请看后面的总结
(废话)】 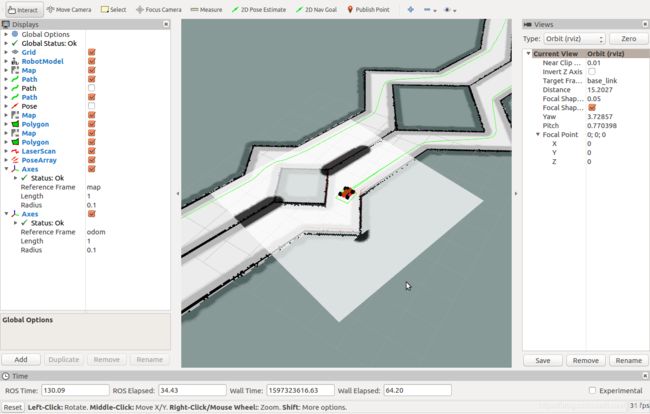 - 3)你可能会看到终端由以下错误提示。这就是全局路径丢失的错误,如果局部路径丢失的话只报警告。如果长期全局路径丢失就会终止导航任务。这个时间间隔可以在
move_base参数列表修改。
- 4)避障实验,请手动在gazebo内添加障碍,具体方法北邮学长的教程中也有。如果避障效果不好,请考虑修改参数和,在
motor_control.py关节控制器文件内添加一些判断,然后强行撞过去。就当做最后的实践内容,其实应该能直接避障,因为之前教程中编写的motor_control.py关节控制器很慢,直接减小odom里程计坐标系漂移程度,定位更加准,就能慢慢挪过去了。
智能车仿真 —— 2020室外光电组仿真指导(一)
https://blog.csdn.net/qq_37668436/article/details/107142166
- 5)最后展示
move_base.launch.xml文件内容。其中多了base_frame_id等坐标名字的参数定义,按照推荐操作是:在启动节点时对参数文件内的frame_id相关参数重新定义,方便移植和避免错误。比如有些不同文件需要同一个值的参数,如果不小心只修改了一遍就报错了。在我的工程中其实由很多我自己加添加的命名空间,在做教程时都去掉了。详细内容可以到git下载我的工程查看。
move_base.launch.xml
<launch>

    <arg name="base_frame_id"   default="base_footprint"/>
    <arg name="odom_frame_id"   default="odom"/>
    <arg name="global_frame_id" default="map"/>
    <arg name="odom_topic"      default="/odom_topic" />
    <arg name="laser_topic"     default="/scan" />
    <arg name="cmd_vel_name"    default="/motor_output" />

    <node pkg="move_base" type="move_base" respawn="false" name="move_base" output="screen">
        <rosparam file="$(find carpack_move)/param/move_base_params.yaml" command="load" />
        <rosparam file="$(find carpack_move)/param/costmap_common_params.yaml" command="load" ns="global_costmap" />
        <rosparam file="$(find carpack_move)/param/costmap_common_params.yaml" command="load" ns="local_costmap" />
        <rosparam file="$(find carpack_move)/param/local_costmap_params.yaml" command="load" />
        <rosparam file="$(find carpack_move)/param/global_costmap_params.yaml" command="load" />
        <rosparam file="$(find carpack_move)/param/global_planner_params.yaml" command="load" />
        <rosparam file="$(find carpack_move)/param/teb_local_planner_params.yaml" command="load" />


        <param name="global_costmap/global_frame" value="$(arg global_frame_id)"/>
        <param name="global_costmap/robot_base_frame" value="$(arg base_frame_id)"/>
        <param name="local_costmap/global_frame" value="$(arg odom_frame_id)"/>
        <param name="local_costmap/robot_base_frame" value="$(arg base_frame_id)"/>
        <param name="DWAPlannerROS/global_frame_id" value="$(arg odom_frame_id)"/>
        <param name="TebLocalPlannerROS/odom_topic" value="$(arg odom_topic)"/>

        <remap from="/odom"            to="$(arg odom_topic)"/>
        <remap from="/scan"            to="$(arg laser_topic)"/>
        <remap from="/cmd_vel"         to="$(arg cmd_vel_name)"/>
    node>
launch>
- 还有另外2个路径规划器的参数文件,可以自行尝试对比导航效果,在wiki-ros查找参数含义。
navfn_global_planner_params.yaml
NavfnROS:
  visualize_potential: false    #Publish potential for rviz as pointcloud2, not really helpful, default false
  allow_unknown: true          #Specifies whether or not to allow navfn to create plans that traverse unknown space, default true
                                #Needs to have track_unknown_space: true in the obstacle / voxel layer (in costmap_commons_param) to work
  planner_window_x: 0.0         #Specifies the x size of an optional window to restrict the planner to, default 0.0
  planner_window_y: 0.0         #Specifies the y size of an optional window to restrict the planner to, default 0.0

  default_tolerance: 0.0        #If the goal is in an obstacle, the planer will plan to the nearest point in the radius of default_tolerance, default 0.0
                                #The area is always searched, so could be slow for big values
dwa_local_planner_params.yaml
DWAPlannerROS:

# Robot Configuration Parameters
  max_vel_x: 0.5
  min_vel_x: 0

  max_vel_y: 0.0
  min_vel_y: 0.0

  # The velocity when robot is moving in a straight line
  max_trans_vel:  0.55
  min_trans_vel:  0.1
  trans_stopped_vel: 0.1

  max_rot_vel: 5.0
  min_rot_vel: 0.8
  rot_stopped_vel: 0.8

  acc_lim_x: 1.0
  acc_lim_theta: 2.0
  acc_lim_y: 0.0

# Goal Tolerance Parametes
  yaw_goal_tolerance: 0.3
  xy_goal_tolerance: 0.15
  latch_xy_goal_tolerance: false

# Forward Simulation Parameters
  sim_time: 0.5
  sim_granularity: 0.025
  vx_samples: 20
  vy_samples: 0
  vtheta_samples: 40

# Trajectory Scoring Parameters
  path_distance_bias: 32.0
  goal_distance_bias: 24.0
  occdist_scale: 0.1
  forward_point_distance: 0.325
  stop_time_buffer: 0.2
  scaling_speed: 0.25
  max_scaling_factor: 0.2

# Oscillation Prevention Parameters
  oscillation_reset_dist: 0.05

# Debugging
  publish_traj_pc : true
  publish_cost_grid_pc: true
  global_frame_id: odom
8.总结
- 0)至此这个系列教程就暂时告一段落了(2020年08月13日);比完赛(2020年08月1日)后就开始写,中间因为在Ubuntu20.04实验失败中断几天,之后由在Ubuntu16.04继续实验,现在终于完成了(2020年08月13日)。算是完成了一个小小的心愿
,我只是个仿真预赛都没有完赛的菜鸡小白。赛前”慢悠悠“准备十几天,比赛时间10分钟发车3次(第0次按错了),第三次跑到一半时间就到了。即使第三次跑完了,花了3分钟。被志愿者裁判宣布成绩无效,中间比赛还要忍受在线会议内其他人的讨论:”好慢“。那叫,还不算太惨……。 - 1)根据参赛大佬的帖子,关节控制器的速度给大,调整
controller_racecar.yaml关节控制器参数文件的PID解锁最大速度;然后再细调一下,就能达到40s左右的时间。这成绩是应该能进线下国赛了。这就意味着,今年,学完这个教程,知道怎么建立ros仿真小车工程后,再花几天时间就调局部路径规划器的参数,就能获得”全国智能车汽车竞赛“创意组别——ros组的国赛成绩!…… 才怪呢! 大概……因为线下赛是需要真车模,而且跑完全程,如果是第一次参赛可能还是悬。(2020年08月13日)
智能车竞赛——ROS组仿真篇
https://www.guyuehome.com/9697
- 2)之后如果还有学到新的ros知识或是需要补充的知识,会修改和补充这个系列教程。同时欢迎各位大佬指点错误。我都会虚心接受和立马修改更正
,前提当然是你提出来问题,而不是单纯的骂。O(∩_∩)O谢谢
《 个人空间 》
https://blog.csdn.net/Lovely_him
/*********目录*********/
- 教程 Re:Zero ROS (七/完)
- —— 建图&定位&导航 - 代价地图&路径规划
- 1. slam_gmapping 建图
- 2.map_server 提供地图 & amcl 定位
- 3.Move base 导航
- 4. 配置move_base参数 -> move_base_params
- 5.配置 代价地图 参数 -> costmap_common_params
- 6. 配置 全局路径规划器 参数 -> global_planner_params
- 7. 配置 局部路径规划器 参数 -> teb_local_planner_params
- 8.总结