【Java】利用SpringBoot搭建WebService服务接口
前言
在项目开发过程中经常会碰到对接医疗软件系统的时候对方要求提供WebService形式的接口,本篇文章记载了个人对接项目过程中整合并搭建的WebService形式的接口,希望对您能够有所帮助!
一、在pom.xml文件中导入WebService所需的Jar包
代码如下:
        <!--WebService-->
        <dependency>
            <groupId>javax.xml.bind</groupId>
            <artifactId>jaxb-api</artifactId>
            <version>2.3.0</version>
        </dependency>
        <dependency>
            <groupId>com.sun.xml.bind</groupId>
            <artifactId>jaxb-impl</artifactId>
            <version>2.3.0</version>
        </dependency>
        <dependency>
            <groupId>com.sun.xml.bind</groupId>
            <artifactId>jaxb-core</artifactId>
            <version>2.3.0</version>
        </dependency>
        <dependency>
            <groupId>javax.activation</groupId>
            <artifactId>activation</artifactId>
            <version>1.1.1</version>
        </dependency>
        <dependency>
            <groupId>org.springframework.boot</groupId>
            <artifactId>spring-boot-starter-web-services</artifactId>
        </dependency>
        <dependency>
            <groupId>org.apache.cxf</groupId>
            <artifactId>cxf-spring-boot-starter-jaxws</artifactId>
            <version>3.3.1</version>
        </dependency>
        <dependency>
            <groupId>org.apache.cxf</groupId>
            <artifactId>cxf-rt-transports-http</artifactId>
            <version>3.2.2</version>
        </dependency>
        <dependency>
            <groupId>org.codehaus.woodstox</groupId>
            <artifactId>stax2-api</artifactId>
            <version>4.0.0</version>
        </dependency>
        <dependency>
            <groupId>org.codehaus.woodstox</groupId>
            <artifactId>woodstox-core-asl</artifactId>
            <version>4.4.1</version>
        </dependency>
        <!-- 这个主要是client访问的,但是问题多多-->
        <dependency>
            <groupId>org.apache.axis</groupId>
            <artifactId>axis</artifactId>
            <version>1.4</version>
        </dependency>
        <dependency>
            <groupId>axis</groupId>
            <artifactId>axis-jaxrpc</artifactId>
            <version>1.4</version>
        </dependency>
        <dependency>
            <groupId>commons-discovery</groupId>
            <artifactId>commons-discovery</artifactId>
            <version>0.2</version>
        </dependency>
        <dependency>
            <groupId>wsdl4j</groupId>
            <artifactId>wsdl4j</artifactId>
            <version>1.6.3</version>
        </dependency>
        <!--WebService-->
二、定义WebService接口实现类
1.RequestDTO通用入参实体类
代码如下(示例):
import lombok.Data;

import javax.xml.bind.annotation.XmlAccessType;
import javax.xml.bind.annotation.XmlAccessorType;
import javax.xml.bind.annotation.XmlRootElement;
import javax.xml.bind.annotation.XmlType;

/**
 * @author 孤巷.
 * @description
 * @date 2022/8/5 11:47
 */
@XmlRootElement(name="ROOT")
@XmlAccessorType(XmlAccessType.FIELD)
@XmlType(propOrder={"msgData", "loginToken","orgCode","type"})
@Data
public class RequestDTO {
    private static final long serialVersionUID = 3428504463675931746L;

    /**
     * 机构编码
     */
    String orgCode;

    /**
     * 业务方法
     */
    String type;

    /**
     * 业务参数,格式为JSON
     */
    String msgData;

    /**
     * 登录凭证
     */
    String loginToken;
}
2.impl接口实现类
代码如下(示例):
import com.example.web.dto.RequestDTO;

import javax.jws.WebParam;
import javax.jws.WebService;

/**
 * @author 孤巷.
 * @description WebService函数定义
 * @date 2022/8/9 10:30
 */
@WebService(name = "qcsOdsImpl", targetNamespace = "http://server.webservice.example.com")
public interface qcsOdsImpl {

    /**
     * 门诊排队叫号通用函数
     * @param requestDTO 通用入参
     * @return String-SM4加密密文
     */
    String publicInterfaceFun(@WebParam(name="ROOT") RequestDTO requestDTO);

    /**
     * 智慧病房通用函数
     * @param requestDTO 通用入参
     * @return String-SM4加密密文
     */
    String smartWard(@WebParam(name="ROOT") RequestDTO requestDTO);

}
提示:其中的@WebParam(name="ROOT") 中的ROOT代表着方法的参数,与通用入参实体类RequestDTO中的一致即可
3.service业务类中引入实现类
代码如下(示例):
import com.alibaba.fastjson.JSON;
import com.alibaba.fastjson.JSONObject;
import com.example.web.constant.Constant;
import com.example.web.dto.RequestDTO;
import com.example.web.model.MapMappingModel;
import com.example.web.service.InitDataService;
import com.example.web.util.MySM4Util;
import com.example.web.util.ReflectUtil;
import com.example.web.util.ResultUtil;
import com.example.web.util.SpringContextUtils;
import com.example.web.webservice.impl.qcsOdsImpl;
import lombok.extern.slf4j.Slf4j;
import org.springframework.stereotype.Component;

import javax.annotation.Resource;
import javax.jws.WebService;
import java.lang.reflect.InvocationTargetException;

/**
 * @author 孤巷.
 * @description
 * @date 2022/8/9 10:30
 */
@Component
@WebService( targetNamespace = "http://server.webservice.example.com",
        endpointInterface = "com.example.web.webservice.impl.qcsOdsImpl")
@Slf4j
public class qcsOdsService implements qcsOdsImpl {

    /**
     * 门诊排队叫号通用函数
     * @param requestDTO 通用入参
     * @return String-SM4加密密文
     */
    @Override
    public String publicInterfaceFun(RequestDTO requestDTO) {
        return currencyService(requestDTO,1);
    }

    /**
     * 智慧病房通用函数
     * @param requestDTO 通用入参
     * @return String-SM4加密密文
     */
    @Override
    public String smartWard(RequestDTO requestDTO) {
        return currencyService(requestDTO,2);
    }


    /**
     * 通用业务
     * @param requestDTO 通用入参
     * @param type 1:智慧病房,2:门诊排队叫号
     * @return String
     */
    public String currencyService(RequestDTO requestDTO,int type){
        ........根据项目需求填写实际业务代码
        return null;
    }
    }
}
三、其他配置
1.application.yml
代码如下(示例):
cxf:
  path: /qcs_ods
2.启动类配置注解
代码如下(示例):
import org.mybatis.spring.annotation.MapperScan;
import org.springframework.boot.SpringApplication;
import org.springframework.boot.autoconfigure.SpringBootApplication;
import org.springframework.boot.autoconfigure.jdbc.DataSourceAutoConfiguration;
import org.springframework.context.annotation.ComponentScan;
import org.springframework.scheduling.annotation.EnableScheduling;

@SpringBootApplication(exclude= {DataSourceAutoConfiguration.class})
@EnableScheduling
@MapperScan(value = {"com.example.web.dao.*"})
@ComponentScan(basePackages = "com.example.web.*")
public class JavaWebserviceApplication {


    public static void main(String[] args) {
        SpringApplication.run(JavaWebserviceApplication.class, args);
    }

}
2.WebServiceConfig配置
代码如下(示例):
import javax.xml.ws.Endpoint;

import com.example.web.webservice.qcsOdsService;
import org.apache.cxf.Bus;
import org.apache.cxf.bus.spring.SpringBus;
import org.apache.cxf.jaxws.EndpointImpl;
import org.springframework.beans.factory.annotation.Autowired;
import org.springframework.context.annotation.Bean;
import org.springframework.context.annotation.Configuration;

/**
 * @author 孤巷.
 * @description
 * @date 2022/8/4 14:04
 */
@Configuration
public class WebServiceConfig {

    @Autowired
    private qcsOdsService serverServiceDemo;

    /**
     * Apache CXF 核心架构是以BUS为核心,整合其他组件。
     * Bus是CXF的主干, 为共享资源提供一个可配置的场所,作用类似于Spring的ApplicationContext,这些共享资源包括
     * WSDl管理器、绑定工厂等。通过对BUS进行扩展,可以方便地容纳自己的资源,或者替换现有的资源。默认Bus实现基于Spring架构,
     * 通过依赖注入,在运行时将组件串联起来。BusFactory负责Bus的创建。默认的BusFactory是SpringBusFactory,对应于默认
     * 的Bus实现。在构造过程中,SpringBusFactory会搜索META-INF/cxf(包含在 CXF 的jar中)下的所有bean配置文件。
     * 根据这些配置文件构建一个ApplicationContext。开发者也可以提供自己的配置文件来定制Bus。
     */
    @Bean(name = Bus.DEFAULT_BUS_ID)
    public SpringBus springBus() {
        return new SpringBus();
    }

    /**
     * 此方法作用是改变项目中服务名的前缀名,此处127.0.0.1或者localhost不能访问时,请使用ipconfig查看本机ip来访问
     * 此方法被注释后, 即不改变前缀名(默认是services), wsdl访问地址为 http://127.0.0.1:8080/services/ws/api?wsdl
     * 去掉注释后wsdl访问地址为:http://127.0.0.1:8080/soap/ws/api?wsdl
     * http://127.0.0.1:8080/soap/列出服务列表 或 http://127.0.0.1:8080/soap/ws/api?wsdl 查看实际的服务
     * 新建Servlet记得需要在启动类添加注解:@ServletComponentScan
     *
     * 如果启动时出现错误:not loaded because DispatcherServlet Registration found non dispatcher servlet dispatcherServlet
     * 可能是springboot与cfx版本不兼容。
     * 同时在spring boot2.0.6之后的版本与xcf集成,不需要在定义以下方法,直接在application.properties配置文件中添加:
     * cxf.path=/webservice(默认是services)
     */
//    @Bean
//    public ServletRegistrationBean dispatcherServlet() {
//        return new ServletRegistrationBean(new CXFServlet(), "/soap/*");
//    }

    @Bean
    public Endpoint endpoint() {
        EndpointImpl endpoint = new EndpointImpl(springBus(), serverServiceDemo);
        endpoint.publish("/services/qcsOdsService");
        return endpoint;
    }


}
四、访问地址
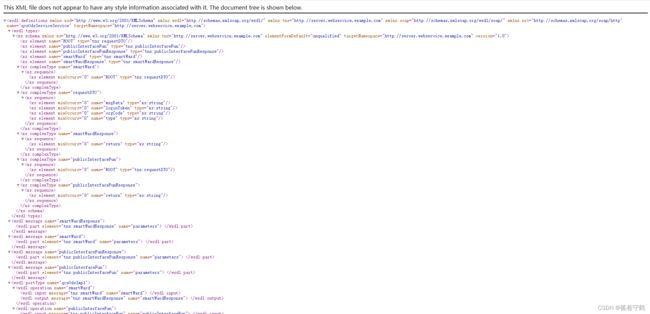
1.最后浏览器访问项目地址:http://localhost:9803/qcs_ods/services/qcsOdsService?wsdl
提示:项目访问地址的构成在代码中都有标注,请仔细核对并根据实际需求进行修改;
总结
以上就是今天要讲的内容,本文仅仅简单介绍了WebService服务的使用,具体疑问可下方评论,感谢您的点赞以及评论;
