SpringBoot开发笔记
SpringBoot开发
- mybatis入门
-
- 配置依赖
- 连接mysql数据库的相关配置
- 注解方式实现mybatis
-
- 定义mapper接口(放在数据层dao或者mapper层)
- Mapper.xml映射文件实现mybatis
- xml映射文件注意事项
- 修改Application启动端口的三种方式
- 登录模块的拦截器功能实现
-
- 1、JWT的介绍
- 2、JWT的生成(JWTUtil工具类)
-
- (1)、配置JWT的属性
- (2)、创建属性对象
- (3)、创建JWT工具类
- 3、实现拦截
- 4、拦截器的全局配置
- AOP实现
-
- 1、 自定义注解
- 2、 AOP实现类
- AOP的底层:动态代理
- AOP核心概念
- AOP通知类型
- 全局异常处理相关配置
-
- 实现代码
- Springboot自动配置
-
- 1、bean的作用域
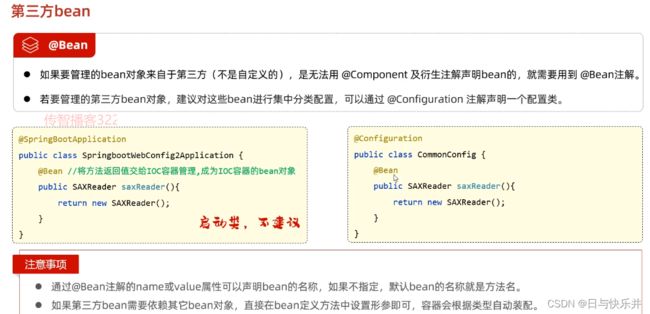
- 2、如何使用第三方的bean对象
- 阿里云上传文件功能
-
- 1、导alioss的sdk依赖
- 2、属性配置
- 3、创建oss工具类
- 4、使用oss工具类
- 第三方http请求功能实现
-
- 1、导入依赖
- 2、工具类代码实现(前提:记得导入HttpClient依赖,但如果有OSSsdk的依赖就可以不导了,因为oss依赖了HttpClient)
- 3、使用HttpClient发送请求到高德获取经纬度和距离的例子
-
- (1)、配置高德的key和店铺shop的地址address
- (2)、代码实现
- 使用redis实现缓存功能
-
- 1、redis依赖
- 2、redis配置
- 3、redis序列化配置
- 4、使用redis实现缓存
- 5、redis实现清缓存
- 使用SpringCache实现redis缓存
-
- 1、开启缓存
- 2、添加缓存
- 3、清除缓存
- 使用SpringTask实现定时任务
-
- 1、开启任务调度
- 2、创建task任务类
- 使用WebSocket实现来单提醒,催单提醒
-
- 1、导入依赖
- 2、创建webSocket服务实现两端连接
- 3、创建WebSocket任务类
- 4、在具体方法上使用WebSocket发送消息提醒
- 使用POI实现office表格的读取和写入
-
- 1、导入依赖
- 2、具体实现
mybatis入门
配置依赖
 	<dependency>
        <groupId>com.mysqlgroupId>
        <artifactId>mysql-connector-jartifactId>
        <scope>runtimescope>
    dependency>
    <dependency>
        <groupId>org.projectlombokgroupId>
        <artifactId>lombokartifactId>
        <version>1.18.6version>
        <optional>trueoptional>
    dependency>

    <dependency>
        <groupId>com.alibabagroupId>
        <artifactId>druid-spring-boot-starterartifactId>
        <version>1.2.4version>
    dependency>
连接mysql数据库的相关配置
# properties格式配置文件
spring.datasource.druid.driver-class-name=com.mysql.cj.jdbc.Driver//驱动
spring.datasource.druid.url=jdbc:mysql://127.0.0.1:3306/emp?useUnicode=true&characterEncoding=utf-8&useSSL=false//端口和数据库名称
spring.datasource.druid.username=*****//mysql用户名
spring.datasource.druid.password=*****//mysql密码
mybatis.configuration.log-impl=org.apache.ibatis.logging.stdout.StdOutImpl//输出执行日志
# 和yml格式、效果一模一样,只是后缀名不同
spring:
  datasource:
    druid:
      driver-class-name: com.mysql.cj.jdbc.Driver
      url: jdbc:mysql://127.0.0.1:3306/web01?useUnicode=true&characterEncoding=utf-8&useSSL=false
      username: mysql用户名
      password: mysql密码
  servlet:
# servlet可上传最大文件
    multipart:
# 一次上传最大文件限10MB,不加单位,默认为KB,KB和MB必须全称,不能省略为K或者M
      max-file-size: 10MB
# 一次请求上传全部文件大小总和限100MB
      max-request-size: 100MB
mybatis:
  configuration:
#    开启驼峰命名
    map-underscore-to-camel-case: true
#    开启mybatis日志
    log-impl: org.apache.ibatis.logging.stdout.StdOutImpl
# 配置mapper扫描对象的路径
  type-aliases-package: com.example.webcase01.pojo
  mapper-locations: classpath:mapper/*.xml
注解方式实现mybatis
定义mapper接口(放在数据层dao或者mapper层)
@Mapper//加上该注解才能生效为mapper对象
public interface EmpMapper {
    @Select("select * from emp")//放sql语句实现增删改查
    public List<Emp> findAll();
//@select查
//@Insert增
//@Update改
//@Delete删

    @Options(keyProperty = "id", useGeneratedKeys = true)//返回数据库自动生成的id,便于开发中获取,xml中也可以使用这两个属性
    @Insert("insert into emp(id,username,password,name,gender," +
            "image,job,entrydate,dept_id,create_time,update_time) " +
            "values(#{id},#{username},#{password},#{name}," +
            "#{gender},#{image},#{job},#{entrydate}," +
            "#{dept_id},#{create_time},#{update_time})")
    void insertOne(Emp emp1);
}
Mapper.xml映射文件实现mybatis
<?xml version="1.0" encoding="UTF-8" ?>
<!DOCTYPE mapper PUBLIC "-//mybatis.org//DTD Mapper 3.0//EN"
        "http://mybatis.org/dtd/mybatis-3-mapper.dtd" >
<mapper namespace="com.sky.mapper.AddressMapper">
<!-- 可以把所有的列名放在sql标签里面,定义好id,方便后面的SQL语句根据id取用 -->
	<sql id="addressColumns">
        user_id,consignee,sex,phone,province_code,
        province_name,city_code,city_name,
        district_code,district_name,detail,label,is_default
    </sql>
<!-- 取用的时候用<include/>标签,并指定id -->
	<select id="selectById" resultType="com.sky.entity.AddressBook">
        select id,<include refid="addressColumns"/> from address_book where id = #{id}
    </select>
</mapper>
xml映射文件注意事项

DOCTYPE mapper
        PUBLIC "-//mybatis.org//DTD Mapper 3.0//EN"
        "https://mybatis.org/dtd/mybatis-3-mapper.dtd">
<mapper namespace="com.example.webcase01.mapper.EmpMapper">


    <select id="selectByUsernameAndPassword" resultType="Emp">
        select id,username, password,name,gender,image,job,entrydate,
        dept_id,create_time,update_time from emp
        where username = #{username} and password = #{password}
    select>

    <select id="selectByPage" resultType="Emp">
        select id,username, password,name,gender,image,job,entrydate,dept_id,create_time,update_time from emp
        <where>
            <if test="name != null">
                name like concat( '%' ,#{name},'%')
            if>
            <if test="gender != null">
                and gender = #{gender}
            if>
            <if test=" begin != '' and end != ''">
                and entrydate between #{begin} and #{end}
            if>
        where>
        order by entrydate desc
    select>


    <delete id="deleteByIds">
        delete from emp where id in

        <foreach collection="ids" open = "(" close = ")" separator="," item = "id">
            #{id}
        foreach>
    delete>

    <insert id="insertEmp" keyProperty = "id" useGeneratedKeys = "true">
        insert into emp(username,name,gender,image,job,entrydate,dept_id,create_time,update_time)
        values(#{username},#{name},#{gender},#{image},#{job},#{entrydate},#{deptId},#{createTime},#{updateTime})
    insert>

    <select id="selectById" resultType="Emp">
        select id,username, password,name,gender,image,job,
        entrydate,dept_id,create_time,update_time
        from emp
        where id = #{id}
    select>

    <update id="updateById">
        update emp
        <set>
            <if test="username != null">
                username = #{username},
            if>
            <if test="name != null">
                name = #{name},
            if>
            <if test="gender != null">
                gender = #{gender},
            if>
            <if test="image != null">
                image = #{image},
            if>
            <if test="deptId != null">
                dept_id = #{deptId},
            if>
            <if test="entrydate != null">
                entrydate = #{entrydate},
            if>
            <if test="job != null">
                job = #{job},
            if>
            update_time = #{updateTime}
        set>
        where id = #{id}
    update>

mapper>
例子:获取规定时间内销售量前10
在xml文件里面使用大于小于号需要转义,大于用> 小于用<
<select id="getSalesTop10" resultType="com.sky.dto.GoodsSalesDTO">
        select od.name, sum(od.number) number
        from order_detail od,orders o
        where od.order_id = o.id and o.status = 5
        <if test="start != null">
            and o.order_time > #{start}
        if>
        <if test="end != null">
            and o.order_time < #{end}
        if>
        group by od.name
        order by number desc
        limit 0,10
    select>
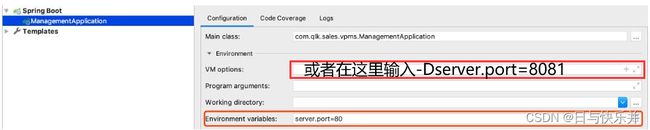
修改Application启动端口的三种方式
第一种、application.yml里面改server:port:8080
第二种和第三种:
登录模块的拦截器功能实现
1、JWT的介绍

2、JWT的生成(JWTUtil工具类)
(1)、配置JWT的属性
sky:
	jwt:
	    # 设置jwt签名加密时使用的秘钥
	    admin-secret-key: chjchj
	    # 设置jwt过期时间
	    admin-ttl: 7200000
	    # 设置前端传递过来的令牌名称
	    admin-token-name: token
(2)、创建属性对象
@Component
@ConfigurationProperties(prefix = "sky.jwt")
@Data
public class JwtProperties {

    /**
     * 管理端员工生成jwt令牌相关配置
     */
    private String adminSecretKey;
    private long adminTtl;
    private String adminTokenName;
(3)、创建JWT工具类
public class JwtUtil {
    /**
     * 生成jwt
     * 使用Hs256算法, 私匙使用固定秘钥
     *
     * @param secretKey jwt秘钥
     * @param ttlMillis jwt过期时间(毫秒)
     * @param claims    设置的信息
     * @return
     */
    public static String createJWT(String secretKey, long ttlMillis, Map<String, Object> claims) {
        // 指定签名的时候使用的签名算法,也就是header那部分
        SignatureAlgorithm signatureAlgorithm = SignatureAlgorithm.HS256;

        // 生成JWT的时间
        long expMillis = System.currentTimeMillis() + ttlMillis;
        Date exp = new Date(expMillis);

        // 设置jwt的body
        JwtBuilder builder = Jwts.builder()
                // 如果有私有声明,一定要先设置这个自己创建的私有的声明,这个是给builder的claim赋值,一旦写在标准的声明赋值之后,就是覆盖了那些标准的声明的
                .setClaims(claims)
                // 设置签名使用的签名算法和签名使用的秘钥
                .signWith(signatureAlgorithm, secretKey.getBytes(StandardCharsets.UTF_8))
                // 设置过期时间
                .setExpiration(exp);

        return builder.compact();
    }

    /**
     * Token解密
     * @param secretKey jwt秘钥 此秘钥一定要保留好在服务端, 不能暴露出去, 否则sign就可以被伪造, 如果对接多个客户端建议改造成多个
     * @param token     加密后的token
     * @return
     */
    public static Claims parseJWT(String secretKey, String token) {
        // 得到DefaultJwtParser
        Claims claims = Jwts.parser()
                // 设置签名的秘钥
                .setSigningKey(secretKey.getBytes(StandardCharsets.UTF_8))
                // 设置需要解析的jwt
                .parseClaimsJws(token).getBody();
        return claims;
    }

}
3、实现拦截
/**
 * 管理端jwt令牌校验的拦截器
 */
@Component
@Slf4j
public class JwtTokenAdminInterceptor implements HandlerInterceptor {

    @Autowired
    private JwtProperties jwtProperties;

    /**
     * 校验jwt
     */
    @Override
    public boolean preHandle(HttpServletRequest request, HttpServletResponse response, Object handler) throws Exception {
        //判断当前拦截到的是Controller的方法还是其他资源
        if (!(handler instanceof HandlerMethod)) {
            //当前拦截到的不是动态方法,直接放行
            return true;
        }

        //1、从请求头中获取令牌
        String token = request.getHeader(jwtProperties.getAdminTokenName());

        //2、校验令牌
        try {
            log.info("jwt校验:{}", token);
            Claims claims = JwtUtil.parseJWT(jwtProperties.getAdminSecretKey(), token);
            Long empId = Long.valueOf(claims.get(JwtClaimsConstant.EMP_ID).toString());
            log.info("当前员工id:{}", empId);
            BaseContext.setCurrentId(empId);//把当前线程的员工id存到线程map集合里面
            BaseContext.setCurrentToken(token);//把当前线程的员工登录生成的token存到线程map集合里面
            //3、通过,放行
            return true;
        } catch (Exception ex) {
            //4、不通过,响应401状态码
            response.setStatus(401);
            return false;
        }
    }

    @Override
    public void postHandle(HttpServletRequest request, HttpServletResponse response, Object handler, @Nullable ModelAndView modelAndView) throws Exception {
        BaseContext.removeCurrentId();//请求结束后清除缓存的id
        BaseContext.removeCurrentToken();//请求结束后清除缓存的token
    }
}
4、拦截器的全局配置
/**
 * 配置类,注册web层相关组件
 */
@Configuration
@Slf4j
public class WebMvcConfiguration extends WebMvcConfigurationSupport {

    @Autowired
    private JwtTokenAdminInterceptor jwtTokenAdminInterceptor;

    @Autowired
    private JwtTokenUserInterceptor jwtTokenUserInterceptor;

    /**
     * 注册自定义拦截器
     *
     * @param registry
     */
    protected void addInterceptors(InterceptorRegistry registry) {
        log.info("开始注册自定义拦截器...");
        registry.addInterceptor(jwtTokenAdminInterceptor)
                .addPathPatterns("/admin/**")
                .excludePathPatterns("/admin/employee/login")
                .excludePathPatterns("/admin/employee/logout");

        registry.addInterceptor(jwtTokenUserInterceptor)
                .addPathPatterns("/user/**")
                .excludePathPatterns("/user/user/login")
                .excludePathPatterns("/user/user/logout")
                .excludePathPatterns("/user/shop/status");
    }
}
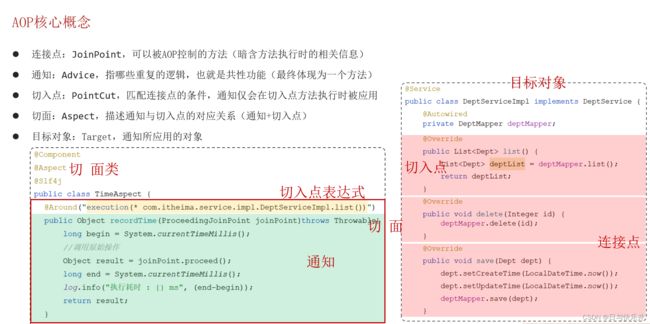
AOP实现
1、 自定义注解
@Target(ElementType.METHOD)//目标位置:方法
@Retention(RetentionPolicy.RUNTIME)//运行时起作用
public @interface AutoFill {
    OperationType type();//用枚举指定类型
}
2、 AOP实现类
@Component
@Aspect
public class AutoFillAspect {

    //ctrl+alt+shift+C  复制全类名
    // 切入点:必须是mapper中的方法 并且 必须加@AutoFill注解
    @Pointcut("execution(* com.sky.mapper.*.*(..)) && @annotation(com.sky.anno.AutoFill)")
    public void pc(){

    }

    @Before("pc() && @annotation(autoFill)")
    public void before(JoinPoint joinPoint, AutoFill autoFill){
        //获取方法的参数
        Object[] args = joinPoint.getArgs();
        Object arg = args[0];

        //获取方法上定义的注解
        OperationType operationType = autoFill.type();

        //给实体类的属性设置值
        Class<?> aClass = arg.getClass();
        //获取属性对应的set方法
        try {
            Method setUpdateTimeMethod = aClass.getMethod(AutoFillConstant.SET_UPDATE_TIME, LocalDateTime.class);
            Method setUpdateUserMethod = aClass.getMethod(AutoFillConstant.SET_UPDATE_USER, Long.class);
            //准备数据
            LocalDateTime now = LocalDateTime.now();
            Long id = BaseContext.getCurrentId();
            //调用set方法给arg设置对应的数据值
            setUpdateTimeMethod.invoke(arg,now);
            setUpdateUserMethod.invoke(arg,id);

            if (operationType == OperationType.INSERT) {
                Method setCreateTimeMethod = aClass.getMethod(AutoFillConstant.SET_CREATE_TIME, LocalDateTime.class);
                Method setCreateUserMethod = aClass.getMethod(AutoFillConstant.SET_CREATE_USER, Long.class);
                //调用set方法给arg设置对应的数据值
                setCreateTimeMethod.invoke(arg,now);
                setCreateUserMethod.invoke(arg,id);
            }
        } catch (Exception e) {
            e.printStackTrace();
        }

    }
}
AOP的底层:动态代理

AOP核心概念
AOP通知类型

全局异常处理相关配置

实现代码
/**
 * 全局异常处理器,处理项目中抛出的业务异常
 */
@RestControllerAdvice
@Slf4j
public class GlobalExceptionHandler {

    /**
     * 捕获业务异常
     * @param ex
     * @return
     */
    @ExceptionHandler
    public Result exceptionHandler(BaseException ex){
        log.error("异常信息:{}", ex.getMessage());
        return Result.error(ex.getMessage());
    }

    /**
     * 捕获sql异常
     * @param ex
     * @return
     */
    @ExceptionHandler(SQLIntegrityConstraintViolationException.class)
    public Result exceptionHandler(SQLIntegrityConstraintViolationException ex){
        log.error("异常信息:{}", ex.getMessage());
        String message = ex.getMessage();
        if(message.contains("Duplicate entry")){
            String name = message.split(" ")[2].replaceAll("'","");
            return Result.error(name+ MessageConstant.ALREADY_EXISTS);
        }
        return Result.error(ex.getMessage());
    }

}
Springboot自动配置
1、bean的作用域

2、如何使用第三方的bean对象

阿里云上传文件功能
1、导alioss的sdk依赖
	<dependency>
        <groupId>com.aliyun.ossgroupId>
        <artifactId>aliyun-sdk-ossartifactId>
        <version>${aliyun.sdk.oss}version>
    dependency>
2、属性配置
sky:
  alioss:
    endpoint: oss-cn-XXX.aliyuncs.com
    access-key-id: XXXXXXXXXX
    access-key-secret: XXX
    bucket-name: XXX
@Component
@ConfigurationProperties(prefix = "sky.alioss")
@Data
public class AliOssProperties {

    private String endpoint;
    private String accessKeyId;
    private String accessKeySecret;
    private String bucketName;

}
3、创建oss工具类
/**
 * 阿里OSS上传文件的配置类
 */
@Configuration
@Slf4j
public class AliOssConfig {

    @Autowired
    private AliOssProperties aliOssProperties;

    @Bean
    @ConditionalOnMissingBean
    public AliOssUtil aliOssUtil(AliOssProperties aliOssProperties){
        log.info("开始创建阿里云文件上传工具类对象:{}",aliOssProperties);
        return new AliOssUtil(aliOssProperties.getEndpoint(),aliOssProperties.getAccessKeyId(),
                aliOssProperties.getAccessKeySecret(),aliOssProperties.getBucketName());
    }

}
4、使用oss工具类
@Slf4j
@RestController
@RequestMapping("/admin/common")
@Api(tags = "公共接口")
public class CommonController {

    @Autowired
    private AliOssUtil aliOssUtil;

    /**
     * 上传文件接口
     */
    @ApiOperation("上传文件接口")
    @PostMapping("/upload")
    public Result<String> upload(MultipartFile file){
        log.info("上传的文件:{}",file);
        try {
            //获取原始文件名称
            String originalFilename = file.getOriginalFilename();
            //截取原始文件后缀
            String substring = originalFilename.substring(originalFilename.indexOf("."));
            //使用UUID生成新文件名称+截取的后缀名
            String fileName = UUID.randomUUID().toString() +substring;
            //获取文件请求路径
            String uploadUrl = aliOssUtil.upload(file.getBytes(), fileName);

            return Result.success(uploadUrl);
        } catch (IOException e) {
            e.printStackTrace();
            log.error("文件上传失败:{}",e);
        }
        return Result.error(MessageConstant.UPLOAD_FAILED);
    }
}
第三方http请求功能实现
1、导入依赖
<dependencies>
	<dependency>
		<groupId>org.apache.httpcomponentsgroupId>
        <artifactId>httpclientartifactId>
        <version>4.4.1version>
    dependency>
<dependencies>
2、工具类代码实现(前提:记得导入HttpClient依赖,但如果有OSSsdk的依赖就可以不导了,因为oss依赖了HttpClient)
/**
 * Http工具类
 */
public class HttpClientUtil {

    static final  int TIMEOUT_MSEC = 5 * 1000;

    /**
     * 发送GET方式请求
     * @param url
     * @param paramMap
     * @return
     */
    public static String doGet(String url,Map<String,String> paramMap){
        // 创建Httpclient对象
        CloseableHttpClient httpClient = HttpClients.createDefault();

        String result = "";
        CloseableHttpResponse response = null;

        try{
            URIBuilder builder = new URIBuilder(url);
            if(paramMap != null){
                for (String key : paramMap.keySet()) {
                    builder.addParameter(key,paramMap.get(key));
                }
            }
            URI uri = builder.build();

            //创建GET请求
            HttpGet httpGet = new HttpGet(uri);

            //发送请求
            response = httpClient.execute(httpGet);

            //判断响应状态
            if(response.getStatusLine().getStatusCode() == 200){
                result = EntityUtils.toString(response.getEntity(),"UTF-8");
            }
        }catch (Exception e){
            e.printStackTrace();
        }finally {
            try {
                response.close();
                httpClient.close();
            } catch (IOException e) {
                e.printStackTrace();
            }
        }

        return result;
    }

    /**
     * 发送POST方式请求
     * @param url
     * @param paramMap
     * @return
     * @throws IOException
     */
    public static String doPost(String url, Map<String, String> paramMap) throws IOException {
        // 创建Httpclient对象
        CloseableHttpClient httpClient = HttpClients.createDefault();
        CloseableHttpResponse response = null;
        String resultString = "";

        try {
            // 创建Http Post请求
            HttpPost httpPost = new HttpPost(url);

            // 创建参数列表
            if (paramMap != null) {
                List<NameValuePair> paramList = new ArrayList();
                for (Map.Entry<String, String> param : paramMap.entrySet()) {
                    paramList.add(new BasicNameValuePair(param.getKey(), param.getValue()));
                }
                // 模拟表单
                UrlEncodedFormEntity entity = new UrlEncodedFormEntity(paramList);
                httpPost.setEntity(entity);
            }

            httpPost.setConfig(builderRequestConfig());

            // 执行http请求
            response = httpClient.execute(httpPost);

            resultString = EntityUtils.toString(response.getEntity(), "UTF-8");
        } catch (Exception e) {
            throw e;
        } finally {
            try {
                response.close();
            } catch (IOException e) {
                e.printStackTrace();
            }
        }

        return resultString;
    }

    /**
     * 发送POST方式请求
     * @param url
     * @param paramMap
     * @return
     * @throws IOException
     */
    public static String doPost4Json(String url, Map<String, String> paramMap) throws IOException {
        // 创建Httpclient对象
        CloseableHttpClient httpClient = HttpClients.createDefault();
        CloseableHttpResponse response = null;
        String resultString = "";

        try {
            // 创建Http Post请求
            HttpPost httpPost = new HttpPost(url);

            if (paramMap != null) {
                //构造json格式数据
                JSONObject jsonObject = new JSONObject();
                for (Map.Entry<String, String> param : paramMap.entrySet()) {
                    jsonObject.put(param.getKey(),param.getValue());
                }
                StringEntity entity = new StringEntity(jsonObject.toString(),"utf-8");
                //设置请求编码
                entity.setContentEncoding("utf-8");
                //设置数据类型
                entity.setContentType("application/json");
                httpPost.setEntity(entity);
            }

            httpPost.setConfig(builderRequestConfig());

            // 执行http请求
            response = httpClient.execute(httpPost);

            resultString = EntityUtils.toString(response.getEntity(), "UTF-8");
        } catch (Exception e) {
            throw e;
        } finally {
            try {
                response.close();
            } catch (IOException e) {
                e.printStackTrace();
            }
        }

        return resultString;
    }
    private static RequestConfig builderRequestConfig() {
        return RequestConfig.custom()
                .setConnectTimeout(TIMEOUT_MSEC)
                .setConnectionRequestTimeout(TIMEOUT_MSEC)
                .setSocketTimeout(TIMEOUT_MSEC).build();
    }

}
3、使用HttpClient发送请求到高德获取经纬度和距离的例子
(1)、配置高德的key和店铺shop的地址address
#店铺地址
sky:
  shop:
    address: 长沙市岳麓区东方红中路380-4麓谷星辰
  gaode:
    key: XXXXXXXXXXXXXXXXXXX
(2)、代码实现
    //店铺地址
    @Value("${sky.shop.address}")
    private String shopAddress;

    //高德key
    @Value("${sky.gaode.key}")
    private String gaoDeKey;
    /**
     * 测算距离
     */
    public Integer getDistance(String address){
        Map map = new HashMap();
        map.put("key",gaoDeKey);
        map.put("address",shopAddress);
        //获取店铺在高德的经纬度
        String shop = HttpClientUtil.doGet("https://restapi.amap.com/v3/geocode/geo?parameters", map);
        //转为Json对象,获取高德返回的json里面的location(经度,纬度)
        String shopLocation = JSON.parseObject(shop).getJSONArray("geocodes").getJSONObject(0).getString("location");
        Integer shopStatus = JSON.parseObject(shop).getInteger("status");

        log.info("店铺经纬度:{}",shopLocation);
        map.put("key",gaoDeKey);
        map.put("address",address);
        //获取用户收货地址的经纬度
        String userAddress = HttpClientUtil.doGet("https://restapi.amap.com/v3/geocode/geo?parameters", map);
        //转为Json对象,获取高德返回的json里面的location(经度,纬度)
        String userAddressLocation = JSON.parseObject(userAddress).getJSONArray("geocodes").getJSONObject(0).getString("location");
        //获取高德返回的状态
        Integer userAddressStatus = JSON.parseObject(userAddress).getInteger("status");
        log.info("用户地址经纬度:{}",userAddressLocation);

        //根据出发地和目的地的经纬度获取两地的骑行距离
        Map map1 = new HashMap();
        map1.put("key",gaoDeKey);
        //出发点经纬度,即店铺经纬度
        map1.put("origin",shopLocation);
        //目的地经纬度,即用户地址经纬度
        map1.put("destination",userAddressLocation);
        String distance = HttpClientUtil.doGet("https://restapi.amap.com/v4/direction/bicycling?parameters", map1);
        Integer lastDistance = JSON.parseObject(distance).getJSONObject("data").getJSONArray("paths").getJSONObject(0).getInteger("distance");

        log.info("距离为:{}",lastDistance);
        return (shopStatus == 0 || userAddressStatus == 0) ? 0 : lastDistance;
    }
使用redis实现缓存功能
1、redis依赖
<dependency>
	<groupId>org.springframework.bootgroupId>
	<artifactId>spring-boot-starter-data-redisartifactId>
dependency>
2、redis配置
sky:
  redis:
    # 主机IP
    host: localhost
    # 默认端口
    port: 6379
    # 密码在redis.windows.conf去找
    password: XXXXXX
    # 一共有16个数据库(编号0-15,这里使用了10号数据库)
    database: 10
3、redis序列化配置
@Configuration
@Slf4j
public class RedisConfig {

    @Bean
    public RedisTemplate redisTemplate(RedisConnectionFactory redisConnectionFactory){
        log.info("开始创建redis模板对象...");
        RedisTemplate redisTemplate = new RedisTemplate();
        //设置redis的连接工厂对象
        redisTemplate.setConnectionFactory(redisConnectionFactory);
        return redisTemplate;
    }
}
4、使用redis实现缓存
在第三方用户查询数据时把当下的数据缓存到redis
@RestController("userDishController")
@Slf4j
@Api(tags = "C端菜品接口")
@RequestMapping("/user/dish")
public class DishController {

    @Autowired
    private RedisTemplate redisTemplate;

    @Autowired
    private DishService dishService;

    @GetMapping("/list")
    @ApiOperation("C端获取菜品列表接口")
    public Result<List<DishVO>> getDishes(Long categoryId){
        //构造redis中的key,规则:dish_分类id
        String key = "dish_categoryId" + categoryId;

        //查询redis中是否存在菜品数据
        List<DishVO> dishes = (List<DishVO>) redisTemplate.opsForValue().get(key);
        if(dishes != null && dishes.size() > 0){
            //如果存在,直接返回,无须查询数据库
            return Result.success(dishes);
        }

        Dish dish = new Dish();
        dish.setCategoryId(categoryId);
        dish.setStatus(StatusConstant.ENABLE);//查询起售中的菜品

        //如果不存在,查询数据库,将查询到的数据放入redis中
        List<DishVO> byCategoryId = dishService.findByCategoryId(categoryId);
        //定义一个菜品列表 用于存放在售菜品
        List<DishVO> enableDishes = new ArrayList<>();

        //判断菜品是否在售,在售的话,添加到enableDishes
        for (DishVO dishVO : byCategoryId) {
            if (dishVO.getStatus() == 1){
                enableDishes.add(dishVO);
            }
        }
        //存入redis
        redisTemplate.opsForValue().set(key, enableDishes);
        return Result.success(enableDishes);
    }
}
5、redis实现清缓存
用于后台增删改(只要有增删改,就清除缓存,避免数据不一致)
//注入RedisTemplate对象
@Autowired
private RedisTemplate redisTemplate;

 /**
     * 清理缓存数据方法
     */
    private void cleanCache(String key){
        //查找key
        Set keys = redisTemplate.keys(key);
        //删除查出来的所有key
        redisTemplate.delete(keys);
    }
使用SpringCache实现redis缓存
1、开启缓存
在启动类加上@EnableCaching
2、添加缓存
在第三方用户查询数据时,把数据缓存到redis
    @GetMapping("/list")
    @ApiOperation("根据分类id获取套餐接口")
    @Cacheable(cacheNames = "setmealCache",key = "#categoryId") //key: setmealCache::100
    public Result getSetmeals(Long categoryId){
        List<SetmealVO> byCategoryId = setmealService.findByCategoryId(categoryId);
        return Result.success(byCategoryId);
    }
3、清除缓存
在后台增删改时清除缓存,避免数据不一致
     /**
     * 添加套餐
     */
    @PostMapping
    @ApiOperation("添加套餐接口")
    @CacheEvict(cacheNames = "setmealCache",key = "#setmealDTO.categoryId")
    public Result add(@RequestBody SetmealDTO setmealDTO){
        setmealService.add(setmealDTO);
        return Result.success();
    }

    /**
     * 修改套餐
     */
    @PutMapping
    @ApiOperation("修改套餐接口")
    @CacheEvict(cacheNames = "setmealCache",allEntries = true)
    public Result update(@RequestBody SetmealDTO setmealDTO){
        setmealService.updateWithDish(setmealDTO);
        return Result.success();
    }

    /**
     * 修改套餐状态
     */
    @PostMapping("/status/{status}")
    @ApiOperation("修改套餐状态接口")
    @CacheEvict(cacheNames = "setmealCache",allEntries = true)
    public Result denyById(@PathVariable Integer status,Long id){
        setmealService.denyById(status,id);
        return Result.success();
    }

    /**
     * 批量删除套餐
     */
    @DeleteMapping
    @ApiOperation("批量删除套餐")
    @CacheEvict(cacheNames = "setmealCache",allEntries = true)
    public Result deleteByIds(@RequestParam List<Integer> ids){
        setmealService.deleteByIds(ids);
        return Result.success();
    }
使用SpringTask实现定时任务
1、开启任务调度
//启动类上加该注解
@EnableScheduling//开启任务调度
2、创建task任务类
/**
 * 自定义定时任务,实现订单状态定时处理
 */
@Component
@Slf4j
public class OrderTask {

    @Autowired
    private OrderMapper orderMapper;

    /**
     * 处理支付超时订单
     */
    //每分钟
    @Scheduled(cron = "0 * * * * ?")
    public void processTimeoutOrder(){
        log.info("处理支付超时订单:{}", new Date());
        //当前时间-15分钟
        LocalDateTime time = LocalDateTime.now().plusMinutes(-15);
        //查询出15分钟前下单 未支付的订单
        List<Orders> ordersList = orderMapper.selectByStatusAndOrderTimeLT(Orders.PENDING_PAYMENT, time);
        //如果不为空 订单改为已取消状态
        if(ordersList != null && ordersList.size() > 0){
            for (Orders order : ordersList) {
                order.setStatus(Orders.CANCELLED);
                order.setCancelReason("支付超时,自动取消");
                order.setCancelTime(LocalDateTime.now());
                orderMapper.updateByOrderNumber(order);
            }
        }
    }

    /**
     * 处理“派送中”状态的订单
     */
    //每天凌晨1点钟
    @Scheduled(cron = "0 0 1 * * ?")
    public void processDeliveryOrder(){
        log.info("处理派送中订单:{}", new Date());
        //当前时间-1小时
        LocalDateTime time = LocalDateTime.now().plusMinutes(-60);
        //查询出一个小时前派送的订单
        List<Orders> ordersList = orderMapper.selectByStatusAndOrderTimeLT(Orders.DELIVERY_IN_PROGRESS, time);
        //如果不为空 订单改为已完成状态
        if(ordersList != null && ordersList.size() > 0){
            for (Orders order : ordersList) {
                order.setStatus(Orders.COMPLETED);
                orderMapper.updateByOrderNumber(order);
            }
        }
    }
}
使用WebSocket实现来单提醒,催单提醒
1、导入依赖
<dependency>
	<groupId>org.springframework.bootgroupId>
	<artifactId>spring-boot-starter-websocketartifactId>
dependency>
2、创建webSocket服务实现两端连接
/**
 * WebSocket服务
 */
@Component
@ServerEndpoint("/ws/{sid}")
public class WebSocketServer {

    //存放会话对象
    private static Map<String, Session> sessionMap = new HashMap();

    /**
     * 连接建立成功调用的方法
     */
    @OnOpen
    public void onOpen(Session session, @PathParam("sid") String sid) {
        System.out.println("客户端:" + sid + "建立连接");
        sessionMap.put(sid, session);
    }

    /**
     * 收到客户端消息后调用的方法
     * @param message 客户端发送过来的消息
     */
    @OnMessage
    public void onMessage(String message, @PathParam("sid") String sid) {
        System.out.println("收到来自客户端:" + sid + "的信息:" + message);
    }

    /**
     * 连接关闭调用的方法
     * @param sid
     */
    @OnClose
    public void onClose(@PathParam("sid") String sid) {
        System.out.println("连接断开:" + sid);
        sessionMap.remove(sid);
    }

    /**
     * 群发
     * @param message
     */
    public void sendToAllClient(String message) {
        Collection<Session> sessions = sessionMap.values();
        for (Session session : sessions) {
            try {
                //服务器向客户端发送消息
                session.getBasicRemote().sendText(message);
            } catch (Exception e) {
                e.printStackTrace();
            }
        }
    }

}
3、创建WebSocket任务类
@Component
public class WebSocketTask {
    @Autowired
    private WebSocketServer webSocketServer;

    /**
     * 通过WebSocket每隔5秒向客户端发送消息
     */
    @Scheduled(cron = "0/5 * * * * ?")
    public void sendMessageToClient() {
        webSocketServer.sendToAllClient("这是来自服务端的消息:" + DateTimeFormatter.ofPattern("HH:mm:ss").format(LocalDateTime.now()));
    }
}
4、在具体方法上使用WebSocket发送消息提醒
		Map map = new HashMap();
        map.put("type", 1);//消息类型,1表示来单提醒
        map.put("orderId", order.getId());
        map.put("content", "订单号:" + ordersPaymentDTO.getOrderNumber());

        //通过WebSocket实现来单提醒,向客户端浏览器推送消息
        webSocketServer.sendToAllClient(JSON.toJSONString(map));
使用POI实现office表格的读取和写入
1、导入依赖
 <dependency>
     <groupId>org.apache.poigroupId>
     <artifactId>poiartifactId>
     <version>${poi}version>
 dependency>
 <dependency>
     <groupId>org.apache.poigroupId>
     <artifactId>poi-ooxmlartifactId>
     <version>${poi}version>
 dependency>
2、具体实现
	/**
     * 导出运营数据 接口方法
     */
    @Override
    public void exportExcel(HttpServletResponse response) {
        //获取最近30天的运营数据
        LocalDate startTime = LocalDate.now().minusDays(30);
        LocalDate endTime = LocalDate.now().minusDays(1);
        //查询数据总览
        BusinessDataVO businessDataVO = workBenchService.findBusinessData(LocalDateTime.of(startTime, LocalTime.MIN), LocalDateTime.of(endTime, LocalTime.MAX));
        //通过POI将数据写入到Excel文件中
        InputStream in = this.getClass().getClassLoader().getResourceAsStream("template/运营数据报表模板.xlsx");

        try {
            //基于模板文件创建一个新的Excel文件
            XSSFWorkbook excel = new XSSFWorkbook(in);

            //获取表格文件的Sheet页
            XSSFSheet sheet = excel.getSheet("Sheet1");

            //填充数据--时间 第2行第2个单元格 填入"时间:" + startTime + "至" + endTime
            sheet.getRow(1).getCell(1).setCellValue("时间:" + startTime + "至" + endTime);

            //获得第4行
            XSSFRow row = sheet.getRow(3);
            //第4行第3个单元格填入营业额
            row.getCell(2).setCellValue(businessDataVO.getTurnover());
            //第4行第5个单元格填入订单完成率
            row.getCell(4).setCellValue(businessDataVO.getOrderCompletionRate());
            //第4行第7个单元格填入新增用户数
            row.getCell(6).setCellValue(businessDataVO.getNewUsers());

            //获得第5行
            row = sheet.getRow(4);
            //第5行第3个单元格填入有效订单数
            row.getCell(2).setCellValue(businessDataVO.getValidOrderCount());
            //第5行第5个单元格填入平均客单价
            row.getCell(4).setCellValue(businessDataVO.getUnitPrice());

            //填充明细数据
            for (int i = 0; i < 30; i++) {
                LocalDate date = startTime.plusDays(i);
                //查询某一天的营业数据
                BusinessDataVO businessData = workBenchService.findBusinessData(LocalDateTime.of(date, LocalTime.MIN), LocalDateTime.of(date, LocalTime.MAX));

                //获得某一行(从第8行开始,每次加1行)
                row = sheet.getRow(7 + i);
                //给该行的第2个单元格填入当天日期
                row.getCell(1).setCellValue(date.toString());
                //给该行的第3个单元格填入当天营业额
                row.getCell(2).setCellValue(businessData.getTurnover());
                //给该行的第4个单元格填入当天有效订单
                row.getCell(3).setCellValue(businessData.getValidOrderCount());
                //给该行的第5个单元格填入当天订单完成率
                row.getCell(4).setCellValue(businessData.getOrderCompletionRate());
                //给该行的第6个单元格填入当天平均客单价
                row.getCell(5).setCellValue(businessData.getUnitPrice());
                //给该行的第7个单元格填入当天新增用户
                row.getCell(6).setCellValue(businessData.getNewUsers());
            }

            //3. 通过输出流将Excel文件下载到客户端浏览器
            ServletOutputStream out = response.getOutputStream();
            excel.write(out);

            //关闭资源
            out.close();
            excel.close();
        } catch (IOException e) {
            e.printStackTrace();
        }
    }