项目一总结(下)
注意点
第七天
1.用redis缓存菜品数据,减少数据库查询操作
分析
每个分类下的菜品保存一份缓存数据
数据库中菜品数据有变更时清理缓存数据
代码实现
修改用户端接口 DishController 的 list 方法,加入缓存处理逻辑:
@Autowired
private RedisTemplate redisTemplate;
/**
* 根据分类id查询菜品
*
* @param categoryId
* @return
*/
@GetMapping("/list")
@ApiOperation("根据分类id查询菜品")
public Result> list(Long categoryId) {
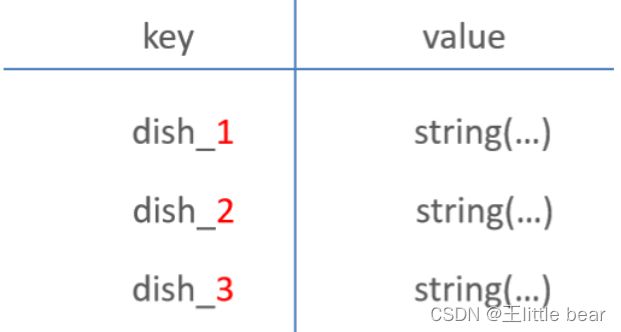
//构造redis中的key,规则:dish_分类id
String key = "dish_" + categoryId;
//查询redis中是否存在菜品数据
List list = (List) redisTemplate.opsForValue().get(key);
if(list != null && list.size() > 0){
//如果存在,直接返回,无须查询数据库
return Result.success(list);
}
Dish dish = new Dish();
dish.setCategoryId(categoryId);
dish.setStatus(StatusConstant.ENABLE);//查询起售中的菜品
//如果不存在,查询数据库,将查询到的数据放入redis中
list = dishService.listWithFlavor(dish);
redisTemplate.opsForValue().set(key, list);
return Result.success(list);
} 为了保证数据库和Redis中的数据保持一致,修改管理端接口 DishController 的相关方法,加入清理缓存逻辑。
抽取清理缓存的方法: 在管理端DishController中添加
	/**
     * 清理缓存数据
     * @param pattern
     */
    private void cleanCache(String pattern){
        Set keys = redisTemplate.keys(pattern);
        redisTemplate.delete(keys);
    }
新增菜品(在原有DishController的基础上增加下面代码)
        //清理缓存数据
        String key = "dish_" + dishDTO.getCategoryId();
        cleanCache(key);
修改菜品(在原有DishController的基础上增加下面代码)
        //将所有的菜品缓存数据清理掉,所有以dish_开头的key
        cleanCache("dish_*");
批量删除菜品(在原有DishController的基础上增加下面代码)
    //将所有的菜品缓存数据清理掉,所有以dish_开头的key
        cleanCache("dish_*");
起售、停售菜品(在原有DishController的基础上增加下面代码)
        //将所有的菜品缓存数据清理掉,所有以dish_开头的key
        cleanCache("dish_*");
2.Spring Cache
是一个框架,实现了基于注解的缓存功能,只需要简单地加一个注解,就能实现缓存功能。
2.1引入起步依赖,使用Redis作为缓存技术,只需要导入Spring data Redis的maven坐标即可。
	org.springframework.boot
	spring-boot-starter-cache
    2.7.3


      org.springframework.boot
      spring-boot-starter-data-redis
2.2常用注解
| @EnableCaching | 开启缓存注解功能,通常加在启动类上 |
| @Cacheable | 在方法执行前先查询缓存中是否有数据,如果有数据,则直接返回缓存数据;如果没有缓存数据,调用方法并将方法返回值放到缓存中 |
| @CachePut | 将方法的返回值放到缓存中 |
| @CacheEvict | 将一条或多条数据从缓存中删除 |
@CachePut 说明:
作用: 将方法返回值,放入缓存
value: 缓存的名称, 每个缓存名称下面可以有很多key
key: 缓存的key ----------> 支持Spring的表达式语言SPEL语法
在save方法上加注解@CachePut
/** * CachePut:将方法返回值放入缓存 * value:缓存的名称,每个缓存名称下面可以有多个key * key:缓存的key */ @PostMapping @CachePut(value = "userCache", key = "#user.id")//key的生成:userCache::1 public User save(@RequestBody User user){ userMapper.insert(user); return user; }说明:key的写法如下
#user.id : #user指的是方法形参的名称, id指的是user的id属性 , 也就是使用user的id属性作为key ;
#result.id : #result代表方法返回值,该表达式 代表以返回对象的id属性作为key ;
#p0.id:#p0指的是方法中的第一个参数,id指的是第一个参数的id属性,也就是使用第一个参数的id属性作为key ;
#a0.id:#a0指的是方法中的第一个参数,id指的是第一个参数的id属性,也就是使用第一个参数的id属性作为key ;
#root.args[0].id:#root.args[0]指的是方法中的第一个参数,id指的是第一个参数的id属性,也就是使用第一个参数
的id属性作为key ;
@Cacheable 说明:
作用: 在方法执行前,spring先查看缓存中是否有数据,如果有数据,则直接返回缓存数据;若没有数据,调用方法并将方法返回值放到缓存中
value: 缓存的名称,每个缓存名称下面可以有多个key
key: 缓存的key ----------> 支持Spring的表达式语言SPEL语法
在getById上加注解@Cacheable
/**
	* Cacheable:在方法执行前spring先查看缓存中是否有数据,如果有数据,则直接返回缓存数据;若没有数据,	  *调用方法并将方法返回值放到缓存中
	* value:缓存的名称,每个缓存名称下面可以有多个key
	* key:缓存的key
	*/
	@GetMapping
    @Cacheable(cacheNames = "userCache",key="#id")
    public User getById(Long id){
        User user = userMapper.getById(id);
        return user;
    }
@CacheEvict 说明:
作用: 清理指定缓存
value: 缓存的名称,每个缓存名称下面可以有多个key
key: 缓存的key ----------> 支持Spring的表达式语言SPEL语法
在 delete 方法上加注解@CacheEvict
	@DeleteMapping
    @CacheEvict(cacheNames = "userCache",key = "#id")//删除某个key对应的缓存数据
    public void deleteById(Long id){
        userMapper.deleteById(id);
    }

	@DeleteMapping("/delAll")
    @CacheEvict(cacheNames = "userCache",allEntries = true)//删除userCache下所有的缓存数据
    public void deleteAll(){
        userMapper.deleteAll();
    }
3.缓存套餐
实现步骤:
1). 导入Spring Cache和Redis相关maven坐标
      org.springframework.boot
      spring-boot-starter-data-redis


      org.springframework.boot
      spring-boot-starter-cache
2). 在启动类上加入@EnableCaching注解,开启缓存注解功能
@SpringBootApplication
@EnableTransactionManagement //开启注解方式的事务管理
@Slf4j
@EnableCaching
public class SkyApplication {
    public static void main(String[] args) {
        SpringApplication.run(SkyApplication.class, args);
        log.info("server started");
    }
}
3). 在用户端接口SetmealController的 list 方法上加入@Cacheable注解
/**
     * 条件查询
     *
     * @param categoryId
     * @return
     */
    @GetMapping("/list")
    @ApiOperation("根据分类id查询套餐")
    @Cacheable(cacheNames = "setmealCache",key = "#categoryId") //key: setmealCache::100
    public Result> list(Long categoryId) {
        Setmeal setmeal = new Setmeal();
        setmeal.setCategoryId(categoryId);
        setmeal.setStatus(StatusConstant.ENABLE);

        List list = setmealService.list(setmeal);
        return Result.success(list);
    }
4). 在管理端接口SetmealController的 save、delete、update、startOrStop等方法上加入CacheEvict注解
/**
     * 新增套餐
     *
     * @param setmealDTO
     * @return
     */
    @PostMapping
    @ApiOperation("新增套餐")
    @CacheEvict(cacheNames = "setmealCache",key = "#setmealDTO.categoryId")//key: setmealCache::100
    public Result save(@RequestBody SetmealDTO setmealDTO) {
        setmealService.saveWithDish(setmealDTO);
        return Result.success();
    }
	/**
     * 批量删除套餐
     *
     * @param ids
     * @return
     */
    @DeleteMapping
    @ApiOperation("批量删除套餐")
    @CacheEvict(cacheNames = "setmealCache",allEntries = true)
    public Result delete(@RequestParam List ids) {
        setmealService.deleteBatch(ids);
        return Result.success();
    }
	/**
     * 修改套餐
     *
     * @param setmealDTO
     * @return
     */
    @PutMapping
    @ApiOperation("修改套餐")
    @CacheEvict(cacheNames = "setmealCache",allEntries = true)
    public Result update(@RequestBody SetmealDTO setmealDTO) {
        setmealService.update(setmealDTO);
        return Result.success();
    }

    /**
     * 套餐起售停售
     *
     * @param status
     * @param id
     * @return
     */
    @PostMapping("/status/{status}")
    @ApiOperation("套餐起售停售")
    @CacheEvict(cacheNames = "setmealCache",allEntries = true)
    public Result startOrStop(@PathVariable Integer status, Long id) {
        setmealService.startOrStop(status, id);
        return Result.success();
    }
4.添加购物车
ShoppingCartDTO.java
@Data
public class ShoppingCartDTO implements Serializable {

    private Long dishId;
    private Long setmealId;
    private String dishFlavor;

}
ShoppingCartController
/**
 * 购物车
 */
@RestController
@RequestMapping("/user/shoppingCart")
@Slf4j
@Api(tags = "C端-购物车接口")
public class ShoppingCartController {

    @Autowired
    private ShoppingCartService shoppingCartService;

    /**
     * 添加购物车
     * @param shoppingCartDTO
     * @return
     */
    @PostMapping("/add")
    @ApiOperation("添加购物车")
    public Result add(@RequestBody ShoppingCartDTO shoppingCartDTO){
        log.info("添加购物车:{}", shoppingCartDTO);
        shoppingCartService.addShoppingCart(shoppingCartDTO);//后绪步骤实现
        return Result.success();
    }
}
ShoppingCartService接口
public interface ShoppingCartService {

    /**
     * 添加购物车
     * @param shoppingCartDTO
     */
    void addShoppingCart(ShoppingCartDTO shoppingCartDTO);
}
ShoppingCartServiceImpl实现类,并实现add方法
@Service
public class ShoppingCartServiceImpl implements ShoppingCartService {

    @Autowired
    private ShoppingCartMapper shoppingCartMapper;
    @Autowired
    private DishMapper dishMapper;
    @Autowired
    private SetmealMapper setmealMapper;
    /**
     * 添加购物车
     *
     * @param shoppingCartDTO
     */
    public void addShoppingCart(ShoppingCartDTO shoppingCartDTO) {
        ShoppingCart shoppingCart = new ShoppingCart();
        BeanUtils.copyProperties(shoppingCartDTO, shoppingCart);
        //只能查询自己的购物车数据
        shoppingCart.setUserId(BaseContext.getCurrentId());

        //判断当前商品是否在购物车中
        List shoppingCartList = shoppingCartMapper.list(shoppingCart);

        if (shoppingCartList != null && shoppingCartList.size() == 1) {
            //如果已经存在,就更新数量,数量加1
            shoppingCart = shoppingCartList.get(0);
            shoppingCart.setNumber(shoppingCart.getNumber() + 1);
            shoppingCartMapper.updateNumberById(shoppingCart);
        } else {
            //如果不存在,插入数据,数量就是1

            //判断当前添加到购物车的是菜品还是套餐
            Long dishId = shoppingCartDTO.getDishId();
            if (dishId != null) {
                //添加到购物车的是菜品
                Dish dish = dishMapper.getById(dishId);
                shoppingCart.setName(dish.getName());
                shoppingCart.setImage(dish.getImage());
                shoppingCart.setAmount(dish.getPrice());
            } else {
                //添加到购物车的是套餐
                Setmeal setmeal = setmealMapper.getById(shoppingCartDTO.getSetmealId());
                shoppingCart.setName(setmeal.getName());
                shoppingCart.setImage(setmeal.getImage());
                shoppingCart.setAmount(setmeal.getPrice());
            }
            shoppingCart.setNumber(1);
            shoppingCart.setCreateTime(LocalDateTime.now());
            shoppingCartMapper.insert(shoppingCart);
        }
    }
}
ShoppingCartMapper接口
@Mapper
public interface ShoppingCartMapper {
    /**
     * 条件查询
     *
     * @param shoppingCart
     * @return
     */
    List list(ShoppingCart shoppingCart);

    /**
     * 更新商品数量
     *
     * @param shoppingCart
     */
    @Update("update shopping_cart set number = #{number} where id = #{id}")
    void updateNumberById(ShoppingCart shoppingCart);

    /**
     * 插入购物车数据
     *
     * @param shoppingCart
     */
    @Insert("insert into shopping_cart (name, user_id, dish_id, setmeal_id, dish_flavor, number, amount, image, create_time) " +
            " values (#{name},#{userId},#{dishId},#{setmealId},#{dishFlavor},#{number},#{amount},#{image},#{createTime})")
    void insert(ShoppingCart shoppingCart);

}
ShoppingCartMapper.xml
查看购物车
controller层
	/**
     * 查看购物车
     * @return
     */
    @GetMapping("/list")
    @ApiOperation("查看购物车")
    public Result> list(){
        return Result.success(shoppingCartService.showShoppingCart());
    }
ShoppingCartService接口
	/**
     * 查看购物车
     * @return
     */
    List showShoppingCart();
ShoppingCartServiceImpl
	/**
     * 查看购物车
     * @return
     */
    public List showShoppingCart() {
        return shoppingCartMapper.list(ShoppingCart.builder().userId(BaseContext.getCurrentId()).build());
    }
清空购物车
controller层
	/**
     * 清空购物车商品
     * @return
     */
    @DeleteMapping("/clean")
    @ApiOperation("清空购物车商品")
    public Result clean(){
        shoppingCartService.cleanShoppingCart();
        return Result.success();
    }
ShoppingCartService接口
	/**
     * 清空购物车商品
     */
    void cleanShoppingCart();
ShoppingCartServiceImpl
	/**
     * 清空购物车商品
     */
    public void cleanShoppingCart() {
        shoppingCartMapper.deleteByUserId(BaseContext.getCurrentId());
    }
ShoppingCartMapper
	/**
     * 根据用户id删除购物车数据
     *
     * @param userId
     */
    @Delete("delete from shopping_cart where user_id = #{userId}")
    void deleteByUserId(Long userId);
第八天
1.地址簿功能
2.用户下单
OrdersSubmitDTO.java
@Data
public class OrdersSubmitDTO implements Serializable {
    //地址簿id
    private Long addressBookId;
    //付款方式
    private int payMethod;
    //备注
    private String remark;
    //预计送达时间
    @JsonFormat(shape = JsonFormat.Shape.STRING, pattern = "yyyy-MM-dd HH:mm:ss")
    private LocalDateTime estimatedDeliveryTime;
    //配送状态  1立即送出  0选择具体时间
    private Integer deliveryStatus;
    //餐具数量
    private Integer tablewareNumber;
    //餐具数量状态  1按餐量提供  0选择具体数量
    private Integer tablewareStatus;
    //打包费
    private Integer packAmount;
    //总金额
    private BigDecimal amount;
}
下单接口返回结果vo
@Data
@Builder
@NoArgsConstructor
@AllArgsConstructor
public class OrderSubmitVO implements Serializable {
    //订单id
    private Long id;
    //订单号
    private String orderNumber;
    //订单金额
    private BigDecimal orderAmount;
    //下单时间
    private LocalDateTime orderTime;
}
OrderController并提供用户下单方法
/**
 * 订单
 */
@RestController("userOrderController")
@RequestMapping("/user/order")
@Slf4j
@Api(tags = "C端-订单接口")
public class OrderController {

    @Autowired
    private OrderService orderService;

    /**
     * 用户下单
     *
     * @param ordersSubmitDTO
     * @return
     */
    @PostMapping("/submit")
    @ApiOperation("用户下单")
    public Result submit(@RequestBody OrdersSubmitDTO ordersSubmitDTO) {
        log.info("用户下单:{}", ordersSubmitDTO);
        OrderSubmitVO orderSubmitVO = orderService.submitOrder(ordersSubmitDTO);
        return Result.success(orderSubmitVO);
    }

}
OrderService接口,并声明用户下单方法
public interface OrderService {

    /**
     * 用户下单
     * @param ordersSubmitDTO
     * @return
     */
    OrderSubmitVO submitOrder(OrdersSubmitDTO ordersSubmitDTO);
}
OrderServiceImpl实现OrderService接口
/**
 * 订单
 */
@Service
@Slf4j
public class OrderServiceImpl implements OrderService {
    @Autowired
    private OrderMapper orderMapper;
    @Autowired
    private OrderDetailMapper orderDetailMapper;
    @Autowired
    private ShoppingCartMapper shoppingCartMapper;
    @Autowired
    private AddressBookMapper addressBookMapper;


    /**
     * 用户下单
     *
     * @param ordersSubmitDTO
     * @return
     */
    @Transactional
    public OrderSubmitVO submitOrder(OrdersSubmitDTO ordersSubmitDTO) {
        //异常情况的处理(收货地址为空、超出配送范围、购物车为空)
        AddressBook addressBook = addressBookMapper.getById(ordersSubmitDTO.getAddressBookId());
        if (addressBook == null) {
            throw new AddressBookBusinessException(MessageConstant.ADDRESS_BOOK_IS_NULL);
        }

        Long userId = BaseContext.getCurrentId();
        ShoppingCart shoppingCart = new ShoppingCart();
        shoppingCart.setUserId(userId);

        //查询当前用户的购物车数据
        List shoppingCartList = shoppingCartMapper.list(shoppingCart);
        if (shoppingCartList == null || shoppingCartList.size() == 0) {
            throw new ShoppingCartBusinessException(MessageConstant.SHOPPING_CART_IS_NULL);
        }

        //构造订单数据
        Orders order = new Orders();
        BeanUtils.copyProperties(ordersSubmitDTO,order);
        order.setPhone(addressBook.getPhone());
        order.setAddress(addressBook.getDetail());
        order.setConsignee(addressBook.getConsignee());
        order.setNumber(String.valueOf(System.currentTimeMillis()));
        order.setUserId(userId);
        order.setStatus(Orders.PENDING_PAYMENT);
        order.setPayStatus(Orders.UN_PAID);
        order.setOrderTime(LocalDateTime.now());

        //向订单表插入1条数据
        orderMapper.insert(order);

        //订单明细数据
        List orderDetailList = new ArrayList<>();
        for (ShoppingCart cart : shoppingCartList) {
            OrderDetail orderDetail = new OrderDetail();
            BeanUtils.copyProperties(cart, orderDetail);
            orderDetail.setOrderId(order.getId());
            orderDetailList.add(orderDetail);
        }

        //向明细表插入n条数据
        orderDetailMapper.insertBatch(orderDetailList);

        //清理购物车中的数据
        shoppingCartMapper.deleteByUserId(userId);

        //封装返回结果
        OrderSubmitVO orderSubmitVO = OrderSubmitVO.builder()
                .id(order.getId())
                .orderNumber(order.getNumber())
                .orderAmount(order.getAmount())
                .orderTime(order.getOrderTime())
                .build();

        return orderSubmitVO;
    }

}
OrderMapper接口和对应的xml映射文件
OrderMapper.java
@Mapper
public interface OrderMapper {
    /**
     * 插入订单数据
     * @param order
     */
    void insert(Orders order);
}
OrderMapper.xml
        insert into orders
        (number, status, user_id, address_book_id, order_time, checkout_time, pay_method, pay_status, amount, remark,
         phone, address, consignee, estimated_delivery_time, delivery_status, pack_amount, tableware_number,
         tableware_status)
        values (#{number}, #{status}, #{userId}, #{addressBookId}, #{orderTime}, #{checkoutTime}, #{payMethod},
                #{payStatus}, #{amount}, #{remark}, #{phone}, #{address}, #{consignee},
                #{estimatedDeliveryTime}, #{deliveryStatus}, #{packAmount}, #{tablewareNumber}, #{tablewareStatus})
OrderDetailMapper接口和对应的xml映射文件
OrderDetailMapper.java
@Mapper
public interface OrderDetailMapper {

    /**
     * 批量插入订单明细数据
     * @param orderDetails
     */
    void insertBatch(List orderDetails);

}
OrderDetailMapper.xml
        insert into order_detail
        (name, order_id, dish_id, setmeal_id, dish_flavor, number, amount, image)
        values

            (#{od.name},#{od.orderId},#{od.dishId},#{od.setmealId},#{od.dishFlavor},#{od.number},#{od.amount},#{od.image})
3.订单支付本项目选择小程序支付
参考:产品中心 - 微信支付商户平台
3.1如何保证数据安全?
第一个就是需要在商户系统当中调用微信后台的一个下单接口,就是生成预支付交易单。
第二个就是支付成功之后微信后台会给推送消息。
解决:微信提供的方式就是对数据进行加密、解密、签名多种方式。要完成数据加密解密,需要提前准备相应的一些文件,其实就是一些证书。
获取微信支付平台证书、商户私钥文件

3.2如何调用到商户系统?
微信后台会调用到商户系统给推送支付的结果,在这里我们就会遇到一个问题,就是微信后台怎么就能调用到我们这个商户系统呢?因为这个调用过程,其实本质上也是一个HTTP请求。
目前,商户系统它的ip地址就是当前自己电脑的ip地址,只是一个局域网内的ip地址,微信后台无法调用到。
解决:内网穿透。通过cpolar软件可以获得一个临时域名,而这个临时域名是一个公网ip,这样,微信后台就可以请求到商户系统了。
cpolar软件的使用:
1). 下载与安装
下载地址:cpolar - secure introspectable tunnels to localhost
在资料中已提供,可无需下载。
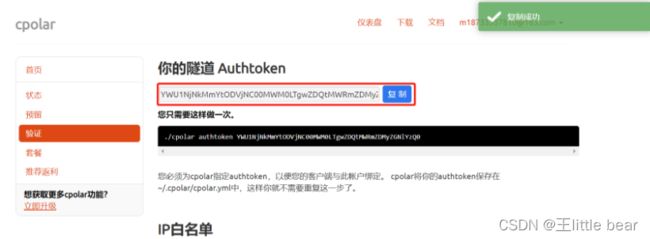
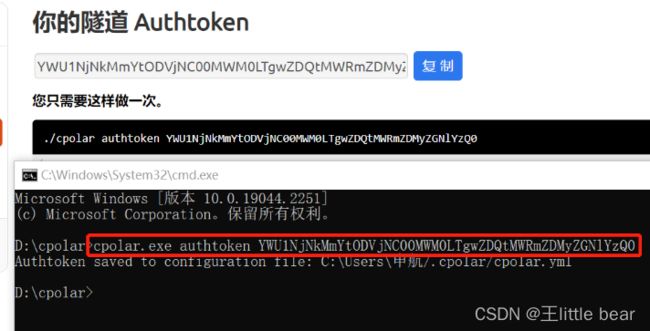
2). cpolar指定authtoken
复制authtoken:
执行命令:
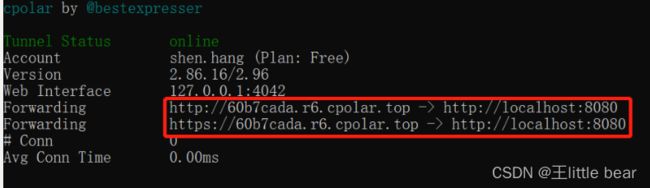
3). 获取临时域名
执行命令:
获取域名:
4). 验证临时域名有效性
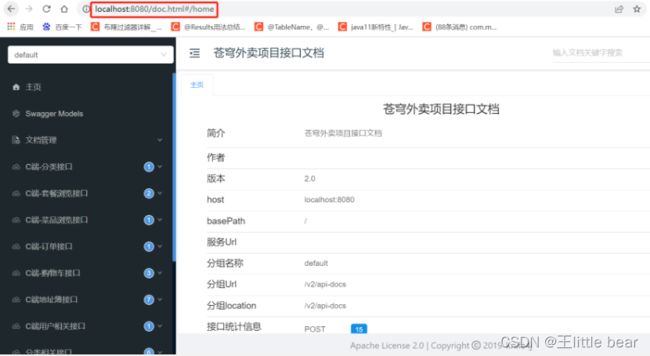
访问接口文档
使用localhost:8080访问
使用临时域名访问,证明临时域名生效。


4.微信支付
application-dev.yml
sky:
  wechat:
    appid: wxcd2e39f677fd30ba
    secret: 84fbfdf5ea288f0c432d829599083637
    mchid : 1561414331
    mchSerialNo: 4B3B3DC35414AD50B1B755BAF8DE9CC7CF407606
    privateKeyFilePath: D:\apiclient_key.pem
    apiV3Key: CZBK51236435wxpay435434323FFDuv3
    weChatPayCertFilePath: D:\wechatpay_166D96F876F45C7D07CE98952A96EC980368ACFC.pem
    notifyUrl: https://www.weixin.qq.com/wxpay/pay.php
    refundNotifyUrl: https://www.weixin.qq.com/wxpay/pay.php
application.yml
sky:
  wechat:
    appid: ${sky.wechat.appid}
    secret: ${sky.wechat.secret}
    mchid : ${sky.wechat.mchid}
    mchSerialNo: ${sky.wechat.mchSerialNo}
    privateKeyFilePath: ${sky.wechat.privateKeyFilePath}
    apiV3Key: ${sky.wechat.apiV3Key}
    weChatPayCertFilePath: ${sky.wechat.weChatPayCertFilePath}
    notifyUrl: ${sky.wechat.notifyUrl}
    refundNotifyUrl: ${sky.wechat.refundNotifyUrl}
WeChatProperties.java:读取配置(已定义)
@Component
@ConfigurationProperties(prefix = "sky.wechat")
@Data
public class WeChatProperties {

    private String appid; //小程序的appid
    private String secret; //小程序的秘钥
    private String mchid; //商户号
    private String mchSerialNo; //商户API证书的证书序列号
    private String privateKeyFilePath; //商户私钥文件
    private String apiV3Key; //证书解密的密钥
    private String weChatPayCertFilePath; //平台证书
    private String notifyUrl; //支付成功的回调地址
    private String refundNotifyUrl; //退款成功的回调地址
}
OrderMapper.java中添加getByNumberAndUserId和update两个方法
	/**
     * 根据订单号和用户id查询订单
     * @param orderNumber
     * @param userId
     */
    @Select("select * from orders where number = #{orderNumber} and user_id= #{userId}")
    Orders getByNumberAndUserId(String orderNumber, Long userId);

    /**
     * 修改订单信息
     * @param orders
     */
    void update(Orders orders);
OrderMapper.xml中添加
        update orders


                cancel_reason=#{cancelReason},


                rejection_reason=#{rejectionReason},


                cancel_time=#{cancelTime},


                pay_status=#{payStatus},


                pay_method=#{payMethod},


                checkout_time=#{checkoutTime},


                status = #{status},


                delivery_time = #{deliveryTime}


        where id = #{id}
OrderService.java中添加payment和paySuccess两个方法定义
	/**
     * 订单支付
     * @param ordersPaymentDTO
     * @return
     */
    OrderPaymentVO payment(OrdersPaymentDTO ordersPaymentDTO) throws Exception;

    /**
     * 支付成功,修改订单状态
     * @param outTradeNo
     */
    void paySuccess(String outTradeNo);
OrderServiceImpl.java中实现payment和paySuccess两个方法
@Autowired
    private UserMapper userMapper;
	@Autowired
    private WeChatPayUtil weChatPayUtil;
    /**
     * 订单支付
     *
     * @param ordersPaymentDTO
     * @return
     */
    public OrderPaymentVO payment(OrdersPaymentDTO ordersPaymentDTO) throws Exception {
        // 当前登录用户id
        Long userId = BaseContext.getCurrentId();
        User user = userMapper.getById(userId);

        //调用微信支付接口,生成预支付交易单
        JSONObject jsonObject = weChatPayUtil.pay(
                ordersPaymentDTO.getOrderNumber(), //商户订单号
                new BigDecimal(0.01), //支付金额,单位 元
                "苍穹外卖订单", //商品描述
                user.getOpenid() //微信用户的openid
        );

        if (jsonObject.getString("code") != null && jsonObject.getString("code").equals("ORDERPAID")) {
            throw new OrderBusinessException("该订单已支付");
        }

        OrderPaymentVO vo = jsonObject.toJavaObject(OrderPaymentVO.class);
        vo.setPackageStr(jsonObject.getString("package"));

        return vo;
    }

    /**
     * 支付成功,修改订单状态
     *
     * @param outTradeNo
     */
    public void paySuccess(String outTradeNo) {
        // 当前登录用户id
        Long userId = BaseContext.getCurrentId();

        // 根据订单号查询当前用户的订单
        Orders ordersDB = orderMapper.getByNumberAndUserId(outTradeNo, userId);

        // 根据订单id更新订单的状态、支付方式、支付状态、结账时间
        Orders orders = Orders.builder()
                .id(ordersDB.getId())
                .status(Orders.TO_BE_CONFIRMED)
                .payStatus(Orders.PAID)
                .checkoutTime(LocalDateTime.now())
                .build();

        orderMapper.update(orders);
    }
OrderController.java中添加payment方法
 	/**
     * 订单支付
     *
     * @param ordersPaymentDTO
     * @return
     */
    @PutMapping("/payment")
    @ApiOperation("订单支付")
    public Result payment(@RequestBody OrdersPaymentDTO ordersPaymentDTO) throws Exception {
        log.info("订单支付:{}", ordersPaymentDTO);
        OrderPaymentVO orderPaymentVO = orderService.payment(ordersPaymentDTO);
        log.info("生成预支付交易单:{}", orderPaymentVO);
        return Result.success(orderPaymentVO);
    }
PayNotifyController.java
/**
 * 支付回调相关接口
 */
@RestController
@RequestMapping("/notify")
@Slf4j
public class PayNotifyController {
    @Autowired
    private OrderService orderService;
    @Autowired
    private WeChatProperties weChatProperties;

    /**
     * 支付成功回调
     *
     * @param request
     */
    @RequestMapping("/paySuccess")
    public void paySuccessNotify(HttpServletRequest request, HttpServletResponse response) throws Exception {
        //读取数据
        String body = readData(request);
        log.info("支付成功回调:{}", body);

        //数据解密
        String plainText = decryptData(body);
        log.info("解密后的文本:{}", plainText);

        JSONObject jsonObject = JSON.parseObject(plainText);
        String outTradeNo = jsonObject.getString("out_trade_no");//商户平台订单号
        String transactionId = jsonObject.getString("transaction_id");//微信支付交易号

        log.info("商户平台订单号:{}", outTradeNo);
        log.info("微信支付交易号:{}", transactionId);

        //业务处理,修改订单状态、来单提醒
        orderService.paySuccess(outTradeNo);

        //给微信响应
        responseToWeixin(response);
    }

    /**
     * 读取数据
     *
     * @param request
     * @return
     * @throws Exception
     */
    private String readData(HttpServletRequest request) throws Exception {
        BufferedReader reader = request.getReader();
        StringBuilder result = new StringBuilder();
        String line = null;
        while ((line = reader.readLine()) != null) {
            if (result.length() > 0) {
                result.append("\n");
            }
            result.append(line);
        }
        return result.toString();
    }

    /**
     * 数据解密
     *
     * @param body
     * @return
     * @throws Exception
     */
    private String decryptData(String body) throws Exception {
        JSONObject resultObject = JSON.parseObject(body);
        JSONObject resource = resultObject.getJSONObject("resource");
        String ciphertext = resource.getString("ciphertext");
        String nonce = resource.getString("nonce");
        String associatedData = resource.getString("associated_data");

        AesUtil aesUtil = new AesUtil(weChatProperties.getApiV3Key().getBytes(StandardCharsets.UTF_8));
        //密文解密
        String plainText = aesUtil.decryptToString(associatedData.getBytes(StandardCharsets.UTF_8),
                nonce.getBytes(StandardCharsets.UTF_8),
                ciphertext);

        return plainText;
    }

    /**
     * 给微信响应
     * @param response
     */
    private void responseToWeixin(HttpServletResponse response) throws Exception{
        response.setStatus(200);
        HashMap map = new HashMap<>();
        map.put("code", "SUCCESS");
        map.put("message", "SUCCESS");
        response.setHeader("Content-type", ContentType.APPLICATION_JSON.toString());
        response.getOutputStream().write(JSONUtils.toJSONString(map).getBytes(StandardCharsets.UTF_8));
        response.flushBuffer();
    }
}
第九天
1.用户端历史订单模块
查询历史订单
查询订单详情
取消订单
再来一单
2.管理端历史订单模块
订单搜索
各个状态订单数量的统计
查询订单详情
接单
拒单
取消订单
派送订单
完成订单
校验收货地址是否超出配送范围
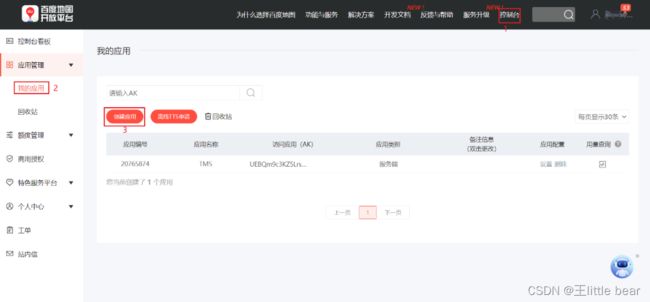
注册账号:注册百度账号
登录百度地图开放平台:百度地图开放平台 | 百度地图API SDK | 地图开发
进入控制台,创建应用,获取AK:
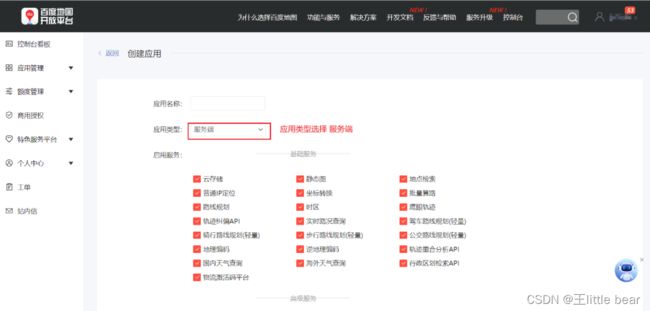
相关接口:
逆地理编码 gc | 百度地图API SDK
webapi | 百度地图API SDK
代码开发
application.yml
配置外卖商家店铺地址和百度地图的AK:

OrderServiceImpl,注入上面的配置项:
    @Value("${sky.shop.address}")
    private String shopAddress;

    @Value("${sky.baidu.ak}")
    private String ak;
OrderServiceImpl中提供校验方法
/**
* 检查客户的收货地址是否超出配送范围
* @param address
*/
private void checkOutOfRange(String address) {
Map map = new HashMap();
map.put("address",shopAddress);
map.put("output","json");
map.put("ak",ak);
//获取店铺的经纬度坐标
String shopCoordinate = HttpClientUtil.doGet("https://api.map.baidu.com/geocoding/v3", map);
JSONObject jsonObject = JSON.parseObject(shopCoordinate);
if(!jsonObject.getString("status").equals("0")){
throw new OrderBusinessException("店铺地址解析失败");
}
//数据解析
JSONObject location = jsonObject.getJSONObject("result").getJSONObject("location");
String lat = location.getString("lat");
String lng = location.getString("lng");
//店铺经纬度坐标
String shopLngLat = lat + "," + lng;
map.put("address",address);
//获取用户收货地址的经纬度坐标
String userCoordinate = HttpClientUtil.doGet("https://api.map.baidu.com/geocoding/v3", map);
jsonObject = JSON.parseObject(userCoordinate);
if(!jsonObject.getString("status").equals("0")){
throw new OrderBusinessException("收货地址解析失败");
}
//数据解析
location = jsonObject.getJSONObject("result").getJSONObject("location");
lat = location.getString("lat");
lng = location.getString("lng");
//用户收货地址经纬度坐标
String userLngLat = lat + "," + lng;
map.put("origin",shopLngLat);
map.put("destination",userLngLat);
map.put("steps_info","0");
//路线规划
String json = HttpClientUtil.doGet("https://api.map.baidu.com/directionlite/v1/driving", map);
jsonObject = JSON.parseObject(json);
if(!jsonObject.getString("status").equals("0")){
throw new OrderBusinessException("配送路线规划失败");
}
//数据解析
JSONObject result = jsonObject.getJSONObject("result");
JSONArray jsonArray = (JSONArray) result.get("routes");
Integer distance = (Integer) ((JSONObject) jsonArray.get(0)).get("distance");
if(distance > 5000){
//配送距离超过5000米
throw new OrderBusinessException("超出配送范围");
}
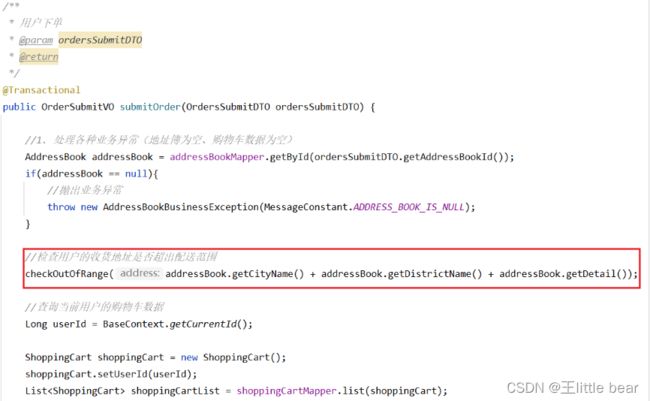
}OrderServiceImpl的submitOrder方法中调用上面的校验方法
第十天
1.Spring Task
Spring框架提供的任务调度工具,可以按照约定的时间自动执行某个代码逻辑。
定位:定时任务框架
作用:定时自动执行某段Java代码
应用场景:
1). 信用卡每月还款提醒
2). 银行贷款每月还款提醒
3). 火车票售票系统处理未支付订单
4). 入职纪念日为用户发送通知
强调:只要是需要定时处理的场景都可以使用Spring Task
cron表达式
其实就是一个字符串,通过cron表达式可以定义任务触发的时间
构成规则:分为6或7个域,由空格分隔开,每个域代表一个含义
每个域的含义分别为:秒、分钟、小时、日、月、周、年(可选)
举例:
2022年10月12日上午9点整 对应的cron表达式为:0 0 9 12 10 ? 2022

说明:一般日和周的值不同时设置,其中一个设置,另一个用?表示。
cron表达式在线生成器:在线Cron表达式生成器
通配符:
* 表示所有值;
? 表示未说明的值,即不关心它为何值;
- 表示一个指定的范围;
, 表示附加一个可能值;
/ 符号前表示开始时间,符号后表示每次递增的值;
cron表达式案例:
*/5 * * * * ? 每隔5秒执行一次
0 */1 * * * ? 每隔1分钟执行一次
0 0 5-15 * * ? 每天5-15点整点触发
0 0/3 * * * ? 每三分钟触发一次
0 0-5 14 * * ? 在每天下午2点到下午2:05期间的每1分钟触发
0 0/5 14 * * ? 在每天下午2点到下午2:55期间的每5分钟触发
0 0/5 14,18 * * ? 在每天下午2点到2:55期间和下午6点到6:55期间的每5分钟触发
0 0/30 9-17 * * ? 朝九晚五工作时间内每半小时
0 0 10,14,16 * * ? 每天上午10点,下午2点,4点
Spring Task使用步骤
1). 导入maven坐标 spring-context
2). 启动类添加注解 @EnableScheduling 开启任务调度
3). 自定义定时任务类
代码开发
编写定时任务类
/**
 * 自定义定时任务类
 */
@Component
@Slf4j
public class MyTask {

    /**
     * 定时任务 每隔5秒触发一次
     */
    @Scheduled(cron = "0/5 * * * * ?")
    public void executeTask(){
        log.info("定时任务开始执行:{}",new Date());
    }
}
开启任务调度 (启动类添加注解 @EnableScheduling )
@SpringBootApplication
@EnableTransactionManagement //开启注解方式的事务管理
@Slf4j
@EnableCaching
@EnableScheduling
public class SkyApplication {
    public static void main(String[] args) {
        SpringApplication.run(SkyApplication.class, args);
        log.info("server started");
    }
}
2.订单状态定时处理
代码开发
1). 自定义定时任务类OrderTask(待完善)
/**
 * 自定义定时任务,实现订单状态定时处理
 */
@Component
@Slf4j
public class OrderTask {

    @Autowired
    private OrderMapper orderMapper;

    /**
     * 处理支付超时订单
     */
    @Scheduled(cron = "0 * * * * ?")
    public void processTimeoutOrder(){
        log.info("处理支付超时订单:{}", new Date());
    }

    /**
     * 处理“派送中”状态的订单
     */
    @Scheduled(cron = "0 0 1 * * ?")
    public void processDeliveryOrder(){
        log.info("处理派送中订单:{}", new Date());
    }

}
2). 在OrderMapper接口中扩展方法
/** * 根据状态和下单时间查询订单 * @param status * @param orderTime */ @Select("select * from orders where status = #{status} and order_time < #{orderTime}") ListgetByStatusAndOrdertimeLT(Integer status, LocalDateTime orderTime); 3). 完善定时任务类的processTimeoutOrder方法
/** * 处理支付超时订单 */ @Scheduled(cron = "0 * * * * ?") public void processTimeoutOrder(){ log.info("处理支付超时订单:{}", new Date()); LocalDateTime time = LocalDateTime.now().plusMinutes(-15); // select * from orders where status = 1 and order_time < 当前时间-15分钟 ListordersList = orderMapper.getByStatusAndOrdertimeLT(Orders.PENDING_PAYMENT, time); if(ordersList != null && ordersList.size() > 0){ ordersList.forEach(order -> { order.setStatus(Orders.CANCELLED); order.setCancelReason("支付超时,自动取消"); order.setCancelTime(LocalDateTime.now()); orderMapper.update(order); }); } } 4). 完善定时任务类的processDeliveryOrder方法
/** * 处理“派送中”状态的订单 */ @Scheduled(cron = "0 0 1 * * ?") public void processDeliveryOrder(){ log.info("处理派送中订单:{}", new Date()); // select * from orders where status = 4 and order_time < 当前时间-1小时 LocalDateTime time = LocalDateTime.now().plusMinutes(-60); ListordersList = orderMapper.getByStatusAndOrdertimeLT(Orders.DELIVERY_IN_PROGRESS, time); if(ordersList != null && ordersList.size() > 0){ ordersList.forEach(order -> { order.setStatus(Orders.COMPLETED); orderMapper.update(order); }); } }
3.WebSocket
基于 TCP 的一种新的网络协议。它实现了浏览器与服务器全双工通信——浏览器和服务器只需要完成一次握手,两者之间就可以创建持久性的连接, 并进行双向数据传输。
HTTP协议和WebSocket协议对比:
-
HTTP是短连接
-
WebSocket是长连接
-
HTTP通信是单向的,基于请求响应模式
-
WebSocket支持双向通信
-
HTTP和WebSocket底层都是TCP连接
WebSocket缺点:
服务器长期维护长连接需要一定的成本 各个浏览器支持程度不一 WebSocket 是长连接,受网络限制比较大,需要处理好重连
结论:WebSocket并不能完全取代HTTP,它只适合在特定的场景下使用
1). 视频弹幕
2). 网页聊天
3). 体育实况更新
4). 股票基金报价实时更新
4.来单提醒
设计思路:
-
通过WebSocket实现管理端页面和服务端保持长连接状态
-
当客户支付后,调用WebSocket的相关API实现服务端向客户端推送消息
-
客户端浏览器解析服务端推送的消息,判断是来单提醒还是客户催单,进行相应的消息提示和语音播报
-
约定服务端发送给客户端浏览器的数据格式为JSON,字段包括:type,orderId,content
-
type 为消息类型,1为来单提醒 2为客户催单
-
orderId 为订单id
-
content 为消息内容
-
代码开发
OrderServiceImpl中注入WebSocketServer对象,修改paySuccess方法
	@Autowired
    private WebSocketServer webSocketServer;
	/**
     * 支付成功,修改订单状态
     *
     * @param outTradeNo
     */
    public void paySuccess(String outTradeNo) {
        // 当前登录用户id
        Long userId = BaseContext.getCurrentId();

        // 根据订单号查询当前用户的订单
        Orders ordersDB = orderMapper.getByNumberAndUserId(outTradeNo, userId);

        // 根据订单id更新订单的状态、支付方式、支付状态、结账时间
        Orders orders = Orders.builder()
                .id(ordersDB.getId())
                .status(Orders.TO_BE_CONFIRMED)
                .payStatus(Orders.PAID)
                .checkoutTime(LocalDateTime.now())
                .build();

        orderMapper.update(orders);
		//
        Map map = new HashMap();
        map.put("type", 1);//消息类型,1表示来单提醒
        map.put("orderId", orders.getId());
        map.put("content", "订单号:" + outTradeNo);

        //通过WebSocket实现来单提醒,向客户端浏览器推送消息
        webSocketServer.sendToAllClient(JSON.toJSONString(map));
        ///
    }
5.客户催单
设计思路:
-
通过WebSocket实现管理端页面和服务端保持长连接状态
-
当用户点击催单按钮后,调用WebSocket的相关API实现服务端向客户端推送消息
-
客户端浏览器解析服务端推送的消息,判断是来单提醒还是客户催单,进行相应的消息提示和语音播报 约定服务端发送给客户端浏览器的数据格式为JSON,字段包括:type,orderId,content
-
type 为消息类型,1为来单提醒 2为客户催单
-
orderId 为订单id
-
content 为消息内容
-
代码开发
用户催单的接口定义,在user/OrderController中创建催单方法
	/**
     * 用户催单
     *
     * @param id
     * @return
     */
    @GetMapping("/reminder/{id}")
    @ApiOperation("用户催单")
    public Result reminder(@PathVariable("id") Long id) {
        orderService.reminder(id);
        return Result.success();
    }
OrderService接口中声明reminder方法
	/**
     * 用户催单
     * @param id
     */
    void reminder(Long id);
OrderServiceImpl中实现reminder方法
	/**
     * 用户催单
     *
     * @param id
     */
    public void reminder(Long id) {
        // 查询订单是否存在
        Orders orders = orderMapper.getById(id);
        if (orders == null) {
            throw new OrderBusinessException(MessageConstant.ORDER_NOT_FOUND);
        }

        //基于WebSocket实现催单
        Map map = new HashMap();
        map.put("type", 2);//2代表用户催单
        map.put("orderId", id);
        map.put("content", "订单号:" + orders.getNumber());
        webSocketServer.sendToAllClient(JSON.toJSONString(map));
    }
OrderMapper中添加getById
	/**
     * 根据id查询订单
     * @param id
     */
    @Select("select * from orders where id=#{id}")
    Orders getById(Long id);
第十一天
1.Apache ECharts
一款基于 Javascript 的数据可视化图表库,提供直观,生动,可交互,可个性化定制的数据可视化图表。 官网地址:Apache ECharts
1). 柱形图
2). 饼形图
3). 折线图
Apache Echarts官方提供的快速入门:快速上手 - Handbook - Apache ECharts
2.营业额统计
业务规则:
营业额指订单状态为已完成的订单金额合计
基于可视化报表的折线图展示营业额数据,X轴为日期,Y轴为营业额
根据时间选择区间,展示每天的营业额数据
TurnoverReportVO.java
@Data
@Builder
@NoArgsConstructor
@AllArgsConstructor
public class TurnoverReportVO implements Serializable {

    //日期,以逗号分隔,例如:2022-10-01,2022-10-02,2022-10-03
    private String dateList;

    //营业额,以逗号分隔,例如:406.0,1520.0,75.0
    private String turnoverList;

}
ReportController
/**
 * 报表
 */
@RestController
@RequestMapping("/admin/report")
@Slf4j
@Api(tags = "统计报表相关接口")
public class ReportController {

    @Autowired
    private ReportService reportService;

    /**
     * 营业额数据统计
     *
     * @param begin
     * @param end
     * @return
     */
    @GetMapping("/turnoverStatistics")
    @ApiOperation("营业额数据统计")
    public Result turnoverStatistics(
            @DateTimeFormat(pattern = "yyyy-MM-dd")
                    LocalDate begin,
            @DateTimeFormat(pattern = "yyyy-MM-dd")
                    LocalDate end) {
        return Result.success(reportService.getTurnover(begin, end));
    }

}
ReportService接口,声明getTurnover方法
public interface ReportService {

    /**
     * 根据时间区间统计营业额
     * @param beginTime
     * @param endTime
     * @return
     */
    TurnoverReportVO getTurnover(LocalDate beginTime, LocalDate endTime);
}
ReportServiceImpl实现类,实现getTurnover方法
@Service
@Slf4j
public class ReportServiceImpl implements ReportService {

    @Autowired
    private OrderMapper orderMapper;

    /**
     * 根据时间区间统计营业额
     * @param begin
     * @param end
     * @return
     */
    public TurnoverReportVO getTurnover(LocalDate begin, LocalDate end) {
        List dateList = new ArrayList<>();
        dateList.add(begin);

        while (!begin.equals(end)){
            begin = begin.plusDays(1);//日期计算,获得指定日期后1天的日期
            dateList.add(begin);
        }

       List turnoverList = new ArrayList<>();
        for (LocalDate date : dateList) {
            LocalDateTime beginTime = LocalDateTime.of(date, LocalTime.MIN);
            LocalDateTime endTime = LocalDateTime.of(date, LocalTime.MAX);
            Map map = new HashMap();
        	map.put("status", Orders.COMPLETED);
        	map.put("begin",beginTime);
        	map.put("end", endTime);
            Double turnover = orderMapper.sumByMap(map);
            turnover = turnover == null ? 0.0 : turnover;
            turnoverList.add(turnover);
        }

        //数据封装
        return TurnoverReportVO.builder()
                .dateList(StringUtils.join(dateList,","))
                .turnoverList(StringUtils.join(turnoverList,","))
                .build();
    }
}
OrderMapper接口声明sumByMap方法
	/**
     * 根据动态条件统计营业额
     * @param map
     */
    Double sumByMap(Map map);
OrderMapper.xml文件中编写动态SQL
3.用户统计
业务规则:
-
基于可视化报表的折线图展示用户数据,X轴为日期,Y轴为用户数
-
根据时间选择区间,展示每天的用户总量和新增用户量数据
UserReportVO.java
@Data
@Builder
@NoArgsConstructor
@AllArgsConstructor
public class UserReportVO implements Serializable {

    //日期,以逗号分隔,例如:2022-10-01,2022-10-02,2022-10-03
    private String dateList;

    //用户总量,以逗号分隔,例如:200,210,220
    private String totalUserList;

    //新增用户,以逗号分隔,例如:20,21,10
    private String newUserList;

}
ReportController中创建userStatistics方法
/**
     * 用户数据统计
     * @param begin
     * @param end
     * @return
     */
    @GetMapping("/userStatistics")
    @ApiOperation("用户数据统计")
    public Result userStatistics(
            @DateTimeFormat(pattern = "yyyy-MM-dd") LocalDate begin,
            @DateTimeFormat(pattern = "yyyy-MM-dd") LocalDate end){

        return Result.success(reportService.getUserStatistics(begin,end));
}
ReportService接口中声明getUserStatistics方法
    /**
     * 根据时间区间统计用户数量
     * @param begin
     * @param end
     * @return      */
    UserReportVO getUserStatistics(LocalDate begin, LocalDate end);
ReportServiceImpl实现类中实现getUserStatistics方法
	@Override
    public UserReportVO getUserStatistics(LocalDate begin, LocalDate end) {
        List dateList = new ArrayList<>();
        dateList.add(begin);

        while (!begin.equals(end)){
            begin = begin.plusDays(1);
            dateList.add(begin);
        }
        List newUserList = new ArrayList<>(); //新增用户数
        List totalUserList = new ArrayList<>(); //总用户数

        for (LocalDate date : dateList) {
            LocalDateTime beginTime = LocalDateTime.of(date, LocalTime.MIN);
            LocalDateTime endTime = LocalDateTime.of(date, LocalTime.MAX);
            //新增用户数量 select count(id) from user where create_time > ? and create_time < ?
            Integer newUser = getUserCount(beginTime, endTime);
            //总用户数量 select count(id) from user where  create_time < ?
            Integer totalUser = getUserCount(null, endTime);

            newUserList.add(newUser);
            totalUserList.add(totalUser);
        }

        return UserReportVO.builder()
                .dateList(StringUtils.join(dateList,","))
                .newUserList(StringUtils.join(newUserList,","))
                .totalUserList(StringUtils.join(totalUserList,","))
                .build();
    }
ReportServiceImpl实现类中创建私有方法getUserCount
	/**
     * 根据时间区间统计用户数量
     * @param beginTime
     * @param endTime
     * @return
     */
    public Integer getUserCount(LocalDateTime beginTime, LocalDateTime endTime) {
        Map map = new HashMap();
        map.put("begin",beginTime);
        map.put("end", endTime);
        return userMapper.countByMap(map);
    }
UserMapper接口中声明countByMap方法
	/**
     * 根据动态条件统计用户数量
     * @param map
     * @return
     */
    Integer countByMap(Map map);
UserMapper.xml文件中编写动态SQL
4.订单统计
业务规则:
-
有效订单指状态为 “已完成” 的订单
-
基于可视化报表的折线图展示订单数据,X轴为日期,Y轴为订单数量
-
根据时间选择区间,展示每天的订单总数和有效订单数
-
展示所选时间区间内的有效订单数、总订单数、订单完成率,订单完成率 = 有效订单数 / 总订单数 * 100%
OrderReportVO.java
@Data
@Builder
@NoArgsConstructor
@AllArgsConstructor
public class OrderReportVO implements Serializable {

    //日期,以逗号分隔,例如:2022-10-01,2022-10-02,2022-10-03
    private String dateList;

    //每日订单数,以逗号分隔,例如:260,210,215
    private String orderCountList;

    //每日有效订单数,以逗号分隔,例如:20,21,10
    private String validOrderCountList;

    //订单总数
    private Integer totalOrderCount;

    //有效订单数
    private Integer validOrderCount;

    //订单完成率
    private Double orderCompletionRate;

}
ReportController中根据订单统计接口创建orderStatistics方法
/**
     * 订单数据统计
     * @param begin
     * @param end
     * @return
     */
    @GetMapping("/ordersStatistics")
    @ApiOperation("用户数据统计")
    public Result orderStatistics(
            @DateTimeFormat(pattern = "yyyy-MM-dd")
                    LocalDate begin,
            @DateTimeFormat(pattern = "yyyy-MM-dd")
                    LocalDate end){

        return Result.success(reportService.getOrderStatistics(begin,end));
    }
ReportService接口中声明getOrderStatistics方法
/**
* 根据时间区间统计订单数量
* @param begin
* @param end
* @return
*/
OrderReportVO getOrderStatistics(LocalDate begin, LocalDate end);
ReportServiceImpl实现类中实现getOrderStatistics方法
/**
* 根据时间区间统计订单数量
* @param begin
* @param end
* @return
*/
public OrderReportVO getOrderStatistics(LocalDate begin, LocalDate end){
	List dateList = new ArrayList<>();
    dateList.add(begin);

    while (!begin.equals(end)){
          begin = begin.plusDays(1);
          dateList.add(begin);
     }
    //每天订单总数集合
     List orderCountList = new ArrayList<>();
    //每天有效订单数集合
    List validOrderCountList = new ArrayList<>();
    for (LocalDate date : dateList) {
         LocalDateTime beginTime = LocalDateTime.of(date, LocalTime.MIN);
         LocalDateTime endTime = LocalDateTime.of(date, LocalTime.MAX);
   //查询每天的总订单数 select count(id) from orders where order_time > ? and order_time < ?
         Integer orderCount = reportService.getOrderCount(beginTime, endTime, null);

  //查询每天的有效订单数 select count(id) from orders where order_time > ? and order_time < ? and status = ?
         Integer validOrderCount = reportService.getOrderCount(beginTime, endTime, Orders.COMPLETED);

         orderCountList.add(orderCount);
         validOrderCountList.add(validOrderCount);
        }

    //时间区间内的总订单数
    Integer totalOrderCount = orderCountList.stream().reduce(Integer::sum).get();
    //时间区间内的总有效订单数
    Integer validOrderCount = validOrderCountList.stream().reduce(Integer::sum).get();
    //订单完成率
    Double orderCompletionRate = 0.0;
    if(totalOrderCount != 0){
         orderCompletionRate = validOrderCount.doubleValue() / totalOrderCount;
     }
    return OrderReportVO.builder()
                .dateList(StringUtils.join(dateList, ","))
                .orderCountList(StringUtils.join(orderCountList, ","))
                .validOrderCountList(StringUtils.join(validOrderCountList, ","))
                .totalOrderCount(totalOrderCount)
                .validOrderCount(validOrderCount)
                .orderCompletionRate(orderCompletionRate)
                .build();

}
ReportServiceImpl实现类中提供私有方法getOrderCount
/**
* 根据时间区间统计指定状态的订单数量
* @param beginTime
* @param endTime
* @param status
* @return
*/
private Integer getOrderCount(LocalDateTime beginTime, LocalDateTime endTime, Integer status) {
	Map map = new HashMap();
	map.put("status", status);
	map.put("begin",beginTime);
	map.put("end", endTime);
	return orderMapper.countByMap(map);
}
OrderMapper接口中声明countByMap方法
/**
*根据动态条件统计订单数量
* @param map
*/
Integer countByMap(Map map);
OrderMapper.xml文件中编写动态SQL
5.销量排名Top10
业务规则:
-
根据时间选择区间,展示销量前10的商品(包括菜品和套餐)
-
基于可视化报表的柱状图降序展示商品销量
-
此处的销量为商品销售的份数
SalesTop10ReportVO.java
@Data
@Builder
@NoArgsConstructor
@AllArgsConstructor
public class SalesTop10ReportVO implements Serializable {

    //商品名称列表,以逗号分隔,例如:鱼香肉丝,宫保鸡丁,水煮鱼
    private String nameList;

    //销量列表,以逗号分隔,例如:260,215,200
    private String numberList;

}
ReportController中根据销量排名接口创建top10方法
/**
* 销量排名统计
* @param begin
* @param end
* @return
*/
@GetMapping("/top10")
@ApiOperation("销量排名统计")
public Result top10(
    @DateTimeFormat(pattern = "yyyy-MM-dd") LocalDate begin,
    @DateTimeFormat(pattern = "yyyy-MM-dd") LocalDate end){
	return Result.success(reportService.getSalesTop10(begin,end));
}
ReportService接口中声明getSalesTop10方法
/**
* 查询指定时间区间内的销量排名top10
* @param begin
* @param end
* @return
*/
SalesTop10ReportVO getSalesTop10(LocalDate begin, LocalDate end);
ReportServiceImpl实现类中实现getSalesTop10方法
/**
     * 查询指定时间区间内的销量排名top10
     * @param begin
     * @param end
     * @return
     * */
    public SalesTop10ReportVO getSalesTop10(LocalDate begin, LocalDate end){
        LocalDateTime beginTime = LocalDateTime.of(begin, LocalTime.MIN);
        LocalDateTime endTime = LocalDateTime.of(end, LocalTime.MAX);
        List goodsSalesDTOList = orderMapper.getSalesTop10(beginTime, endTime);

        String nameList = StringUtils.join(goodsSalesDTOList.stream().map(GoodsSalesDTO::getName).collect(Collectors.toList()),",");
        String numberList = StringUtils.join(goodsSalesDTOList.stream().map(GoodsSalesDTO::getNumber).collect(Collectors.toList()),",");

        return SalesTop10ReportVO.builder()
                .nameList(nameList)
                .numberList(numberList)
                .build();
    }
OrderMapper接口中声明getSalesTop10方法
/**
* 查询商品销量排名
* @param begin
* @param end
*/
List getSalesTop10(LocalDateTime begin, LocalDateTime end);
OrderMapper.xml文件中编写动态SQL
第十二天
1.工作台
工作台展示的数据:
-
今日数据
-
订单管理
-
菜品总览
-
套餐总览
-
订单信息
今日数据接口
订单管理接口
菜品总览接口
套餐总览接口
订单搜索(已完成)
各个状态的订单数量统计(已完成)
添加WorkSpaceController.java
/** * 工作台 */ @RestController @RequestMapping("/admin/workspace") @Slf4j @Api(tags = "工作台相关接口") public class WorkSpaceController { @Autowired private WorkspaceService workspaceService; /** * 工作台今日数据查询 * @return */ @GetMapping("/businessData") @ApiOperation("工作台今日数据查询") public ResultbusinessData(){ //获得当天的开始时间 LocalDateTime begin = LocalDateTime.now().with(LocalTime.MIN); //获得当天的结束时间 LocalDateTime end = LocalDateTime.now().with(LocalTime.MAX); BusinessDataVO businessDataVO = workspaceService.getBusinessData(begin, end); return Result.success(businessDataVO); } /** * 查询订单管理数据 * @return */ @GetMapping("/overviewOrders") @ApiOperation("查询订单管理数据") public Result orderOverView(){ return Result.success(workspaceService.getOrderOverView()); } /** * 查询菜品总览 * @return */ @GetMapping("/overviewDishes") @ApiOperation("查询菜品总览") public Result dishOverView(){ return Result.success(workspaceService.getDishOverView()); } /** * 查询套餐总览 * @return */ @GetMapping("/overviewSetmeals") @ApiOperation("查询套餐总览") public Result setmealOverView(){ return Result.success(workspaceService.getSetmealOverView()); } } WorkspaceService.java
public interface WorkspaceService {

    /**
     * 根据时间段统计营业数据
     * @param begin
     * @param end
     * @return
     */
    BusinessDataVO getBusinessData(LocalDateTime begin, LocalDateTime end);

    /**
     * 查询订单管理数据
     * @return
     */
    OrderOverViewVO getOrderOverView();

    /**
     * 查询菜品总览
     * @return
     */
    DishOverViewVO getDishOverView();

    /**
     * 查询套餐总览
     * @return
     */
    SetmealOverViewVO getSetmealOverView();

}
WorkspaceServiceImpl.java
@Service
@Slf4j
public class WorkspaceServiceImpl implements WorkspaceService {

    @Autowired
    private OrderMapper orderMapper;
    @Autowired
    private UserMapper userMapper;
    @Autowired
    private DishMapper dishMapper;
    @Autowired
    private SetmealMapper setmealMapper;

    /**
     * 根据时间段统计营业数据
     * @param begin
     * @param end
     * @return
     */
    public BusinessDataVO getBusinessData(LocalDateTime begin, LocalDateTime end) {
        /**
         * 营业额:当日已完成订单的总金额
         * 有效订单:当日已完成订单的数量
         * 订单完成率:有效订单数 / 总订单数
         * 平均客单价:营业额 / 有效订单数
         * 新增用户:当日新增用户的数量
         */

        Map map = new HashMap();
        map.put("begin",begin);
        map.put("end",end);

        //查询总订单数
        Integer totalOrderCount = orderMapper.countByMap(map);

        map.put("status", Orders.COMPLETED);
        //营业额
        Double turnover = orderMapper.sumByMap(map);
        turnover = turnover == null? 0.0 : turnover;

        //有效订单数
        Integer validOrderCount = orderMapper.countByMap(map);

        Double unitPrice = 0.0;

        Double orderCompletionRate = 0.0;
        if(totalOrderCount != 0 && validOrderCount != 0){
            //订单完成率
            orderCompletionRate = validOrderCount.doubleValue() / totalOrderCount;
            //平均客单价
            unitPrice = turnover / validOrderCount;
        }

        //新增用户数
        Integer newUsers = userMapper.countByMap(map);

        return BusinessDataVO.builder()
                .turnover(turnover)
                .validOrderCount(validOrderCount)
                .orderCompletionRate(orderCompletionRate)
                .unitPrice(unitPrice)
                .newUsers(newUsers)
                .build();
    }


    /**
     * 查询订单管理数据
     *
     * @return
     */
    public OrderOverViewVO getOrderOverView() {
        Map map = new HashMap();
        map.put("begin", LocalDateTime.now().with(LocalTime.MIN));
        map.put("status", Orders.TO_BE_CONFIRMED);

        //待接单
        Integer waitingOrders = orderMapper.countByMap(map);

        //待派送
        map.put("status", Orders.CONFIRMED);
        Integer deliveredOrders = orderMapper.countByMap(map);

        //已完成
        map.put("status", Orders.COMPLETED);
        Integer completedOrders = orderMapper.countByMap(map);

        //已取消
        map.put("status", Orders.CANCELLED);
        Integer cancelledOrders = orderMapper.countByMap(map);

        //全部订单
        map.put("status", null);
        Integer allOrders = orderMapper.countByMap(map);

        return OrderOverViewVO.builder()
                .waitingOrders(waitingOrders)
                .deliveredOrders(deliveredOrders)
                .completedOrders(completedOrders)
                .cancelledOrders(cancelledOrders)
                .allOrders(allOrders)
                .build();
    }

    /**
     * 查询菜品总览
     *
     * @return
     */
    public DishOverViewVO getDishOverView() {
        Map map = new HashMap();
        map.put("status", StatusConstant.ENABLE);
        Integer sold = dishMapper.countByMap(map);

        map.put("status", StatusConstant.DISABLE);
        Integer discontinued = dishMapper.countByMap(map);

        return DishOverViewVO.builder()
                .sold(sold)
                .discontinued(discontinued)
                .build();
    }

    /**
     * 查询套餐总览
     *
     * @return
     */
    public SetmealOverViewVO getSetmealOverView() {
        Map map = new HashMap();
        map.put("status", StatusConstant.ENABLE);
        Integer sold = setmealMapper.countByMap(map);

        map.put("status", StatusConstant.DISABLE);
        Integer discontinued = setmealMapper.countByMap(map);

        return SetmealOverViewVO.builder()
                .sold(sold)
                .discontinued(discontinued)
                .build();
    }
}
SetmealMapper中添加countByMap方法定义
	/**
     * 根据条件统计套餐数量
     * @param map
     * @return
     */
    Integer countByMap(Map map);
SetmealMapper.xml中添加对应SQL实现
DishMapper中添加countByMap方法
	/**
     * 根据条件统计菜品数量
     * @param map
     * @return
     */
    Integer countByMap(Map map);
DishMapper.xml中添加对应SQL实现
2.Apache POI
一个处理Miscrosoft Office各种文件格式的开源项目。简单来说就是,我们可以使用 POI 在 Java 程序中对Miscrosoft Office各种文件进行读写操作。 一般情况下,POI 都是用于操作 Excel 文件。
应用场景:
- 银行网银系统导出交易明细
- 各种业务系统导出Excel报表
- 批量导入业务数据
2.1Apache POI的maven坐标
    org.apache.poi
    poi
    3.16


    org.apache.poi
    poi-ooxml
    3.16
2.2将数据写入Excel文件
案例
public class POITest {

    /**
     * 基于POI向Excel文件写入数据
     * @throws Exception
     */
    public static void write() throws Exception{
        //在内存中创建一个Excel文件对象
        XSSFWorkbook excel = new XSSFWorkbook();
        //创建Sheet页
        XSSFSheet sheet = excel.createSheet("itcast");

        //在Sheet页中创建行,0表示第1行
        XSSFRow row1 = sheet.createRow(0);
        //创建单元格并在单元格中设置值,单元格编号也是从0开始,1表示第2个单元格
        row1.createCell(1).setCellValue("姓名");
        row1.createCell(2).setCellValue("城市");

        XSSFRow row2 = sheet.createRow(1);
        row2.createCell(1).setCellValue("张三");
        row2.createCell(2).setCellValue("北京");

        XSSFRow row3 = sheet.createRow(2);
        row3.createCell(1).setCellValue("李四");
        row3.createCell(2).setCellValue("上海");

        FileOutputStream out = new FileOutputStream(new File("D:\\itcast.xlsx"));
        //通过输出流将内存中的Excel文件写入到磁盘上
        excel.write(out);

        //关闭资源
        out.flush();
        out.close();
        excel.close();
    }
    public static void main(String[] args) throws Exception {
        write();
    }
}
在D盘中生成itcast.xlsx文件,创建名称为itcast的Sheet页,同时将内容成功写入。

2.3读取Excel文件中的数据
案例
public class POITest {
    /**
     * 基于POI读取Excel文件
     * @throws Exception
     */
    public static void read() throws Exception{
        FileInputStream in = new FileInputStream(new File("D:\\itcast.xlsx"));
        //通过输入流读取指定的Excel文件
        XSSFWorkbook excel = new XSSFWorkbook(in);
        //获取Excel文件的第1个Sheet页
        XSSFSheet sheet = excel.getSheetAt(0);

        //获取Sheet页中的最后一行的行号
        int lastRowNum = sheet.getLastRowNum();

        for (int i = 0; i <= lastRowNum; i++) {
            //获取Sheet页中的行
            XSSFRow titleRow = sheet.getRow(i);
            //获取行的第2个单元格
            XSSFCell cell1 = titleRow.getCell(1);
            //获取单元格中的文本内容
            String cellValue1 = cell1.getStringCellValue();
            //获取行的第3个单元格
            XSSFCell cell2 = titleRow.getCell(2);
            //获取单元格中的文本内容
            String cellValue2 = cell2.getStringCellValue();

            System.out.println(cellValue1 + " " +cellValue2);
        }

        //关闭资源
        in.close();
        excel.close();
    }

    public static void main(String[] args) throws Exception {
        read();
    }
}
将itcast.xlsx文件中的数据进行读取
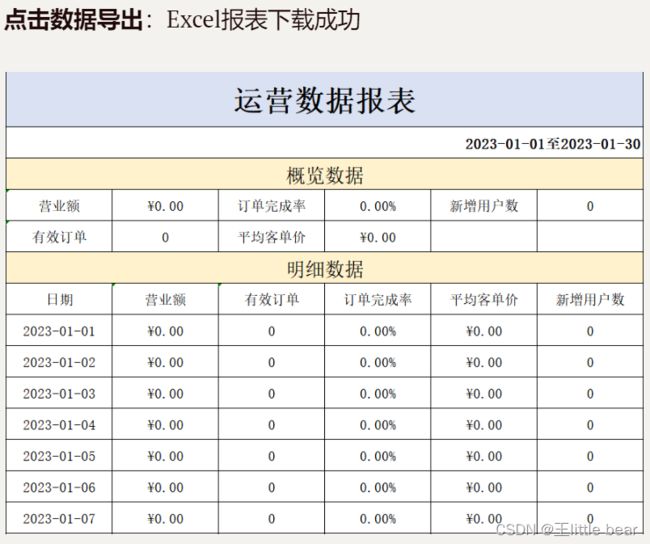
3.导出运营数据Excel报表
注意:
当前接口没有传递参数,因为导出的是最近30天的运营数据,后端计算即可,所以不需要任何参数
当前接口没有返回数据,因为报表导出功能本质上是文件下载,服务端会通过输出流将Excel文件下载到客户端浏览器
实现步骤
1). 设计Excel模板文件
2). 查询近30天的运营数据
3). 将查询到的运营数据写入模板文件
4). 通过输出流将Excel文件下载到客户端浏览器
ReportController中创建export方法
	/**
     * 导出运营数据报表
     * @param response
     */
    @GetMapping("/export")
    @ApiOperation("导出运营数据报表")
    public void export(HttpServletResponse response){
        reportService.exportBusinessData(response);
    }
ReportService接口中声明导出运营数据报表的方法
	/**
     * 导出近30天的运营数据报表
     * @param response
     **/
    void exportBusinessData(HttpServletResponse response);
ReportServiceImpl实现类中实现导出运营数据报表的方法
提前将资料中的运营数据报表模板.xlsx拷贝到项目的resources/template目录中
    /**导出近30天的运营数据报表
     * @param response
     **/
    public void exportBusinessData(HttpServletResponse response) {
        LocalDate begin = LocalDate.now().minusDays(30);
        LocalDate end = LocalDate.now().minusDays(1);
        //查询概览运营数据,提供给Excel模板文件
        BusinessDataVO businessData = workspaceService.getBusinessData(LocalDateTime.of(begin,LocalTime.MIN), LocalDateTime.of(end, LocalTime.MAX));
        InputStream inputStream = this.getClass().getClassLoader().getResourceAsStream("template/运营数据报表模板.xlsx");
        try {
            //基于提供好的模板文件创建一个新的Excel表格对象
            XSSFWorkbook excel = new XSSFWorkbook(inputStream);
            //获得Excel文件中的一个Sheet页
            XSSFSheet sheet = excel.getSheet("Sheet1");

            sheet.getRow(1).getCell(1).setCellValue(begin + "至" + end);
            //获得第4行
            XSSFRow row = sheet.getRow(3);
            //获取单元格
            row.getCell(2).setCellValue(businessData.getTurnover());
            row.getCell(4).setCellValue(businessData.getOrderCompletionRate());
            row.getCell(6).setCellValue(businessData.getNewUsers());
            row = sheet.getRow(4);
            row.getCell(2).setCellValue(businessData.getValidOrderCount());
            row.getCell(4).setCellValue(businessData.getUnitPrice());
            for (int i = 0; i < 30; i++) {
                LocalDate date = begin.plusDays(i);
               //准备明细数据
                businessData = workspaceService.getBusinessData(LocalDateTime.of(date,LocalTime.MIN), LocalDateTime.of(date, LocalTime.MAX));
                row = sheet.getRow(7 + i);
                row.getCell(1).setCellValue(date.toString());
                row.getCell(2).setCellValue(businessData.getTurnover());
                row.getCell(3).setCellValue(businessData.getValidOrderCount());
                row.getCell(4).setCellValue(businessData.getOrderCompletionRate());
                row.getCell(5).setCellValue(businessData.getUnitPrice());
                row.getCell(6).setCellValue(businessData.getNewUsers());
            }
            //通过输出流将文件下载到客户端浏览器中
            ServletOutputStream out = response.getOutputStream();
            excel.write(out);
            //关闭资源
            out.flush();
            out.close();
            excel.close();

        }catch (IOException e){
            e.printStackTrace();
        }
    }