rook-ceph部署Object Storage后,使用s3cmd消费 Object Storage
背景:本文主要介绍rook-ceph部署Object Storage后,使用s3cmd消费 Object Storage的Consume the Object Storage部分。
官网文档:
https://rook.io/docs/rook/v1.5/ceph-object.html的步骤不太详细,对s3cmd初学者不友好,实际操作后记录下详细步骤。
K8S集群内,消费 Object Storage,使用service服务名
K8S集群外,消费 Object Storage,使用NodePort方式将service暴露出来,使用IP:NodePort
一、K8S集群内,Consume the Object Storage
1.1、Connection Environment Variables
获取以下4个变量,配置 s3 client时用得上
export AWS_HOST=<host>
export AWS_ENDPOINT=<endpoint>
export AWS_ACCESS_KEY_ID=<accessKey>
export AWS_SECRET_ACCESS_KEY=<secretKey>
Host: The DNS host name where the rgw service is found in the cluster. Assuming you are using the default rook-ceph cluster, it will be rook-ceph-rgw-my-store.rook-ceph.
Endpoint: The endpoint where the rgw service is listening. Run kubectl -n rook-ceph get svc rook-ceph-rgw-my-store, then combine the clusterIP and the port.
Access key: The user’s access_key as printed above
Secret key: The user’s secret_key as printed above
获取参数 命令:
#config-map, secret, OBC will part of default if no specific name space mentioned
export AWS_HOST=$(kubectl -n default get cm ceph-delete-bucket -o yaml | grep BUCKET_HOST | awk '{print $2}')
#`Endpoint`: combine the clusterIP and the port
kubectl -n rook-ceph get svc rook-ceph-rgw-my-store
export AWS_ENDPOINT=<Endpoint>

###1、以下是获取的bucket的 key和access,所以进入后不能再创建bucket,只能上传/下载文件
export AWS_ACCESS_KEY_ID= $(kubectl -n default get secret ceph-delete-bucket -o yaml | grep AWS_ACCESS_KEY_ID | awk '{print $2}' | base64 --decode)
export AWS_SECRET_ACCESS_KEY=$(kubectl -n default get secret ceph-delete-bucket -o yaml | grep AWS_SECRET_ACCESS_KEY | awk '{print $2}' | base64 --decode)

###2、以下是获取的user的 key和access,所以进入后可以创建bucket,再上传/下载文件
export AWS_ACCESS_KEY_ID= $(kubectl -n rook-ceph get secret rook-ceph-object-user-my-store-my-user -o yaml | grep AccessKey | awk '{print $2}' | base64 --decode)
export AWS_SECRET_ACCESS_KEY=$(kubectl -n rook-ceph get secret rook-ceph-object-user-my-store-my-user -o yaml | grep SecretKey | awk '{print $2}' | base64 --decode)

echo $AWS_HOST
echo $AWS_ACCESS_KEY_ID
echo $AWS_SECRET_ACCESS_KEY
echo $AWS_ENDPOINT
The variables for the user generated in this example might be:
export AWS_HOST=rook-ceph-rgw-my-store.rook-ceph.svc
export AWS_ENDPOINT=10.151.4.144:80
export AWS_ACCESS_KEY_ID=Q1CV6RTEBQUOFCKCOGRZ
export AWS_SECRET_ACCESS_KEY=z7vhXzqGsBPZ8ALlynJuLVAUHoB5BbOd4VdAlvoS
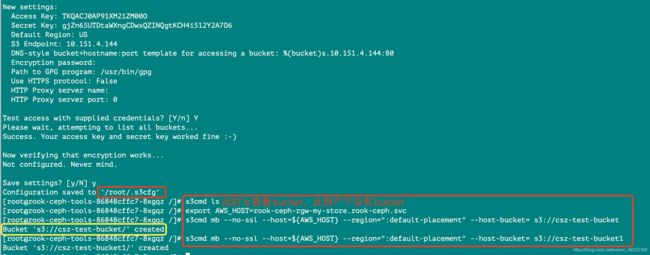
1.2进入rook-ceph-tools,配置s3cmd
#进入rook-ceph-tools工具
$ kubectl -n rook-ceph exec -it deploy/rook-ceph-tools -- bash
#安装s3cmd命令
[root@rook-ceph-tools-86848cffc7-8xgqz /]yum --assumeyes install s3cmd
#给变量赋值
[root@rook-ceph-tools-86848cffc7-8xgqz /]#
export AWS_HOST=rook-ceph-rgw-my-store.rook-ceph.svc
export AWS_ENDPOINT=10.151.4.144:80
export AWS_ACCESS_KEY_ID=Q1CV6RTEBQUOFCKCOGRZ
export AWS_SECRET_ACCESS_KEY=z7vhXzqGsBPZ8ALlynJuLVAUHoB5BbOd4VdAlvoS
#生成s3cmd的配置文件
s3cmd --configure

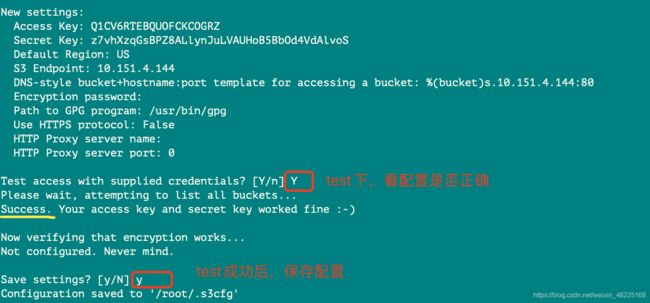
此时,我们即可使用s3cmd命令了。
二、K8S集群外,Consume the Object Storage
2.1、Connection Environment Variables
获取以下4个变量,配置 s3 client时用得上
export AWS_HOST=<host>
export AWS_ENDPOINT=<endpoint>
export AWS_ACCESS_KEY_ID=<accessKey>
export AWS_SECRET_ACCESS_KEY=<secretKey>
Host: The DNS host name where the rgw service is found in the cluster. Assuming you are using the default rook-ceph cluster, it will be rook-ceph-rgw-my-store.rook-ceph.
Endpoint: The endpoint where the rgw service is listening. Run kubectl -n rook-ceph get svc rook-ceph-rgw-my-store, then combine the clusterIP and the port.
Access key: The user’s access_key as printed above
Secret key: The user’s secret_key as printed above
获取参数 命令:
#config-map, secret, OBC will part of default if no specific name space mentioned
export AWS_ACCESS_KEY_ID=$(kubectl -n default get secret ceph-delete-bucket -o yaml | grep AWS_ACCESS_KEY_ID | awk '{print $2}' | base64 --decode)
export AWS_SECRET_ACCESS_KEY=$(kubectl -n default get secret ceph-delete-bucket -o yaml | grep AWS_SECRET_ACCESS_KEY | awk '{print $2}' | base64 --decode)
#`AWS_HOST`: combine the Cluster Node IP and the NodePort
#`Endpoint`: combine the Cluster Node IP and the NodePort
kubectl -n rook-ceph get svc rook-ceph-rgw-my-store-external
The variables for the user generated in this example might be:
export AWS_HOST=http://10.34.76.241:31971
export AWS_ENDPOINT=10.34.76.241:31971
export AWS_ACCESS_KEY_ID=OC64N6OUOX5LS2R0AL7D
export AWS_SECRET_ACCESS_KEY=fDuuNhDD18i8YmEt2SUqq98jIZDDd0faaPzaZqXk
1.2集群外,配置s3cmd
#安装s3cmd命令
Centos主机:yum --assumeyes install s3cmd
Ubuntu主机:apt install s3cmd

#给变量赋值
export AWS_HOST=http://10.34.76.241:31971
export AWS_ENDPOINT=10.34.76.241:31971
export AWS_ACCESS_KEY_ID=Q1CV6RTEBQUOFCKCOGRZ
export AWS_SECRET_ACCESS_KEY=z7vhXzqGsBPZ8ALlynJuLVAUHoB5BbOd4VdAlvoS
#生成s3cmd的配置文件
s3cmd --configure
此后步骤与“集群内”一致,主要区别在于AWS_HOST和AWS_ENDPOINT的内容获取
三、 访问验证
3.1 使用s3cmd命令
注意:.
s3cfg 文件中的AccessKey 和SecretKey是user的,则可以创建bucket,进行object的上传和下载
.s3cfg 文件中的AccessKey 和SecretKey是bucket的,则不能创建bucket,只能进行object的上传和下载
export AWS_HOST=http://10.34.76.241:30280

(1)创建bucket
s3cmd mb --no-ssl --host=${AWS_HOST} --region=":default-placement" --host-bucket= s3://ils-test-bucket

(2)上传文件 PUT an object
echo "Hello Rook" > /tmp/ilsObj
s3cmd put /tmp/ilsObj --no-ssl --host=${AWS_HOST} --host-bucket= s3://ils-test-bucket

(3)下载文件 Get an object
s3cmd get s3://ils-test-bucket/ilsObj /tmp/ilsObj-download --no-ssl --host=${AWS_HOST} --host-bucket=

(4)列出bucket
s3cmd ls
创建bucket
3.1 使用python测试S3访问
测试采用python脚本完成,脚本流程如下:测试脚本连接radosgw,创建bucket,list bucket。
客户端需要安装python-boto
apt install python-boto
编辑测试脚本;
# 注意“access_key”,“secret_key”,”host”与”port”值修改
# 此例是创建bucket,所以此处的access_key和secret_key是user的 key和access,而不能是bucket的
bglab@node4:~/csz$ vi s3.py
import boto.s3.connection

access_key = 'FKFJCHUAC12TA6DYHKIE'
secret_key = 'PLEQyuPMGDugsOtR0HYab2oMMo091uh4jb5WJYlB'
conn = boto.connect_s3(
        aws_access_key_id=access_key,
        aws_secret_access_key=secret_key,
        host='10.34.76.241', port=31971,
        is_secure=False, calling_format=boto.s3.connection.OrdinaryCallingFormat(),
       )

bucket = conn.create_bucket('my-new-bucket')
for bucket in conn.get_all_buckets():
    print "{name} {created}".format(
        name=bucket.name,
        created=bucket.creation_date,
)
运行脚本,返回结果符合预期
bglab@node4:~/csz$ python s3.py
执行成功:
![]()
若使用bucket的access和secret执行脚本会报错
ERROR: S3 error: 400 (TooManyBuckets)
四、 s3cmd详细命令
通过s3cmd --help查看具体使用方法;
# 列举所有 Buckets
$ s3cmd ls
# 创建 bucket,且 bucket 名称是唯一的,不能重复。
s3cmd mb s3://my-bucket-name
# 删除空 bucket
s3cmd rb s3://my-bucket-name
# 列举 Bucket 中的内容
s3cmd ls s3://my-bucket-name
# 上传 file.txt 到某个 bucket,
s3cmd put file.txt s3://my-bucket-name/file.txt
# 上传并将权限设置为所有人可读
s3cmd put --acl-public file.txt s3://my-bucket-name/file.txt
# 批量上传文件
s3cmd put ./* s3://my-bucket-name/
# 下载文件
s3cmd get s3://my-bucket-name/file.txt file.txt
# 批量下载
s3cmd get s3://my-bucket-name/* ./
# 删除文件
s3cmd del s3://my-bucket-name/file.txt
# 来获得对应的bucket所占用的空间大小
s3cmd du -H s3://my-bucket-name
# 设置S3 bucket的Public权限
s3cmd setacl s3://myexamplebucket.calvium.com/ --acl-public --recursive
参考链接:
https://www.cnblogs.com/netonline/p/10691953.html