【在Windows 10下的Docker Desktop安装Hbase, 并使用SpringBoot进行连接】
在Windows 10下的Docker安装Hbase, 并使用SpringBoot进行连接
一、安装Hbse
①拉取镜像
如果是Windows 的Docker DeskTop版, 可以打开Windows PowerShell命令窗口界面, 输入下面指令
docker pull harisekhon/hbase
②创建容器
参考:[Docker 安装Hbase开发环境] #Docker #Hbase (github.com)
docker run -d -h base-server
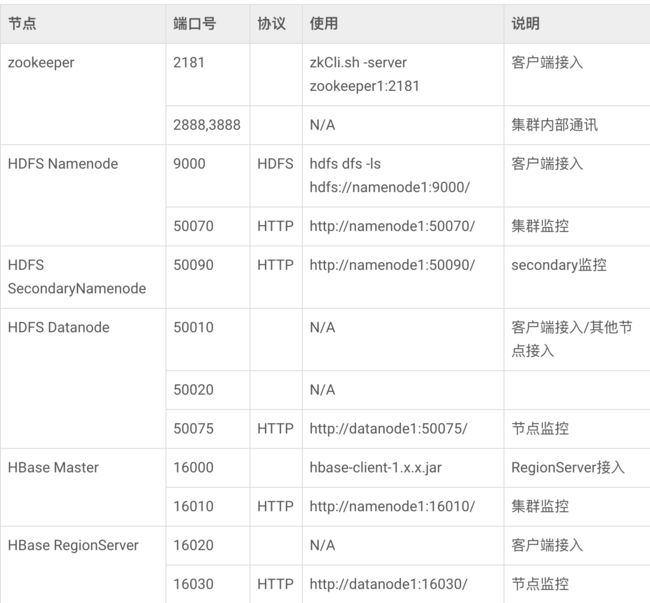
        -p 2181:2181
        -p 8080:8080
        -p 8085:8085
        -p 9090:9090
        -p 9000:9000
        -p 9095:9095
        -p 16000:16000
        -p 16010:16010
        -p 16201:16201
        -p 16301:16301
        -p 16020:16020
        --name hbase
        harisekhon/hbase
-d 表示后台运行
-h 该容器的host为docker-hbase
-p 宿主机端口:容器端口
--name 该容器的名字
将容器跑起来后可以访问下面这个HBase的链接
http://localhost:16010/master-status
③设置Host
在C:\Windows\System32\drivers\etc目录下的hosts文件可以设置
127.0.0.1 base-server
二、使用SpringBoot连接HBase
①安装依赖
在SpringBoot项目的pom.xml文件中添加Hbase相关依赖
<dependency>
    <groupId>org.apache.hbasegroupId>
    <artifactId>hbase-clientartifactId>
    <version>2.3.5version>
dependency>
②在配置文件添加配置信息
在 Spring Boot 应用程序的配置文件中添加 HBase 连接信息。例如,可以在 application.yml 文件中添加以下配置:
spring:
  hbase:
    zookeeper:
      quorum: localhost:2181
    client:
      port: 16010
③添加HBase配置类
在您的 Spring Boot 项目中,创建一个配置类,用于配置 HBase 连接。以下是一个示例 HBaseConfig 类,用于配置 HBase 连接:
import org.apache.hadoop.hbase.HBaseConfiguration;
import org.apache.hadoop.hbase.client.Connection;
import org.apache.hadoop.hbase.client.ConnectionFactory;
import org.springframework.beans.factory.annotation.Value;
import org.springframework.context.annotation.Bean;
import org.springframework.context.annotation.Configuration;

import java.io.IOException;

@Configuration
public class HbaseConfig {

    @Value("${spring.hbase.zookeeper.quorum}")
    private String zookeeperQuorum;

    @Value("${spring.hbase.client.port}")
    private String hbaseClientPort;

    @Bean
    public Connection hbaseConnection() throws IOException {
        org.apache.hadoop.conf.Configuration config = HBaseConfiguration.create();
        config.set("hbase.zookeeper.quorum", zookeeperQuorum);
        config.set("hbase.client.port", hbaseClientPort);
        return ConnectionFactory.createConnection(config);
    }
}
在这个配置类中,我们使用 @Value 注解读取 HBase ZooKeeper 的地址,并创建一个 HBase 连接。请确保在 application.yml文件中设置了 spring.hbase.zookeeper.quorum 属性,以指定 HBase ZooKeeper 的地址。
④使用 HBase API 操作数据
在您的 Spring Boot 项目中,您可以使用 HBase 的 Java API 来操作数据。以下是一个示例 HBaseService 类,用于插入和获取数据
@Service
public class HBaseService {

    @Autowired
    private Connection hbaseConnection;

    public void putHBaseData() throws IOException {
        Table table = hbaseConnection.getTable(TableName.valueOf("mytable"));
        Put put = new Put(Bytes.toBytes("myrow"));
        put.addColumn(Bytes.toBytes("mycf"), Bytes.toBytes("mycolumn"), Bytes.toBytes("myvalue"));
        table.put(put);
        table.close();
    }

    public String getHBaseData() throws IOException {
        Table table = hbaseConnection.getTable(TableName.valueOf("mytable"));
        Get get = new Get(Bytes.toBytes("myrow"));
        Result result = table.get(get);
        byte[] valueBytes = result.getValue(Bytes.toBytes("mycf"), Bytes.toBytes("mycolumn"));
        String value = Bytes.toString(valueBytes);
        table.close();
        return value;
    }
}
在这个服务类中,我们使用注入的 HBase Connection 对象来获取 HBase 表,并使用 Put 和 Get 对象来插入和获取数据。
三、开始测试连接HBase成功与否
①创建一个HBase表
方法一:
可以在容器的终端窗口进入Hbase shell
在 HBase shell 中,使用以下命令创建一个名为 mytable 的表:
create 'mytable', 'mycf'
此命令将创建一个名为 mytable 的表,该表具有一个名为 mycf 的列族。
方法二:
在Windows PowerShell命令窗口下输入下面命令进入容器的shell
docker exec -it hbase bash
在容器的 shell 中,可以使用以下命令启动 HBase shell:
hbase shell
在 HBase shell 中,使用以下命令创建一个名为 mytable 的表:
create 'mytable', 'mycf'
此命令将创建一个名为 mytable 的表,该表具有一个名为 mycf 的列族。
②插入数据和读取数据
在您的 Spring Boot 应用程序中,可以使用 HBaseService 类中的 putHBaseData 方法来插入数据。以下是一个简单的示例:
@Service
public class MyHBaseService {

    @Autowired
    private HBaseService hbaseService;

    public void insertData() throws IOException {
        hbaseService.putHBaseData();
    }

    public String getData() throws IOException {
        return hbaseService.getHBaseData();
    }
}
③编写测试类
在测试包下进行测试
import com.example.service.HBaseService;
import org.junit.jupiter.api.Test;
import org.junit.runner.RunWith;
import org.springframework.beans.factory.annotation.Autowired;
import org.springframework.boot.test.context.SpringBootTest;
import org.springframework.test.context.junit4.SpringJUnit4ClassRunner;
import java.io.IOException;
import static org.junit.jupiter.api.Assertions.assertEquals;

@SpringBootTest(classes = PriceAnalysisOfAgriculturalProductsApplication.class)
@RunWith(SpringJUnit4ClassRunner.class)
class PriceAnalysisOfAgriculturalProductsApplicationTests {

    @Autowired
    private HBaseService hbaseService;

    @Test
    public void testPutAndGetHBaseData() throws IOException {
        // 插入数据
        hbaseService.putHBaseData();

        // 读取数据
        String value = hbaseService.getHBaseData();
        assertEquals("myvalue", value);
    }
}
运行完成后,如果成功的话,在Hbase shell界面中输入scan 'mytable'查看表中所有的数据,就会发现插入数据成功, 如下图所示。
四、运行失败的情况
Caused by: java.io.FileNotFoundException: java.io.FileNotFoundException: HADOOP_HOME and hadoop.home.dir are unset. -see https://wiki.apache.org/hadoop/WindowsProblems
问题分析:
出现上面异常是因为没有设置 HADOOP_HOME 和 hadoop.home.dir 两项。而这两项就是配置在本地环境变量中的 Hadoop 地址,也就是需要我们在本地搭建Hadoop环境
解决方法:
下载winutils文件,然后配置环境变量,最后再把hadoop.dll文件放到 C:/windows/system32 下就可以了
解决步骤:
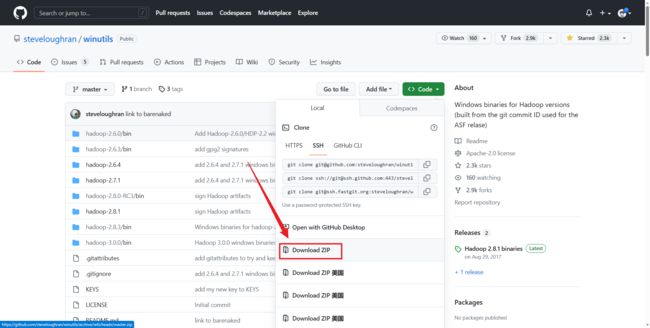
①下载winutils
点进下面链接进行下载,下载压缩包。
steveloughran/winutils: Windows binaries for Hadoop versions (built from the git commit ID used for the ASF relase) (github.com)
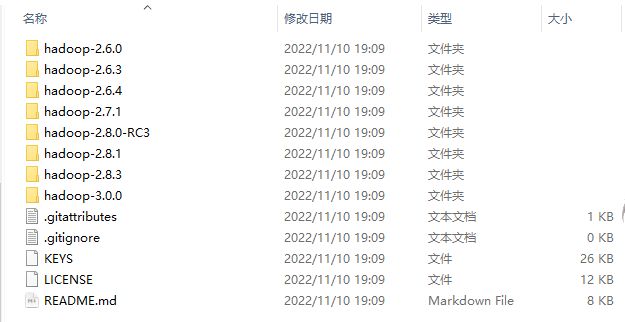
②选择版本
解压压缩包后,可以看到里面有很多个Hadoop的版本,选一个接近你Hadoop版本的即可,
③配置环境变量
在系统变量中新建一个,变量名填HADOOP_HOME,变量值就填你选择的版本文件夹位置
接着在Path中新增 变量值:%HADOOP_HOME%\bin


