SpringBoot集成JWT
SpringBoot集成JWT实现token验证
JWT
JSON Web Token (JWT) 是一种开放标准 ( RFC 7519 ),它定义了一种紧凑且自包含的方式,用于在各方之间作为 JSON 对象安全地传输信息。由于此信息经过数字签名,因此可以验证和信任。JWT 可以使用秘密(使用HMAC算法)或使用RSA或ECDSA的公钥/私钥对进行签名
优劣
传统的session认证
我们知道,http协议本身是一种无状态的协议,而这就意味着如果用户向我们的应用提供了用户名和密码来进行用户认证,那么下一次请求时,用户还要再一次进行用户认证才行,因为根据http协议,我们并不能知道是哪个用户发出的请求,所以为了让我们的应用能识别是哪个用户发出的请求,我们只能在服务器存储一份用户登录的信息,这份登录信息会在响应时传递给浏览器,告诉其保存为cookie,以便下次请求时发送给我们的应用,这样我们的应用就能识别请求来自哪个用户了,这就是传统的基于session认证。
但是这种基于session的认证使应用本身很难得到扩展,随着不同客户端用户的增加,独立的服务器已无法承载更多的用户,而这时候基于session认证应用的问题就会暴露出来。
基于session认证所显露的问题
Session: 每个用户经过我们的应用认证之后,我们的应用都要在服务端做一次记录,以方便用户下次请求的鉴别,通常而言session都是保存在内存中,而随着认证用户的增多,服务端的开销会明显增大。
扩展性: 用户认证之后,服务端做认证记录,如果认证的记录被保存在内存中的话,这意味着用户下次请求还必须要请求在这台服务器上,这样才能拿到授权的资源,这样在分布式的应用上,相应的限制了负载均衡器的能力。这也意味着限制了应用的扩展能力。
CSRF: 因为是基于cookie来进行用户识别的, cookie如果被截获,用户就会很容易受到跨站请求伪造的攻击。
基于token的鉴权机制
基于token的鉴权机制类似于http协议也是无状态的,它不需要在服务端去保留用户的认证信息或者会话信息。这就意味着基于token认证机制的应用不需要去考虑用户在哪一台服务器登录了,这就为应用的扩展提供了便利。
流程上是这样的:
1、用户使用用户名密码来请求服务器
2、服务器进行验证用户的信息
3、服务器通过验证发送给用户一个token
4、客户端存储token,并在每次请求时附送上这个token值
5、服务端验证token值,并返回数据
对比可以得出JWT的好处
1.性能问题。
JWT方式将用户状态分散到了客户端中,相比于session,可以明显减轻服务端的内存压力。
Session方式存储用户id的最大弊病在于Session是存储在服务器端的,所以需要占用大量服务器内存,
对于较大型应用而言可能还要保存许多的状态,一般还需借助nosql和缓存机制来实现session的存储,如果是分布式应用还需session共享。
2.单点登录。
JWT能轻松的实现单点登录,因为用户的状态已经被传送到了客户端。
token 可保存自定义信息,如用户基本信息,web服务器用key去解析token,就获取到请求用户的信息了。
我们也可以配置它以便包含用户拥有的任何权限。这意味着每个服务不需要与授权服务交互才能授权用户。
3.前后端分离。
以前的传统模式下,后台对应的客户端就是浏览器,就可以使用session+cookies的方式实现登录,
但是在前后分离的情况下,后端只负责通过暴露的RestApi提供数据,而页面的渲染、路由都由前端完成。因为rest是无状态的,因此也就不会有session记录到服务器端。
4.兼容性。
支持移动设备,支持跨程序调用,Cookie 是不允许垮域访问的,而 Token 则不存在这个问题。
5.可拓展性。
jwt是无状态的,特别适用于分布式站点的单点登录(SSO)场景。
比如有3台机器(A、B、C)组成服务器集群,若session存在机器A上,session只能保存在其中一台服务器,此时你便不能访问机器B、C,因为B、C上没有存放该Session,
而使用token就能够验证用户请求合法性,并且我再加几台机器也没事,所以可拓展性好。
6.安全性。因为有签名,所以JWT可以防止被篡改。
JWT的缺点
当然jwt也是有缺点的如:
1、JWT在生成token的时候支持失效时间,但是支持的失效时间是固定的,比如说一天。
但是用户在等出的时候是随机触发的,那么我们jwt token来做这个失效是不可行的,因为jwt在初始化的时候已经定死在什么时候过期了。
采用其他方案,在redis中存储token,设置token的过期时间,每次鉴权的时候都会去延长时间
2、jwt不适合存放大量信息,信息越多token越长
JWT 结构
在其紧凑形式中,JSON Web Tokens 由用点 ( .)分隔的三个部分组成,它们是:
- Head
- 有效载荷
- 签名
Header
The header typically consists of two parts: the type of the token, which is JWT, and the signing algorithm being used, such as HMAC SHA256 or RSA.
For example:
{
  "alg": "HS256",
  "typ": "JWT"
}
Then, this JSON is Base64Url encoded to form the first part of the JWT.
Payload
The second part of the token is the payload, which contains the claims. Claims are statements about an entity (typically, the user) and additional data. There are three types of claims: registered, public, and private claims.
-
Registered claims: These are a set of predefined claims which are not mandatory but recommended, to provide a set of useful, interoperable claims. Some of them are: iss (issuer), exp (expiration time), sub (subject), aud (audience), and others.
Notice that the claim names are only three characters long as JWT is meant to be compact.
-
Public claims: These can be defined at will by those using JWTs. But to avoid collisions they should be defined in the IANA JSON Web Token Registry or be defined as a URI that contains a collision resistant namespace.
-
Private claims: These are the custom claims created to share information between parties that agree on using them and are neither registered or public claims.
An example payload could be:
{
  "sub": "1234567890",
  "name": "John Doe",
  "admin": true
}
The payload is then Base64Url encoded to form the second part of the JSON Web Token.
Do note that for signed tokens this information, though protected against tampering, is readable by anyone. Do not put secret information in the payload or header elements of a JWT unless it is encrypted.
Signature
To create the signature part you have to take the encoded header, the encoded payload, a secret, the algorithm specified in the header, and sign that.
For example if you want to use the HMAC SHA256 algorithm, the signature will be created in the following way:
HMACSHA256(
  base64UrlEncode(header) + "." +
  base64UrlEncode(payload),
  secret)
The signature is used to verify the message wasn't changed along the way, and, in the case of tokens signed with a private key, it can also verify that the sender of the JWT is who it says it is.
Putting all together
The output is three Base64-URL strings separated by dots that can be easily passed in HTML and HTTP environments, while being more compact when compared to XML-based standards such as SAML.
The following shows a JWT that has the previous header and payload encoded, and it is signed with a secret.
If you want to play with JWT and put these concepts into practice, you can use jwt.io Debugger to decode, verify, and generate JWTs.
这里提一点注意事项,由于数据声明(Claim)是公开的,千万不要把密码等敏感字段放进去,否则就等于是公开给别人了。
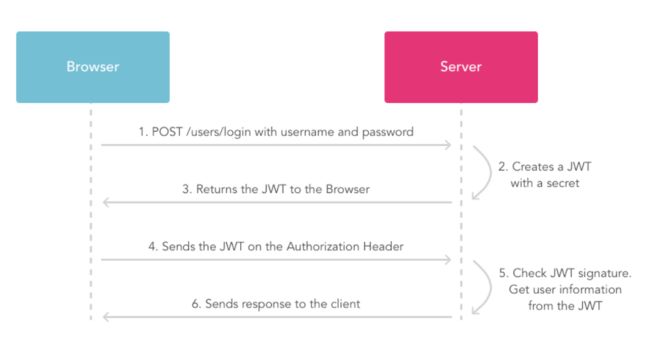
JWT请求流程
1. 用户使用账号和面发出post请求;
2. 服务器使用私钥创建一个jwt;
3. 服务器返回这个jwt给浏览器;
4. 浏览器将该jwt串在请求头中像服务器发送请求;
5. 服务器验证该jwt;
6. 返回响应的资源给浏览器。
SpringBoot集成

