管理服务
1、什么是SSH?
SSH基础服务,SSH是远程连接Linux,管理Linux的服务。
Secure Shell Protocol简写SSH 安全的shell协议
使用的默认的端口为22(一台机器的不同功能就用端口区分)
端口扩展:
| 端口 | 含义 | |
|---|---|---|
| 873 | rsync | |
| 22 | ssh | |
| 25 | smtp邮件发送服务 | |
| 110 | pop3邮件接收服务 | |
| 80 | web 网页服务 | |
| 23 | telnet | |
| 111 | rpcbind | |
| 21 | ftp | |
| 3389 | windows远程桌面 |
- 远程连接服务:
telnet数据是明文的连交换机和路由器,配置。
telnet ip port 监测端口以及服务是否好的。
ssh协议:在传输过程中数据是加密的。安全的shell协议。 - 服务端和客户端,称之为c/s架构,client/server
浏览器/服务器,称之为b/s架构,browser/server(大趋势)
2、SSH服务器:
[root@m01 ~]# rpm -qa openssh openssl
openssl-1.0.2k-16.el7_6.1.x86_64
openssh-7.4p1-16.el7.x86_64
- ssh客户端工具:
windows下:
xshell个人免费
secureCRT收费
putty
Linux下:
ssh命令
ssh客户端:
[root@m01 ~]# rpm -ql openssh-clients
/usr/bin/scp           #远程拷贝文件(加密)
/usr/bin/sftp          # ftp服务,加密的传输文件。
/usr/bin/ssh           #远程连接。
/usr/bin/ssh-copy-id   #拷贝密钥中的公钥文件的。
3、ssh命令介绍和实践
3.1ssh命令:远程连接的命令
[C:\~]$ help ssh
NAME
    ssh - connects to a host using the SSH protocol.

SYNOPSYS
ssh [user@]host[ port][;host[ port]]

OPTIONS
    user   Indicates the user's login name.
    host   Indicates the name, alias, or Internet address of the
           remote host.
    port   Indicates a port number (address of an application).
           If the port is not specified, the default ssh port
           (22) is used.
ssh参数:
-p 指定端口
格式:命令 -p 端口 用户@IP相当于ssh IP
[root@m01 ~]# ssh 10.0.0.7
3.2scp命令:远程拷贝(secure copy),加密的拷贝
scp命令参数:
-P端口
-r递归
-p保持属性
-l 限制速度
推:
scp -P 22 -rp /data root@172.16.1.7:/tmp
scp -P -rp /data 172.16.1.7:/tmp
拉
scp -P 22 -rp root@172.16.1.7:/data /tmp
scp -P -rp 172.16.1.7:/data /tmp
对比下scp和rsync
scp每一次都是全量考本,加密拷贝。
rsync第一次全量拷贝,远程shell也是加密拷贝
3.3sftp(了解即可)使用不安全
sftp命令:加密的ftp服务,默认缺点不能锁定家目录。
ftp:vsftp。
sftp  -oPort=22 root@172.16.1.7
sftp> put "/etc/hosts"    #上传远端家目录。
sftp> put /etc/hosts /tmp #上传远端指定目录/tmp。
sftp> get /etc/yum.conf   #下载到本地家目录。
sftp> get oldboy.txt /etc #下载到本地指定目录/etc
sftp服务也支持windows ftp客户端:
winscp,flashftp,xshell也支持
常规和服务器交互数据文件:
rz/sz 属于lrzsz
4、xshell ssh连不上服务器 如何排查?
ping IP:
不通:检查物理网络网线,电脑IP设置。
通:表示物理链路通的
telnet ip port
不通:查服务端防火墙和ssh服务(ps -ef|grep sshd,netstat -lntup|grep ssh)
通:
检查本地xshell 连接IP 端口 密码 用户
5、ssh服务端
[root@m01 ~]# ll /etc/ssh/ssh*
-rw-r--r--. 1 root root     2276 4月  11 2018 /etc/ssh/ssh_config#ssh配置文件
-rw-------. 1 root root     3907 4月  11 2018 /etc/ssh/sshd_config#sshd配置文件
ssh服务配置:
6、ssh的通讯原理
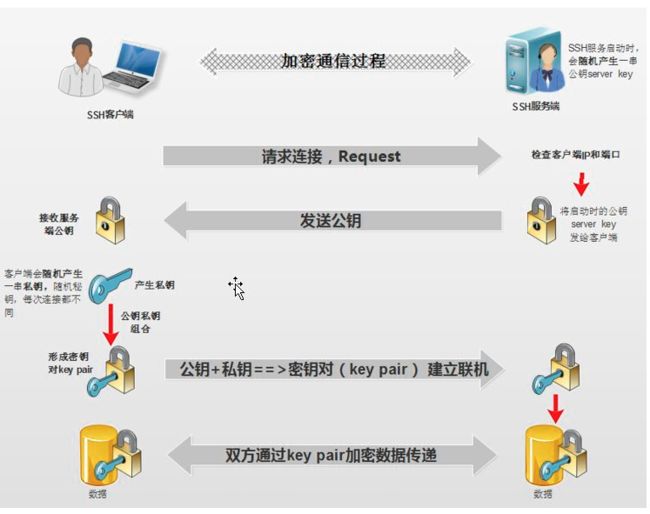
[root@m01 ~]# ssh 10.0.0.8
The authenticity of host '10.0.0.8 (10.0.0.8)' can't be established.
ECDSA key fingerprint is SHA256:pSmZZNpT7WLg8LxBk9gFez5RNq3gaxYgpo/Kd9sv1Do.
ECDSA key fingerprint is MD5:ce:42:93:22:32:b3:9c:4a:71:81:b9:f6:50:e5:bb:6b.
Are you sure you want to continue connecting (yes/no)?       # 密钥
7、SSH两种认证方式
7.1密码认证pam
使用用户名密码登录
7.2密钥登录
不需要密码登录,使用密钥文件就可以连接服务器。
8、密钥认证:
实践密钥认证:
项目实践:批量管理、批量分发内容项目
8、开始实战
1、基于root用户做Linux之间的秘钥认证。
2、生成密钥对(去超市买把锁),不需要指定服务器。
3、在61上生成密钥对(方便)。
[root@m01 ~]# ssh-keygen
ssh-keygen 连续回车
\#ssh-keygen -d dsa
\#→RSA与DSA加密算法的区别
\#→RSA,是一种加密算法(PS:RSA也可以进行数字签名的),它的简写的来由是Ron Rivest、Adi Shamir和 Leonard Adleman
\#→这三个人姓氏的第一个字母连接起来就是RSA。
\#→DSA就是数字签名算法的英文全称的简写,即Digital Signature Algorithm,简写就是DSA,
RSA既可以进行加密,也可以进行数字签名实现认证,而DSA只能用于数字签名从而实现认证。
Your identification has been saved in /root/.ssh/id_rsa.
Your public key has been saved in /root/.ssh/id_rsa.pub.
[root@m01 ~]# ls /root/.ssh -l
总用量 12
-rw------- 1 root root 1679 4月  22 12:12 id_rsa        #<==私钥,钥匙。
-rw-r--r-- 1 root root  390 4月  22 12:12 id_rsa.pub    #<==公钥,锁。
-rw-r--r-- 1 root root  513 4月  22 11:45 known_host
牢记:钥匙开锁。
4、把锁放到7/8上
/usr/bin/ssh-copy-id #专业拷贝密钥中的公钥文件的。
ssh-copy-id -i ~/.ssh/id_rsa.pub 172.16.1.7
ssh-copy-id -i ~/.ssh/id_rsa.pub 172.16.1.8
[root@m01 ~]# ssh-copy-id -i ~/.ssh/id_rsa.pub  172.16.1.7
/usr/bin/ssh-copy-id: INFO: Source of key(s) to be installed: "/root/.ssh/id_rsa.pub"
/usr/bin/ssh-copy-id: INFO: attempting to log in with the new key(s), to filter out any that are already installed
/usr/bin/ssh-copy-id: INFO: 1 key(s) remain to be installed -- if you are prompted now it is to install the new keys
root@172.16.1.7's password:
Number of key(s) added: 1
Now try logging into the machine, with:   "ssh '172.16.1.7'"
and check to make sure that only the key(s) you wanted were added.
C6:
[root@m01 /]# ssh-copy-id -i ~/.ssh/id_rsa.pub  172.16.1.7
root@172.16.1.7's password:
Now try logging into the machine, with "ssh '172.16.1.7'", and check in:
  .ssh/authorized_keys
to make sure we haven't added extra keys that you weren't expecting.
5、ssh-copy-id:原理
scp -rp ~/.ssh/id_rsa.pub 172.16.1.7:~/.ssh/authorized_keys
特别注意:
[root@web02 ~]# ls ~/.ssh/ -ld
drwx------ 2 root root 29 4月  22 12:18 /root/.ssh/      #700
[root@web02 ~]# ls ~/.ssh/ -l
总用量 4
-rw------- 1 root root 390 4月  22 12:18 authorized_keys #600
6、测试远程执行命令:
ssh 172.16.1.7 ifconfig
ssh 172.16.1.8 ifconfig
7、写个脚本
[root@m01 ~]# cat /server/scripts/cmd.sh
ssh 172.16.1.7 ifconfig
ssh 172.16.1.8 ifconfig

[root@m01 ~]# cat /server/scripts/cmd.sh
for n in 7 8
do
   ssh 172.16.1.$n ifconfig
done

执行脚本:
sh /server/scripts/cmd.sh
8、开发脚本实现批量管理服务器:
[root@m01 ~]# cat /server/scripts/cmd.sh
for n in 7 8
do
   echo "=====172.16.1.$n======"
   ssh 172.16.1.$n "$1"
done

[root@m01 /]# sh view.sh "cat /etc/redhat-release"
-------172.16.1.31----------
CentOS release 6.9 (Final)
-------172.16.1.7----------
CentOS release 6.9 (Final)
9、批量发文件:
scp -P 22 -rp /data root@172.16.1.7:/tmp/
rsync -avz /data root@172.16.1.7:/opt
rsync -avz /data -e "ssh -p 22" root@172.16.1.7:/opt
简单批量分发文件脚本
[root@m01 /]# cat fenfa.sh
for n in 31 41
do
   echo ----------172.16.1.$n--------
   scp -P 22 -rp $1 root@172.16.1.$n:$2
done
复杂分发文件脚本:
$# 命令行脚本后面参数的个数
sh cmd.sh oldboy oldgirl
请问$#=2
$?上一个命令是否执行成功,如为0,则成功。
$0脚本的名字(含路径)。
#!/bin/sh
. /etc/init.d/functions
if [ $# -ne 2 ]
then
    echo "usage:$0 localfile remotedir"
    exit 1
fi

for n in 31 41 51
do
   scp -P 22 -rp $1 root@172.16.1.$n:$2 &>/dev/null
   if [ $? -eq 0  ]
   then
        action "172.16.1.$n successful" /bin/true
   else
        action "172.16.1.$n failure" /bin/false
   fi
done
[root@m01 ~]# sh /server/scripts/fenfa.sh
usage:/bin/sh /server/scripts/fenfa.sh localfile remotedir
[root@m01 ~]#
[root@m01 ~]#
[root@m01 ~]#
[root@m01 ~]# mkdir -p /data
[root@m01 ~]# ls /data
[root@m01 ~]# cd /data
[root@m01 /data]# touch {1..5}.txt
[root@m01 /data]# sh /server/scripts/fenfa.sh /data /opt/
172.16.1.7 successful                                      [  确定  ]
172.16.1.8 successful                                      [  确定  ]
[root@m01 /data]# sh /server/scripts/cmd.sh "rm -fr /opt/*"
=====172.16.1.7======
=====172.16.1.8======
SSH批量管理如何一键完成:
一键创建及分发秘钥: