第一个Maven项目
(一)准备工作
1、从官网下载压缩包:apache-maven-3.5.4-bin,然后解压到D盘没有中文的目录。
2、配置环境变量:
在左下角win打开“设置”,搜索“高级系统设置”,点击“高级”,点击“环境变量”:
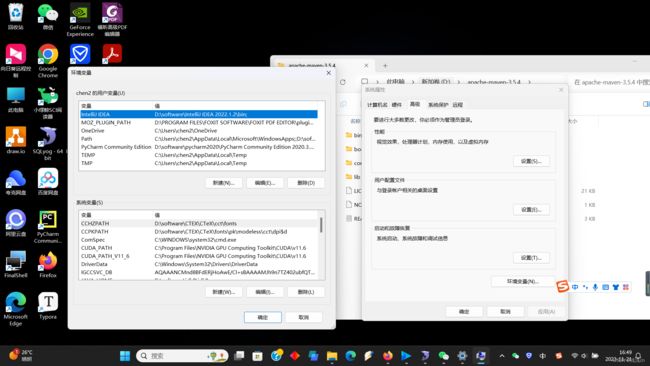
点击“新建”,输入路径名称为“MAVEN_HOME”,然后将刚刚bin文件夹以上的路径“D:\apache-maven-3.5.4”粘贴过来。点击确定即可。
然后再点击栏目中的“Path”,再点击“编辑”,点击“新建”,输入%MAVEN_HOME%\bin,点击确定。
3、检查是否配置成功
打开cmd,输入:
mvn -v
(二)Maven的配置
找到maven的安装目录下的config文件夹下的settings.xml(D:\apache-maven-3.5.4\conf)进行修改。
1、配置本地仓库路径(默认在C盘),平时用来存放jar包。
新建D:\maven\Repository文件夹,然后:
<localRepository>D:\maven\Repository</localRepository>
2、配置中央仓库路径为阿里的镜像:
在 mirrors标签内添加:
   <mirror>
      <id>nexus-aliyun</id>
      <mirrorOf>central</mirrorOf>
      <name>Nexus aliyun</name>
      <url>http://maven.aliyun.com/nexus/content/groups/public
    </mirror>
3、配置编译版本:
在profiles标签内添加:
<profile>
      <id>jdk-1.8</id>

      <activation>
        <activeByDefault>true</activeByDefault>
        <jdk>1.8</jdk>
      </activation>

      <properties>
        <maven.compiler.source>1.8</maven.compiler.source>
        <maven.compiler.target>1.8</maven.compiler.target>
        <maven.compiler.compilerVersion>1.8</maven.compiler.compilerVersion>
      </properties>
    </profile>
(三)IDEA创建Maven项目
1、新建一个empty project,命名为SSM1。
点击项目名,右键new,选择Module,左侧选择“Maven archetype”,可以给项目命名为MavenIntro,然后是点击下方add archetype:
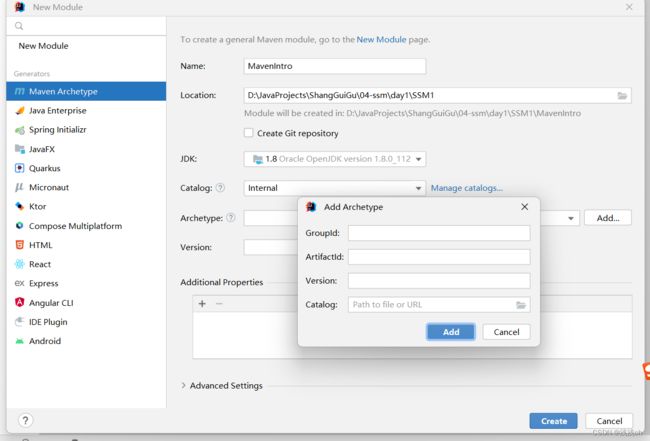 其中GroupId表示公司域名的倒序,ArtifactId表示模块名,Version表示版本,都可以任意设置,这里我们分别设置为com.atguigu.web1;Hello;1.0,点击确定即可。点击create即可。
2、与本地Maven构建起来
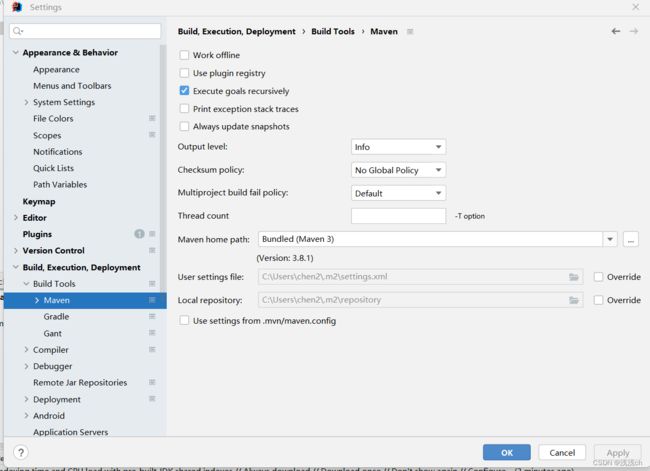
点击File,选择Settings,选择Build,Execution…下面的Build Tools下面的Maven,修改path,如果想用idea内置的Maven,就找到D:\software\IntelliJ IDEA 2022.1.2\plugins\maven\lib\maven3\conf下的settings.xml文件,像(二)修改三处。
如果想用自己的Maven,就将路径改成:D:\apache-maven-3.5.4
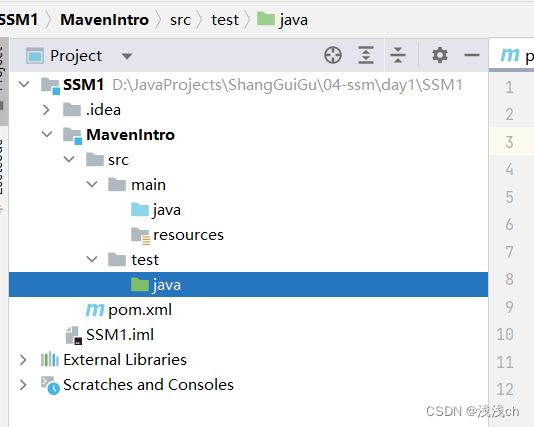
3、根据Maven约定的文件目录,将这些文件目录准备好:
4、首先在pom.xml中导入junit的依赖:
     <dependencies>
        <dependency>
            <groupId>junit</groupId>
            <artifactId>junit</artifactId>
            <version>4.12</version>
            <scope>test</scope>
        </dependency>
    </dependencies>
在src下的main的java文件夹中新建Hello.class,写一个返回类型为String的函数:
public class Hello {
    public String sayHello(String name){
        return "Hello"+name;
    }
}
然后我们在src下的test的java文件夹下新建HelloTest.class,写一个测试类:
public class HelloTest {
    //需要用到单元测试(junit)
    @Test
    public void test(){
        Hello hello = new Hello();//创建一个Hello对象
        String name1 = hello.sayHello("第一个maven项目");
        System.out.println(name1);
    }

}
点击左边的绿色按钮开始运行测试类HelloTest:
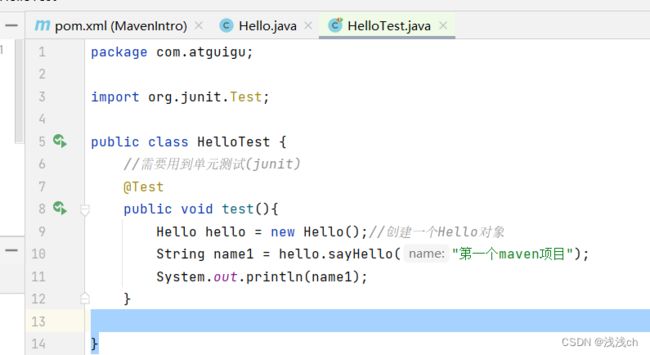
控制台输出:
Hello第一个maven项目
那么第一个maven项目就执行成功了!
(四)补充知识点
4.1 项目打包成jar包被引用
1、根据gav原则去仓库内寻找jar包。g对应groupId,a对应artifactId,v对应version。
则本地仓库路径\g\a\v\a-v.jar
<dependency>
   <groupId>junit</groupId>
   <artifactId>junit</artifactId>
   <version>4.12</version>
   <scope>test</scope>
</dependency>
那么junit的jar包位置在:D:\maven\Repository\junit\junit\4.12\junit-4.12.jar
PS:想要找一些依赖可以去[https://mvnrepository.com],搜索对应的jar包名,找到版本点进去,就可以看到对应的maven代码了,复制过来即可。
2、那么想将刚刚构建的MavenIntro这个moudle(第一个项目)安装到本地仓库呢?
(1)先安装jar包到本地
点击右边侧栏中的“Maven”,点击Lifecycle下的install,双击左键开始安装jar包。
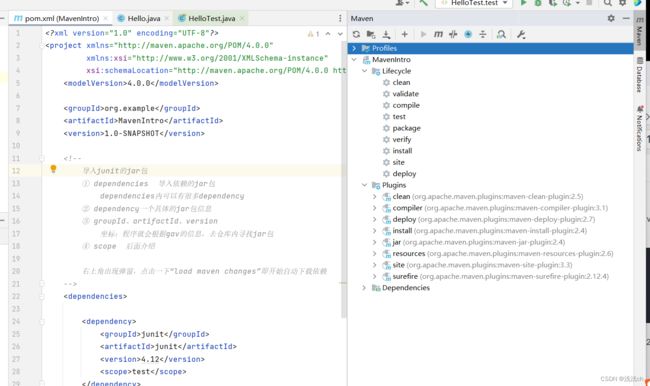
这时我们根据gav可以查找到jar包被安装在:
D:\maven\Repository\org\example\MavenIntro\1.0-SNAPSHOT
(2)在刚刚的项目中,选中SSM1右键new一个moudle,取名为HelloFriend,也设置一下它的gav:
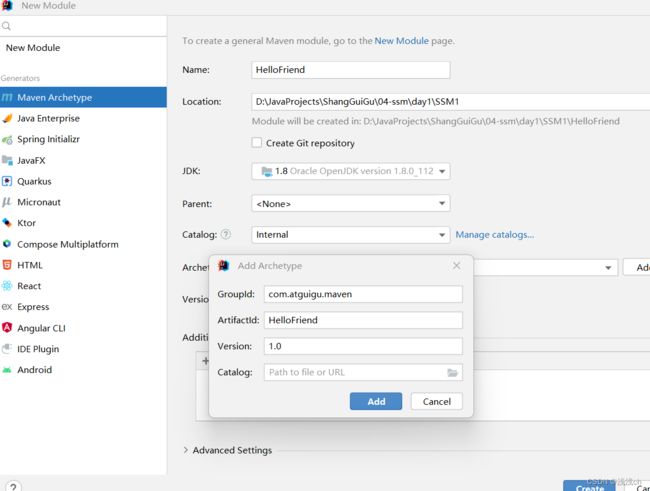
然后就可以在新的moudle中的pom.xml文件上加上MavenIntro的依赖:
<dependency>
    <groupId>org.example</groupId>
    <artifactId>MavenIntro</artifactId>
    <version>1.0-SNAPSHOT</version>
</dependency>
(3)接下来进行测试:
在main文件夹下面的java文件下新建HelloFriend类,可以直接调用Hello类:
public class HelloFriend {
    public String helloFriend(String name){
        Hello hello = new Hello();
        String s = hello.sayHello(name);
        return s;
    }
}
在test文件夹下面的java文件夹下新建HelloFriendTest类进行测试:
public class HelloFriendTest {
    @Test
    public void test(){
        HelloFriend helloFriend = new HelloFriend();
        String helloFriend1 = helloFriend.helloFriend("HelloFriend");
        System.out.println("输出内容"+helloFriend1);
    }
}
点击左边的绿色按钮,的确可以顺利执行,输出:
输出内容HelloHelloFriend
4.2 jar包传递
1、scope属性介绍
test
   -标记该jar包只能在测试程序内使用,不能在主程序用,如果是web项目,也不会部署到服务器上
   -junit这种jar包就设置成test
compile(默认值)  用的最多(只有compile具有传递性,会传递给引用它的类)
   -jar包在测试程序和主程序都能用,也会跟随项目部署到服务器
   -所有的第三方jar包,基本上都得在主程序能用,并且也要跟随项目到服务器
provided
   -jar包在测试程序和主程序都能用,不会跟随项目部署到服务器
   -服务器上本身就有的jar包,设置成provided即可(servlet-api.jar)
2、使用compile传递依赖
(1)在MavenIntro里面的pom.xml中,将junit的依赖属性改为compile。
<dependency>
   <groupId>junit</groupId>
   <artifactId>junit</artifactId>
   <version>4.12</version>
   <scope>compile</scope>
</dependency>
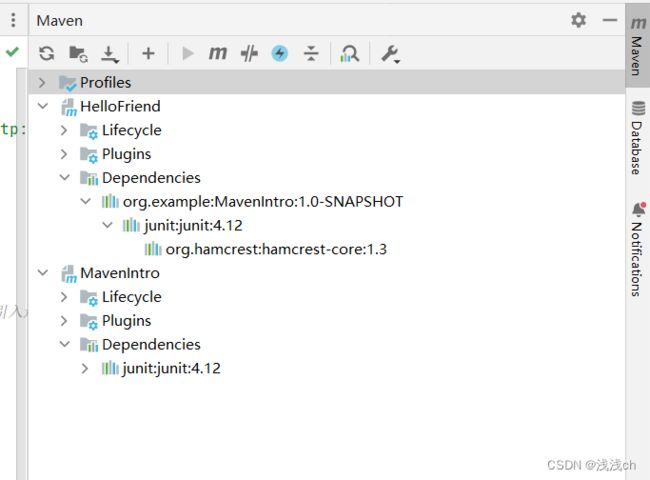
(2)在HelloFriend中的pom.xml文件中,去掉junit的依赖。但是由于它引用了MavenIntro的jar包,所以它也有junit-4.12的依赖,也可以在test文件夹中使用@Test。
4.3 jar包排除
(1)在MavenIntro里面的pom.xml中,有一个版本为4.12的junit依赖,属性为compile。
在HelloFriend里面的pom.xml中,有一个版本为4.0的junit依赖,属性为compile。
(2)现在想让HelloFriend不继承MavenIntro的junit,可以用exclusion标签:
       <dependency>
            <groupId>org.example</groupId>
            <artifactId>MavenIntro</artifactId>
            <version>1.0-SNAPSHOT</version>
            <!--在HelloFriend内排除掉具有传递性的jar包-->
            <exclusions>
                <!--可以排除多个-->
                <exclusion>
                    <groupId>junit</groupId>
                    <artifactId>junit</artifactId>
                </exclusion>

            </exclusions>
        </dependency>
4.4 统一jar包管理
为了避免上面的jar包继承导致版本冲突问题,我们可以一次指定所有jar包的版本。
在与denpendencies标签并列的地方使用properties标签包一个自定义标签(spring.version为例)保存版本号,要使用的时候就${spring.version}去指定即可。
<properties>
    <spring.version>5.3.1</spring.version>
</properties>

<dependencies>
   <dependency>
      <groupId>org.springframework</groupId>
      <artifactId>spring-context</artifactId>
      <version>${spring.version}</version>
   </dependency>
   <dependency>
      <groupId>org.springframework</groupId>
      <artifactId>spring-webmvc</artifactId>
      <version>${spring.version}</version>
   </dependency>
</dependencies>
刷新一下可以看到已经加载好了以上两个依赖:

4.5 jar包的继承
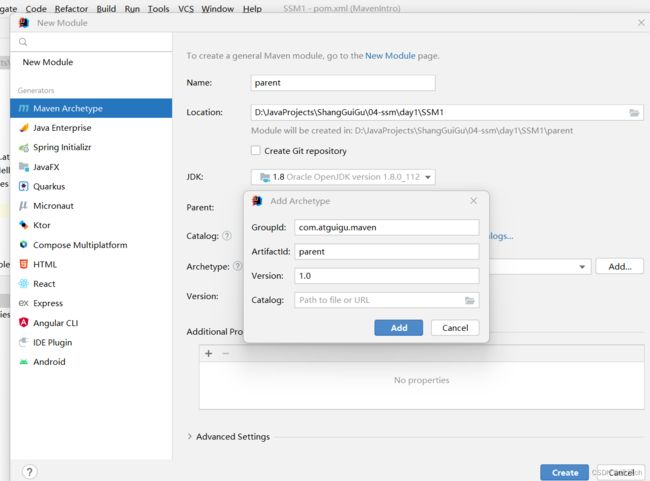
首先在SSM1项目名右键new一个module,命名为parent,设置它的gav。
 方式1:全部继承
(1)将parent的module作为父级,在parent的pom.xml中:
<!--设置打包方式为pom-->
<packaging>pom</packaging>
<dependencies>
  <dependency>
     <groupId>mysql</groupId>
     <artifactId>mysql-connector-java</artifactId>
     <version>8.0.25</version>
  </dependency>
</dependencies>
(2)那么想要引用它的全部类的子级module即HelloFriend,只需要在pom.xml中与dependencies平行的地方引入parent标签,然后将parent的gav拿过来:
<parent>
   <groupId>org.example</groupId>
   <artifactId>parent</artifactId>
   <version>1.0-SNAPSHOT</version>
</parent>
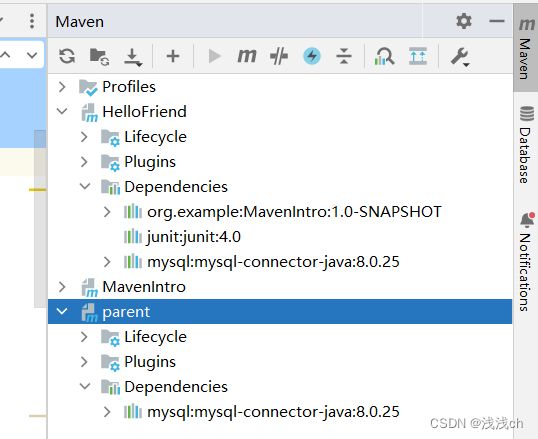
可以看到这时HelloFriend的module自动将parent的module全部继承过来了:
方式2:选择继承
(1)将parent的module作为父级,在parent的pom.xml中用dependencyManagement标签管理可以选择继承的依赖:
<packaging>pom</packaging>

<dependencies>
   <dependency>
     <groupId>mysql</groupId>
     <artifactId>mysql-connector-java</artifactId>
     <version>8.0.25</version>
   </dependency>
</dependencies>

<dependencyManagement>
   <dependencies>
      <dependency>
         <groupId>commons-dbutils</groupId>
         <artifactId>commons-dbutils</artifactId>
         <version>1.6</version>
      </dependency>

      <dependency>
          <groupId>org.mybatis</groupId>
          <artifactId>mybatis</artifactId>
          <version>3.5.11</version>
       </dependency>
   </dependencies>
</dependencyManagement>
(2)在选择继承的HelloFriend的module中,先将parent的gav写到parent标签中:
<parent>
    <groupId>org.example</groupId>
    <artifactId>parent</artifactId>
    <version>1.0-SNAPSHOT</version>
</parent>
然后将要继承的依赖导入ga不要v:
    <dependencies>
        <dependency>
            <groupId>commons-dbutils</groupId>
            <artifactId>commons-dbutils</artifactId>
        </dependency>
    </dependencies>
那么子级会有dbutils的jar包了:
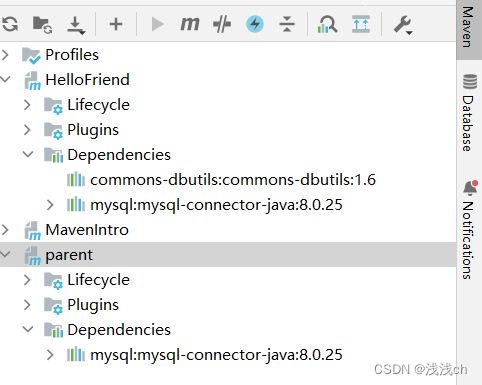
想要修改版本只需要到parent的pom.xml中修改v即可。
4.6 Maven的聚合
主要目的:为了统一的构建。
(1)如果聚合模块和被聚合模块没有继承关系:
将HelloFriend中的parent标签标为注释,那么其与parent不存在继承关系,那么这时只需要在parent的module(聚合模块)中的pom.xml加上:
<!--配置聚合-->
    <modules>
        <!--从当前文件出发通过相对路径寻找被聚合的模块,./表示上一层,就出了parent文件夹;../表示上两层,就出了SSM1文件夹,然后可以在里面选择进入到HelloFriend文件夹-->
        <module>../MavenIntro</module>
        <module>../HelloFriend</module>
    </modules>
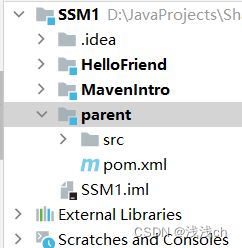
文件关系:
那么这时双击parent的Lifecycle中的install,就可以一次性全部安装好需要的jar包,直接自动完成安装。
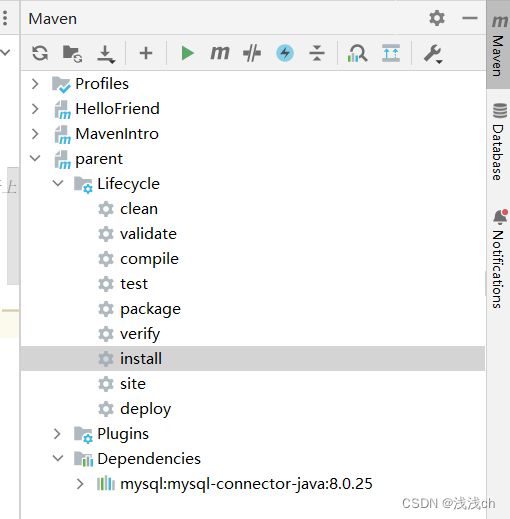
这时点击Lifecycle里面的clean也会自动将jar包清空。
(2)如果聚合模块和被聚合模块有继承关系:
HelloFriend中的parent标签继承了parent的module,现在需要被聚合在parent的module中。
除了parent的module的pom.xml文件中需要像上面一样增加modules标签外:
<!--配置聚合-->
    <modules>
        <!--从当前文件出发通过相对路径寻找被聚合的模块,./表示上一层,就出了parent文件夹;../表示上两层,就出了SSM1文件夹,然后可以在里面选择进入到HelloFriend文件夹-->
        <module>../MavenIntro</module>
        <module>../HelloFriend</module>
    </modules>
还需要在HelloFriend的module的pom.xml中使用relativePath标签增加相对路径的查找:
    <parent>
        <!--将父级的gav拿过来即可-->
        <groupId>org.example</groupId>
        <artifactId>parent</artifactId>
        <version>1.0-SNAPSHOT</version>
        <!--配置聚合式,子级需要添加一个内容:从当前文件出发通过相对路径,寻找父级的pom.xml-->
        <relativePath>../parent/pom.xml</relativePath>
    </parent>
这时双击parent的Lifecycle中的install,就可以一次性全部安装好需要的jar包,直接自动完成安装。
