【Vue2.0源码学习】内置组件篇-keep-alive
文章目录
- 1. 前言
- 2 用法回顾
- 3. 实现原理
- props
- created
- destroyed
- mounted
- render
- 4. 生命周期钩子
- 5. 总结
1. 前言
Vue 实现的一个内置组件,也就是说 Vue 源码不仅实现了一套组件化的机制,也实现了一些内置组件,关于
是Vue中内置的一个抽象组件,它自身不会渲染一个DOM元素,也不会出现在父组件链中。当它包裹动态组件时,会缓存不活动的组件实例,而不是销毁它们。
这句话的意思简单来说:就是我们可以把一些不常变动的组件或者需要缓存的组件用
我们来举个例子看看,假如有如下代码:
<div id="app">
  <button @click="switchComp('child1')">组件1button>
  <button @click="switchComp('child2')">组件2button>
  <component :is="chooseComponent">component>
div>
<body>
  <script src="https://cdn.jsdelivr.net/npm/vue/dist/vue.js">script>
  <script>
    var child1 = {
      template: '组件1:',
    }
    var child2 = {
      template: '组件2:'
    }
    var vm = new Vue({
      el: '##app',
      components: {
        child1,
        child2,
      },
      data() {
        return {
          chooseComponent: 'child1',
        }
      },
      methods: {
        switchComp(component) {
          this.chooseComponent = component;
        }
      }
    })
  script>
body>
可以看到,上述代码中定义了两个子组件child1和child2,然后使用两个按钮和一个动态组件来做出点击按钮切换不同组件的效果,如下图:
从上图中可以看到,我们给组件1和组件2的输入框中分别输入了不同的内容后,之后当我们点击按钮切换组件的时候,切换之前输入的内容已经不存在了,这就说明点击按钮切换组件是把之前的组件销毁,然后又重新挂载了一次。
但是我们有时候又会有这样的需求:当用户再次切回组件时保留切走之前的组件状态。此时Vue内置的
<div id="app">
  <button @click="switchComp('child1')">组件1button>
  <button @click="switchComp('child2')">组件2button>
  <keep-alive>
    <component :is="chooseComponent">component>
  keep-alive>
div>
此时的效果如下:
可以看到,child1和child2不管怎么切换它都能保留自己切换之前的状态了。这就说明,当我们切换组件的时候,组件并没有被销毁,而是被保存在了内存中,这样当我们再次切回去的时候就可以拿到切走之前的状态。
那么,
2 用法回顾
介绍原理之前,我们先根据官方文档来回顾一下
include- 字符串或正则表达式。只有名称匹配的组件会被缓存。exclude- 字符串或正则表达式。任何名称匹配的组件都不会被缓存。max- 数字。最多可以缓存多少组件实例。
include 和 exclude 属性允许组件有条件地缓存。二者都可以用逗号分隔字符串、正则表达式或一个数组来表示:
<keep-alive include="a,b">
  <component :is="view">component>
keep-alive>


<keep-alive :include="/a|b/">
  <component :is="view">component>
keep-alive>


<keep-alive :include="['a', 'b']">
  <component :is="view">component>
keep-alive>
匹配时首先检查组件自身的 name 选项,如果 name 选项不可用,则匹配它的局部注册名称 (父组件 components 选项的键值),也就是组件的标签值。匿名组件不能被匹配。
max表示最多可以缓存多少组件实例。一旦这个数字达到了,在新实例被创建之前,已缓存组件中最久没有被访问的实例会被销毁掉。
请读者注意此处加粗的地方,暂时有个印象,后面我们会详细说明。
<keep-alive :max="10">
  <component :is="view">component>
keep-alive>
OK,以上就是
3. 实现原理
src/core/components/keep-alive.js 文件中,如下:
export default {
  name: 'keep-alive',
  abstract: true,

  props: {
    include: [String, RegExp, Array],
    exclude: [String, RegExp, Array],
    max: [String, Number]
  },

  created () {
    this.cache = Object.create(null)
    this.keys = []
  },

  destroyed () {
    for (const key in this.cache) {
      pruneCacheEntry(this.cache, key, this.keys)
    }
  },

  mounted () {
    this.$watch('include', val => {
      pruneCache(this, name => matches(val, name))
    })
    this.$watch('exclude', val => {
      pruneCache(this, name => !matches(val, name))
    })
  },

  render() {
    /* 获取默认插槽中的第一个组件节点 */
    const slot = this.$slots.default
    const vnode = getFirstComponentChild(slot)
    /* 获取该组件节点的componentOptions */
    const componentOptions = vnode && vnode.componentOptions

    if (componentOptions) {
      /* 获取该组件节点的名称,优先获取组件的name字段,如果name不存在则获取组件的tag */
      const name = getComponentName(componentOptions)

      const { include, exclude } = this
      /* 如果name不在inlcude中或者存在于exlude中则表示不缓存,直接返回vnode */
      if (
        (include && (!name || !matches(include, name))) ||
        // excluded
        (exclude && name && matches(exclude, name))
      ) {
        return vnode
      }

      const { cache, keys } = this
      const key = vnode.key == null
        // same constructor may get registered as different local components
        // so cid alone is not enough (##3269)
        ? componentOptions.Ctor.cid + (componentOptions.tag ? `::${componentOptions.tag}` : '')
        : vnode.key
      if (cache[key]) {
        vnode.componentInstance = cache[key].componentInstance
        // make current key freshest
        remove(keys, key)
        keys.push(key)
      } else {
        cache[key] = vnode
        keys.push(key)
        // prune oldest entry
        if (this.max && keys.length > parseInt(this.max)) {
          pruneCacheEntry(cache, keys[0], keys, this._vnode)
        }
      }

      vnode.data.keepAlive = true
    }
    return vnode || (slot && slot[0])
  }
}
可以看到,该组件内没有常规的标签,取而代之的是它内部多了一个叫做render的函数,所以它不是一个常规的模板组件,而是一个函数式组件。执行 render 函数。了解了这个以后,接下来我们从上到下一步一步细细阅读。
props
在props选项内接收传进来的三个属性:include、exclude和max。如下:
props: {
    include: [String, RegExp, Array],
    exclude: [String, RegExp, Array],
    max: [String, Number]
}
include 表示只有匹配到的组件会被缓存,而 exclude 表示任何匹配到的组件都不会被缓存, max表示缓存组件的数量,因为我们是缓存的 vnode 对象,它也会持有 DOM,当我们缓存的组件很多的时候,会比较占用内存,所以该配置允许我们指定缓存组件的数量。
created
在 created 钩子函数里定义并初始化了两个属性: this.cache 和 this.keys。
created () {
    this.cache = Object.create(null)
    this.keys = []
}
this.cache是一个对象,用来存储需要缓存的组件,它将以如下形式存储:
this.cache = {
    'key1':'组件1',
    'key2':'组件2',
    // ...
}
this.keys是一个数组,用来存储每个需要缓存的组件的key,即对应this.cache对象中的键值。
destroyed
当destroyed钩子函数,在该钩子函数里会遍历this.cache对象,然后将那些被缓存的并且当前没有处于被渲染状态的组件都销毁掉并将其从this.cache对象中剔除。如下:
destroyed () {
    for (const key in this.cache) {
        pruneCacheEntry(this.cache, key, this.keys)
    }
}

// pruneCacheEntry函数
function pruneCacheEntry (cache,key,keys,current) {
  const cached = cache[key]
  /* 判断当前没有处于被渲染状态的组件,将其销毁*/
  if (cached && (!current || cached.tag !== current.tag)) {
    cached.componentInstance.$destroy()
  }
  cache[key] = null
  remove(keys, key)
}
mounted
在mounted钩子函数中观测 include 和 exclude 的变化,如下:
mounted () {
    this.$watch('include', val => {
        pruneCache(this, name => matches(val, name))
    })
    this.$watch('exclude', val => {
        pruneCache(this, name => !matches(val, name))
    })
}
如果include 或exclude 发生了变化,即表示定义需要缓存的组件的规则或者不需要缓存的组件的规则发生了变化,那么就执行pruneCache函数,函数如下:
function pruneCache (keepAliveInstance, filter) {
  const { cache, keys, _vnode } = keepAliveInstance
  for (const key in cache) {
    const cachedNode = cache[key]
    if (cachedNode) {
      const name = getComponentName(cachedNode.componentOptions)
      if (name && !filter(name)) {
        pruneCacheEntry(cache, key, keys, _vnode)
      }
    }
  }
}

function pruneCacheEntry (cache,key,keys,current) {
  const cached = cache[key]
  if (cached && (!current || cached.tag !== current.tag)) {
    cached.componentInstance.$destroy()
  }
  cache[key] = null
  remove(keys, key)
}
在该函数内对this.cache对象进行遍历,取出每一项的name值,用其与新的缓存规则进行匹配,如果匹配不上,则表示在新的缓存规则下该组件已经不需要被缓存,则调用pruneCacheEntry函数将这个已经不需要缓存的组件实例先销毁掉,然后再将其从this.cache对象中剔除。
render
接下来就是重头戏render函数,也是本篇文章中的重中之重。以上工作都是一些辅助工作,真正实现缓存功能的就在这个render函数里,接下来我们逐行分析它。
在render函数中首先获取第一个子组件节点的 vnode:
/* 获取默认插槽中的第一个组件节点 */
const slot = this.$slots.default
const vnode = getFirstComponentChild(slot)
由于我们也是在 component 动态组件或者是 router-view。
接下来获取该组件节点的名称:
/* 获取该组件节点的名称 */
const name = getComponentName(componentOptions)

/* 优先获取组件的name字段,如果name不存在则获取组件的tag */
function getComponentName (opts: ?VNodeComponentOptions): ?string {
  return opts && (opts.Ctor.options.name || opts.tag)
}
然后用组件名称跟 include、exclude 中的匹配规则去匹配:
const { include, exclude } = this
/* 如果name与include规则不匹配或者与exclude规则匹配则表示不缓存,直接返回vnode */
if (
    (include && (!name || !matches(include, name))) ||
    // excluded
    (exclude && name && matches(exclude, name))
) {
    return vnode
}
如果组件名称与 include 规则不匹配或者与 exclude 规则匹配,则表示不缓存该组件,直接返回这个组件的 vnode,否则的话走下一步缓存:
const { cache, keys } = this
/* 获取组件的key */
const key = vnode.key == null
? componentOptions.Ctor.cid + (componentOptions.tag ? `::${componentOptions.tag}` : '')
: vnode.key

/* 如果命中缓存,则直接从缓存中拿 vnode 的组件实例 */
if (cache[key]) {
    vnode.componentInstance = cache[key].componentInstance
    /* 调整该组件key的顺序,将其从原来的地方删掉并重新放在最后一个 */
    remove(keys, key)
    keys.push(key)
}
/* 如果没有命中缓存,则将其设置进缓存 */
else {
    cache[key] = vnode
    keys.push(key)
    /* 如果配置了max并且缓存的长度超过了this.max,则从缓存中删除第一个 */
    if (this.max && keys.length > parseInt(this.max)) {
        pruneCacheEntry(cache, keys[0], keys, this._vnode)
    }
}
/* 最后设置keepAlive标记位 */
vnode.data.keepAlive = true
首先获取组件的key值:
const key = vnode.key == null?
componentOptions.Ctor.cid + (componentOptions.tag ? `::${componentOptions.tag}` : '')
: vnode.key
拿到key值后去this.cache对象中去寻找是否有该值,如果有则表示该组件有缓存,即命中缓存:
/* 如果命中缓存,则直接从缓存中拿 vnode 的组件实例 */
if (cache[key]) {
    vnode.componentInstance = cache[key].componentInstance
    /* 调整该组件key的顺序,将其从原来的地方删掉并重新放在最后一个 */
    remove(keys, key)
    keys.push(key)
}
直接从缓存中拿 vnode 的组件实例,此时重新调整该组件key的顺序,将其从原来的地方删掉并重新放在this.keys中最后一个。
如果this.cache对象中没有该key值:
/* 如果没有命中缓存,则将其设置进缓存 */
else {
    cache[key] = vnode
    keys.push(key)
    /* 如果配置了max并且缓存的长度超过了this.max,则从缓存中删除第一个 */
    if (this.max && keys.length > parseInt(this.max)) {
        pruneCacheEntry(cache, keys[0], keys, this._vnode)
    }
}
表明该组件还没有被缓存过,则以该组件的key为键,组件vnode为值,将其存入this.cache中,并且把key存入this.keys中。此时再判断this.keys中缓存组件的数量是否超过了设置的最大缓存数量值this.max,如果超过了,则把第一个缓存组件删掉。
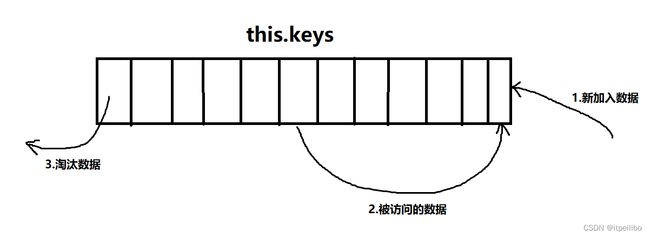
那么问题来了:为什么要删除第一个缓存组件并且为什么命中缓存了还要调整组件key的顺序?
这其实应用了一个缓存淘汰策略LRU:
LRU(Least recently used,最近最少使用)算法根据数据的历史访问记录来进行淘汰数据,其核心思想是“如果数据最近被访问过,那么将来被访问的几率也更高”。
它的算法是这样子的:
- 将新数据从尾部插入到
this.keys中; - 每当缓存命中(即缓存数据被访问),则将数据移到
this.keys的尾部; - 当
this.keys满的时候,将头部的数据丢弃;
LRU的核心思想是如果数据最近被访问过,那么将来被访问的几率也更高,所以我们将命中缓存的组件key重新插入到this.keys的尾部,这样一来,this.keys中越往头部的数据即将来被访问几率越低,所以当缓存数量达到最大值时,我们就删除将来被访问几率最低的数据,即this.keys中第一个缓存的组件。这也就之前加粗强调的已缓存组件中最久没有被访问的实例会被销毁掉的原因所在。
OK,言归正传,以上工作做完后设置 vnode.data.keepAlive = true ,最后将vnode返回。
以上就是render函数的整个过程。
4. 生命周期钩子
组件一旦被 created、mounted 等钩子函数,但是我们很多业务场景都是希望在我们被缓存的组件再次被渲染的时候做一些事情,好在Vue 提供了 activated和deactivated 两个钩子函数,它的执行时机是
let A = {
template: '' +
'A Comp
' +
'',
name: 'A',
mounted(){
console.log('Comp A mounted')
},
activated(){
console.log('Comp A activated')
},
deactivated(){
console.log('Comp A deactivated')
}
}
let B = {
template: '' +
'B Comp
' +
'',
name: 'B',
mounted(){
console.log('Comp B mounted')
},
activated(){
console.log('Comp B activated')
},
deactivated(){
console.log('Comp B deactivated')
}
}
let vm = new Vue({
el: '##app',
template: '' +
'' +
'' +
'' +
'' +
'' +
'',
data: {
currentComp: 'A'
},
methods: {
change() {
this.currentComp = this.currentComp === 'A' ? 'B' : 'A'
}
},
components: {
A,
B
}
})
在上述代码中,我们定义了两个组件A和B并为其绑定了钩子函数,并且在根组件中用 A,当点击switch按钮时,动态切换组件A和B。我们来看下效果:
从图中我们可以看到,当第一次打开页面时,组件A被挂载,执行了组件A的mounted和activated钩子函数,当点击switch按钮后,组件A停止调用,同时组件B被挂载,此时执行了组件A的deactivated和组件B的mounted和activated钩子函数。此时再点击switch按钮,组件B停止调用,组件A被再次激活,我们发现现在只执行了组件A的activated钩子函数,这就验证了文档中所说的组件一旦被 created、mounted 等钩子函数。
5. 总结
本篇文章介绍了Vue中的内置组件
首先,通过简单例子介绍了
接着,根据官方文档回顾了
然后,从源码角度深入分析了LRU的缓存策略。
最后,观察了
读完这篇文章相信在面试中被问到


