微信小程序-地图类应用
这段时间由于公司的要求将我们APP做了一个微信小程序的版本出来,也是自己对微信小程序好奇,就接下来了,按照流程先看微信小程序API文档,然后申请小程序,一系列配置(这里就不介绍了,文档里都写的很清楚),然后确定功能,出UI原型图,开工写代码,单元测试,整个花了2个周的时间;
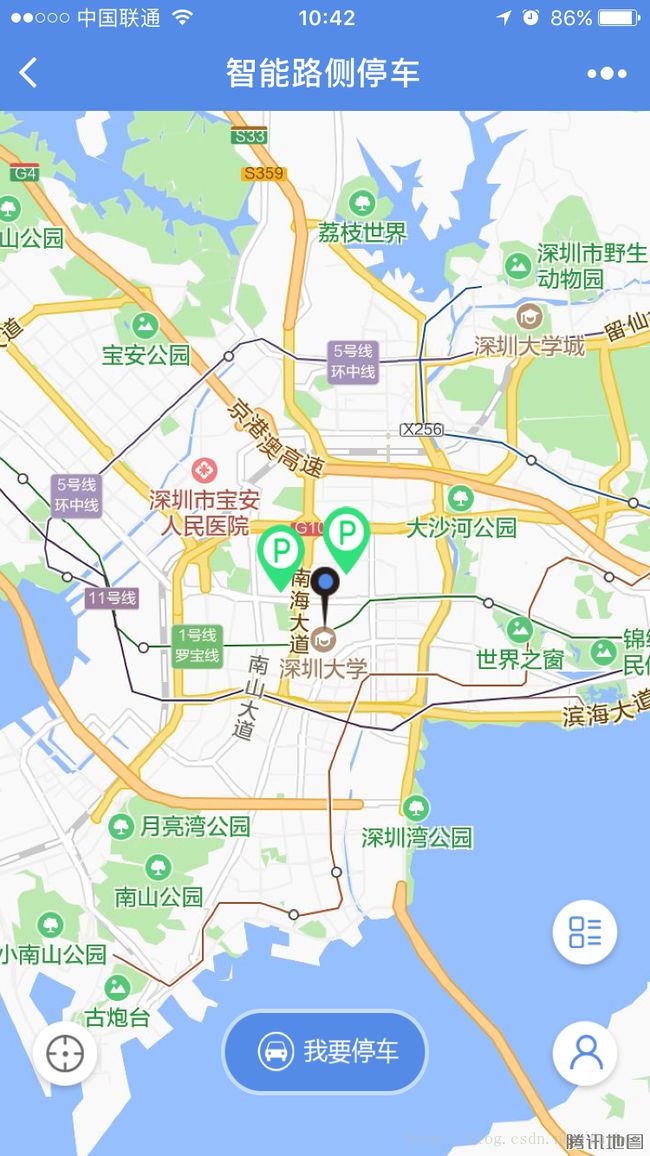
废话了一堆,这里主要介绍下微信小程序map的使用,先来一张效果图:
这里贴下主要代码介绍下:
先是wxml文件:
<map id='parkingMap' class='mp_map' longitude="{{lon}}" latitude="{{lat}}" scale='14' markers='{{markers}}' controls='{{controls}}' bindcontroltap='controltap' bindmarkertap='markertap' show-location='true' bindregionchange='regionchange' bindtap='clickOther'> 标签里的属性API文档里都有介绍,应该没什么好说的了;
可以看到在地图上有标记p,点击需要有提示信息,查了下微信map上面无法在继续添加覆盖物,然后看了API文档有个cover-view,于是就用这个来做了个提示信息:
    {{parkingName}}


      总车位:{{totalNum}}
      剩余车位:{{leftNum}}
注意这里是要添加到map标签里面:
加了个if判断,点击地图上的P才显示;
js文件:
初始化data:
//定义全局变量
var longitude, latitude, mapCtx
var centerLongitude, centerLatitude, windowWidth, windowHeight
 /**
   * 页面的初始数据
   */
  data: {
    lon: '',
    lat: '',
    is_show: false,
    parkingName:'',
    totalNum:'',
    leftNum:'',
    markers: [],
    controls: []
  },
首先是获取定位,使用微信小程序API提供的方式:
getloca:function(){
    var that = this
    var time
    wx.getLocation({
      type: "wgs84 ",
      success: function (res) {
        console.log(res.latitude)
        console.log(res.longitude)

        latitude = res.latitude
        longitude = res.longitude
        centerLatitude = latitude
        centerLongitude = longitude
        that.setData({
          lat: res.latitude,
          lon: res.longitude,
        })
      },
      fail: function (res) {

      }
    })
  },
在实际测试中,发现有的android机掉用改API就是无法定位,测试过所需要的权限都有,最后尝试了下百度地图,居然发现成功了,一下是百度地图定位(具体可以查看百度地图小程序API)的方式:
//引入百度地图api
var bmap = require('../../libs/bmap-wx.min.js');
//百度api定位我的位置
  getLocaByBM:function(){
    var that = this;
    var BMap = new bmap.BMapWX({
      ak: '你自己申请的ak'
    });
    var fail = function (data) {
      console.log(data)
    };
    var success = function (data) {
      wxMarkerData = data.wxMarkerData;
      console.log(wxMarkerData)
      centerLatitude = wxMarkerData[0].latitude
      centerLongitude = wxMarkerData[0].longitude

      that.setData({
        markers: wxMarkerData
      });
      that.setData({
       lat: wxMarkerData[0].latitude
      });
      that.setData({
        lon: wxMarkerData[0].longitude
      });
    }
    //好像必须要加这个
    BMap.regeocoding({
      fail: fail,
      success: success,
      iconPath: '../../image/center.png',
      iconTapPath: '../../img/center.png',
      width:23,
      height:40
    });
  },
好吧,这次的测试结果苹果,小米,华为,三星均能正常定位了;希望微信以后能改善这个问题吧。
不过这里需要注意一个问题,小程序是基于腾讯地图(使用火星坐标),百度地图定位出来的坐标需要转换才能正确的标识,文末会贴出转换的代码;
下面是map的操作了,常见的几种添加markers,controls,地图移动时的监听处理;
先介绍地图移动的监听处理:
这里可以结合微信API文档来看会更清晰(文笔不好,写的有些乱),先获取map对象:
this.mapCtx = wx.createMapContext('parkingMap')移动时获取中心点坐标:
//获取地图中心点坐标
  getcenterLocal: function () {
    var that = this
    this.mapCtx.getCenterLocation({
      success: function (res) {
        centerLatitude = res.latitude
        centerLongitude = res.longitude
        console.log("中心点坐标" + centerLatitude)
        console.log("中心点坐标" + centerLongitude)
      }
    })
  },
regionchange(e) {
    // 移动marker坐标
    // this.mapCtx.translateMarker({
    //   markerId: 0,
    //   autoRotate: false,
    //   duration: 300,
    //   destination: {
    //     latitude: centerLatitude,
    //     longitude: centerLongitude,
    //   }
    // })
  },
  this.mapCtx.moveToLocation()//移动到我的位置
下面是设置controls,因为我这里中间的那个大图标是有两种状态的,下单前是“我要停车”,下单后是“我的订单”,所以我这里用的方法是controls写了两套,通过接口放回的状态来判断显示哪一套:
//设置地图悬浮按钮
  setContral:function(that){
    that.setData({
      // width: windowWidth,
      // height: windowHeight,
      controls: [{
        //定位
        id: 0,
        iconPath: "../../image/location.png",
        position: {
          left: 15,
          top: windowHeight - 80,
          width: 45,
          height: 45
        },
        clickable: true
      }, {
        id: 1,
        iconPath: "../../image/user_center.png",
        position: {
          left: windowWidth - (15 + 45),
          top: windowHeight - 80,
          width: 45,
          height: 45
        },
        clickable: true
      }, {
        id: 2,
        iconPath: "../../image/list.png",
        position: {
          left: windowWidth - (15 + 45),
          top: windowHeight - 150,
          width: 45,
          height: 45
        },
        clickable: true
      }, {
        id: 3,
        iconPath: "../../image/parking.png",
        position: {
          left: windowWidth / 2 - 60,
          top: windowHeight - 85,
          width: 120,
          height: 50
        },
        clickable: true
      }]
    })
  },
第二套就是将最后一个修改为:
{
        id: 4,
        iconPath: "../../image/parking.png",
        position: {
          left: windowWidth / 2 - 60,
          top: windowHeight - 85,
          width: 120,
          height: 50
        },
        clickable: true
      }]
    }
id和图标修改一下,其他还是一样的;这种方式比较笨重,如果有朋友想到其他更好的方式麻烦底下留言;
设置markers,由于我这里的markers是通过传入中心点坐标去服务端动态获取,无法固定所以这里是这样写的:
getMarkers(parkingList) {
    let markers = [];
    for (let item of parkingList) {
      let marker = this.createMarker(item);
      markers.push(marker)
    }
    return markers;
  },

  //创建标记点、中心点、停车场
  createMarker(point) {
    let latitude = point.pointLat;
    let longitude = point.pointLng;
    let p = (point.leftNum / point.totalNum) * 100
    console.log("打印:" + p)
    let marker
    if (point.id == 0) {
      marker = {
        iconPath: "../../image/center.png",
        id: point.id,
        latitude: latitude,
        longitude: longitude,
        width: 23,
        height: 40
      }
    } else if (p <= 20 || !Boolean(p)) {
      marker = {
        iconPath: "../../image/red_parking.png",
        id: point.id,
        latitude: latitude,
        longitude: longitude,
        width: 28,
        height: 40
      }
    } else if (p > 20 && p <= 40) {

      marker = {
        iconPath: "../../image/yellow_parking.png",
        id: point.id,
        latitude: latitude,
        longitude: longitude,
        width: 28,
        height: 40
      }
    } else {
      marker = {
        iconPath: "../../image/green_parking.png",
        id: point.id,
        latitude: latitude,
        longitude: longitude,
        width: 28,
        height: 40
      }
    }
    return marker;
  },
其中parkingList是服务端获取的停车场列表;map的操作基本就是上面这些了,结合API来看你会收获更多。
一下是坐标转换的代码:经本人测试转换的坐标基本都是正确的:
//火星坐标转百度地图坐标系
    var x_pi = 3.14159265358979324 * 3000.0 / 180.0;
    var x = parseFloat(lon);
    var y = parseFloat(latu);
    var z = Math.sqrt(x * x + y * y) + 0.00002 * Math.sin(y * x_pi);
    var theta = Math.atan2(y, x) + 0.000003 * Math.cos(x * x_pi);
    var lng = z * Math.cos(theta) + 0.0065;
    var lat = z * Math.sin(theta) + 0.006;
//百度坐标转火星坐标
  var X_PI = Math.Pi * 3000.0 / 180.0;
  var x = bd_lon - 0.0065;
  var y = bd_lat - 0.006;
  var z = Math.sqrt(x * x + y * y) - 0.00002 * Math.sin(y * X_PI);
  var theta = Math.atan2(y, x) - 0.000003 * Math.cos(x * X_PI);
  var gg_lon = z * Math.cos(theta);
  var gg_lat = z * Math.sin(theta);
附上源码下载地址:http://download.csdn.net/download/fuyboy/10022245