使用braft-editor实现简易版即时写文档并预览的富文本编辑器
最近在看各个富文本编辑库的时候,有点好奇,于是对比了一些,有draft-js,Slate.js。但是这些基本都是英文库,简单demo无法满足需求,比如插入截图和表格,这些复杂结构的数据,实现这些,必须自定义扩展,要想做到这些,通读一遍文档基本是必须,且内含的天坑,估计也是数不胜数。市面上做的好的富文本编辑器,基本上各家我都使用了一下,语雀的文档就做的蛮好的,有道云也不错,当然人家是吃这口饭的,就单独说插入表格这个吧,(浅吐槽一句csdn写文章的插入表格都还蛮low的)还有插入模板,语雀做的非常棒了,选中表格也能即时删除某列,更别说插入模板了。富文本编辑器这东西,怎么说呢,简单的调用是很简单,复杂使用也是巨复杂。
好了言归正传,使用braft-editor库我简易的实现了富文本编辑器的效果,能够插入图片和表格,点击图片也能放大查看
具体效果如图:


具体代码如下:
import React, { useState, useEffect,useRef } from 'react';
import 'braft-editor/dist/index.css';
import 'braft-extensions/dist/table.css';
import BraftEditor from 'braft-editor';
import Table from 'braft-extensions/dist/table';
import {Image } from 'antd';
import './index.less'

BraftEditor.use(Table({
  defaultColumns: 2, // 默认列数
  defaultRows: 1, // 默认行数
  withDropdown: false, // 插入表格前是否弹出下拉菜单
  columnResizable: false, // 是否允许拖动调整列宽,默认false
  exportAttrString: 'border="1" style="border-collapse: collapse"', // 指定输出HTML时附加到table标签上的属性字符串
  includeEditors: ['editor-id-1'], // 指定该模块对哪些BraftEditor生效,不传此属性则对所有BraftEditor有效
  excludeEditors: ['editor-id-2']  // 指定该模块对哪些BraftEditor无效
}));

const RichTextEditor = () => {
  const [editorState, setEditorState] = useState(BraftEditor.createEditorState(''));
  const [content, setContent] = useState('');
  const editorRef = useRef(null);
   // 预览图片的显示隐藏
   const [visible, setVisible] = useState(false);
   // 预览图片的src
   const [imgSrc, setImgSrc] = useState('');

  const handleEditorChange = (editorState) => {
    setEditorState(editorState);
    setContent(editorState.toHTML());
    console.log('editorState=====',JSON.stringify(editorState.toHTML()))
    console.log('editorState-------',editorState.toRAW())
  };

  useEffect(() => {
    const fetchData = async () => {
      const response = await fetch('your-backend-api-url');
      const data = await response.json();
      const editorState = BraftEditor.createEditorState(data.content);
      setEditorState(editorState);
    };

    fetchData();
  }, []);

  const saveContent = async () => {
    const htmlContent = editorState.toHTML();
    await fetch('your-backend-api-url', {
      method: 'POST',
      body: JSON.stringify({ content: htmlContent }),
      headers: {
        'Content-Type': 'application/json',
      },
    });
    console.log('内容保存成功');
  };

  const tableOptions = {
    defaultColumns: 1,
    defaultRows: 1,
    withDropdown: true,
  };


  const handleImg = (e) => {
    if (e.target.nodeName === 'IMG') {
      setVisible(true);
      setImgSrc(e.target.currentSrc);
    }
  };

  return (
    <>
    <div style={{display:'flex',justifyContent:'space-around'}}>
      <div style={{width:'800px',height:'700px'}} onClick={handleImg}>
      <BraftEditor   placeholder="请输入正文内容" style={{ border: '1px solid #d9d9d9', height: 700,background:'#FAFAFA' }}  ref={editorRef} value={editorState} onChange={handleEditorChange}
      id="editor-id-1"
    extendControls={[
      'separator',
      {
        key: 'my-modal',
        type: 'modal',
        title: '这是一个自定义的下拉组件', // 指定鼠标悬停提示文案
        className: 'my-modal', // 指定触发按钮的样式名
        html: null, // 指定在按钮中渲染的html字符串
        text: 'Hello', // 指定按钮文字,此处可传入jsx,若已指定html,则text不会显示
        onClick: () => {}, // 指定触发按钮点击后的回调函数
        modal: {
            id: 'my-modal', // 必选属性,传入一个唯一字符串即可
            title: '我的弹窗', // 指定弹窗组件的顶部标题
            className: 'my-modal', // 指定弹窗组件样式名
            width: 500, // 指定弹窗组件的宽度
            height: 500, // 指定弹窗组件的高度
            showFooter: true, // 指定是否显示弹窗组件底栏
            showCancel: true, // 指定是否显示取消按钮
            showConfirm: true, // 指定是否显示确认按钮
            confirmable: true, // 指定确认按钮是否可用
            showClose: true, // 指定是否显示右上角关闭按钮
            closeOnBlur: true, // 指定是否在点击蒙层后关闭弹窗(v2.1.24)
            closeOnConfirm: true, // 指定是否在点击确认按钮后关闭弹窗(v2.1.26)
            closeOnCancel: true, // 指定是否在点击取消按钮后关闭弹窗(v2.1.26)
            cancelText: '取消', // 指定取消按钮文字
            confirmText: '确定', // 指定确认按钮文字
            bottomText: null, // 指定弹窗组件底栏左侧的文字,可传入jsx
            onConfirm: () => {}, // 指定点击确认按钮后的回调函数
            onCancel: () => {}, // 指定点击取消按钮后的回调函数
            onClose: () => {}, // 指定弹窗被关闭后的回调函数
            onBlur: () => {}, // 指定蒙层被点击时的回调函数
            children: <>这是一个弹窗</>, // 指定弹窗组件的内容组件
        }
    }
    ]}
      />
      <Image
            width={400}
            style={{
              display: 'none',
            }}
            src={imgSrc}
            preview={{
              visible,
              src: imgSrc,
              onVisibleChange: (value) => {
                setVisible(value);
              },
            }}
          />
      </div>
      <div onClick={handleImg} dangerouslySetInnerHTML={{ __html: content }} style={{width:'800px',height:'700px',border: '1px solid #d9d9d9',padding:'20px'}} className='cont'></div>
    </div>
    <button onClick={saveContent}>保存</button>
    </>
  );
};

export default RichTextEditor;
index.less 文件如下:
.cont {
  table{
    width: 100%;
    border-color: #d9d9d9;
    td{
      height: 36px;
    }
  }
  pre {
    max-width: 100%;
    max-height: 100%;
    margin: 10px 0;
    padding: 15px;
    overflow: auto;
    background-color: #f1f2f3;
    border-radius: 3px;
    color: #666;
    font-family: monospace;
    font-size: 14px;
    font-weight: 400;
    line-height: 16px;
    word-wrap: break-word;
    white-space: pre-wrap;
  }
  ul{
    list-style-type:disc;
     list-style-position:inside;
    }
  ol{
    list-style-type:decimal;
    list-style-position:inside;
  }
}
友情提示
gif文件是不能直接粘贴进去编辑器里面的,对于此我又额外去研究了一下。ContentUtils是Braft Editor基础工具包链接在此,在通过受控组件的形式使用编辑器时,你可以通过操作editorState来达到一些特定的需求。这种使用extendControls自定义控件,需要借助上传文件的方法让后端返回url再回显到编辑器里面。语雀也是这么做的。
为此我们需要自定义一个自定义控件
extendControls={[
'separator',
{
key: 'my-modal',
type: 'modal',
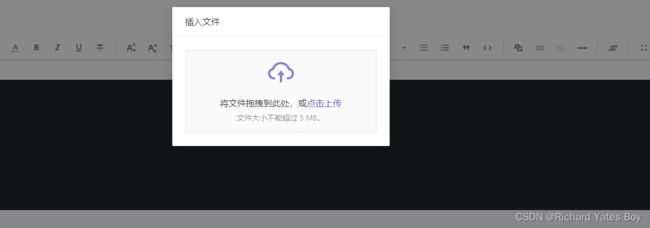
title: '插入文件', // 指定鼠标悬停提示文案
className: 'my-modal', // 指定触发按钮的样式名
html: null, // 指定在按钮中渲染的html字符串
text: '插入文件', // 指定按钮文字,此处可传入jsx,若已指定html,则text不会显示
onClick: () => {
setIsVisible(true);
}, // 指定触发按钮点击后的回调函数
},
]}
点击插入文件弹出modal框,这一步就跟普通的上传文件一样
紧接着在上传文件成功时,拿到URL处理一下再返回编辑器里面,
 const uploadFiles = {
    name: 'file',
    multiple: false,
    action: toHandleToken(),
    showUploadList: false,
    beforeUpload: (file) => {
      console.log(file, '文件');
      const fileType = file.name.split('.').pop();
      console.log(fileType);
      if (fileType !== 'gif' && fileType !== 'jpg' && fileType !== 'mp4') {
        noticeError(`上传失败:上传文件格式非.jpg,.gif,.mp4`);
        return false;
      }
      const arrData = fileList;
      for (let i = 0; i < arrData.length; i++) {
        if (arrData[i].name == file.name) {
          noticeError(`上传失败:禁止上传重复的文件`);
          return false;
        }
      }
      return true;
    },
    onChange: (info) => {
      console.log(info);
      if (info.file.status === 'done') {
        // 图片上传成功返回url
        const newEditorState = ContentUtils.insertMedias(editorState, [
          {
            type: info?.file?.type?.includes('image')
              ? 'IMAGE'
              : info?.file?.type?.includes('mp4')
              ? 'VIDEO'
              : 'AUDIO',
            url: info.file.response.fileUrl, // 图片url,
          },
        ]);
        setEditorState(newEditorState);
        setFileList(info.fileList);
        setIsVisible(false);
      } else if (info.file.status === 'error') {
      }
    },
  };
另外存储编辑器内容最好以raw形式存储。具体见官方文档
下面贴出全部代码:
import React, { useState } from 'react';
import BraftEditor from 'braft-editor';
import 'braft-editor/dist/index.css';
import { ContentUtils } from 'braft-utils';
import { Button, message, Upload, Modal } from 'antd';
import { noticeError, noticeSuccess, noticeWarn } from '@/utils/noticeUtil';
import { CloudUploadOutlined } from '@ant-design/icons';
import baseUrl from '@/utils/globalUrl';
const { Dragger } = Upload;
const MyEditor = () => {
  const [editorState, setEditorState] = useState(
    BraftEditor.createEditorState(null),
  );
  const [isVisible, setIsVisible] = useState(false);
  const [fileList, setFileList] = useState([]);

  const handleEditorChange = (editorState) => {
    //console.log(editorState)
    setEditorState(editorState);
    //console.log('editorState=====',JSON.stringify(editorState.toHTML()))
    console.log('editorState-------', editorState.toRAW());
  };

  const insertGif = () => {
    const gifUrl = 'https://dev-xxxxxxx.gif'; // 替换为你的 GIF 图片 URL
    const newEditorState = ContentUtils.insertMedias(editorState, [
      {
        type: 'IMAGE',
        url: gifUrl,
        meta: {
          id: 'gifId',
          gif: true,
        },
      },
    ]);
    setEditorState(newEditorState);
  };

  //处理导入文件的url
  const toHandleToken = () => {
    let baseurl = `${baseUrl}/api/auto_devops/script/upload?`;
    let url;
    let resInfo = sessionStorage.getItem('oauth');
    if (resInfo != null) {
      let resJsons = JSON.parse(resInfo);
      let token = resJsons.access_token;
      url = baseurl + 'access_token=' + token;
    } else {
      url = baseurl + '';
    }
    return url;
  };
  const uploadFiles = {
    name: 'file',
    multiple: false,
    action: toHandleToken(),
    showUploadList: false,
    beforeUpload: (file) => {
      console.log(file, '文件');
      const fileType = file.name.split('.').pop();
      console.log(fileType);
      if (fileType !== 'gif' && fileType !== 'jpg' && fileType !== 'mp4') {
        noticeError(`上传失败:上传文件格式非.jpg,.gif,.mp4`);
        return false;
      }
      const arrData = fileList;
      for (let i = 0; i < arrData.length; i++) {
        if (arrData[i].name == file.name) {
          noticeError(`上传失败:禁止上传重复的文件`);
          return false;
        }
      }
      return true;
    },
    onChange: (info) => {
      console.log(info);
      if (info.file.status === 'done') {
        // 图片上传成功返回url
        const newEditorState = ContentUtils.insertMedias(editorState, [
          {
            type: info?.file?.type?.includes('image')
              ? 'IMAGE'
              : info?.file?.type?.includes('mp4')
              ? 'VIDEO'
              : 'AUDIO',
            url: info.file.response.fileUrl, // 图片url,
          },
        ]);
        setEditorState(newEditorState);
        setFileList(info.fileList);
        setIsVisible(false);
      } else if (info.file.status === 'error') {
      }
    },
  };

  return (
    <div>
      <button onClick={insertGif}>插入 GIF</button>
      <BraftEditor
        value={editorState}
        onChange={handleEditorChange}
        extendControls={[
          'separator',
          {
            key: 'my-modal',
            type: 'modal',
            title: '插入文件', // 指定鼠标悬停提示文案
            className: 'my-modal', // 指定触发按钮的样式名
            html: null, // 指定在按钮中渲染的html字符串
            text: '插入文件', // 指定按钮文字,此处可传入jsx,若已指定html,则text不会显示
            onClick: () => {
              setIsVisible(true);
            }, // 指定触发按钮点击后的回调函数
          },
        ]}
      />
      <Modal
        closable={false}
        visible={isVisible}
        onCancel={() => {
          setIsVisible(false);
        }}
        title={'插入文件'}
        width={400}
        footer={null}
      >
        <Dragger {...uploadFiles}>
          <p className="ant-upload-drag-icon">
            <CloudUploadOutlined />
          </p>
          <p className="ant-upload-text">
            将文件拖拽到此处,或<a>点击上传</a>
          </p>
          <p className="ant-upload-hint">文件大小不能超过 5 MB。</p>
        </Dragger>
      </Modal>
    </div>
  );
};

const App = () => {
  return (
    <div>
      <h1>富文本编辑器示例</h1>
      <MyEditor />
    </div>
  );
};

export default App;