spring动态数据源,多数据源
Spring是如何支持多数据源的
Spring提供了一个AbstractRoutingDataSource类,用来实现对多个DataSource的按需路由,本文介绍的就是基于此方式实现的多数据源实践。
一、什么是AbstractRoutingDataSource
先看类上的注释:
Abstract {@link javax.sql.DataSource} implementation that routes {@link #getConnection()}
calls to one of various target DataSources based on a lookup key. The latter is usually
(but not necessarily) determined through some thread-bound transaction context.
课代表翻译:这是一个抽象类,可以通过一个lookup key,把对getConnection()方法的调用,路由到目标DataSource。后者(指lookup key)通常是由和线程绑定的上下文决定的。
这段注释可谓字字珠玑,没有一句废话。下文结合主要代码解释其含义。
public abstract class AbstractRoutingDataSource extends AbstractDataSource implements InitializingBean {

    //目标 DataSource Map,可以装很多个 DataSource
    @Nullable
    private Map targetDataSources;

    @Nullable
    private Map resolvedDataSources;

    //Bean初始化时,将 targetDataSources 遍历并解析后放入 resolvedDataSources
    @Override
    public void afterPropertiesSet() {
        if (this.targetDataSources == null) {
            throw new IllegalArgumentException("Property 'targetDataSources' is required");
        }
        this.resolvedDataSources = CollectionUtils.newHashMap(this.targetDataSources.size());
        this.targetDataSources.forEach((key, value) -> {
            Object lookupKey = resolveSpecifiedLookupKey(key);
            DataSource dataSource = resolveSpecifiedDataSource(value);
            this.resolvedDataSources.put(lookupKey, dataSource);
        });
        if (this.defaultTargetDataSource != null) {
            this.resolvedDefaultDataSource = resolveSpecifiedDataSource(this.defaultTargetDataSource);
        }
    }

    @Override
    public Connection getConnection() throws SQLException {
        return determineTargetDataSource().getConnection();
    }

    /**
     * Retrieve the current target DataSource. Determines the
     * {@link #determineCurrentLookupKey() current lookup key}, performs
     * a lookup in the {@link #setTargetDataSources targetDataSources} map,
     * falls back to the specified
     * {@link #setDefaultTargetDataSource default target DataSource} if necessary.
     * @see #determineCurrentLookupKey()
     */
     //根据 #determineCurrentLookupKey()返回的lookup key 去解析好的数据源 Map 里取相应的数据源
    protected DataSource determineTargetDataSource() {
        Assert.notNull(this.resolvedDataSources, "DataSource router not initialized");
        // 当前 lookupKey 的值由用户自己实现↓
        Object lookupKey = determineCurrentLookupKey();
        DataSource dataSource = this.resolvedDataSources.get(lookupKey);
        if (dataSource == null && (this.lenientFallback || lookupKey == null)) {
            dataSource = this.resolvedDefaultDataSource;
        }
        if (dataSource == null) {
            throw new IllegalStateException("Cannot determine target DataSource for lookup key [" + lookupKey + "]");
        }
        return dataSource;
    }

    /**
     * Determine the current lookup key. This will typically be
     * implemented to check a thread-bound transaction context.
     * Allows for arbitrary keys. The returned key needs
     * to match the stored lookup key type, as resolved by the
     * {@link #resolveSpecifiedLookupKey} method.
     */
    // 该方法用来决定lookup key,通常用线程绑定的上下文来实现
    @Nullable
    protected abstract Object determineCurrentLookupKey();

    // 省略其余代码...

}
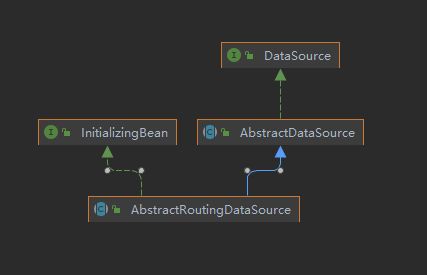
首先看类图
是个DataSource,并且实现了InitializingBean,说明有Bean的初始化操作。
其次看实例变量
private Map和private Map其实是一回事,后者是经过对前者的解析得来的,本质就是用来存储多个 DataSource实例的 Map。
最后看核心方法
使用DataSource,本质就是调用其getConnection()方法获得连接,从而进行数据库操作。
AbstractRoutingDataSource#getConnection()方法首先调用determineTargetDataSource(),决定使用哪个目标数据源,并使用该数据源的getConnection()连接数据库:
@Override
public Connection getConnection() throws SQLException {
   return determineTargetDataSource().getConnection();
}
protected DataSource determineTargetDataSource() {
   Assert.notNull(this.resolvedDataSources, "DataSource router not initialized");
   // 这里使用的 lookupKey 就能决定返回的数据源是哪个
   Object lookupKey = determineCurrentLookupKey();
   DataSource dataSource = this.resolvedDataSources.get(lookupKey);
   if (dataSource == null && (this.lenientFallback || lookupKey == null)) {
      dataSource = this.resolvedDefaultDataSource;
   }
   if (dataSource == null) {
      throw new IllegalStateException("Cannot determine target DataSource for lookup key [" + lookupKey + "]");
   }
   return dataSource;
}
所以重点就是determineCurrentLookupKey()方法,该方法是抽象方法,由用户自己实现,通过改变其返回值,控制返回不同的数据源。用表格表示如下:
| lookupKey | DataSource |
|---|---|
| first | firstDataSource |
| second | secondDataSource |
如何实现这个方法呢?结合Spring在注释里给的提示:
后者(指 lookup key)通常是由和线程绑定的上下文决定的。
应该能联想到ThreadLocal了吧!ThreadLocal可以维护一个与当前线程绑定的变量,充当这个线程的上下文。
二、实现
设计yaml文件外部化配置多个数据源
spring:
  datasource:
    first:
      driver-class-name: org.h2.Driver
      jdbc-url: jdbc:h2:mem:db1
      username: sa
      password:
    second:
      driver-class-name: org.h2.Driver
      jdbc-url: jdbc:h2:mem:db2
      username: sa
      password:
创建lookupKey的上下文持有类:
/**
 * 数据源 key 上下文
 * 通过控制 ThreadLocal变量 LOOKUP_KEY_HOLDER 的值用于控制数据源切换
 * @see RoutingDataSource
 * @author :Java课代表
 */
public class RoutingDataSourceContext {

    private static final ThreadLocal LOOKUP_KEY_HOLDER = new ThreadLocal<>();

    public static void setRoutingKey(String routingKey) {
        LOOKUP_KEY_HOLDER.set(routingKey);
    }

    public static String getRoutingKey() {
        String key = LOOKUP_KEY_HOLDER.get();
        // 默认返回 key 为 first 的数据源
        return key == null ? "first" : key;
    }

    public static void reset() {
        LOOKUP_KEY_HOLDER.remove();
    }
}
实现AbstractRoutingDataSource:
/**
 * 支持动态切换的数据源
 * 通过重写 determineCurrentLookupKey 实现数据源切换
 * @author :Java课代表
 */
public class RoutingDataSource extends AbstractRoutingDataSource {

    @Override
    protected Object determineCurrentLookupKey() {
        return RoutingDataSourceContext.getRoutingKey();
    }

}
给我们的RoutingDataSource初始化上多个数据源:
/**
 * 数据源配置
 * 把多个数据源,装配到一个 RoutingDataSource 里
 * @author :Java课代表
 */
@Configuration
public class RoutingDataSourcesConfig {

    @Bean
    @ConfigurationProperties(prefix = "spring.datasource.first")
    public DataSource firstDataSource() {
        return DataSourceBuilder.create().build();
    }

    @Bean
    @ConfigurationProperties(prefix = "spring.datasource.second")
    public DataSource secondDataSource() {
        return DataSourceBuilder.create().build();
    }

    @Primary
    @Bean
    public RoutingDataSource routingDataSource() {
        RoutingDataSource routingDataSource = new RoutingDataSource();
        routingDataSource.setDefaultTargetDataSource(firstDataSource());
        Map dataSourceMap = new HashMap<>();
        dataSourceMap.put("first", firstDataSource());
        dataSourceMap.put("second", secondDataSource());
        routingDataSource.setTargetDataSources(dataSourceMap);
        return routingDataSource;
    }

}
演示一下手工切换的代码:
public void init() {
    // 手工切换为数据源 first,初始化表
    RoutingDataSourceContext.setRoutingKey("first");
    createTableUser();
    RoutingDataSourceContext.reset();

    // 手工切换为数据源 second,初始化表
    RoutingDataSourceContext.setRoutingKey("second");
    createTableUser();
    RoutingDataSourceContext.reset();

}
这样就实现了最基本的多数据源切换了。
不难发现,切换工作很明显可以抽成一个切面,我们可以优化一下,利用注解标明切点,哪里需要切哪里。
三、引入AOP
自定义注解
/**
 * @author :Java课代表
 */
@Target({ElementType.TYPE, ElementType.METHOD})
@Retention(RetentionPolicy.RUNTIME)
@Documented
public @interface WithDataSource {
    String value() default "";
}
创建切面
@Aspect
@Component
// 指定优先级高于@Transactional的默认优先级
// 从而保证先切换数据源再进行事务操作
@Order(Ordered.LOWEST_PRECEDENCE - 1)
public class DataSourceAspect {

    @Around("@annotation(withDataSource)")
    public Object switchDataSource(ProceedingJoinPoint pjp, WithDataSource withDataSource) throws Throwable {

        // 1.获取 @WithDataSource 注解中指定的数据源
        String routingKey = withDataSource.value();
        // 2.设置数据源上下文
        RoutingDataSourceContext.setRoutingKey(routingKey);
        // 3.使用设定好的数据源处理业务
        try {
            return pjp.proceed();
        } finally {
            // 4.清空数据源上下文
            RoutingDataSourceContext.reset();
        }
    }
}
有了注解和切面,使用起来就方便多了:
// 注解标明使用"second"数据源
@WithDataSource("second")
public List getAllUsersFromSecond() {
    List users = userService.selectAll();
    return users;
}
关于切面有两个细节需要注意:
-
需要指定优先级高于声明式事务
原因:声明式事务事务的本质也是 AOP,其只对开启时使用的数据源生效,所以一定要在切换到指定数据源之后再开启,声明式事务默认的优先级是最低级,这里只需要设定自定义的数据源切面的优先级比它高即可。
-
业务执行完之后一定要清空上下文
原因:假设方法 A 使用
@WithDataSource("second")指定走"second"数据源,紧跟着方法 B 不写注解,期望走默认的first数据源。但由于方法A放入上下文的lookupKey此时还是"second"并未删除,所以导致方法 B 执行的数据源与期望不符。
四、回顾
至此,基于AbstractRoutingDataSource+AOP的多数据源就实现好了。
在配置DataSource 这个Bean的时候,用的是自定义的RoutingDataSource,并且标记为 @Primary。这样就可以让mybatis-spring-boot-starter使用RoutingDataSource帮我们自动配置好mybatis,比搞两套DataSource+两套Mybatis配置的方案简单多了。
文中相关代码已上传课代表的github
特别说明:
样例中为了减少代码层级,让展示更直观,在 controller 层写了事务注解,实际开发中可别这么干,controller 层的任务是绑定、校验参数,封装返回结果,尽量不要在里面写业务!
五、优化
对于一般的多数据源使用场景,本文方案已足够覆盖,可以实现灵活切换。
但还是存在如下不足:
- 每个应用使用时都要新增相关类,大量重复代码
- 修改或新增功能时,所有相关应用都得改
- 功能不够强悍,没有高级功能,比如读写分离场景下的读多个从库负载均衡
其实把这些代码封装到一个starter里面,高级功能慢慢扩展就可以。
好在开源世界早就有现成工具可用了,开发mybatis-plus的"baomidou"团队在其生态中开源了一个多数据源框架 Dynamic-Datasource,底层原理就是AbstractRoutingDataSource,增加了更多强悍的扩展功能,下篇介绍其使用。
