福州大学《嵌入式系统综合设计》实验七:图像灰度直方图
一、实验目的
直方图是一种统计特征,在图像中广为使用,因为具有计算简便、不受平移、旋转的影响,因此可以作为图像的一种有效的局部/全局特征来表示图像,是图像的重要特征之一。直方图在SIFT算法、HOG算法、直方图均衡等图像特征检测算法中都广为使用。本实验的目的是让大家掌握bmcv_calc_hist、和OpenCV中calcHist函数的使用,可以计算出图像的直方图。
二、实验内容
搭建BMCV环境并成功运行bmcv_calc_hist例程
三、开发环境
开发主机:Ubuntu 22.04 LTS
硬件:算能SE5
四、实验器材
开发主机 + 云平台
五、实验过程与结论
本实验涉及的程序框架与实验4的图4-1一致,仅需根据具体调用的API函数配置相关参数即可,因此接下来重点介绍bmcv_calc_hist API函数的参数及其调用方法。图像灰度直方图因为可以反映图像中灰度的分布情况,常作为图像的一种重要特征。可以通过bmcv提供的bmcv_calc_hist函数实现。
5.1 bmcv_calc_hist函数介绍
bmcv_calc_hist函数形式如下:
bm_status_t bmcv_calc_hist ( bm_handle_t handle, bm_device_mem_t input,
bm_device_mem_t output,
int C, int H, int W,
const int *channels,
int dims,
const int *histSizes,
const float *ranges,
int inputDtype);
其中,handle为bm_handle 句柄; input为已分配好 device memory的输入信息,该device memory 空间存储了输入数据,类型可以是float32 或者uint8,由参数inputDtype决定,其大小为C*H*W*sizeof(Dtype);Output为已分配好 device memory的直方图输出结果信息,该 device memory 空间存储了输出结果,类型为 float, 其大小为 histSizes[0]* histSizes[1]*…… *histSizes[n]*sizeof(float)。
C为输入通道数,H为输入通道高度,W为输入通道宽度,channels为需要计算直方图的 channel 列表,其长度为 dims,每个元素的值必须小于 C; 例如,RGB图像的C=3, 而如果只需要计算R通道图像的直方图,则dims=1;
histSizes:对应每个 channel 统计直方图的份数, ranges:每个通道参与统计的范围,其长度为 2*dims; 例如,对位深为24bit的RGB图像,如果三个通道的颜色值都参加直方图统计,每个通道颜色取值范围从0到255, 因此ranges为[0, 255, 0, 255, 0, 255],如果每个通道的值被分为8个bins,则histSizes为:[8,8,8];
inputDtype:输入数据的类型:0 表示 float,1 表示 uint8。
代码使用范例如下:
int H = 1024;
int W = 1024;
int C = 3;
int dim = 3;
int channels[3] = {0, 1, 2};
int histSizes[] = {15000, 32, 32};
float ranges[] = {0, 1000000, 0, 256, 0, 256};
int totalHists = 1;

for (int i = 0; i < dim; ++i) {
totalHists *= histSizes[i];
}
bm_handle_t handle = nullptr;
bm_status_t ret = bm_dev_request(&handle, 0);
float *inputHost = new float[C * H * W];
float *outputHost = new float[totalHists];

for (int i = 0; i < C; ++i) {
for (int j = 0; j < H * W; ++j)
inputHost[i * H * W + j] = static_cast(rand() % 1000000);
}

//创建图像input,和保持直方图结果的output对象,分配内存;
ret = bmcv_calc_hist(handle,input, output, C, H, W,  channels, dim, histSizes, ranges, 0);
5.2 OpenCV calcHist函数
OpenCV 提供calcHist函数来实现直方图的计算,具体形式如下:
void cv::calcHist (
    const Mat * images,
    int 	    nimages,
    const int * channels,
    InputArray 	mask,
    OutputArray hist,
    int 	    dims,
    const int * histSize,
    const float ** ranges,
    bool 	    uniform = true,
    bool 	    accumulate = false
)- 其中,images为输入的图像的指针;nimages为输入图像个数;channels为需要统计直方图的第几通道。
- mask:掩模,mask必须是一个8位(CV_8U)的数组并且和images的数组大小相同;如果其值不为空,则,值为1的点将用来计算直方图。
- hist:直方图计算的输出值;dims:输出直方图的维度(由channels指定);histSize:直方图中每个dims维度需要分成多少个区间(如果把直方图看作一个一个竖条的话,就是竖条的个数);ranges:统计像素值的区间;uniform=true:是否对得到的直方图数组进行归一化处理;accumulate= false:在多个图像时,是否累积计算像素值的个数;
调用时,参考代码如下:
//需要计算的图像的通道,灰度图像为3,BGR图像需要指定B,G,R
    const int channels[] - {0 };
    Mat hist; //定义输出Mat类型int dims = 1;
    int dims = 1;//设置直方图维度
    const int histSize[] - { 256 }; //直方图每一个维度划分的柱条的数目
    //每一个维度取值范围
    float pranges[] - { 0, 255 }; //取值区间
    const float* ranges[] - { pranges };
    calcHist(&gray,1, channels, Mat(), hist, dims, histSize,ranges, true, false);
5.3 画直方图
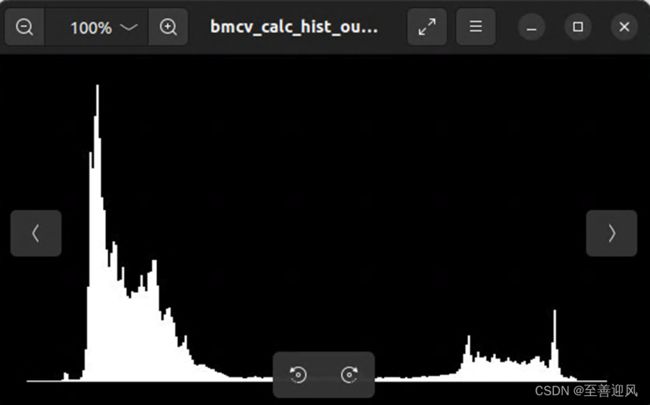
最后输出的结果可以通过OpenCV的rectangle函数将点连接起来画出直方图:
int scale = 2;
	int hist_height = 256;
	Mat hist_img = Mat::zeros(hist_height, 256 * scale, CV_8UC3);
	double max_val;
	Mat hist = Mat::zeros(1, 256 , CV_32FC3);;
	for (int i = 0; i < 250; i++)
	{
		hist.at(i) = outputHost[i];
	}
	minMaxLoc(hist, 0, &max_val, 0, 0);
	for (int i = 0; i < 250; i++)
	{
		float bin_val = hist.at(i);
		int intensity = cvRound(bin_val * hist_height / max_val);
        rectangle(hist_img, Point(i * scale, hist_height - 1), Point((i + 1) * scale - 1,
                  hist_height - intensity), Scalar(255, 255, 255));
	}
	imwrite("bmcv_calc_hist_out.jpg", hist_img);
7.4 执行结果
按照上述步骤,生成可执行文件并上传到算能盒子给可执行文件赋权限并执行:
root@ab162899a93b:/tmp/tmp6l8uq_dw# chmod 777 bmcv_calc_hist
root@ab162899a93b:/tmp/tmp6l8uq_dw# ./bmcv_calc_hist encodeImage.jpg
Open /dev/jpu successfully,device index = 0, jpu fd = 8,vpp fd = 9
执行结果如下:
