Spring-Aop
什么是AOP?
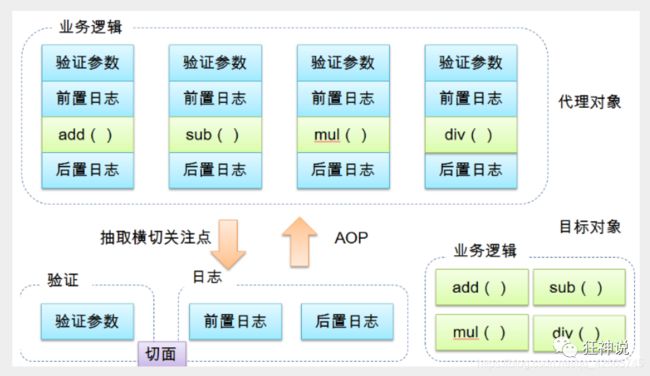
AOP(Aspect Oriented Programming)面向切面编程,通过预编译和运行期动态代理实现程序功能的统一维护的一种技术。是Spring框架中的重要部分,利用AOP可以对业务逻辑的各个部分进行隔离,从而使得业务逻辑各部分的耦合度降低,提高程序的可重用性,提高了开发效率。
AOP在Spring中的作用
- 提供声明式事务,允许用户自定义切面
AOP中的名词
- 横切关注点:跨越应用程序多个模块的方法或功能。即是,与我们业务逻辑无关的,但是我们需要关注的部分,就是横切关注点。如日志 , 安全 , 缓存 , 事务等等 …
- 切面(ASPECT):横切关注点 被模块化 的特殊对象。即,它是一个类。
- 通知(Advice):切面必须要完成的工作。即,它是类中的一个方法。
- 切入点(PointCut):切面通知 执行的 “地点”的定义,例如坐地铁的时候,具体在某个站下车,那这个站就是切入点
- 织入(Weaving):织入是把切面应用到目标对象并创建新的代理对象的过程。
- 目标对象(Target):被一个或者多个切面所通知的对象。
- 连接点(JointPoint):连接点是在应用执行过程中能够插入切面的一个点。这些点可以是调用方法时、甚至修改一个字段时。例如坐地铁的时候,每一个站都可以下车,那么这每一个站都是一个接入点。假如一个对象中有多个方法,那么这个每一个方法就是一个连接点。
- 通过接口实现
- 自定义类实现
- 注解实现
使用AOP织入,需要导入一个依赖包
        <dependency>
            <groupId>org.aspectjgroupId>
            <artifactId>aspectjweaverartifactId>
            <version>1.9.4version>
        dependency>
通过接口实现
1.创建业务接口
public interface UserService {
    void add();
    void delete();
    void insert();
    void select();
}
2.创建接口对应的实现类
public class UserServiceImpl implements UserService{
    public void add() {
        System.out.println("增加一个用户");
    }

    public void delete() {
        System.out.println("删除一个用户");
    }

    public void insert() {
        System.out.println("插入一个用户");
    }

    public void select() {
        System.out.println("查询一个用户");
    }
}
3.定义一个前置通知类和后置通知类
public class BeforeLog implements MethodBeforeAdvice {

    //method:调用的方法
    //objects:参数
    //o:目标对象
    public void before(Method method, Object[] objects, Object o) throws Throwable {
        System.out.println(o.getClass().getName()+"的"+method.getName()+"方法");
    }
}
public class AfterLog implements AfterReturningAdvice {

    //returnValue:返回值
    public void afterReturning(Object returnValue, Method method, Object[] args, Object target) throws Throwable {
        System.out.println("执行了后置通知"+returnValue);
    }
}
4.创建配置文件
<beans xmlns="http://www.springframework.org/schema/beans"
       xmlns:xsi="http://www.w3.org/2001/XMLSchema-instance"
       xmlns:context="http://www.springframework.org/schema/context"
       xmlns:aop="http://www.springframework.org/schema/aop"
       xsi:schemaLocation="http://www.springframework.org/schema/beans
       http://www.springframework.org/schema/beans/spring-beans.xsd
       http://www.springframework.org/schema/context
       http://www.springframework.org/schema/context/spring-context.
       http://www.springframework.org/schema/aop
       http://www.springframework.org/schema/aop/spring-aop.xsd">

    <bean id="userServiceImpl" class="com.kuang.service.UserServiceImpl"/>
    <bean id="afterLog" class="com.kuang.log.AfterLog"/>
    <bean id="beforeLog" class="com.kuang.log.BeforeLog"/>


    <aop:config>


        <aop:pointcut id="pointcut" expression="execution(* com.kuang.service.UserServiceImpl.*(..))"/>

        <aop:advisor advice-ref="beforeLog" pointcut-ref="pointcut"/>
        <aop:advisor advice-ref="afterLog" pointcut-ref="pointcut"/>
    aop:config>

beans>
5.测试
    @Test
    public void test(){
        ApplicationContext context = new ClassPathXmlApplicationContext("beans.xml");
        UserService bean = (UserService) context.getBean("userServiceImpl");
        bean.add();
    }
总结:类实现了具体的通知接口后,只需要引用这个类的bean,并告诉在哪个切入点要执行通知。

自定义类实现
1.自定义类
public class Diy {
    public void before(){
        System.out.println("执行diy前置通知");
    }
    public void after(){
        System.out.println("执行diy后置通知");
    }
}
2.配置核心配置文件
<beans xmlns="http://www.springframework.org/schema/beans"
       xmlns:xsi="http://www.w3.org/2001/XMLSchema-instance"
       xmlns:context="http://www.springframework.org/schema/context"
       xmlns:aop="http://www.springframework.org/schema/aop"
       xsi:schemaLocation="http://www.springframework.org/schema/beans
       http://www.springframework.org/schema/beans/spring-beans.xsd
       http://www.springframework.org/schema/context
       http://www.springframework.org/schema/context/spring-context.
       http://www.springframework.org/schema/aop
       http://www.springframework.org/schema/aop/spring-aop.xsd">

    <bean id="userServiceImpl" class="com.kuang.service.UserServiceImpl"/>
    <bean id="afterLog" class="com.kuang.log.AfterLog"/>
    <bean id="beforeLog" class="com.kuang.log.BeforeLog"/>


    <bean id="diy" class="com.kuang.diy.Diy"/>

    <aop:config>

        <aop:aspect ref="diy">
            <aop:pointcut id="pointcut" expression="execution(* com.kuang.service.UserServiceImpl.*(..))"/>
            <aop:before method="before" pointcut-ref="pointcut"/>
            <aop:after method="after" pointcut-ref="pointcut"/>
        aop:aspect>
    aop:config>

beans>
3.测试
    @Test
    public void test2(){
        ApplicationContext context = new ClassPathXmlApplicationContext("beans.xml");
        UserService bean = (UserService) context.getBean("userServiceImpl");
        bean.delete();
    }
使用注解实现
1.编写一个注解实现的增强类
@Aspect
public class AnnotionAop {
    @Before("execution(* com.kuang.service.UserServiceImpl.*(..))")
    public void before(){
        System.out.println("执行注解前置通知");
    }
    @After("execution(* com.kuang.service.UserServiceImpl.*(..))")
    public void after(){
        System.out.println("执行注解后置通知");
    }

    @Around("execution(* com.kuang.service.UserServiceImpl.*(..))")
    public void around(ProceedingJoinPoint pj) throws Throwable {
        System.out.println("注解前置环绕");
        Object proceed = pj.proceed();
        System.out.println("注解后置环绕");
    }
}
类名上面使用@Aspect标记成一个切面
再在方法上面标记成具体的通知(前置、后置,还是环绕),里面要传的参数是切入点
2.配置配置文件
<beans xmlns="http://www.springframework.org/schema/beans"
       xmlns:xsi="http://www.w3.org/2001/XMLSchema-instance"
       xmlns:context="http://www.springframework.org/schema/context"
       xmlns:aop="http://www.springframework.org/schema/aop"
       xsi:schemaLocation="http://www.springframework.org/schema/beans
       http://www.springframework.org/schema/beans/spring-beans.xsd
       http://www.springframework.org/schema/context
       http://www.springframework.org/schema/context/spring-context.
       http://www.springframework.org/schema/aop
       http://www.springframework.org/schema/aop/spring-aop.xsd">

    <bean id="userServiceImpl" class="com.kuang.service.UserServiceImpl"/>
    <bean id="afterLog" class="com.kuang.log.AfterLog"/>
    <bean id="beforeLog" class="com.kuang.log.BeforeLog"/>

    <bean id="annotation" class="com.kuang.diy.AnnotionAop"/>
    <aop:aspectj-autoproxy/>
beans>
通过aop命名空间的
3.测试
    @Test
    public void test3(){
        ApplicationContext context = new ClassPathXmlApplicationContext("beans.xml");
        UserService bean = (UserService) context.getBean("userServiceImpl");
        bean.delete();
    }
4.结果

执行顺序:先执行了环绕通知里的前置,到达切入点后,执行前置通知,然后切入点方法执行,完事执行环绕的后置通知,最好执行后置通知。

