QML学习笔记【04】:常用控件
1 Repeater与model
Window {
    width: 640; height: 480
    visible: true
    title: qsTr("Hello World")
    Column{
        id: col
        spacing: 30
        Repeater{
            model: 3 //model控制了所有的数据,这里定义了Button的数量
            Button{
                width: 100; height: 50
                text: "btn" + index
            }
        }
    }
}
2 ListView与ListModel、ObjectModel、XmlListModel、FolderListModel
model用于定义数据,delegate用于控制每一项数据如何绘制
(1)ListView 与数值、list类型、ListModel类型model配合使用
import QtQuick 2.0
import QtQuick.Controls 2.0

ListView {
    width: 180; height: 200
    spacing: 10 //控制两个项之间的距离

    //1、model控制了所有的数据
//    model: 3 //数字类型
//    model:["btn1", "btn2", "btn3"] //list类型
    model: ListModel {
         ListElement { name: "Bill Smith"; number: "555 3264"}
         ListElement { name: "John Brown"; number: "555 8426"}
         ListElement { name: "Sam Wise"; number: "555 0473" }
     }
    //2、delegate控制了每一项数据如何绘制的
    delegate: Button {
//        text: index
//        text: modelData //model类型为list时,要获取list数据可以用modelData获取
        text: name + " " + number//model类型为ListModel时,可直接使用ListModel中的自定义数据
    }
 }
(2)ListView与ObjectModel 类型model配合使用
//5、ListView扩展,实现SwipeView界面切换的效果
Window {
    id: root
    width: 640; height: 480
    visible: true
    title: qsTr("ListView(实现SwipeView界面切换的效果)")

    //左侧的按钮
    Button{
        id: btn
        width: 100; height: 480
    }

    //右侧切换的界面
    ObjectModel{
        id: myModel
        Rectangle{
            width: 540; height: 480
            color: "lightsteelblue"
        }
        Rectangle{
            width: 540; height: 480
            color: "grey"
        }
        Rectangle{
            width: 540; height: 480
            color: "black"
        }
    }
    ListView{
        model: myModel
        anchors.left: btn.right
        anchors.right: root.right
        width: 540; height: 480
        orientation: ListView.Horizontal //水平滑动
        snapMode: ListView.SnapOneItem //控制一次滑动一个item
        clip: true //超过当前范围后会被裁剪
    }
}
(3)ListView用于XmlListModel类型model配合使用,用于读取xml文件数据
//6、ListView扩展,使用XmlListModel
Window{
    id: root
    width: 640; height: 480
    visible: true
    title: qsTr("ListView扩展,使用XmlListModel")

    XmlListModel {
         id: xmlModel
         source: "/myXML.xml"  //xml资源文件路径
         query: "/rss/channel/item" //item节点路径
        //类似于ListEmelents效果
         XmlRole { name: "title"; query: "title/string()" }
         XmlRole { name: "pubDate"; query: "pubDate/string()" }
     }

    ListView {
        width: 180; height: 300
        model: xmlModel
        delegate: Text { text: title + ": " + pubDate }
    }
}
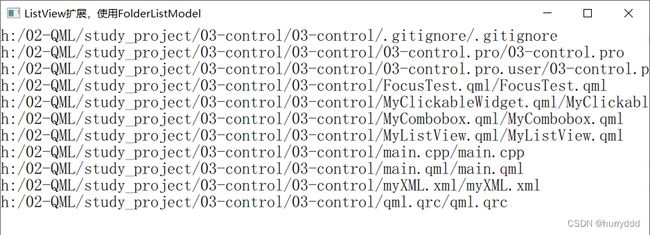
(4)ListView用于FolderListModel类型model配合使用,用于读取文件目录
import QtQuick 2.0
import QtQuick.Window 2.0
import QtQuick.Controls 2.0
import QtQml.Models 2.12
import QtQuick.XmlListModel 2.12
import Qt.labs.folderlistmodel 2.12

//7、ListView扩展,使用FolderListModel
Window{
    id: root
    width: 640; height: 480
    visible: true
    title: qsTr("ListView扩展,使用FolderListModel")

    FolderListModel {
        id: folderModel
        //可以指定搜索的路径,路径前必须加上file:///
        folder: "file:///H:\\02-QML\\study_project\\03-control\\03-control"
        showDirs: false //显示目录下的文件夹,默认是true
        nameFilters: ["*"] //文件过滤器
        showDirsFirst: true //优先显示文件夹
    }

    ListView {
        width: 200; height: 400
        model: folderModel  //控制了数据
        delegate: Text {    //控制了每一项数据的绘制
            text: filePath + "/" + fileName
            font.pixelSize: 24
        }
    }
}
3 Popup
4 Combobox
5 ChartView
用于图表的绘制:
PieSeries:饼状图、
LineSeries:线状图、
AreaSeries与BarSeries:柱状图
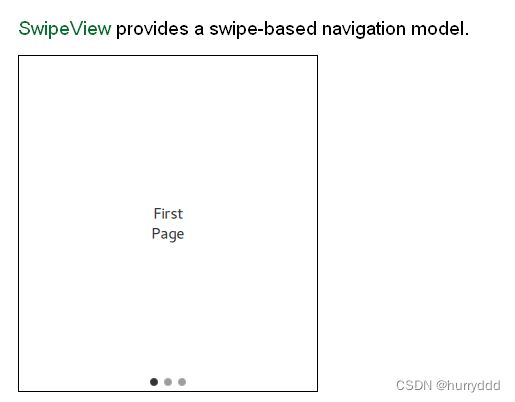
6 SwipeView
用作滑动窗口切页的效果
7 ListView与自定义model配合使用
在项目开发中,常会用到 Repeater、ListView、TableView 等来进行多个重复控件的绘制,它们都用到了 model 属性来定义控件的数量和一些数据,但是实际项目中,往往数据都会很复杂,用model默认的 数值类型(model: 3)、List类型(model:["btn1", "btn2", "btn3"])、ListModel类型(model: ListModel {ListElement {}}) 不能满足所以需求,这时候就需要自定义model类型了
自定义方法如下:
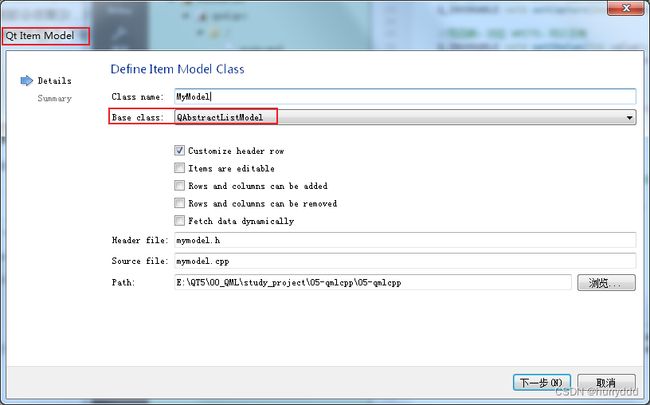
1、创建一个Qt Item Model,继承自 QAbstractListModel
2、自定义数据类型和QML端的字符串跟C++端数据之间的枚举
3、添加 roleNames 函数, 映射C++端的枚举与QML端的字符串
4、实现数据的读取,QT会自动将QML端传来的字符串按照 roleNames 的映射关系映射成枚举role.然后可通过index来返回m_data中的role数据
mlistmodel.h
#ifndef MYLISTMODEL_H
#define MYLISTMODEL_H
#include

//1.1、定义自定义数据类型
class MyData
{
public:
    //定义有参构造函数,使用初始化列表的方式初始化变量
    MyData(QString s, int v):str(s),value(v) {}

    QString str;
    int value;
};

class MyListModel : public QAbstractListModel
{
    Q_OBJECT
public:
    //1.3、自定义枚举,映射QML端的字符串
    enum MyRoleName{
        Name = Qt::DisplayRole + 1,
        Value
    };

    explicit MyListModel(QObject *parent = nullptr);
    static MyListModel * getInstance(); //单列

    // Header:
    //几乎用不到
    QVariant headerData(int section, Qt::Orientation orientation, int role = Qt::DisplayRole) const override;

    // Basic functionality:
    //model的大小/长度 或者说是 元素的个数
    int rowCount(const QModelIndex &parent = QModelIndex()) const override;

    //3、现实数据读取,QT会自动将QML端传来的字符串按照roleNames的映射关系映射成枚举role.然后可通过index来返回m_data中的role数据
    //index是一个二维坐标,比如(0,0) 指示的是 (row index, column index)
    //对于ListModel而言,columnCount和column index是没有用的,所以实际使用的只有row index
    QVariant data(const QModelIndex &index, int role = Qt::DisplayRole) const override;

    //2、添加roleNames,它是继承自 QAbstractListModel
    //作用为 映射C++端的枚举与QML端的字符串
    QHash roleNames() const override;

private:

    //1.2、创建自定义数据类型
    QList m_data;
};
#endif // MYLISTMODEL_H
mlistmodel.cpp
#include "mylistmodel.h"

MyListModel::MyListModel(QObject *parent)
    : QAbstractListModel(parent)
{
    m_data.append(MyData("zhangsan", 111));
    m_data.append(MyData("lisi", 111));
    m_data.append(MyData("wangwu", 111));
}

MyListModel *MyListModel::getInstance()
{
    static MyListModel *obj = new MyListModel;
    return obj;
}

QVariant MyListModel::headerData(int section, Qt::Orientation orientation, int role) const
{
    // FIXME: Implement me!
}
int MyListModel::rowCount(const QModelIndex &parent) const
{
    // For list models only the root node (an invalid parent) should return the list's size. For all
    // other (valid) parents, rowCount() should return 0 so that it does not become a tree model.
    if (parent.isValid())
        return 0;

    // FIXME: Implement me!
    m_data.count();
}

QVariant MyListModel::data(const QModelIndex &index, int role) const
{
    if (!index.isValid())
        return QVariant();
    if(role == MyRoleName::Name){
        return m_data[index.row()].str;
    }
    else if(role == MyRoleName::Value){
        return m_data[index.row()].value;
    }
    // FIXME: Implement me!
    return QVariant();
}


QHash MyListModel::roleNames() const
{
    QHash roles;

    //映射C++端的枚举与QML端的字符串
    //字符串是QML端使用,枚举是C++端判断
    roles.insert(MyRoleName::Name, "name");
    roles.insert(MyRoleName::Value, "value");

    return roles;
}
5、在 engine.load 前注册模块
int main(int argc, char *argv[])
{
    QCoreApplication::setAttribute(Qt::AA_EnableHighDpiScaling);
    QGuiApplication app(argc, argv);
    QQmlApplicationEngine engine;
    //注册MyListModel模块
    QQmlContext *context = engine.rootContext();
    //1、使用setContextProperty设置全局对象/上下文对象。作用域为全局
    //参数:模块名称,实例
    context->setContextProperty("MyListModel", MyListModel::getInstance());
    //2、使用qmlRegisterType注册模块,在qml中通过 import 模块名称 进行引用
    //这种方法测试不行
    //模块名称、主版本号、次版本号、类名称
//    qmlRegisterType("MyModel", 1, 0, "MyListModel");

    const QUrl url(QStringLiteral("qrc:/main.qml"));
    QObject::connect(&engine, &QQmlApplicationEngine::objectCreated,
                     &app, [url](QObject *obj, const QUrl &objUrl) {
        if (!obj && url == objUrl)
            QCoreApplication::exit(-1);
    }, Qt::QueuedConnection);
    engine.load(url);

    return app.exec();
}
6、QML中使用
import QtQuick 2.12
import QtQuick.Window 2.12
import QtQuick.Controls 2.12
//import MyModel 1.0

Window {
    width: 640; height: 480
    visible: true
    title: qsTr("Hello World")

    ListView {
        width: 200; height: 300
        //1、model为list类型
//        model: ["zhangsan", "lisi", "wangwu"]
        //2、model为ListModel类型
//        model: ListModel{
//            ListElement{
//                name: "zhangsan"
//                value: 111
//            }
//            ListElement{
//                name: "lisi"
//                value: 222
//            }
//            ListElement{
//                name: "wangwu"
//                value: 333
//            }
//        }
        //3、model为自定义model类型
        model: MyListModel
        delegate: Text {
            id: txt
            text: name + " " + value
        }
    }
}
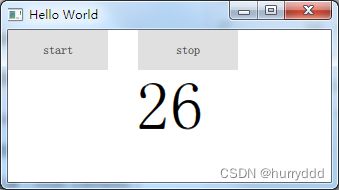
8 Timer
Window{
    width: 640
    height: 480
    visible: true
    title: qsTr("Hello World")
    color: "white"
    property int time: 0

    Timer{
        id: timer
        interval: 1000
//        running: true
        repeat: true
        triggeredOnStart: true //在start的时候也会触发onTriggered
        onTriggered: { //超时回调函数
            time += 1 //更新Text的内容
        }
    }
    Text {
        id: txt
        text: time
        font.pixelSize: 68
        anchors.centerIn: parent
    }

    Button{
        id: startbtn
        text: "start"
        onClicked: {
            timer.start()
        }
    }
    Button{
        id: stopbtn
        text: "stop"
        anchors.left: startbtn.right
        anchors.leftMargin: 30
        onClicked: {
            timer.stop()
        }
    }
}


