【亚马逊云】基于EC2以 All-in-One 模式快速部署 KubeSphere 和 Kubernetes
文章目录
-
- 1. 云实例配置说明
- 2. SSH连接云实例
- 3. 查看系统版本
- 4. 修改主机名
- 5. 安装依赖项
- 6. 安全组和DNS修改
- 7. 下载KubeKey
- 8. 同时安装Kubesphere和Kubernetes
- [可选]单独安装Kubernetes
- [可选]单独安装KubeSphere
- 9. 验证KubeSphere安装结果
- 10. 登录KubeSphere控制台
- [可选]安装KubeSphere应用商店
-
- 图形化操作
- 命令行操作
- 验证安装结果
- 11. 常见问题
- 12. 参考链接
1. 云实例配置说明
若要以 All-in-One 模式进行安装,仅需要准备一台满足需求的云主机实例即可。
(PS:如果系统至少有 8 核 CPU 和 16 GB 内存,则建议启用所有组件。有关更多信息,请参见启用可插拔组件。)
| 操作系统 | 配置信息 | 安全组 | 连接方式 |
|---|---|---|---|
| CentOS Linux release 7.9.2009 (Core) | 8 核 CPU,16 GB 内存,100 GB 磁盘空间 | 允许所有流量 | SSH远程连接 |
云实例节点要求:
- 云实例节点能够SSH远程连接上;
- 节点需要有sudo/curl/openssl/tar等相关命令。
2. SSH连接云实例
C:\Users\xyb>ssh -i xybaws-ningxia-key.pem centos@<公网IP地址>
3. 查看系统版本
[root@ip-172-31-6-245 ~]# cat /etc/redhat-release
CentOS Linux release 7.9.2009 (Core)
[root@ip-172-31-6-245 ~]# cat /etc/os-release
NAME="CentOS Linux"
VERSION="7 (Core)"
ID="centos"
ID_LIKE="rhel fedora"
VERSION_ID="7"
PRETTY_NAME="CentOS Linux 7 (Core)"
ANSI_COLOR="0;31"
CPE_NAME="cpe:/o:centos:centos:7"
HOME_URL="https://www.centos.org/"
BUG_REPORT_URL="https://bugs.centos.org/"

CENTOS_MANTISBT_PROJECT="CentOS-7"
CENTOS_MANTISBT_PROJECT_VERSION="7"
REDHAT_SUPPORT_PRODUCT="centos"
REDHAT_SUPPORT_PRODUCT_VERSION="7"
4. 修改主机名
$ sudo hostnamectl set-hostname kubesphere-master
$ sudo bash
$ sudo hostname
kubesphere-master
5. 安装依赖项
$ sudo yum install -y socat conntrack ebtables ebtables ipset ipvsadm
6. 安全组和DNS修改
- 设置云实例的安全组允许所有流量和端口通过【仅实验测试环境,生产环境建议安装最小开放规则设置允许端口放行】。
如果您的网络配置使用防火墙规则或安全组,请务必确保基础设施组件可以通过特定端口相互通信。建议您关闭防火墙。
- 请确保
/etc/resolv.conf中的 DNS 地址可用,否则,可能会导致集群中的 DNS 出现问题。
$ sudo vim /etc/resolv.conf
$ sudo cat /etc/resolv.conf
; generated by /usr/sbin/dhclient-script
search cn-northwest-1.compute.internal
nameserver 8.8.8.8
7. 下载KubeKey
您的集群必须有一个可用的容器运行时。如果您使用 KubeKey 搭建集群,KubeKey 会默认安装最新版本的 Docker。或者,您也可以在创建集群前手动安装 Docker 或其他容器运行时。
KubeKey 是用 Go 语言开发的一款全新的安装工具,代替了以前基于 ansible 的安装程序。KubeKey 为用户提供了灵活的安装选择,可以分别安装 KubeSphere 和 Kubernetes 或二者同时安装,既方便又高效。
# 若访问Github/Googleapis受限,先执行以下命令确保从正确的区域下载KubeKey。
export KKZONE=cn

# 再执行以下命令下载 KubeKey。
curl -sfL https://get-kk.kubesphere.io | VERSION=v3.0.13 sh -

# 最后为下载下来的 kk 添加可执行权限。
chmod +x kk

# 查看下载
# ll
total 112100
-rwxr-xr-x  1 root root 78973328 Nov  7 08:43 kk
drwxr-xr-x  3 root root       18 Nov 19 05:21 kubekey
-rw-r--r--  1 root root 35796470 Nov 19 05:17 kubekey-v3.0.13-linux-amd64.tar.gz

8. 同时安装Kubesphere和Kubernetes
只需执行一个命令即可进行安装,其模板如下所示:
./kk create cluster [--with-kubernetes version] [--with-kubesphere version]
若要同时安装 Kubernetes 和 KubeSphere,可参考以下示例命令:
./kk create cluster --with-kubernetes v1.26.12 --with-kubesphere v3.4.0

./kk create cluster --with-kubernetes v1.26.12 --with-kubesphere v3.4.0 --container-manager containerd -y
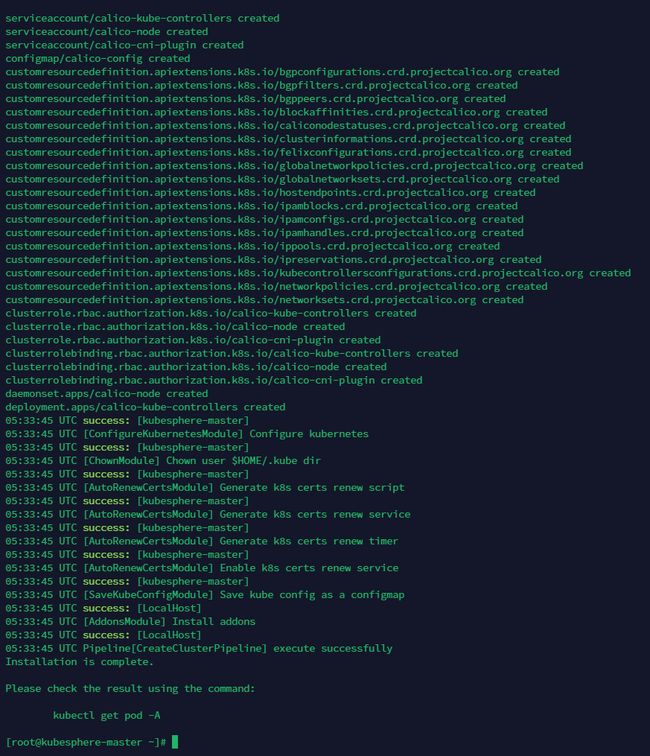
执行该命令后,KubeKey 将检查安装环境,结果显示在一张表格中。输入 yes 继续安装流程。
[root@kubesphere-master ~]# ./kk create cluster --with-kubernetes v1.22.12 --with-kubesphere v3.4.0


 _   __      _          _   __
| | / /     | |        | | / /
| |/ / _   _| |__   ___| |/ /  ___ _   _
|    \| | | | '_ \ / _ \    \ / _ \ | | |
| |\  \ |_| | |_) |  __/ |\  \  __/ |_| |
\_| \_/\__,_|_.__/ \___\_| \_/\___|\__, |
                                    __/ |
                                   |___/

05:28:23 UTC [GreetingsModule] Greetings
05:28:27 UTC message: [kubesphere-master]
Greetings, KubeKey!
05:28:27 UTC success: [kubesphere-master]
05:28:27 UTC [NodePreCheckModule] A pre-check on nodes
05:28:43 UTC success: [kubesphere-master]
05:28:43 UTC [ConfirmModule] Display confirmation form
+-------------------+------+------+---------+----------+-------+-------+---------+-----------+--------+--------+------------+------------+-------------+------------------+--------------+
| name              | sudo | curl | openssl | ebtables | socat | ipset | ipvsadm | conntrack | chrony | docker | containerd | nfs client | ceph client | glusterfs client | time         |
+-------------------+------+------+---------+----------+-------+-------+---------+-----------+--------+--------+------------+------------+-------------+------------------+--------------+
| kubesphere-master | y    | y    | y       | y        | y     | y     | y       | y         | y      |        |            | y          |             |                  | UTC 05:28:43 |
+-------------------+------+------+---------+----------+-------+-------+---------+-----------+--------+--------+------------+------------+-------------+------------------+--------------+

This is a simple check of your environment.
Before installation, ensure that your machines meet all requirements specified at
https://github.com/kubesphere/kubekey#requirements-and-recommendations

Continue this installation? [yes/no]: yes

安装过程中,输入如下信息,代表Kubernetes集群已经安装完毕!
Your Kubernetes control-plane has initialized successfully!

To start using your cluster, you need to run the following as a regular user:

  mkdir -p $HOME/.kube
  sudo cp -i /etc/kubernetes/admin.conf $HOME/.kube/config
  sudo chown $(id -u):$(id -g) $HOME/.kube/config

Alternatively, if you are the root user, you can run:

  export KUBECONFIG=/etc/kubernetes/admin.conf

You should now deploy a pod network to the cluster.
Run "kubectl apply -f [podnetwork].yaml" with one of the options listed at:
  https://kubernetes.io/docs/concepts/cluster-administration/addons/

You can now join any number of control-plane nodes by copying certificate authorities
and service account keys on each node and then running the following as root:

  kubeadm join lb.kubesphere.local:6443 --token qpnirw.gyfdxnceyth942i9 \
        --discovery-token-ca-cert-hash sha256:8f0739bdfa2fb5a6118b5b6d0e10985641aa7c903fd749e073caf718b350c282 \
        --control-plane

Then you can join any number of worker nodes by running the following on each as root:

kubeadm join lb.kubesphere.local:6443 --token qpnirw.gyfdxnceyth942i9 \
        --discovery-token-ca-cert-hash sha256:8f0739bdfa2fb5a6118b5b6d0e10985641aa7c903fd749e073caf718b350c282
最后结果输出如下信息,代表KubeSphere集群也已经安装完毕!✅

[可选]单独安装Kubernetes
也可以不指定KubeSphere和Kubernetes版本。
./kk create cluster --with-kubernetes
[root@kubesphere-master ~]# ./kk create cluster --with-kubernetes --with-kubesphere


 _   __      _          _   __
| | / /     | |        | | / /
| |/ / _   _| |__   ___| |/ /  ___ _   _
|    \| | | | '_ \ / _ \    \ / _ \ | | |
| |\  \ |_| | |_) |  __/ |\  \  __/ |_| |
\_| \_/\__,_|_.__/ \___\_| \_/\___|\__, |
                                    __/ |
                                   |___/

05:30:47 UTC [GreetingsModule] Greetings
05:30:47 UTC message: [kubesphere-master]
Greetings, KubeKey!
05:30:47 UTC success: [kubesphere-master]
05:30:47 UTC [NodePreCheckModule] A pre-check on nodes
05:30:48 UTC success: [kubesphere-master]
05:30:48 UTC [ConfirmModule] Display confirmation form
+-------------------+------+------+---------+----------+-------+-------+---------+-----------+--------+--------+------------+------------+-------------+------------------+--------------+
| name              | sudo | curl | openssl | ebtables | socat | ipset | ipvsadm | conntrack | chrony | docker | containerd | nfs client | ceph client | glusterfs client | time         |
+-------------------+------+------+---------+----------+-------+-------+---------+-----------+--------+--------+------------+------------+-------------+------------------+--------------+
| kubesphere-master | y    | y    | y       | y        | y     | y     | y       | y         | y      |        |            | y          |             |                  | UTC 05:30:48 |
+-------------------+------+------+---------+----------+-------+-------+---------+-----------+--------+--------+------------+------------+-------------+------------------+--------------+

This is a simple check of your environment.
Before installation, ensure that your machines meet all requirements specified at
https://github.com/kubesphere/kubekey#requirements-and-recommendations

Continue this installation? [yes/no]: yes
至此,Kubernetes集群完成安装。通过以下命令查看Kubernetes运行情况。
[root@kubesphere-master ~]# kubectl get nodes
NAME                STATUS   ROLES                         AGE     VERSION
kubesphere-master   Ready    control-plane,master,worker   2m14s   v1.23.10
[root@kubesphere-master ~]# kubectl get pod -A
NAMESPACE     NAME                                        READY   STATUS    RESTARTS   AGE
kube-system   calico-kube-controllers-74dbdc644f-rsn8n    1/1     Running   0          2m6s
kube-system   calico-node-p27nq                           1/1     Running   0          2m7s
kube-system   coredns-b7c47bcdc-45mzd                     1/1     Running   0          2m6s
kube-system   coredns-b7c47bcdc-5n5mc                     1/1     Running   0          2m6s
kube-system   kube-apiserver-kubesphere-master            1/1     Running   0          2m17s
kube-system   kube-controller-manager-kubesphere-master   1/1     Running   0          2m17s
kube-system   kube-proxy-xqsl4                            1/1     Running   0          2m7s
kube-system   kube-scheduler-kubesphere-master            1/1     Running   0          2m17s
kube-system   nodelocaldns-m6j69                          1/1     Running   0          2m7s
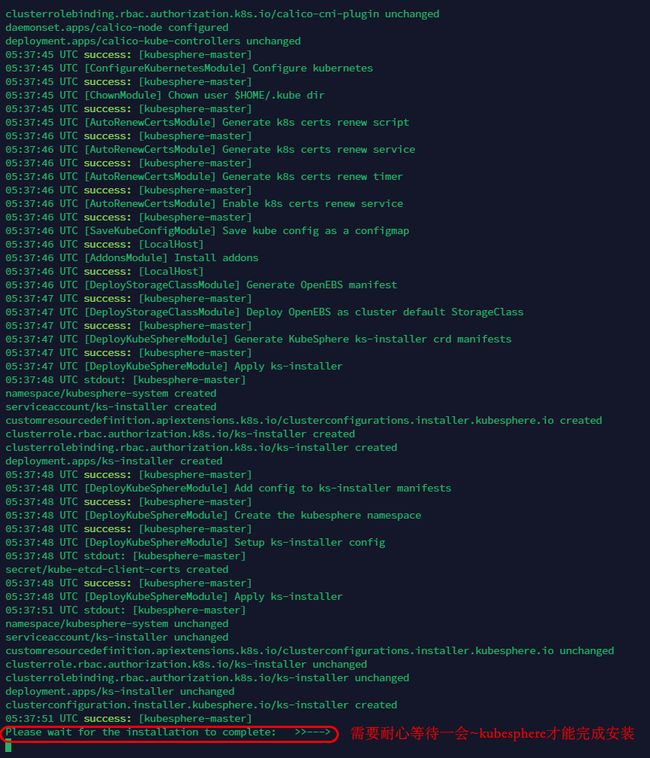
[可选]单独安装KubeSphere
[root@kubesphere-master ~]# ./kk create cluster --with-kubesphere


 _   __      _          _   __
| | / /     | |        | | / /
| |/ / _   _| |__   ___| |/ /  ___ _   _
|    \| | | | '_ \ / _ \    \ / _ \ | | |
| |\  \ |_| | |_) |  __/ |\  \  __/ |_| |
\_| \_/\__,_|_.__/ \___\_| \_/\___|\__, |
                                    __/ |
                                   |___/

05:36:52 UTC [GreetingsModule] Greetings
05:36:53 UTC message: [kubesphere-master]
Greetings, KubeKey!
05:36:53 UTC success: [kubesphere-master]
05:36:53 UTC [NodePreCheckModule] A pre-check on nodes
05:36:53 UTC success: [kubesphere-master]
05:36:53 UTC [ConfirmModule] Display confirmation form
+-------------------+------+------+---------+----------+-------+-------+---------+-----------+--------+--------+------------+------------+-------------+------------------+--------------+
| name              | sudo | curl | openssl | ebtables | socat | ipset | ipvsadm | conntrack | chrony | docker | containerd | nfs client | ceph client | glusterfs client | time         |
+-------------------+------+------+---------+----------+-------+-------+---------+-----------+--------+--------+------------+------------+-------------+------------------+--------------+
| kubesphere-master | y    | y    | y       | y        | y     | y     | y       | y         | y      | 24.0.6 | v1.7.3     | y          |             |                  | UTC 05:36:53 |
+-------------------+------+------+---------+----------+-------+-------+---------+-----------+--------+--------+------------+------------+-------------+------------------+--------------+

This is a simple check of your environment.
Before installation, ensure that your machines meet all requirements specified at
https://github.com/kubesphere/kubekey#requirements-and-recommendations

Continue this installation? [yes/no]: yes
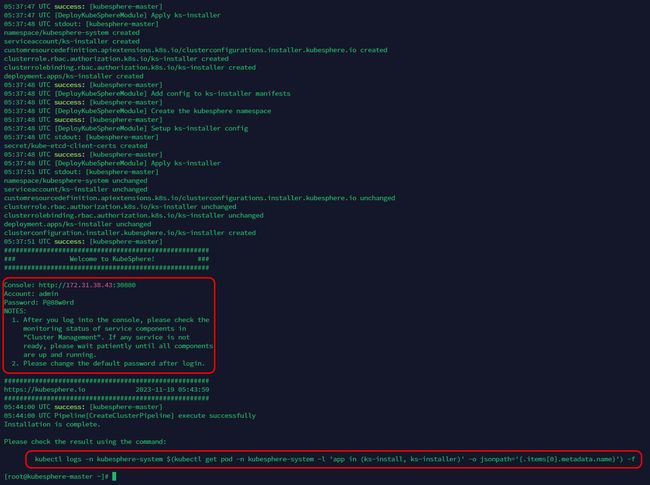
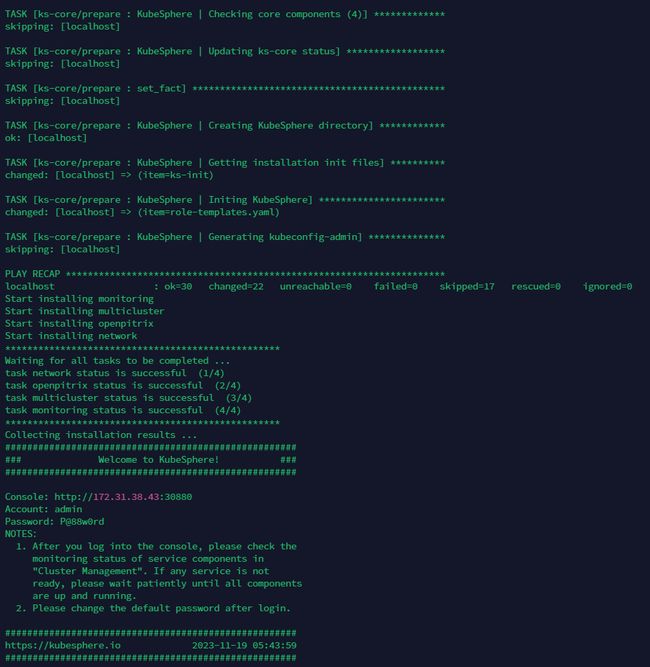
#####################################################
###              Welcome to KubeSphere!           ###
#####################################################

Console: http://172.31.38.43:30880
Account: admin
Password: P@88w0rd
NOTES:
  1. After you log into the console, please check the
     monitoring status of service components in
     "Cluster Management". If any service is not
     ready, please wait patiently until all components
     are up and running.
  2. Please change the default password after login.

#####################################################
https://kubesphere.io             2023-11-19 05:43:59
#####################################################
05:44:00 UTC success: [kubesphere-master]
05:44:00 UTC Pipeline[CreateClusterPipeline] execute successfully
Installation is complete.

Please check the result using the command:

        kubectl logs -n kubesphere-system $(kubectl get pod -n kubesphere-system -l 'app in (ks-install, ks-installer)' -o jsonpath='{.items[0].metadata.name}') -f
[root@kubesphere-master ~]# kubectl get nodes -A
NAME                STATUS   ROLES                         AGE   VERSION
kubesphere-master   Ready    control-plane,master,worker   13m   v1.23.10
[root@kubesphere-master ~]# kubectl get pods -A
NAMESPACE                      NAME                                               READY   STATUS    RESTARTS   AGE
kube-system                    calico-kube-controllers-74dbdc644f-rsn8n           1/1     Running   0          13m
kube-system                    calico-node-p27nq                                  1/1     Running   0          13m
kube-system                    coredns-b7c47bcdc-45mzd                            1/1     Running   0          13m
kube-system                    coredns-b7c47bcdc-5n5mc                            1/1     Running   0          13m
kube-system                    kube-apiserver-kubesphere-master                   1/1     Running   0          13m
kube-system                    kube-controller-manager-kubesphere-master          1/1     Running   0          13m
kube-system                    kube-proxy-xqsl4                                   1/1     Running   0          13m
kube-system                    kube-scheduler-kubesphere-master                   1/1     Running   0          13m
kube-system                    nodelocaldns-m6j69                                 1/1     Running   0          13m
kube-system                    openebs-localpv-provisioner-69cbb769b8-cz2jf       1/1     Running   0          9m13s
kube-system                    snapshot-controller-0                              1/1     Running   0          8m28s
kubesphere-controls-system     default-http-backend-696d6bf54f-9rhx7              1/1     Running   0          7m33s
kubesphere-controls-system     kubectl-admin-b49cf5585-g59ww                      1/1     Running   0          3m9s
kubesphere-monitoring-system   alertmanager-main-0                                2/2     Running   0          5m53s
kubesphere-monitoring-system   kube-state-metrics-774ff789cf-pj4r6                3/3     Running   0          6m23s
kubesphere-monitoring-system   node-exporter-n6dmw                                2/2     Running   0          6m25s
kubesphere-monitoring-system   notification-manager-deployment-78ff4d6789-8qpgp   2/2     Running   0          5m16s
kubesphere-monitoring-system   notification-manager-operator-85d67fdc46-khmwv     2/2     Running   0          5m31s
kubesphere-monitoring-system   prometheus-k8s-0                                   2/2     Running   0          6m18s
kubesphere-monitoring-system   prometheus-operator-57c78bd7fb-dq7r7               2/2     Running   0          6m27s
kubesphere-system              ks-apiserver-76bf8bb556-hjq47                      1/1     Running   0          7m33s
kubesphere-system              ks-console-768dbcdf9c-bccbd                        1/1     Running   0          7m33s
kubesphere-system              ks-controller-manager-866bf75746-tfxd2             1/1     Running   0          7m33s
kubesphere-system              ks-installer-d949f8fcc-zh6pr                       1/1     Running   0          9m12s
9. 验证KubeSphere安装结果
输入以下命令以检查安装结果。
kubectl logs -n kubesphere-system $(kubectl get pod -n kubesphere-system -l 'app in (ks-install, ks-installer)' -o jsonpath='{.items[0].metadata.name}') -f
输出信息会显示 Web 控制台的 IP 地址和端口号,默认的 NodePort 是
30880。现在,可以使用默认的帐户和密码 (admin/P@88w0rd) 通过访问控制台。:30880
10. 登录KubeSphere控制台
- Console: http://<公网IP地址>:30880
- Account: admin
- Password: P@88w0rd

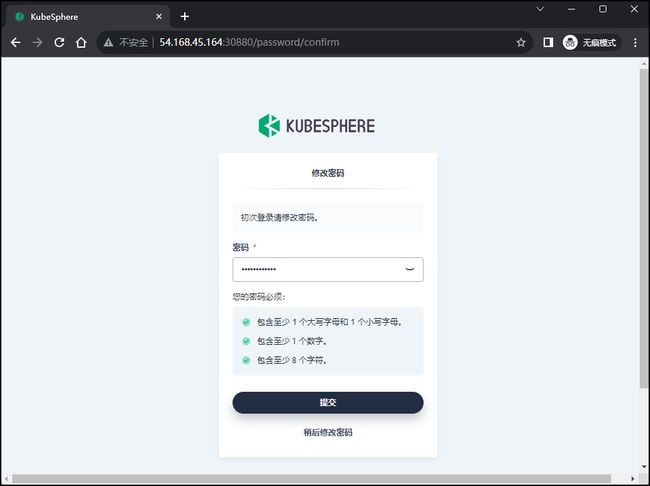
首次登录,提示需要设置新的密码。
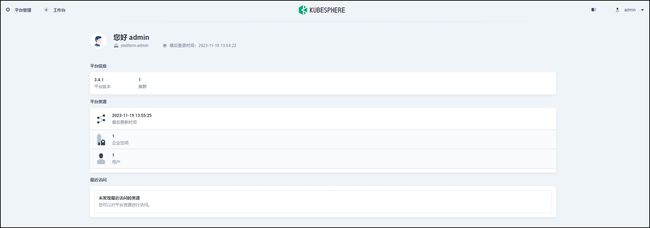
进入KubeSphere控制台。
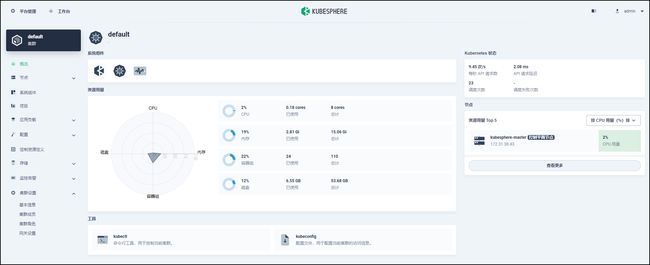

登录至控制台后,您可以在系统组件中查看各个组件的状态。也可以使用
kubectl get pod --all-namespaces来检查 KubeSphere 相关组件的运行状况。

[可选]安装KubeSphere应用商店
图形化操作
- 使用
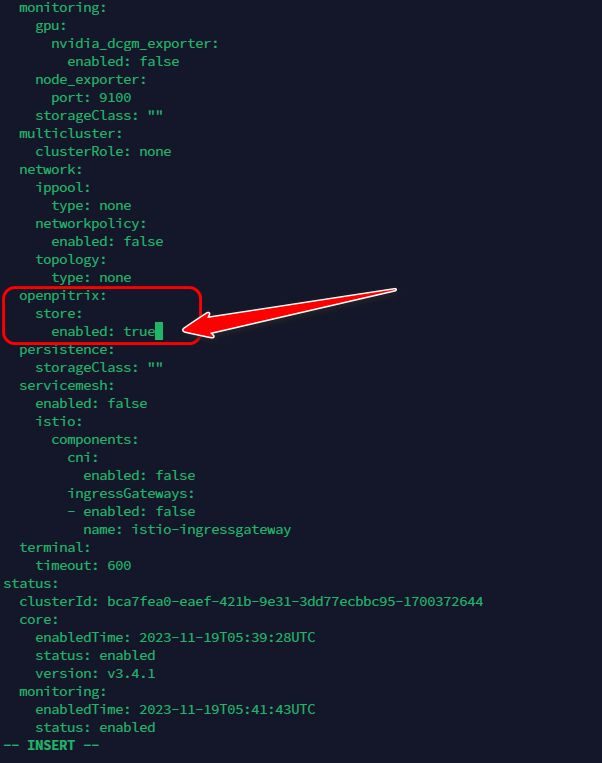
admin用户登录控制台,点击左上角的平台管理,选择集群管理。 - 点击定制资源定义**,在搜索栏中输入
clusterconfiguration,点击结果查看其详细页面。** - 在自定义资源中,点击
ks-installer右侧的三个点。选择编辑 YAML。 - 在该 YAML 文件中,搜索
openpitrix,将enabled的false改为true。完成后,点击右下角的确定,保存配置。
openpitrix:
  store:
    enabled: true # 将“false”更改为“true”。
- 在 kubectl 中执行以下命令检查安装过程:
kubectl logs -n kubesphere-system $(kubectl get pod -n kubesphere-system -l 'app in (ks-install, ks-installer)' -o jsonpath='{.items[0].metadata.name}') -f


命令行操作
[root@kubesphere-master ~]# kubectl edit cc ks-installer -n kubesphere-system
clusterconfiguration.installer.kubesphere.io/ks-installer edited
验证安装结果
输入
http://<公网IP地址>:30880/apps


11. 常见问题
问题:缺少依赖项。
[root@kubesphere-master ~]# ./kk create cluster --with-kubernetes v1.25.4 --with-kubesphere v3.4.0


 _   __      _          _   __
| | / /     | |        | | / /
| |/ / _   _| |__   ___| |/ /  ___ _   _
|    \| | | | '_ \ / _ \    \ / _ \ | | |
| |\  \ |_| | |_) |  __/ |\  \  __/ |_| |
\_| \_/\__,_|_.__/ \___\_| \_/\___|\__, |
                                    __/ |
                                   |___/

05:25:34 UTC [GreetingsModule] Greetings
05:25:35 UTC message: [kubesphere-master]
Greetings, KubeKey!
05:25:35 UTC success: [kubesphere-master]
05:25:35 UTC [NodePreCheckModule] A pre-check on nodes
05:25:35 UTC success: [kubesphere-master]
05:25:35 UTC [ConfirmModule] Display confirmation form
+-------------------+------+------+---------+----------+-------+-------+---------+-----------+--------+--------+------------+------------+-------------+------------------+--------------+
| name              | sudo | curl | openssl | ebtables | socat | ipset | ipvsadm | conntrack | chrony | docker | containerd | nfs client | ceph client | glusterfs client | time         |
+-------------------+------+------+---------+----------+-------+-------+---------+-----------+--------+--------+------------+------------+-------------+------------------+--------------+
| kubesphere-master | y    | y    | y       |          | y     |       |         | y         | y      |        |            | y          |             |                  | UTC 05:25:35 |
+-------------------+------+------+---------+----------+-------+-------+---------+-----------+--------+--------+------------+------------+-------------+------------------+--------------+

This is a simple check of your environment.
Before installation, ensure that your machines meet all requirements specified at
https://github.com/kubesphere/kubekey#requirements-and-recommendations

[Notice]
Incorrect runtime. Please specify a container runtime other than Docker to install Kubernetes v1.24 or later.
You can set "spec.kubernetes.containerManager" in the configuration file to "containerd" or add "--container-manager containerd" to the "./kk create cluster" command.
For more information, see:
https://github.com/kubesphere/kubekey/blob/master/docs/commands/kk-create-cluster.md
https://kubernetes.io/docs/setup/production-environment/container-runtimes/#container-runtimes
https://kubernetes.io/blog/2022/02/17/dockershim-faq/
✅解决:安装缺少的依赖性。
yum install -y ebtables ipset ipvsadm
12. 参考链接
在 Linux 上以 All-in-One 模式安装 KubeSphere
KubeSphere 应用商店