Android 热修复
1、热修复原理
热修复是指,在应用上线后出现 bug 需要及时修复时,不用再发新的安装包,只需要发布补丁包,在客户无感知下修复掉 bug。补丁包需要由开发者生成,由服务器管理并下发补丁包到用户的设备上执行热修复。
热修复解决方案对比(图片来源 Tinker GitHub):
框架都会用到反射 + 类加载技术,只不过使用方式不同呈现的效果也不同。通过类替换实现的热修复方案都不是即时生效的,需要重启应用后才能生效,而非类替换的方案可以做到即时生效,但实现方式有所不同,下面简单看看各方案的实现原理。
1.1 AndFix
AndFix 会在 native 层动态替换 Java 层的方法属性,通过 native 层 hook Java 层的代码。
首先,在补丁包的源文件中要对需要修改的方法打上 @MethodReplace 注解,注明要替换的类名和方法名:
@Target(ElementType.METHOD)
@Retention(RetentionPolicy.RUNTIME)
public @interface MethodReplace {
	String clazz();

	String method();
}
方法写好后编译生成 class 再打包成 dex 文件。然后 AndFix 会在 Java 层通过 DexFile 加载这个补丁包中的 dex 文件,遍历其中的 Class:
	/**
	 * @param file
	 *            patch file
	 * @param classLoader
	 *            classloader of class that will be fixed
	 * @param classes
	 *            classes will be fixed
	 */
	public synchronized void fix(File file, ClassLoader classLoader,
			List<String> classes) {
		...

		try {
			File optfile = new File(mOptDir, file.getName());
			...

			// 加载补丁包 dex 文件
			final DexFile dexFile = DexFile.loadDex(file.getAbsolutePath(),
					optfile.getAbsolutePath(), Context.MODE_PRIVATE);

			ClassLoader patchClassLoader = new ClassLoader(classLoader) {
				@Override
				protected Class<?> findClass(String className)
						throws ClassNotFoundException {
					Class<?> clazz = dexFile.loadClass(className, this);
					if (clazz == null
							&& className.startsWith("com.alipay.euler.andfix")) {
						return Class.forName(className);// annotation’s class
														// not found
					}
					if (clazz == null) {
						throw new ClassNotFoundException(className);
					}
					return clazz;
				}
			};
			// 获取 dex 文件中的所有 Class 对象
			Enumeration<String> entrys = dexFile.entries();
			Class<?> clazz = null;
			// 遍历 dex 中的所有 Class
			while (entrys.hasMoreElements()) {
				String entry = entrys.nextElement();
				if (classes != null && !classes.contains(entry)) {
					continue;// skip, not need fix
				}
				clazz = dexFile.loadClass(entry, patchClassLoader);
				if (clazz != null) {
					// 开始执行类内方法的修复
					fixClass(clazz, classLoader);
				}
			}
		} catch (IOException e) {
			Log.e(TAG, "pacth", e);
		}
	}
遍历类里面声明的所有方法,筛选出被 @MethodReplace 注解标记的方法,从中获得要替换的类名+方法名,以便进行替换:
	private void fixClass(Class<?> clazz, ClassLoader classLoader) {
		// 获取 clazz 内声明的所有方法
		Method[] methods = clazz.getDeclaredMethods();
		MethodReplace methodReplace;
		String clz;
		String meth;
		// 遍历 methods,筛选出被 @MethodReplace 注解标记的方法
		for (Method method : methods) {
			methodReplace = method.getAnnotation(MethodReplace.class);
			if (methodReplace == null)
				continue;
			// 从 @MethodReplace 注解上获取类和方法名
			clz = methodReplace.clazz();
			meth = methodReplace.method();
			if (!isEmpty(clz) && !isEmpty(meth)) {
				// 开始替换
				replaceMethod(classLoader, clz, meth, method);
			}
		}
	}
replaceMethod() 会对已经修复过的类做缓存处理,真正执行修复操作的是 addReplaceMethod():
	// 缓存,<类名@ClassLoader名,Class对象>
	private static Map<String, Class<?>> mFixedClass = new ConcurrentHashMap<String, Class<?>>();
	/**
	 * replace method
	 *
	 * @param classLoader classloader
	 * @param clz class
	 * @param meth name of target method
	 * @param method source method
	 */
	private void replaceMethod(ClassLoader classLoader, String clz,
			String meth, Method method) {
		try {
			// 缓存的 key 是类名@ClassLoader名
			String key = clz + "@" + classLoader.toString();
			// 先去缓存中找 clazz
			Class<?> clazz = mFixedClass.get(key);
			if (clazz == null) {// class not load
				Class<?> clzz = classLoader.loadClass(clz);
				// initialize target class
				clazz = AndFix.initTargetClass(clzz);
			}
			// 缓存没找到
			if (clazz != null) {// initialize class OK
				mFixedClass.put(key, clazz);
				Method src = clazz.getDeclaredMethod(meth,
						method.getParameterTypes());
				// 真正的执行替换
				AndFix.addReplaceMethod(src, method);
			}
		} catch (Exception e) {
			Log.e(TAG, "replaceMethod", e);
		}
	}
在 addReplaceMethod() 中会通过一个 native 方法执行方法体的替换:
	/**
	 * replace method's body
	 *
	 * @param src
	 *            source method
	 * @param dest
	 *            target method
	 *
	 */
	public static void addReplaceMethod(Method src, Method dest) {
		try {
			replaceMethod(src, dest);
			initFields(dest.getDeclaringClass());
		} catch (Throwable e) {
			Log.e(TAG, "addReplaceMethod", e);
		}
	}

	private static native void replaceMethod(Method dest, Method src);
native 的 replaceMethod() 主要是对 ArtMethod 结构体的属性进行替换:
void replace_4_4(JNIEnv* env, jobject src, jobject dest) {
	// 分别获取源方法和目标方法的 ArtMethod 结构体,进行对应属性替换
	art::mirror::ArtMethod* smeth =
			(art::mirror::ArtMethod*) env->FromReflectedMethod(src);

	art::mirror::ArtMethod* dmeth =
			(art::mirror::ArtMethod*) env->FromReflectedMethod(dest);

	dmeth->declaring_class_->class_loader_ =
			smeth->declaring_class_->class_loader_; //for plugin classloader
	dmeth->declaring_class_->clinit_thread_id_ =
			smeth->declaring_class_->clinit_thread_id_;
	dmeth->declaring_class_->status_ = smeth->declaring_class_->status_-1;
	//for reflection invoke
	reinterpret_cast<art::mirror::Class*>(dmeth->declaring_class_)->super_class_ = 0;

	smeth->declaring_class_ = dmeth->declaring_class_;
    smeth->dex_cache_initialized_static_storage_ = dmeth->dex_cache_initialized_static_storage_;
    smeth->access_flags_ = dmeth->access_flags_  | 0x0001;
    smeth->dex_cache_resolved_types_ = dmeth->dex_cache_resolved_types_;
    smeth->dex_cache_resolved_methods_ = dmeth->dex_cache_resolved_methods_;
    smeth->dex_cache_strings_ = dmeth->dex_cache_strings_;
    smeth->code_item_offset_ = dmeth->code_item_offset_;
    smeth->core_spill_mask_ = dmeth->core_spill_mask_;
    smeth->fp_spill_mask_ = dmeth->fp_spill_mask_;
    smeth->method_dex_index_ = dmeth->method_dex_index_;
    smeth->mapping_table_ = dmeth->mapping_table_;
    smeth->method_index_ = dmeth->method_index_;
    smeth->gc_map_ = dmeth->gc_map_;
    smeth->frame_size_in_bytes_ = dmeth->frame_size_in_bytes_;
    smeth->native_method_ = dmeth->native_method_;
    smeth->vmap_table_ = dmeth->vmap_table_;

    smeth->entry_point_from_compiled_code_ = dmeth->entry_point_from_compiled_code_;

    smeth->entry_point_from_interpreter_ = dmeth->entry_point_from_interpreter_;

    smeth->method_index_ = dmeth->method_index_;
}
从 AndFix 的源码中能看出,ART 虚拟机(从 4.4 开始)上的每一个系统版本都需要对 ArtMethod 结构体进行适配,在适配到 7.0 之后 AndFix 便停更了。
1.2 Robust
Robust 也是会即时生效的热修复框架,但是它是在 Java 层实现的,并没有 native 的处理。
Robust 会在编译打包阶段对每个方法自动插入一段代码(字节码插桩),类似于代理,将方法执行的代码重定向到其它方法,这个插入过程对业务开发是完全透明的。
比如说 State.java 的 getIndex() 内容如下:
	public long getIndex() {
        return 100;
    }
经过 Robust 处理后变成下面这样:
	public static ChangeQuickRedirect changeQuickRedirect;

    public long getIndex() {
        if(changeQuickRedirect != null) {
        	//PatchProxy中封装了获取当前className和methodName的逻辑,并在其内部最终调用了changeQuickRedirect的对应函数
            if(PatchProxy.isSupport(new Object[0], this, changeQuickRedirect, false)) {
                return ((Long)PatchProxy.accessDispatch(new Object[0], this, changeQuickRedirect, false)).longValue();
            }
        }
        return 100L;
    }
Robust 为每个 class 增加了一个类型为 ChangeQuickRedirect 的静态成员,在每个方法前都插入了使用 changeQuickRedirect 相关的逻辑。当 changeQuickRedirect 不为 null 时,可能会执行到 accessDispatch 从而替换掉之前老的逻辑,达到 fix 的目的。
想要修改 getIndex() 的返回值,补丁包中需要包含如下两个源文件:
public class PatchesInfoImpl implements PatchesInfo {
    public List<PatchedClassInfo> getPatchedClassesInfo() {
        List<PatchedClassInfo> patchedClassesInfos = new ArrayList<PatchedClassInfo>();
        // 需要打补丁的类名,com.meituan.sample.d 是混淆后的类名
        PatchedClassInfo patchedClass = new PatchedClassInfo("com.meituan.sample.d", StatePatch.class.getCanonicalName());
        patchedClassesInfos.add(patchedClass);
        return patchedClassesInfos;
    }
}
public class StatePatch implements ChangeQuickRedirect {
    @Override
    public Object accessDispatch(String methodSignature, Object[] paramArrayOfObject) {
        String[] signature = methodSignature.split(":");
        if (TextUtils.equals(signature[1], "a")) {//long getIndex() -> a
        	// 修改 getIndex() 的返回值为 106
            return 106;
        }
        return null;
    }

    @Override
    public boolean isSupport(String methodSignature, Object[] paramArrayOfObject) {
        String[] signature = methodSignature.split(":");
        if (TextUtils.equals(signature[1], "a")) {//long getIndex() -> a
            return true;
        }
        return false;
    }
}
打补丁的主要过程为:
- ClassLoader 加载补丁的 dex 文件,拿到 PatchesInfoImpl.class 并创建一个对应的 Class 对象
- 反射调用 getPatchedClassesInfo(),拿到需要打补丁的类名,再反射拿到这个类的 Class 对象
- 反射上一步中 Class 对象的 changeQuickRedirect 字段,并赋值为补丁包 dex 文件中 StatePatch.class new 出来的对象。
以上过程没有动系统的 ClassLoader,都是直接使用,兼容性得以保证。
更详细内容可以直接参考美团技术团队对 Robust 的介绍文章链接Android热更新方案Robust。
1.3 Tinker
Tinker 的补丁包与前两者不同,它是一个差分包而不是完整的 dex 文件。这个差分包是计算了指定的 base apk(一般就是设备正在运行的 apk)的 dex 与修改后 apk 的 dex 的区别的描述,运行时将 base apk 的 dex 与差分包进行合成,重启后加载全新合成的 dex 文件:
图片来源:微信Tinker的一切都在这里,包括源码(一)
Tinker 实现热修复的原理,是将补丁包的 dex 文件存放到系统的 PathClassLoader 的 pathList 字段的 dexElements 数组的前面:
由于 ClassLoader 加载 dexElements 数组中的类是按照由先到后的顺序,且加载过的类不会重复加载,所以补丁包的 Key.class 生效,原本 Classes2.dex 中的 Key.class 不会被加载,使得修复生效。参考 Tinker 代码:
tinker/tinker-android/tinker-android-loader/src/main/java/com/tencent/tinker/loader/SystemClassLoaderAdder.java:

	static void injectDexesInternal(ClassLoader cl, List<File> dexFiles, File optimizeDir) throws Throwable {
		// 针对不同系统需要做出兼容处理,我们看V23的
        if (Build.VERSION.SDK_INT >= 23) {
            V23.install(cl, dexFiles, optimizeDir);
        } else if (Build.VERSION.SDK_INT >= 19) {
            V19.install(cl, dexFiles, optimizeDir);
        } else if (Build.VERSION.SDK_INT >= 14) {
            V14.install(cl, dexFiles, optimizeDir);
        } else {
            V4.install(cl, dexFiles, optimizeDir);
        }
    }

	private static final class V23 {

        private static void install(ClassLoader loader, List<File> additionalClassPathEntries,
                                    File optimizedDirectory)
            throws IllegalArgumentException, IllegalAccessException,
            NoSuchFieldException, InvocationTargetException, NoSuchMethodException, IOException {
            // 找到 loader 中的 pathList 字段,并拿到 pathList 对象
            Field pathListField = ShareReflectUtil.findField(loader, "pathList");
            Object dexPathList = pathListField.get(loader);
            ArrayList<IOException> suppressedExceptions = new ArrayList<IOException>();
            // expandFieldArray() 会将 makePathElements() 得到的 Element 数组放在 dexPathList 对象 dexElements 的前面
            ShareReflectUtil.expandFieldArray(dexPathList, "dexElements", makePathElements(dexPathList,
                new ArrayList<File>(additionalClassPathEntries), optimizedDirectory,
                suppressedExceptions));
            if (suppressedExceptions.size() > 0) {
                for (IOException e : suppressedExceptions) {
                    ShareTinkerLog.w(TAG, "Exception in makePathElement", e);
                    throw e;
                }
            }
        }

        /**
         * 反射调用 makePathElements() 或者 makeDexElements(),将补丁包中的 dex 文件转换成 Element 数组。
         * 系统源码在不同版本中使用的方法形式不同,版本由高到低的形式为 makePathElements(List,File,List)、
         * makeDexElements(ArrayList,File,ArrayList)、makeDexElements(List,File,List)。
         */
        private static Object[] makePathElements(
            Object dexPathList, ArrayList<File> files, File optimizedDirectory,
            ArrayList<IOException> suppressedExceptions)
            throws IllegalAccessException, InvocationTargetException, NoSuchMethodException {

            Method makePathElements;
            try {
                makePathElements = ShareReflectUtil.findMethod(dexPathList, "makePathElements", List.class, File.class,
                    List.class);
            } catch (NoSuchMethodException e) {
                ShareTinkerLog.e(TAG, "NoSuchMethodException: makePathElements(List,File,List) failure");
                try {
                    makePathElements = ShareReflectUtil.findMethod(dexPathList, "makePathElements", ArrayList.class, File.class, ArrayList.class);
                } catch (NoSuchMethodException e1) {
                    ShareTinkerLog.e(TAG, "NoSuchMethodException: makeDexElements(ArrayList,File,ArrayList) failure");
                    try {
                        ShareTinkerLog.e(TAG, "NoSuchMethodException: try use v19 instead");
                        return V19.makeDexElements(dexPathList, files, optimizedDirectory, suppressedExceptions);
                    } catch (NoSuchMethodException e2) {
                        ShareTinkerLog.e(TAG, "NoSuchMethodException: makeDexElements(List,File,List) failure");
                        throw e2;
                    }
                }
            }

            return (Object[]) makePathElements.invoke(dexPathList, files, optimizedDirectory, suppressedExceptions);
        }
    }
如果对 ClassLoader 不是很了解,可以参考插件化系列中对 ClassLoader 的介绍:插件化基础(一)——加载插件的类
2、热修复的兼容问题
从上述热修复框架的介绍中不难发现,热修复对兼容性的要求是很高的,最明显的就是,如果反射了系统源码,就要跟随版本对系统源码的变化做兼容处理。除了源码的变化,系统机制的变化也会对热修复的兼容性产生影响。
2.1 Android N 混合编译
ART 虚拟机是在 Android KitKat(4.4) 被引入的,并从 Android L(5.0) 开始被设为默认运行环境。
Android N(7.0)之前,ART 在安装 apk 时会采用 AOT(Ahead of time:提前编译、静态编译)预编译为机器码。
而从 Android N 开始,使用混合编译模式,即安装 apk 时不编译,运行时解释字节码,同时在 JIT (Just-In-Time:即时编译)编译热点代码(即频繁执行的代码)并将这些代码信息记录至 Profile 文件,在设备空闲时使用 AOT(All-Of-the-Time compilation:全时段编译)编译生成名为 app_image 的 base.art(类对象映像)文件,该文件会在 apk 下次启动时自动加载(相当于缓存)。
根据 Android 的类加载机制,已经被加载过的类无法被替换,使得无法通过热修复修正这些类(启动 apk 时,在 ActivityThread 创建 PathClassLoader 时就会先加载 app_image 中的类,随后才执行热修复的代码,所以被编译进 app_image 的类无法被热修复)。
Tinker 的解决方案是自己创建一个 PathClassLoader 替换掉系统的:
public class SystemClassLoaderAdder {
	public static void installDexes(Application application, ClassLoader loader, File dexOptDir, List<File> files,
                                    boolean isProtectedApp, boolean useDLC) throws Throwable {
		if (!files.isEmpty()) {
            files = createSortedAdditionalPathEntries(files);
            ClassLoader classLoader = loader;
            if (Build.VERSION.SDK_INT >= 24 && !isProtectedApp) {
            	// 从 7.0 开始要用自己创建的 PathClassLoader 替换掉系统的
                classLoader = NewClassLoaderInjector.inject(application, loader, dexOptDir, useDLC, files);
            } else {
            	// 7.0 以下
                injectDexesInternal(classLoader, files, dexOptDir);
            }
            ...
        }
	}
}
2.Dalvik 虚拟机的 CLASS_ISPREVERIFIED 标记
我们仿照 Tinker 写一个热修复 Demo,在 4.4 系统上运行(4.4 默认用的还是 Dalvik 虚拟机):
	/**
     * 1、获取程序的PathClassLoader对象
     * 2、反射获得PathClassLoader父类BaseDexClassLoader的pathList对象
     * 3、反射获取pathList的dexElements对象 (oldElement)
     * 4、把补丁包变成Element数组:patchElement(反射执行makePathElements)
     * 5、合并patchElement+oldElement = newElement (Array.newInstance)
     * 6、反射把oldElement赋值成newElement
     *
     * @param application
     * @param patch
     */
    public static void installPatch(Application application, File patch) {
        //1、获取程序的PathClassLoader对象
        ClassLoader classLoader = application.getClassLoader();
        if (Build.VERSION.SDK_INT >= Build.VERSION_CODES.N) {
            try {
                ClassLoaderInjector.inject(application, classLoader, patchs);
            } catch (Throwable throwable) {
            }
            return;
        }
        //2、反射获得PathClassLoader父类BaseDexClassLoader的pathList对象
        try {
            Field pathListField = ShareReflectUtil.findField(classLoader, "pathList");
            Object pathList = pathListField.get(classLoader);
            //3、反射获取pathList的dexElements对象 (oldElement)
            Field dexElementsField = ShareReflectUtil.findField(pathList, "dexElements");
            Object[] oldElements = (Object[]) dexElementsField.get(pathList);
            //4、把补丁包变成Element数组:patchElement(反射执行makePathElements)
            Object[] patchElements = null;
            if (Build.VERSION.SDK_INT >= Build.VERSION_CODES.M) {
                Method makePathElements = ShareReflectUtil.findMethod(pathList, "makePathElements",
                        List.class, File.class,
                        List.class);
                ArrayList<IOException> ioExceptions = new ArrayList<>();
                patchElements = (Object[])
                        makePathElements.invoke(pathList, patchs, application.getCacheDir(), ioExceptions);

            } else if (Build.VERSION.SDK_INT >= Build.VERSION_CODES.KITKAT) {
                Method makePathElements = ShareReflectUtil.findMethod(pathList, "makeDexElements",
                        ArrayList.class, File.class, ArrayList.class);
                ArrayList<IOException> ioExceptions = new ArrayList<>();
                patchElements = (Object[])
                        makePathElements.invoke(pathList, patchs, application.getCacheDir(), ioExceptions);
            }

            //5、合并patchElement+oldElement = newElement (Array.newInstance)
            //创建一个新数组,大小 oldElements+patchElements
            Object[] newElements = (Object[]) Array.newInstance(oldElements.getClass().getComponentType(),
                    oldElements.length + patchElements.length);

            System.arraycopy(patchElements, 0, newElements, 0, patchElements.length);
            System.arraycopy(oldElements, 0, newElements, patchElements.length, oldElements.length);
            //6、反射把oldElement赋值成newElement
            dexElementsField.set(pathList, newElements);
        } catch (Exception e) {
            e.printStackTrace();
        }
    }
会发现抛出如下错误:
![]()
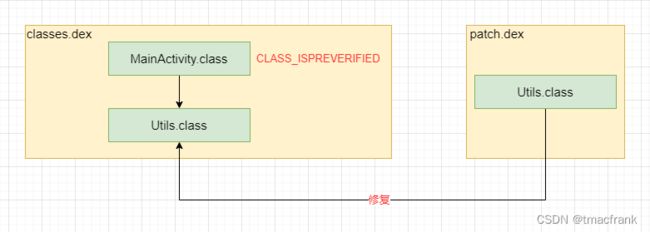
这是因为,被标记了 CLASS_ISPREVERIFIED 的类,引用了不在同一个 dex 文件中的类。如果一个类只引用了(正向调用,反射不算,因为反射不需要一个类的引用就用获取到该类对象)同一个 dex 文件中的类,那么在打包 dex 文件时,这个类就会被打上 CLASS_ISPREVERIFIED 标记(这个机制属于 Dalvik 虚拟机的一个优化):
比如说 MainActivity 只引用了 Utils,且二者在同一个 dex 文件中,那么 MainActivity.class 就会被打上 CLASS_ISPREVERIFIED 标记。
在热修复时,会用 patch.dex 中的 Utils.class 去替换 classes.dex 中的 Utils.class,导致 MainActivity 引用了不同 dex 文件中的类,就会抛出 IllegalAccessError。
如何规避掉这个错误呢?那就尝试让 MainActivity 引用不同 dex 文件中的类,这样它就打不上 CLASS_ISPREVERIFIED 标记,再引用其它 dex 中的类也就不会出错了。具体做法是:
- 在补丁包中创建一个专门被引用的空类 AntiLazyLoad
- 通过字节码插桩的方式在 MainActivity.class 的构造方法中添加引用 AntiLazyLoad 的代码
- 将 AntiLazyLoad 这个类添加到负责加载 classes.dex 的那个 ClassLoader 中
上述过程可以通过打补丁包的方式实现,做法是:
图片来源:安卓App热补丁动态修复技术介绍
3、自定义 Gradle 插件打补丁包
我们写一个通过 Gradle 插件 + ASM 字节码插桩的自动化补丁 Demo 来解决上面的问题。
实现自动化补丁需要有两个前置知识:
- 熟悉 Android Gradle Plugin(AGP)的基础知识(可参考为什么说 Gradle 是 Android 进阶绕不去的坎)
- 知道如何通过 ASM 实现字节码插桩(可参考ASM 字节码插桩入门)
此外,由于 AGP 的向后兼容性很弱,所以这里先声明 Demo 中使用的 Gradle 版本是 4.10.1,AGP 版本是 3.3.1(版本确实老了点),如果你所使用的版本高于上述版本,可能部分 API 不兼容(比如说你的 AS 升级到了 AS BumbleBee,其支持最低的 Gradle 版本为 6.1.1,那么本文章中的示例代码就无法运行),但是处理问题的思路应该是大致相同的。关于 Gradle 与 AGP 的版本对照表,可以参考下图:
图片来源:更新 Gradle
此外,下面做 Demo 演示时只会编译 debug 版本,所以涉及到的任务名都是以 debug 为准,比如编译 Java 源文件为 class 文件的任务名,在编译 debug 时为 compileDebugJavaWithJavac,而编译 Release 版本时就为 compileReleaseJavaWithJavac,如果还配置了其它变体,如 Xxx,那么编译该变体的任务就是 compileXxxJavaWithJavac。
3.1 实现思路
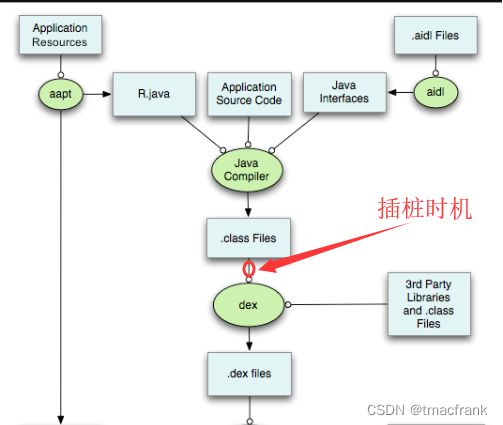
我们的目的是自定义一个 Gradle 任务,自动为两次编译之间发生了变化的 class 文件进行字节码插桩,再通过 dx/d8 命令将 class 文件打包成 dex 文件后放入补丁包。
如上图所示,在由 Java 源文件生成 dex 文件的过程中,其实是经过了几个 Gradle 任务处理的:
- compileDebugJavaWithJavac 将 Java 源文件编译成 class 文件
- transformClassesAndResourcesWithProguardForDebug 对 class 文件进行混淆
- transformClassesWithDexBuilderForDebug 将混淆后的 class 文件打包进 dex 文件
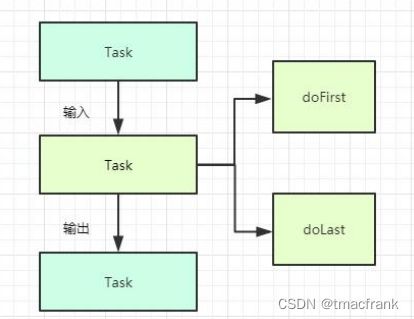
每个任务都有输入和输出,以及 doFirst 和 doLast 两个监听:
比如混淆任务 transformClassesAndResourcesWithProguardForDebug 的输入,是所有模块的 compileDebugJavaWithJavac 任务输出的 class 文件,输出就是混淆后的 class,这些 class 就是 transformClassesWithDexBuilderForDebug 任务的输入。
而 doFirst/doLast 可以理解为任务的入口/出口监听,会分别在刚进入任务还没开始执行任务功能、已经执行完任务功能即将结束任务时回调。在 Demo 中常用 doFirst 来获取上一个任务的输出文件,用 doLast 获取当前任务的输出文件,后面结合具体思路以及代码能看的更清楚些。
此外必须要明确的是,对于热修复而言,我们只需要在补丁包中加入相比于正式版本进行过修改的 class 文件,而不是本次编译生成的所有 class 文件,所以我们在每次编译时都应该用一个文件保存 class 文件的 md5 值,如果本次编译与正式版本的 md5 不同,那么该 class 文件才需要放进补丁包。
还有,如果编译开启了混淆,为了保证每次编译时,同一个文件被混淆成相同的名字,需要保存正式版本编译时使用的 mapping.txt 文件,并在后续编译中使用该 mapping。
经过以上论述呢,我们可以理出一个大致的思路:
- 如果开启了混淆,transformClassesAndResourcesWithProguardForDebug 任务进行混淆时需要使用之前备份的 mapping 文件,并且在任务的 doLast 中备份本次混淆的 mapping 作为下次的参考
- transformClassesWithDexBuilderForDebug 的输入是混淆后的 class/jar 文件,在将它们打包成 dex 之前,即在 doFirst 中,进行插桩,并通过与之前备份的 md5 值文件对比筛选出修改过的 class/jar,对它们用 dx/d8 命令打包成包含 dex 文件的补丁包
3.2 创建与使用 AGP 的基本步骤
还是要简单提一下如何创建与使用一个 Android Plugin 插件,如果前面给出的参考链接中的内容已经掌握,可以跳过本节。
我们想在两个任务执行期间加入字节码插桩、补丁打包等操作,需要自定义一个 AGP 来实现。自定义 AGP 的方式有如下三种:
| 方式 | 说明 |
|---|---|
| Build script 脚本 | 把插件写在 build.gradle 文件中,一般用于简单的逻辑,只在该 build.gradle 文件可见 |
| buildSrc 目录 | 将插件源代码放在 buildSrc/src/main/ 中,只对该项目中可见 |
| 独立项目 | 一个独立的 Java 项目/模块,可以将文件包发布到仓库(Jcenter),使其他项目方便引入 |
Build script 脚本只能在当前 build.gradle 文件中生效,复用性差;buildSrc 目录对当前项目生效,buildSrc 被作为系统保留的目录,编译时会最先编译该目录下的代码;独立项目的方式复用性最好,可以通过 Maven 实现远程共享。这里我们主要介绍 buildSrc 目录的方式。
确定 Gradle 与 AGP 版本
首先设置合适的 Gradle 与 Gradle 插件版本,Gradle 版本修改 /gradle/wrapper/gradle-wrapper.properties 文件:
distributionUrl=https\://services.gradle.org/distributions/gradle-4.10.1-all.zip
Gradle 插件版本修改项目的 build.gradle:
buildscript {
    dependencies {
        classpath "com.android.tools.build:gradle:3.3.1"
    }
}
创建 buildSrc 目录
在项目根目录下创建 buildSrc 目录(注意不是模块),然后新建 build.gradle 文件添加 Gradle 插件依赖:
apply plugin: 'java-library'

repositories {
    google()
    mavenCentral()
}
dependencies {
    // 我们需要实现的 Plugin 接口在这个依赖中
    implementation 'com.android.tools.build:gradle:3.3.1'
}
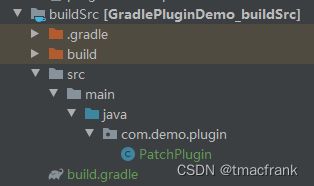
我们使用 Java 语言编写自定义插件(其实用 Groovy 更方便一些),新建 PatchPlugin 实现 Plugin 接口来完成自定义插件,目录结构:
PatchPlugin 实现 Plugin 接口时需要重写入口方法 apply,我们先只在 apply() 中添加一句 log:
public class PatchPlugin implements Plugin<Project> {

    @Override
    public void apply(Project project) {
        System.out.println("Execute apply() in PatchPlugin.");
    }
}
使用 AGP 插件
当其它模块需要使用 AGP 插件时,需要在模块 build.gradle 中通过 apply plugin 声明插件的全类名:
apply plugin: com.demo.plugin.PatchPlugin
然后编译,在编译的输出信息中可以看到我们在 apply() 中加的 log:
导入插件还有另一种形式,就是在 buildSrc 目录下,具体是在 buildSrc/src/main/resources/META-INF/gradle-plugins 目录下新建一个 xxx.properties 文件(xxx 文件名由你自己指定,但是后面在引用的时候要保持一致),并将 implementation-class 属性指定为插件类的全类名:
implementation-class=com.demo.plugin.PatchPlugin
然后在 app 模块中就可以通过单引号的方式引入该插件了:
// 这个 xxx 要和 gradle-plugins 目录下定义的 xxx 文件名一致
apply plugin:'xxx'
3.3 插件功能实现
下面正式进入 Demo 的代码。
创建扩展并进行配置
首先在插件执行的入口方法 apply() 中创建一个名为 patch 的扩展:
public class PatchPlugin implements Plugin<Project> {

    @Override
    public void apply(Project project) {
        // 作用在 application 插件上,而不是 library
        if (!project.getPlugins().hasPlugin(AppPlugin.class)) {
            throw new GradleException("本插件需要结合Android Application插件使用!!!");
        }

        // 创建一个 patch 扩展,支持的属性定义在 PatchExtension 中,其它模块
        // 在 build.gradle 中引入本插件后,就可以用 patch{} 进行配置
        project.getExtensions().create("patch", PatchExtension.class);
        ...
    }
    ...
}
通过 project 拿到 ExtensionContainer 并调用 create() 创建一个 patch 闭包,PatchExtension 是一个 JavaBean,定义了 patch 支持的属性:
public class PatchExtension {

    /**
     * 是否在 debug 模式下开启热修复,默认为 false
     */
    private boolean debugOn;

    /**
     * Application 的全类名。由于热修复一般是在 Application 中执行的,执行热修复代码时 Application
     * 已经被系统 ClassLoader 加载了,无法再替换,所以热修复时要刨除掉 Application 的 class 文件。
     * 虽然 Application 信息可以通过解析插件中的 AndroidManifest 获取,但是通过 Java 实现的插件
     * 解析 xml 很麻烦(Groovy 简单些),因此直接要求作为配置项获取
     */
    private String applicationName;

    /**
     * 可选项,补丁的输出目录,默认为 app/build/patch
     */
    private String output;

    getters and setters...
}
这样需要打补丁包的模块就可以这样配置其 build.gradle 来使用我们的插件:
apply plugin: 'com.android.application'
// 引入我们的自定义插件
apply plugin: 'com.plugin.patch'

patch {
	// debug 模式下开启打补丁包
    debugOn true
    // 本模块使用的 Application 全类名
    applicationName 'com.demo.plugin.Application'
    // 输出路径没配置,使用默认的
}
获取配置信息
接下来要获取所有配置信息为编译工作做准备了,这些操作要放在 Project 的 afterEvaluate() 回调中:
	@Override
    public void apply(Project project) {
        // 作用在 application 插件上,而不是 library
        if (!project.getPlugins().hasPlugin(AppPlugin.class)) {
            throw new GradleException("本插件需要结合Android Application插件使用!!!");
        }

        // 创建一个 patch 扩展,支持的属性定义在 PatchExtension 中,其它模块
        // 在 build.gradle 中引入本插件后,就可以用 patch{} 进行配置
        project.getExtensions().create("patch", PatchExtension.class);

        // afterEvaluate() 在 build.gradle 文件解析完成后回调
        project.afterEvaluate(new Action<Project>() {
            @Override
            public void execute(Project project) {
                PatchExtension patchExtension = project.getExtensions().findByType(PatchExtension.class);
                if (patchExtension != null) {
                    // debug 模式下是否打补丁包
                    boolean debugOn = patchExtension.isDebugOn();
                    project.getLogger().info("debugOn:" + debugOn + ", ApplicationName:" + patchExtension.getApplicationName());
                    // 获取 android 扩展
                    AppExtension android = project.getExtensions().getByType(AppExtension.class);
                    // 遍历 android -> buildTypes 下所有的变体,如 debug、release 等
                    android.getApplicationVariants().all(new Action<ApplicationVariant>() {
                        @Override
                        public void execute(ApplicationVariant applicationVariant) {
                            // 如果编译的是 debug 版本并且已经配置了 debug 不需要生成补丁包,就不作处理
                            if (applicationVariant.getName().contains("debug") && !debugOn) {
                                return;
                            }
                            // 开始编译配置与生成补丁工作
                            configTasks(project, applicationVariant, patchExtension);
                        }
                    });
                }
            }
        });
    }
如果不在 afterEvaluate() 中获取配置信息,那么会拿不到 patchExtension 中的属性值。因为使用 PatchPlugin 插件的模块,在其 build.gradle 执行到 apply plugin: ‘com.plugin.patch’ 这句话时就去执行其 apply() 去获取 patch 扩展中配置的 patchExtension 的值,而此时 build.gradle 还没解析,所以拿不到 patch 配置的属性值。
configTasks() 作为接下来一系列工作的入口:
	private void configTasks(Project project, ApplicationVariant variant, PatchExtension patchExtension) {
        // 1.创建补丁文件的输出路径
        String variantName = variant.getName();
        File outputDir = Utils.getOrCreateOutputDir(project, variantName, patchExtension);

        // 2.获取 Android 的混淆任务,并配置混淆任务使用的 mapping 文件
        String variantCapName = Utils.capitalize(variantName);
        Task proguardTask = project.getTasks().findByName("transformClassesAndResourcesWithProguardFor"
                + variantCapName);
        if (proguardTask != null) {
            configProguardTask(project, proguardTask);
        }

        // 3.配置任务,进行字节码插桩和补丁生成
        Task dexTask = getTransformTask(project, patchExtension, outputDir, variantCapName);

        // 4.创建打补丁的任务 patchDebug/patchRelease,依赖于 dexTask
        Task task = project.getTasks().create("patch" + variantCapName);
        task.setGroup("patch");
        task.dependsOn(dexTask);
    }
注释已经标明,任务大致分为 4 步,第 1 步比较简单,就是根据配置创建补丁输出目录:
	public static File getOrCreateOutputDir(Project project, String variantName, PatchExtension patchExtension) {
        File outputDir;
        // 如果 build.gradle 中没有指定 patch -> output 就用默认值 /build/patch/[variantName]
        if (!Utils.isEmpty(patchExtension.getOutput())) {
            outputDir = new File(patchExtension.getOutput(), variantName);
        } else {
            outputDir = new File(project.getBuildDir(), "patch/" + variantName);
        }

        project.getLogger().info("补丁输出路径:" + outputDir.getAbsolutePath());

        outputDir.mkdirs();
        return outputDir;
    }
后面 3 步下面详解。
处理混淆
我们需要让混淆任务按照上一次混淆的映射关系 mapping.txt 进行(如果有),并且在本次混淆任务结束之后,保存本次混淆的 mapping 文件以备下次混淆时使用:
	private void configProguardTask(Project project, Task proguardTask) {
        if (proguardTask == null) {
            return;
        }

        // 如果有备份的 mapping 文件,那么本次编译还要使用上次的 mapping
        File backupMappingFile = new File(project.getBuildDir(), "mapping.txt");
        if (backupMappingFile.exists()) {
            TransformTask task = (TransformTask) proguardTask;
            ProGuardTransform transform = (ProGuardTransform) task.getTransform();
            // 相当于在 proguard-rules.pro 中配置了 -applymapping mapping.txt
            transform.applyTestedMapping(backupMappingFile);
        }

        // 只要开启了混淆,在混淆任务结束后就要把 mapping 文件备份
        proguardTask.doLast(new Action<Task>() {
            @Override
            public void execute(Task task) {
                // mapping 文件在 proguardTask 的输出之中
                TaskOutputs outputs = proguardTask.getOutputs();
                Set<File> files = outputs.getFiles().getFiles();
                for (File file : files) {
                    if (file.getName().endsWith("mapping.txt")) {
                        try {
                        	// 找出 mapping.txt 并备份
                            FileUtils.copyFile(file, backupMappingFile);
                            project.getLogger().info("mapping: " + backupMappingFile.getCanonicalPath());
                        } catch (IOException e) {
                            e.printStackTrace();
                        }
                        break;
                    }
                }
            }
        });
    }
字节码插桩,生成补丁
	@NotNull
    private Task getTransformTask(Project project, PatchExtension patchExtension, File outputDir, String variantCapName) {
        // 保存 class 文件名及其 md5 值的文件
        File hexFile = new File(outputDir, "hex.txt");
        // 需要打补丁的类组成的 jar 包
        File patchClassFile = new File(outputDir, "patchClass.jar");
        // dx 命令打包 patchClassFile 后生成的补丁包,最终产物
        File patchFile = new File(outputDir, "patch.jar");

        // 获取将 class 打包成 dex 的任务
        Task dexTask = project.getTasks().findByName("transformClassesWithDexBuilderFor" + variantCapName);
        // 在开始打包之前,插桩并记录每个 class 的 md5 哈希值
        dexTask.doFirst(new Action<Task>() {
            @Override
            public void execute(Task task) {
                // 将 Application 全类名中的 . 替换成平台相关的斜杠,Windows 是 xx\xx\,Linux 是 xx/xx/
                String applicationName = patchExtension.getApplicationName();
                applicationName = applicationName.replaceAll("\\.", Matcher.quoteReplacement(File.separator));

                // 记录类本次编译的 md5 值
                Map<String, String> newHexes = new HashMap<>();

                // 负责生成补丁
                PatchGenerator patchGenerator = new PatchGenerator(project, patchFile, patchClassFile, hexFile);

                // 遍历 dexTask 任务的输入文件,对 class 和 jar 文件进行处理,像 app 中的 MainActivity
                // 的路径是:app\build\intermediates\transforms\proguard\debug\0.jar
                Set<File> files = dexTask.getInputs().getFiles().getFiles();
                for (File file : files) {
                    String filePath = file.getAbsolutePath();
                    // 插桩,并做 md5 值比较,不一致的放入补丁包
                    if (filePath.endsWith(".class")) {
                        processClass(project, applicationName, file, newHexes, patchGenerator);
                    } else if (filePath.endsWith(".jar")) {
                        processJar(project, applicationName, file, newHexes, patchGenerator);
                    }
                }

                // 保存本次编译的 md5
                Utils.writeHex(newHexes, hexFile);

                // 生成补丁文件
                try {
                    patchGenerator.generate();
                } catch (Exception e) {
                    e.printStackTrace();
                }
            }
        });
        return dexTask;
    }
开头三个文件的作用:
- hexFile 保存每次编译生成的 class 文件,插桩之后的类名及 md5 值,这样才能比较出哪些文件有改动,进而被放入补丁包
- patchClassFile 是所有需要被添加进补丁包的 class 文件打成的 jar 包,是一个中间产物,用来生成最终的补丁包
- patchFile 是 dx/d8 命令对 patchClassFile 打包生成的 jar 包,也就是最终需要的补丁包
在拿到 transformClassesWithDexBuilderForDebug 任务的一开始,先拿到模块的 applicationName 对应的全类名路径,因为热修复不会替换 Application,所以在后面处理时要剔除掉。
PatchGenerator 主要用来比较 md5 值以及执行打包的 dx/d8 命令,初始化时要获取 buildToolsVersion 以便动态获取 dx/d8 命令的执行路径,还要读取上次编译时备份的 hexFile:
	public PatchGenerator(Project project, File patchFile, File jarFile, File hexFile) {
        this.project = project;
        this.patchFile = patchFile;
        this.jarFile = jarFile;
        // 从 android{} 中获取 buildToolsVersion 属性
        buildToolsVersion = project.getExtensions().getByType(AppExtension.class).getBuildToolsVersion();
        // 从备份文件中读取上一次编译生成的 class 文件名和 md5 值
        if (hexFile.exists()) {
            prevHexes = Utils.readHex(hexFile);
            project.getLogger().info("从备份文件 " + hexFile.getAbsolutePath() + " 中读取md5值");
        } else {
            // 如果备份文件不存在,可能是首次编译,直接创建备份文件
            try {
                if (hexFile.createNewFile()) {
                    project.getLogger().info("创建备份文件成功:" + hexFile.getAbsolutePath());
                }
            } catch (IOException e) {
                e.printStackTrace();
            }
        }
    }
接下来就是对所有输入文件进行插桩和 md5 值的比较,由于输入的文件既可能是 class 也可能是 jar 包(没开混淆上一个任务传过来的就是 class,开了混淆传过来的就是 jar 包,具体路径看注释),所以才会用 processClass() 和 processJar() 分别处理:
	/**
     * 对 class 文件执行插桩,并记录插装后的 md5,与上一次编译的备份 md5
     * 做比较,如果比较结果不相同,说明文件发生了变化,需要打包进补丁包中
     *
     * @param applicationName Application 全类名对应的路径名,如:com\demo\plugin\Application
     * @param file            待处理的 class 文件
     * @param newHexes        记录 Map 类名与对应 md5 值的 Map
     * @param patchGenerator  生成补丁包
     */
    private void processClass(Project project, String applicationName, File file, Map<String, String> newHexes,
                              PatchGenerator patchGenerator) {
        // 截取文件的绝对路径,仅保留包名之后的部分,比如 filePath 为
        // app\build\intermediates\javac\debug\compileDebugJavaWithJavac\classes\com\demo\plugin\Test.class,
        // 那么截取后的 classPath 就是 com\demo\plugin\Test.class
        String filePath = file.getAbsolutePath();
        String classPath = filePath.split("classes")[1].substring(1);

        if (classPath.startsWith(applicationName) || Utils.isAndroidClass(classPath)) {
            return;
        }

        try {
            project.getLogger().info("开始处理 class 文件:" + filePath);
            FileInputStream fis = new FileInputStream(filePath);
            // 插桩
            byte[] bytes = ClassUtils.referHackWhenInit(fis);

            // 生成这个 class 文件的 16 进制 md5
            String hex = Utils.hex(bytes);
            fis.close();

            // 输出插桩后的 class 文件
            FileOutputStream fos = new FileOutputStream(filePath);
            fos.write(bytes);
            fos.close();

            // 将本次的 md5 值存入缓存,并与上一次的 md5 进行对比
            newHexes.put(classPath, hex);
            patchGenerator.checkClass(classPath, hex, bytes);
        } catch (Exception e) {
            e.printStackTrace();
        }
    }

    /**
     * 对 jar 包中的 class 文件执行插桩,并记录插装后的 md5,与上一次编译的备份 md5
     * 做比较,如果比较结果不相同,说明文件发生了变化,需要打包进补丁包中
     *
     * @param applicationName
     * @param file            条件限定,这个 file 是个 jar 包
     * @param hexes           保存类名及其 md5 值的 Map
     * @param patchGenerator  生成补丁
     */
    private void processJar(Project project, String applicationName, File file, Map<String, String> hexes,
                            PatchGenerator patchGenerator) {
        try {
            applicationName = applicationName.replaceAll(Matcher.quoteReplacement(File.separator), "/");
            File backupJar = new File(file.getParent(), file.getName() + ".bak");

            JarOutputStream jarOutputStream = new JarOutputStream(new FileOutputStream(backupJar));

            JarFile jarFile = new JarFile(file);
            Enumeration<JarEntry> entries = jarFile.entries();

            while (entries.hasMoreElements()) {
                JarEntry jarEntry = entries.nextElement();
                String className = jarEntry.getName();
                jarOutputStream.putNextEntry(new JarEntry(className));
                InputStream inputStream = jarFile.getInputStream(jarEntry);

                if (className.endsWith(".class") && !className.startsWith(applicationName) &&
                        !Utils.isAndroidClass(className) && !className.startsWith("com/demo/patch")) {
                    project.getLogger().info("开始处理 jar 包中的 class 文件:" + className);
                    byte[] bytes = ClassUtils.referHackWhenInit(inputStream);
                    String hex = Utils.hex(bytes);
                    hexes.put(className, hex);
                    // 对比缓存的 md5,不一致则放入补丁
                    patchGenerator.checkClass(className, hex, bytes);
                    jarOutputStream.write(bytes);
                } else {
                    // 输出到临时文件
                    jarOutputStream.write(IOUtils.toByteArray(inputStream));
                }

                inputStream.close();
                jarOutputStream.closeEntry();
            }

            jarOutputStream.close();
            jarFile.close();
            file.delete();
            backupJar.renameTo(file);
        } catch (Exception e) {
            e.printStackTrace();
        }
    }
二者的处理思路大致相同,都是先插桩:
public class ClassUtils {
// 向 class 文件的构造方法中插入一句 Class cls = AntiLazyLoad.class
public static byte[] referHackWhenInit(InputStream inputStream) throws IOException {
ClassReader classReader = new ClassReader(inputStream);
ClassWriter classWriter = new ClassWriter(ClassWriter.COMPUTE_FRAMES);
ClassVisitor classVisitor = new ClassVisitor(Opcodes.ASM6, classWriter) {
@Override
public MethodVisitor visitMethod(int access, String name, String desc, String signature, String[] exceptions) {
MethodVisitor methodVisitor = super.visitMethod(access, name, desc, signature, exceptions);
methodVisitor = new MethodVisitor(api, methodVisitor) {
@Override
public void visitInsn(int opcode) {
if ("" .equals(name) && opcode == Opcodes.RETURN) {
// 在构造方法末尾插入 AntiLazyLoad 引用
super.visitLdcInsn(Type.getType("Lcom/demo/plugin/AntiLazyLoad;"));
}
super.visitInsn(opcode);
}
};
return methodVisitor;
}
};
classReader.accept(classVisitor, 0);
return classWriter.toByteArray();
}
}
然后将插桩后的 md5 值存入 Map
	/**
     * 检查本次编译的 md5 与上一次的是否相同,如果不同说明文件
     * 有变化,需要打包进补丁包
     *
     * @param className class 文件全类名对应的路径
     * @param newHex    新编译后 class 文件的 md5 值
     * @param bytes     新编译后 class 文件的字节内容
     */
    public void checkClass(String className, String newHex, byte[] bytes) {
        if (Utils.isEmpty(prevHexes)) {
            return;
        }

        // 如果 newHex 不在缓存中或者与缓存中的值不相等,就要放入补丁包
        String oldHex = prevHexes.get(className);
        if (oldHex == null || !oldHex.equals(newHex)) {
            JarOutputStream jarOutputStream = getJarOutputStream();
            try {
                jarOutputStream.putNextEntry(new JarEntry(className));
                jarOutputStream.write(bytes);
                jarOutputStream.closeEntry();
                project.getLogger().info("放入补丁包,文件路径:" + className);
            } catch (IOException e) {
                e.printStackTrace();
            }
        }
    }
md5 不一致的类会被放入 patchClassFile 中,最后再用 generate() 执行 dx/d8 命令,对 patchClassFile 执行打包,生成最终的补丁包:
	/**
     * 运行 dx 命令将 class/jar 文件打包成 dex 文件,Java Runtime 和
     * Gradle 都提供了运行 Java 命令的方法
     */
    public void generate() throws Exception {
        if (!jarFile.exists()) {
            return;
        }

        // 关流 jar 包才会去写数据
        getJarOutputStream().close();

        Properties properties = new Properties();
        File localPropFile = project.getRootProject().file("local.properties");
        // dx 命令在 sdk 中,先获取 sdk 路径,再拼接出 dx 命令的绝对路径
        String sdkDir;
        if (localPropFile.exists()) {
            properties.load(new FileInputStream(localPropFile));
            sdkDir = properties.getProperty("sdk.dir");
        } else {
            sdkDir = System.getenv("ANDROID_HOME");
        }

        // Windows 使用 dx.bat 命令,linux/mac 使用 dx 命令
        String cmdExt = Os.isFamily(Os.FAMILY_WINDOWS) ? ".bat" : "";
        String dxPath = sdkDir + "/build-tools/" + buildToolsVersion + "/dx" + cmdExt;
        String patch = "--output=" + patchFile.getAbsolutePath();

        project.exec(new Action<ExecSpec>() {
            @Override
            public void execute(ExecSpec execSpec) {
                execSpec.commandLine(dxPath, "--dex", patch, jarFile.getAbsolutePath());
                project.getLogger().info("执行了命令:" + (dxPath + " --dex" + patch + jarFile.getAbsolutePath()));
            }
        });

        // 删除 class 组成的 jar 包
        jarFile.delete();

        /*// 使用 Java Runtime 执行 dx 命令
        final String cmd = dxPath + " --dex " + patch + " " + jarFile.getAbsolutePath();
        Process process = Runtime.getRuntime().exec(cmd);
        process.waitFor();
        // 命令执行失败
        if (process.exitValue() != 0) {
            throw new IOException("generate patch error:" + cmd);
        }*/
        project.getLogger().info("\npatch generated in : " + patchFile);
    }
创建新任务
最后就是创建一个新任务:
		// 4.创建打补丁的任务 patchDebug,依赖于 dex 打包任务
        Task task = project.getTasks().create("patch" + variantCapName);
        task.setGroup("patch");
        task.dependsOn(dexTask);
如果编译的是 debug 版本,任务名就是 patchDebug,属于 patch 组别,依赖于将混淆后的 class 打包成 dex 的任务 transformClassesWithDexBuilderForDebug,由于 Gradle 会根据所有任务之间的依赖关系形成一个有向无环图,所以执行 patchDebug 任务,就会按照依赖关系将其前面的编译->混淆->插桩->打补丁包->生成 dex 这一系列任务都执行,进而得到补丁包了:
# 执行所有模块的 patchDebug
>gradlew patchDebug
# 执行 app 模块的 patchDebug
>gradlew :app:patchDebug
3.4 测试结果
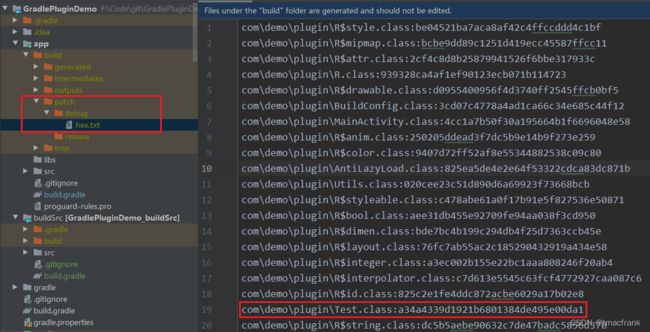
设置 debug 编译也生成补丁包,没有开混淆的情况下,初次编译会生成一个 hex.txt 文件:
接着修改 app 模块中的 Test.java 文件,随便增加个测试语句:
public class Test {

    public Test() {
    	// 增加的语句
        Class clazz = Test.class;
    }
}
再次编译,发现 hex.txt 中 Test.class 的 md5 值发生了变化,并且在 patch/debug 下会生成 patch.jar 文件,也就是补丁包:
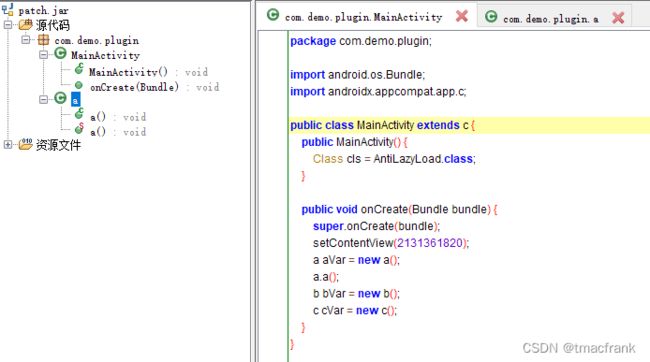
使用 jadx 工具打开 patch.jar,发现里面只有 Test 文件,并且在构造方法的尾部被字节码插桩引入了 AntiLazyLoad.class,证明 Demo 的基本功能还是实现了:
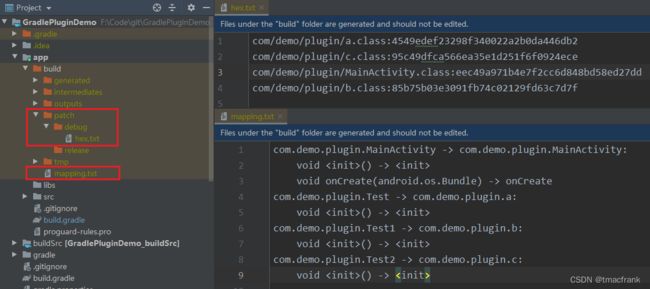
如果开启了混淆,那么 app 模块中的类被编译成 class 文件后,还会再被打包进一个 jar 包,再传递给 transformClassesWithDexBuilderForDebug 任务。首次编译的 hex.txt 以及备份的 mapping.txt 如下:
对上述文件做出更改,让 MainActivity 调用 Test 中新增的方法 newMethod() 后再次编译,结果如下:
查看 patch.jar 的内容也确实是与修改内容相符,并且两个修改的类的构造方法都被插桩引用了 AntiLazyLoad.class:
3.5 调试技巧
主要有二,加 log 和打断点。
Demo 中有很多地方加了类似下面的代码:
project.getLogger().info("xxx");
这是添加了 Gradle log,执行任务时会在控制台输出,log 的级别从低到高为:DEBUG、INFO、LIFECYCLE、WARNING、QUITE、ERROR,默认情况下控制台只会输出 LIFECYCLE 以及更高级别的 log,在执行命令时可以通过添加参数来改变 log 的输出级别:
# 输出 INFO 及更高级别的 log,还可以 -q、-d 等,分别对应 QUITE、DEBUG
> gradlew -i patchDebug
除了加 log 我们还可以打断点,先在 Run/Debug Configurations 中点击 + 添加一个 Remote 类型的 Configuration:
然后在命令行中执行:
# 比如说上图中新建的 Remote 名字为 GradleDebug,那么 TaskName 填 GradleDebug 即可
> gradlew [TaskName] -Dorg.gradle.debug=true --no-daemon
最后点击 debug 按钮就可以进行断点调试了:
Demo 代码地址:GradlePluginDemo
参考文章:
安卓App热补丁动态修复技术介绍
Android N混合编译与对热补丁影响解析
Android热更新方案Robust
微信Tinker的一切都在这里,包括源码(一)


