安装部署zabbix-5.0
准备2台干净的服务器:
10.36.192.186 zabbix_server
10.36.192.124 zabbix_node1
改hostname , 关闭防火墙和selinux(两台均操作)
[root@localhost ~]# hostnamectl set-hostname zabbix_server
[root@localhost ~]# bash
[root@zabbix_server ~]#  setenforce 0 && systemctl stop firewalld

[root@localhost ~]# hostnamectl set-hostname zabbix_server
[root@localhost ~]# bash
[root@zabbix-node1 ~]#  setenforce 0 && systemctl stop firewalld
安装并配置zabbix_server服务
在10.36.192.186 服务器上操作:
网页访问:Zabbix :: The Enterprise-Class Open Source Network Monitoring Solution
www.zabbix.com

然后根据需求选择配置,本实例是以MySQL+Nginx+zabbix模式进行部署:
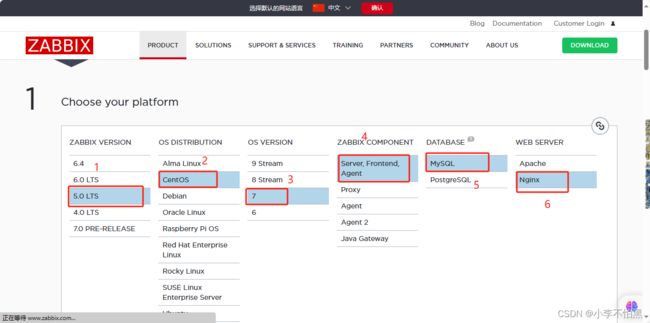
然后下拉根据相应的官方部署流程进行安装:
安装zabbix的repo源:
[root@zabbix_server ~]# rpm -Uvh https://repo.zabbix.com/zabbix/5.0/rhel/7/x86_64/zabbix-release-5.0-1.el7.noarch.rpm
获取https://repo.zabbix.com/zabbix/5.0/rhel/7/x86_64/zabbix-release-5.0-1.el7.noarch.rpm
警告:/var/tmp/rpm-tmp.jNVWvP: 头V4 RSA/SHA512 Signature, 密钥 ID a14fe591: NOKEY
准备中...                          ################################# [100%]
正在升级/安装...
   1:zabbix-release-5.0-1.el7         ################################# [100%]

[root@zabbix_server ~]# yum clean all
已加载插件:fastestmirror
正在清理软件源: base extras updates zabbix
               : zabbix-non-supported
Cleaning up list of fastest mirrors
安装zabbix-server zabbix-agent :
[root@zabbix_server ~]# yum install zabbix-server-mysql zabbix-agent
已加载插件:fastestmirror
Determining fastest mirrors
docker-ce-stable               | 2.9 kB     00:00
·····
总下载量:5.9 M
安装大小:15 M
Is this ok [y/d/N]: y
Downloading packages:
·······
是否继续?[y/N]:y
从 file:///etc/pki/rpm-gpg/RPM-GPG-KEY-ZABBIX 检索密钥
·······
 来自       : /etc/pki/rpm-gpg/RPM-GPG-KEY-ZABBIX
是否继续?[y/N]:y
····
已安装:
  zabbix-agent.x86_64 0:5.0.39-1.el7
  zabbix-server-mysql.x86_64 0:5.0.39-1.el7
作为依赖被安装:
  ····
完毕!
安装centos-release-scl:
[root@zabbix_server ~]# yum install centos-release-scl
已加载插件:fastestmirror
·····
总下载量:24 k
安装大小:39 k
Is this ok [y/d/N]: y
Downloading packages:
·····
已安装:
  centos-release-scl.noarch 0:2-3.el7.centos

作为依赖被安装:
  centos-release-scl-rh.noarch 0:2-3.el7.centos

完毕!
修改/etc/yum.repos.d/zabbix.repo:
[root@zabbix_server ~]# vim /etc/yum.repos.d/zabbix.repo
[zabbix-frontend]
...
enabled=1
...
安装 zabbix-web-mysql-scl zabbix-nginx-conf-scl:
[root@zabbix_server ~]# yum install zabbix-web-mysql-scl zabbix-nginx-conf-scl
已加载插件:fastestmirror
Loading mirror speeds from cached hostfile
····
Is this ok [y/d/N]: y
Downloading packages:
····
是否继续?[y/N]:y
Running transaction check
·····
已安装:
  zabbix-nginx-conf-scl.noarch 0:5.0.39-1.el7
  zabbix-web-mysql-scl.noarch 0:5.0.39-1.el7

作为依赖被安装:
  audit-libs-python.x86_64 0:2.8.5-4.el7
  ·····
  zabbix-web-deps-scl.noarch 0:5.0.39-1.el7

完毕!
安装 mysql mysql-server :
[root@zabbix_server ~]# yum -y install mysql mysql-server
已加载插件:fastestmirror
····
替代:
  mariadb-libs.x86_64 1:5.5.68-1.el7

完毕!
运行mysqld,修改密码并补充数据库信息:
[root@localhost ~]# systemctl start mysqld
[root@localhost ~]# grep password /var/log/mysqld.log
2023-11-14T03:25:41.541665Z 1 [Note] A temporary password is generated for root@localhost: x/U=t!!k*5.k
[root@localhost ~]# mysqladmin -uroot -p'x/U=t!!k*5.k' password 'Mawenbao@123'
mysqladmin: [Warning] Using a password on the command line interface can be insecure.
Warning: Since password will be sent to server in plain text, use ssl connection to ensure password safety.

[root@zabbix_serverv ~]# mysql -p'Mawenbao@123'
mysql> create database zabbix character set utf8 collate utf8_bin;
mysql> create user zabbix@localhost identified by 'Mawenbao@123';
mysql> grant all privileges on zabbix.* to zabbix@localhost;
mysql> set global log_bin_trust_function_creators = 1;
mysql> \q
导入数据库:
[root@zabbix_server ~]# zcat /usr/share/doc/zabbix-server-mysql*/create.sql.gz | mysql -uzabbix -p zabbix
# 输入数据库密码
disanble log_bin_trust_function_creators
[root@zabbix_server ~]# mysql -uroot -p'Mawenbao@123'
mysql> set global log_bin_trust_function_creators = 0;
mysql> quit;
修改/etc/zabbix/zabbix_server.conf文件:
[root@zabbix_server ~]# vim /etc/zabbix/zabbix_server.conf

DBPassword=Mawenbao@123
修改/etc/opt/rh/rh-nginx116/nginx/conf.d/zabbix.conf:
[root@zabbix_server ~]# vim /etc/opt/rh/rh-nginx116/nginx/conf.d/zabbix.conf
 listen          80;
 server_name     zabbix_server;
修改/etc/opt/rh/rh-php72/php-fpm.d/zabbix.conf:
[root@zabbix_server ~]# vim  /etc/opt/rh/rh-php72/php-fpm.d/zabbix.conf

user = nginx
group = nginx

listen.acl_users = nginx

php_value[date.timezone] = Asia/Shanghai
启动服务:
[root@zabbix_server ~]# systemctl restart zabbix-server zabbix-agent rh-nginx116-nginx rh-php72-php-fpm
[root@zabbix_server ~]# systemctl enable zabbix-server zabbix-agent rh-nginx116-nginx rh-php72-php-fpm
浏览器访问:10.36.192.186
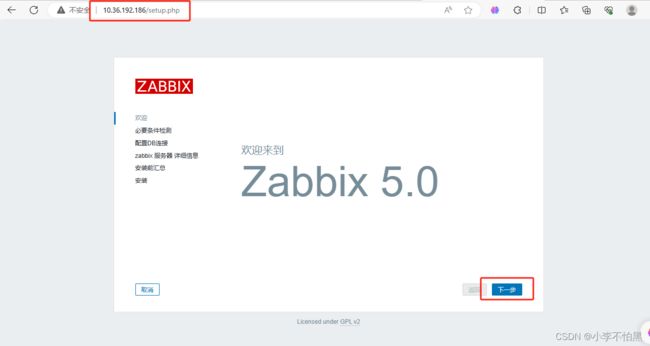


用户:Admin 密码:zabbix


至此,server端的相关配置基本结束。
问题解析:
若安装及配置完成后无法出现zabbix初始页面,需进行以下操作:
# 修改php-fpm服务启动用户
root@zabbix-server ~]# vim /etc/opt/rh/rh-php72/php-fpm.d/zabbix.conf
[zabbix]
user = nginx
group = nginx
listen= /var/opt/rh/rh-php72/run/php-fpm/zabbix.sock
listen.acl users = nginx
listen.allowed clients = 127.0.0.1

[root@zabbix-server ~]# chown .nginx /var/opt/rh/rh-php72/lib/php/session/
[root@zabbix-server ~]# chown nginx.nginx -R /etc/zabbix/web
root@zabbix-server ~]# vim /etc/opt/rh/rh-nginx116/nginx/nginx.conf #将配置文件中的server模块删除掉,注意不要多删其他信息
server {
···
    }

#重启服务
[root@zabbix_server ~]# systemctl restart zabbix-server zabbix-agent rh-nginx116-nginx rh-php72-php-fpm
安装配置zabbix-node1
浏览器访问:www.zabbix.com


在10.36.192.124服务器上操作:
下载zabbix的repo源文件:
[root@zabbix-node1 ~]# rpm -Uvh https://repo.zabbix.com/zabbix/5.0/rhel/7/x86_64/zabbix-release-5.0-1.el7.noarch.rpm
获取https://repo.zabbix.com/zabbix/5.0/rhel/7/x86_64/zabbix-release-5.0-1.el7.noarch.rpm
警告:/var/tmp/rpm-tmp.Onih6l: 头V4 RSA/SHA512 Signature, 密钥 ID a14fe591: NOKEY
准备中...                          ################################# [100%]
正在升级/安装...
   1:zabbix-release-5.0-1.el7         ################################# [100%]

[root@zabbix-node1 ~]# yum clean all
已加载插件:fastestmirror
正在清理软件源: docker-ce-stable kubernetes mybase
               : myepel myextras mysql-5.7-community
               : mysql-connectors-community
               : mysql-tools-community myupdates
               : remi-safe zabbix zabbix-non-supported
Cleaning up list of fastest mirrors
安装下载zabbix-agent:
[root@zabbix-node1 ~]# yum install zabbix-agent
已加载插件:fastestmirror
Determining fastest mirrors
docker-ce-stable               | 2.9 kB     00:00
·····
已安装:
  zabbix-agent.x86_64 0:5.0.39-1.el7

完毕!
启动并设置自启动:
[root@zabbix-node1 ~]# systemctl start zabbix-agent
[root@zabbix-node1 ~]# systemctl enable zabbix-agent
Created symlink from /etc/systemd/system/multi-user.target.wants/zabbix-agent.service to /usr/lib/systemd/system/zabbix-agent.service.
修改/etc/zabbix/zabbix_agentd.conf配置文件:
[root@zabbix-node1 ~]# vim /etc/zabbix/zabbix_agentd.conf

Server=10.36.192.186         #指明服务器是谁
ListenIP=0.0.0.0             #自己监听的地址,0.0.0.0表示本机所有地址
ListenPort=10050             #自己监听的端口

StartAgents=3                #优化时使用的
ServerActive=10.36.192.186   #主动监控时的服务器
Hostname=zabbix-node1        #自己能被server端识别的名称
重启服务:
[root@zabbix-node1 ~]# systemctl restart zabbix-agent.service浏览器继续操作:
1.创建主机群组


2.创建主机


3.添加监控项


4.添加触发器


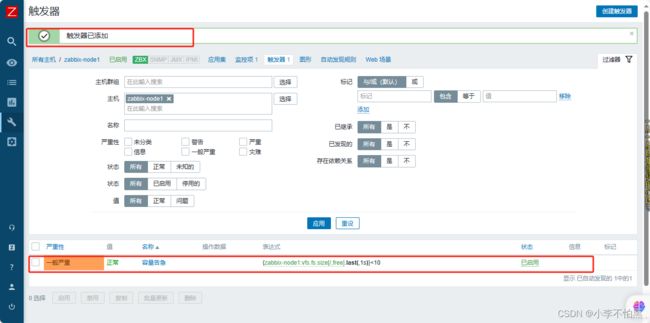

修改触发条件:


5.添加图形


下述图上出现乱码问题,可进行换字体包去处理:

在10.36.192.186(zabbix_server)上操作:
[root@zabbix_server ~]# ls /usr/share/zabbix/assets/fonts
graphfont.ttf

[root@zabbix_server ~]# mv simkai.ttf  graphfont.ttf   #将替换的包名改一致
[root@zabbix_server ~]# ls
anaconda-ks.cfg  graphfont.ttf  ip_hard.sh  test  yum-server.sh
[root@zabbix_server ~]# cp graphfont.ttf /usr/share/zabbix/assets/fonts/
cp:是否覆盖"/usr/share/zabbix/assets/fonts/graphfont.ttf"? y
[root@zabbix_server ~]#
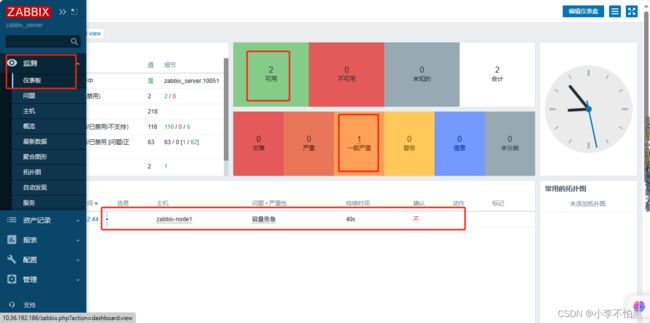
在浏览器查看:
 所以安装部署已基本完成^_^