(单机)FastDFS + Nginx 安装部署流程
FastDFS简介
FastDFS是一个开源的轻量级分布式文件系统,它对文件进行管理,功能包括:文件存储、文件同步、文件访问(文件上传、文件下载)等,解决了大容量存储和负载均衡的问题。特别适合以中小文件(建议范围:4KB < file_size <500MB)为载体的在线服务。
FastDFS服务端有两个角色:跟踪器(tracker)和存储节点(storage)。跟踪器主要做调度工作,在访问上起负载均衡的作用。
FastDFS架构图
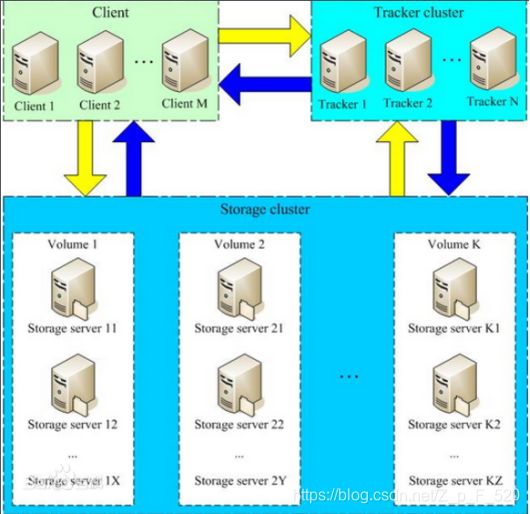
FastDFS各模块介绍
1)tracker server:跟踪服务器,主要做调度工作,起负载均衡的作用。在内存中记录集群中所有存储组和存储服务器的状态信息,是客户端和数据服务器交互的枢纽。
2)storage server:存储服务器(又称:存储节点或数据服务器),文件和文件属性(meta data)都保存到存储服务器上。
3)client:客户端,作为业务请求的发起方,通过专有接口,使用TCP/IP协议与跟踪器服务器或存储节点进行数据交互。
4)group:组,也可称为卷,同组内上的文件是完全相同的。
5)文件标识:包括两部分,组名(group)和文件名(含路径)。
6)文件相关属性:键值对(Key Value Pair)方式。
7)文件名:与原文件名并不相同。由storage server根据特定信息生成,并且可逆,文件名包含:源存储服务器的IP地址、文件创建时间戳、文件大小、随机数和文件扩展名等。
FastDFS同步机制
1)同一组内的storage server之间是对等的,文件上传、删除等操作可以在任意一台storage server上进行;
2)文件同步只在同组内的storage server之间进行,采用push方式,即源服务器同步给目标服务器;
3)源头数据才需要同步,备份数据不需要再次同步,否则就构成环路了;
4)上述第二条规则有个例外,就是新增加一台storage server时,由已有的一台storage server将已有的所有数据(包括源头数据和备份数据)同步给该新增服务器。
1 环境准备说明
1)CentOS 7.5 服务器一台,tracker与storage在同服务器上。
2)下载FastDFS安装包:https://github.com/happyfish100

3)下载nginx安装包:http://nginx.org/en/download.html
注:nginx用于提供访问服务。
4)将下载好的安装包上传到服务器上
所有安装包在 /usr/local/src/ 目录下
[root@localhost src]# pwd
/usr/local/src
[root@localhost src]# ll
-rw-r--r--.  1 root root  914345 11月 19 14:37 fastdfs-master.zip
-rw-r--r--.  1 root root   22492 11月 19 14:37 fastdfs-nginx-module-master.zip
-rw-r--r--.  1 root root  297751 11月 19 14:37 libfastcommon-master.zip
-rw-r--r--.  1 root root 1032630 11月 19 14:37 nginx-1.16.1.tar.gz
2 基础环境安装
1)安装 tracker、storage 所需的依赖包
[root@localhost ~]# yum -y install gcc gcc-c++

[root@localhost ~]# yum -y install libevent
2)安装 nginx 所需的依赖包
[root@localhost ~]# yum -y install pcre pcre-devel

[root@localhost ~]# yum -y install zlib zlib-devel

[root@localhost ~]# yum -y install openssl oppenssl-devel
3)安装其他依赖包
[root@localhost ~]# yum -y install unzip zip

[root@localhost ~]# yum -y install vim lrzsz wget net-tools
安装vim,之所以安装vim是因为安装vim会自动帮我们安装perl,否则我们使用./make.sh来编译的时候会报错。
3 libfastcommon函数库编译安装
1)解压libfastcommon-master.zip安装包
[root@localhost src]# unzip libfastcommon-master.zip2)进入libfastcommon-master文件夹下,进行编译并安装
[root@localhost src]# cd libfastcommon-master

[root@localhost libfastcommon-master]# ./make.sh

[root@localhost libfastcommon-master]# ./make.sh install
4 fastdfs主程序安装
1)解压fastdfs-master.zip安装包
[root@localhost libfastcommon-master]# cd ..

[root@localhost src]# unzip fastdfs-master.zip
2)进入fastdfs-master文件夹下,进行编译并安装
[root@localhost src]# cd fastdfs-master

[root@localhost fastdfs-master]# ./make.sh

[root@localhost fastdfs-master]# ./make.sh install
服务脚本在 /etc/init.d/目录下
[root@localhost fastdfs-master]# cd /etc/init.d/

[root@localhost init.d]# ll

总用量 48
-rwxr-xr-x  1 root root   961 11月 19 16:19 fdfs_storaged
-rwxr-xr-x  1 root root   963 11月 22 19:09 fdfs_trackerd
命令工具在/usr/bin/ 目录下
[root@localhost init.d]# cd /usr/bin/

[root@localhost bin]# ls fdfs*

fdfs_appender_test
fdfs_appender_test1
fdfs_append_file
fdfs_delete_file
fdfs_download_file
fdfs_file_info
fdfs_monitor
fdfs_regenerate_filename
fdfs_storaged
fdfs_test
fdfs_test1
fdfs_trackerd
fdfs_upload_appender
fdfs_upload_file
3)通过 cd /etc/fdfs 查询fastdfs配置文件
[root@localhost bin]# cd /etc/fdfs/

[root@localhost fdfs]# ll
4)将fastdfs-master安装文件夹下的配置文件拷贝到 /etc/fdfs 目录下
[root@localhost fdfs]# cp /usr/local/src/fastdfs-master/conf/* /etc/fdfs/

[root@localhost fdfs]# ll
5 配置tracker服务
1)修改tracker配置文件中tracker工作目录,保存数据以及日志
[root@localhost fdfs]# vim tracker.conf修改tracker工作空间:
base_path = /usr/local/fastdfs/tracker

2)创建/usr/local/fastdfs/tracker目录
[root@localhost fdfs]# mkdir /usr/local/fastdfs/tracker -p3)启动tracker服务
[root@localhost fdfs]# /usr/bin/fdfs_trackerd /etc/fdfs/tracker.conf start检查进程:启动成功如下...
[root@localhost fdfs]# ps -ef | grep tracker
4)停止tracker服务,暂不停止...
[root@localhost fdfs]# /usr/bin/stop.sh /etc/fdfs/tracker.conf6 配置storage服务
1)修改storage配置文件中storage工作目录,保存数据以及日志
[root@localhost fdfs]# vim storage.conf修改storage工作空间:
base_path = /usr/local/fastdfs/storage

修改storage存储空间:
store_path0 = /usr/local/fastdfs/storage

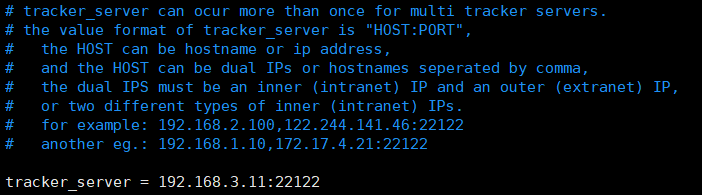
修改tracker地址和端口:
tracker_server = 192.168.3.11:22122
查询访问端口:
http.server_port = 8888

2)创建/usr/local/fastdfs/storage目录
[root@localhost fdfs]# mkdir /usr/local/fastdfs/storage -p3)启动storage服务: 注:启动storage前必须先启动tracker服务
[root@localhost fdfs]# /usr/bin/fdfs_storaged /etc/fdfs/storage.conf start检查进程:启动成功如下...
[root@localhost fdfs]# ps -ef | grep storage
4)停止storage服务,暂不停止...
[root@localhost fdfs]# /usr/bin/stop.sh /etc/fdfs/storage.conf7 测试上传
1)修改client配置文件中client工作目录,保存数据以及日志
[root@localhost fdfs]# vim client.conf修改client工作空间:
base_path = /usr/local/fastdfs/client
修改tracker地址和端口:
tracker_server = 192.168.3.11:22122

2)创建/usr/local/fastdfs/client目录
[root@localhost fdfs]# mkdir /usr/local/fastdfs/client -p3)文件上传测试
上传/etc/fdfs目录下anti-steal.jpg文件为例
[root@localhost fdfs]# /usr/bin/fdfs_test /etc/fdfs/client.conf upload /etc/fdfs/anti-steal.jpg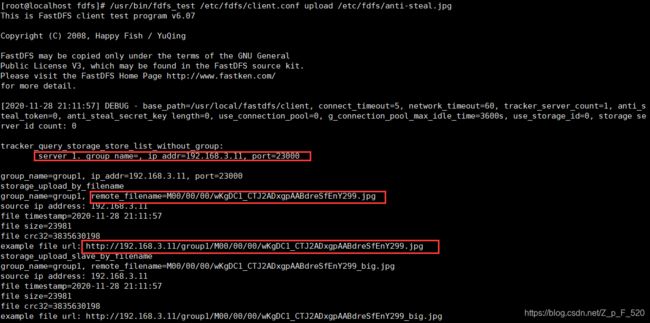
上传成功:remote_filename显示上传后存储目录
(在/usr/local/fastdfs/storage目录下),url为远程访问地址,此时还不能远程访问,需配置nginx才能访问。
[root@localhost fdfs]# cd /usr/local/fastdfs/storage/data/00/00

[root@localhost 00]# ll
8 配置nginx
说明:FastDFS安装好后是无法通过http来访问,需借助nginx访问,此时需安装FastDFS第三模块到nginx中。
8.1 安装nginx插件
1)解压fastdfs-nginx-module-master.zip压缩包
[root@localhost 00]# cd /usr/local/src/

[root@localhost src]# unzip fastdfs-nginx-module-master.zip
2)进入解压目录下src文件夹下,复制配置文件mod_fastdfs.conf到fdfs目录
[root@localhost src]# cd fastdfs-nginx-module-master/src/

[root@localhost src]# cp mod_fastdfs.conf /etc/fdfs/
3)修改config文件,主要修改路径,把local删除,因为安装fastdfs是没修改路径,默认为/usr
[root@localhost src]# vim config
8.2 安装nginx
1)解压nginx-1.16.1.tar.gz安装包
[root@localhost src]# cd /usr/local/src/

[root@localhost src]# tar -zxvf nginx-1.16.1.tar.gz
2)编译前,需创建nginx临时目录,如果不创建,在启动nginx过程中会报错
[root@storage01 src]# mkdir /var/temp/nginx -p3)在解压后的nginx目录下,输入以下命令进行配置,目的是为了创建makefile文件,需要增加 fastdfs-nginx-module 模块
[root@localhost src]# cd nginx-1.16.1

[root@localhost nginx-1.16.1]# ./configure \
--prefix=/usr/local/nginx \
--pid-path=/var/run/nginx/nginx.pid \
--lock-path=/var/lock/nginx.lock \
--error-log-path=/var/log/nginx/error.log \
--http-log-path=/var/log/nginx/access.log \
--with-http_gzip_static_module \
--http-client-body-temp-path=/var/temp/nginx/client \
--http-proxy-temp-path=/var/temp/nginx/proxy \
--http-fastcgi-temp-path=/var/temp/nginx/fastcgi \
--http-uwsgi-temp-path=/var/temp/nginx/uwsgi \
--http-scgi-temp-path=/var/temp/nginx/scgi \
--add-module=/usr/local/src/fastdfs-nginx-module-master/src

4)nginx目录下进行make编译、安装
[root@localhost nginx-1.16.1]# make

[root@localhost nginx-1.16.1]# make install
8.3 修改mod_fastdfs.conf配置文件
1)修改mod_fastdfs.conf配置文件中mod_fastdfs工作目录,保存数据以及日志
[root@storage01 nginx-1.16.1]# cd /etc/fdfs/

[root@storage01 fdfs]# vim mod_fastdfs.conf
修改mod_fastdfs工作空间:
base_path = /usr/local/fastdfs/tmp

修改tracker地址和端口:
tracker_server = 192.168.3.11:22122

url_have_group_name = true

修改storage存储空间:需要和storage.conf地址一致
store_path0=/usr/local/fastdfs/storage

2)创建base_path目录
[root@localhost fdfs]# mkdir /usr/local/fastdfs/tmp -p8.4 修改nginx.conf配置文件
1)修改nginx目录下nginx.config配置文件
[root@localhost fdfs]# cd /usr/local/nginx/conf/

[root@localhost conf]# vim nginx.conf
添加以下内容:
server {
listen 8888;
server_name 192.168.3.23; #访问IP地址
location /group1/M00 {
ngx_fastdfs_module;
}
}

去掉error和pid注释

2)创建nginx日志logs目录
[root@localhost nginx]# mkdir /usr/local/nginx/logs -p执行以下命令
[root@localhost nginx]# /usr/local/nginx/sbin/nginx -c /usr/local/nginx/conf/nginx.conf执行后会logs目录下会生成error.log和nginx.pid两个文件

3)启动前,需配置防火墙端口,添加80和8888两个端口,以便其他设备可以访问到这台设备。
开启80和8888端口
[root@localhost ~]# firewall-cmd --zone=public --add-port=80/tcp --permanent

[root@localhost ~]# firewall-cmd --zone=public --add-port=8888/tcp --permanent
重启防火墙
[root@localhost ~]# firewall-cmd --reload查询端口80和8888是否开启:80为默认端口
[root@localhost ~]# firewall-cmd --query-port=80/tcp

[root@localhost ~]# firewall-cmd --query-port=8888/tcp
查询哪些端口已开启
[root@localhost ~]# firewall-cmd --list-port或者关闭防火墙:(不推荐)——如需关闭,关闭防火墙方法在文章后面。
8.5 启动nginx
进入cd /usr/local/nginx/sbin/目录下启动nginx
[root@localhost ~]# cd /usr/local/nginx/sbin/启动nginx服务
[root@localhost sbin]# ./nginx停止nginx服务
[root@localhost sbin]# ./nginx -s stop重新加载nginx服务
[root@localhost sbin]# ./nginx -s reload9 设置 tracker、storage、nginx 服务自启
[root@localhost ~]# vim /etc/rc.d/rc.local 编辑填入:
/etc/init.d/fdfs_trackerd start
/etc/init.d/fdfs_storaged start
/usr/local/nginx/sbin/nginx

输入完成后执行命令
[root@localhost ~]# chmod +x /etc/rc.d/rc.local访问上传文件,浏览器显示图片说明上传成功
![]()

关闭防火墙
检查防火墙状态
[root@localhost ~]# systemctl status firewalld.service关闭防火墙
[root@localhost ~]# systemctl stop firewalld.service开机禁止防火墙启动
[root@localhost ~]# systemctl disable firewalld.service开机启动防火墙
[root@localhost ~]# systemctl enable firewalld.service查询网络端口以及日志命令
1)查询网络端口
[root@localhost ~]# netstat -ntlp2)查询报错日志命令
[root@localhost ~]# tail -f error.log