SpringMvc及三大组件(适配器、映射器、视图解析器)
文章目录
- 1 SpringMvc三大组件 适配器 映射器 视图解析器
-
-
- 1 @RequestMapping和@Controller
- **1. 什么是mvc**
- 2. SpringMvc三大组件及其作用
- `3. SpringMVC的执行流程`
- `4. springmvc入门的步骤`
- 5.DefaultServlet的处理器
- 6 springMVC如何封装请求参数
-
- 01. 简单类型
- 02. pojo类型
- 03.请求参数乱码
- 04 @RequestParam参数绑定
- 05.自定义请求参数类型转换器
- 7.控制器方法请求参数 Model与ModelMap
- 8.控制器方法返回值
- 9.JSON数据:@RequestBody与@ResponseBody注解
-
- **1.json格式的字符串**
- 2.` @ResponseBody` 和`@RequestBody`区别
-
- 2.SpringMVC 实现文件上传 (重点)
-
-
-
- 1.页面文件上传的三要素
- **2.springmvc的文件上传步骤**
- **3.实现**
-
- 01. 编写upload.html
- 02. 编写Controller
- 03. 配置springMVC.xml文件上传解析器
- 4 Fileupload使用
-
-
- 3.SpringMVC 文件上传跨服务器
-
-
-
- 1 编写upload.html
- 2 编写Controller
-
-
- 4.SpringMVC异常处理异常处理实现【掌握】
-
-
- **1. Java异常分类**
- **2.项目中如何处理异常?**
-
- 01. 代码层面:
- 02. 异常处理方案
- 3.SpringMVC异常处理HandlerExceptionResolver(重点)
-
- 1.搭建springmvc环境
- 2 .传统的异常处理如何实现?
- 3.改为springMVC异常处理机制
-
- 01. 定义异常处理类(重点 必须要)
- 02. 异常处理器放入到容器中
- 03. 测试
-
- 5.SpringMVC拦截器作用
-
-
- 执行流程
- 过滤器、Servlet容器、拦截器、AOP、Controller之间的关系
- **1.过滤器作用**(Filter)
- **2.拦截器作用**(Interceptor)
- **3 过滤器与拦截器的区别**
- 3. SpringMVC自定义拦截器类实现HandlerInterceptor接口
-
- 01.定义一个拦截器
- 02. springMVC.xml中,配置拦截器
-
- 6. Restful 风格的 URL简介
-
-
-
- 01. Restful 风格好处
-
- 1.restful作用?与核心思想
- 2.使用restful风格的步骤
- 3. restful传递参数的一种格式
- **02. 前置条件**
- 03. 实现
- 04.restful风格如何传递参数?
- 04.restful风格如何传递参数?
-
-
1 SpringMvc三大组件 适配器 映射器 视图解析器
SpringMVC 已经成为目前最主流的 MVC 框架之一, 从 Spring3.0 的发布, 就已全面超越 Struts2,成为最优秀的 MVC 框架。它通过一套注解,让一个简单的 Java 类成为处理请求的控制器,而无须实现任何接口。同时它还支持RESTful 编程风格的请求。
-
servlet: 称作为侵入式代码, 因为你编写的servlet一定要实现Servlet接口。 弊端: 一旦脱离依赖的框架(jar)或者所属的环境,就会没法再使用使用,所以移植性较差。· -
controller : 非侵入式代码, 编写Controller的时候不需要继承或者实现任何的类或者接口。 移植性好
1 @RequestMapping和@Controller
/*
@Controller//如果该类需要成为一个控制器,那么需要添加  @Controller注解

@RequestMapping的作用
作用范围:
    可以使用到类上、也可以用于方法上。
@RequestMapping使用的规范:
        类上: 一般我们都会写上对应模块(这里的模板不是带了当前工程,是指实体意思)的名字
        方法上: 功能的名字..


 @RequestParam 该注解作用: 解决参数的名称与形参不一致的情况的。
    常用的属性:
        value: 指定某一个参数给该形参赋值
        defaultValue : 如果不传递该参数过来,那么则使用默认值。
        required: 页面必须传递该参数过来,除非有默认值*/
@Controller
@RequestMapping("/user")
public class UserController {


    @RequestMapping("/addUser")
    public String addUser(){
        System.out.println("addUser方法执行了");
        return "success";
    }
}
1. 什么是mvc
Model 模型(模型的定义【pojo】、模型的实现【dao、service】)
View 视图 (html/jsp)
Controller 控制器 (servlet/filter /springmvc提供的controller/struts2提供的action)
总结: mvc是一种设计模式。表现层用到的设计思想。
SpringMVC是一个表现层的MVC框架!
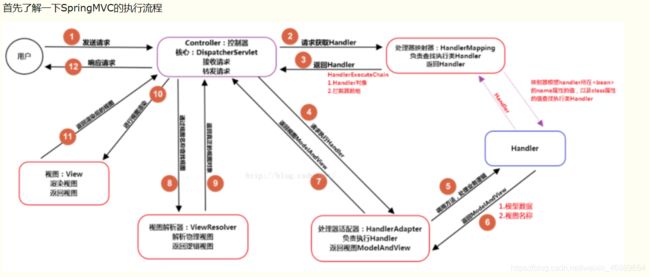
2. SpringMvc三大组件及其作用
1)处理器映射器: HandlerMapping (RequestMapingHandlerMapping)
作用: 查找对应的方法。
2)处理器适配器:HandlerAdapter (RequestMappingHandlerAdapter)
作用: 执行对应的方法
3)视图解析器:ViewResolver ( InternalResourceViewResolver )
作用:解析返回值,得到一个完整的视图路径
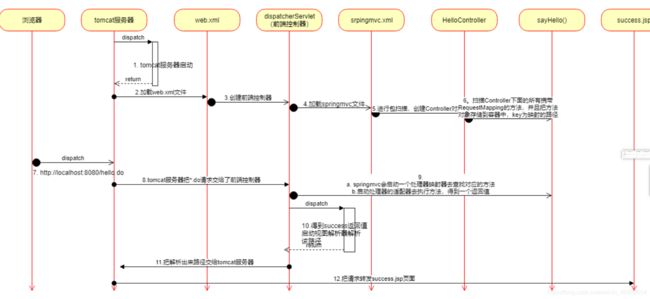
3. SpringMVC的执行流程
- 请求过来的时候会先交给了前端控制器
- 前端控制器就会调用处理器的映射器找到对应的方法
- 前端控制器就会启动处理器适配器去执行对应的方法,方法的返回值是返回给前端控制器。
- 前端控制器再调用视图解析器去得到视图,然后请求转达到对应的视图上。
4. springmvc入门的步骤
springmvc入门的步骤
- 导入依赖 spring-webmvc
- 在web.xml文件上
配置前端控制器 DispatcherServlet, 配置一个初始化的参数加载springmvc.xml文件 - 编写springmvc的文件,
配置视图解析器,在视图解析器中配置路径的前缀后缀,开启注解扫描,注解驱动 - 编写控制器,在普通java类上添加
@Controller,每一个方法上面我们可以配置@RequestMapping(“路径”)编写映射路径 - 部署启动访问
1 导入依赖 spring-webmvc
      org.springframework
      spring-webmvc
      5.0.2.RELEASE
2 在web.xml文件上配置前端控制器 DispatcherServlet, 配置一个初始化的参数加载springmvc.xml文件
		dispatcherServlet
		org.springframework.web.servlet.DispatcherServlet


			contextConfigLocation
			classpath:springmvc.xml


		1


		dispatcherServlet
		*.do
3 编写springmvc的文件, 配置视图解析器,在视图解析器中配置路径的前缀后缀,开启注解扫描,注解驱动
4 编写控制器,在普通java类上添加@Controller,每一个方法上面我们可以配置RequestMapping编写映射路径
/*

@Controller//如果该类需要成为一个控制器,那么需要添加  @Controller注解

@RequestMapping的作用
作用范围:
    可以使用到类上、也可以用于方法上。
@RequestMapping使用的规范:
        类上: 一般我们都会写上对应模块(这里的模板不是带了当前工程,是指实体意思)的名字
        方法上: 功能的名字..


 @RequestParam 该注解作用: 解决参数的名称与形参不一致的情况的。
    常用的属性:
        value: 指定某一个参数给该形参赋值
        defaultValue : 如果不传递该参数过来,那么则使用默认值。
        required: 页面必须传递该参数过来,除非有默认值
 */


//http://localhost:8080/user/find.do

@Controller//如果该类需要成为一个控制器,那么需要添加  @Controller注解
@RequestMapping("/user")
public class UserController {
    @RequestMapping("/find")  //该方法映射路径
    public String findUserByName(@RequestParam(value = "name",required = false) String username){
        System.out.println("用户名:"+ username);
        return "success";
    }
}
5.DefaultServlet的处理器
为什么SpringMVC项目访问不了静态资源呢?
- tomcat服务器只是支持了动态网页技术,html页面是属于静态的网页技术。 tomcat为了解决该问题,tomcat编写一个Servlet处理器静态资源的,当你访问所有的静态资源其实都是有一个叫DefaultServlet去读取静态的资源文件,然后向浏览器输出的。之所以使用了springmvc之后,没法访问静态资源,是 因为你配置路径与defaultServlet的路径冲突,所以导致了DefaultServlet失效。
springmvc.xml 文件上配置DefaultServlet的处理器
<mvc:default-servlet-handler/>
6 springMVC如何封装请求参数
01. 简单类型
编写UserController,编写save方法
/*
要求:形参的名字要与传递参数的名字一致,那么springmvc就会自动的把数据帮你封装好。
*/
@RequestMapping("/addUser")
    public String addUser(int id ,String name){
        System.out.println("编号:"+ id+" 姓名:"+ name);
        return "success";
    }
02. pojo类型
/*
    springmvc把参数封装到对象中,底层依赖的还是setter方法。
     */

    @RequestMapping("/update")
    public String register(User user,String sex){
        System.out.println("用户的信息:"+user);
        System.out.println("sex= "+sex);
        return "success";
    }
03.请求参数乱码
GET
Tomcat8或以上版本: 中文不会乱码
Tomcat7或以下版本:中文会乱码
解决办法:
在Tomcat7的conf/server.xml 添加URIEncoding=“UTF-8”

POST
默认情况下(不管什么版本的Tomtcat),SpringMVC接收的中文都是乱码的
实现:
SpringMVC提供针对POST请求字符编码过滤器,在web.xml配置该过滤器即可!!
	<filter>
		<filter-name>characterEncodingFilterfilter-name>
		<filter-class>org.springframework.web.filter.CharacterEncodingFilterfilter-class>

		<init-param>
			<param-name>encodingparam-name>
			<param-value>utf-8param-value>
		init-param>
	filter>


	<filter-mapping>
		<filter-name>characterEncodingFilterfilter-name>
		<url-pattern>/*url-pattern>
	filter-mapping>
04 @RequestParam参数绑定
当请求参数名称与方法形参不一致时候,如何封装请求数据?
@RequestParam
- 应用场景:当请求参数名称与方法形参不一致时候使用
- 建立请求参数与方法形参的映射关系
   /*
    @RequestParam 该注解作用: 解决参数的名称与形参不一致的情况的。
    常用的属性:
        value: 指定某一个参数给该形参赋值
        defaultValue : 如果不传递该参数过来,那么则使用默认值。
        required: 页面必须传递该参数过来,除非有默认值
     */
    @RequestMapping("/find")
    public String findUserByName(@RequestParam(value = "name",required = false) String username){
        System.out.println("用户名:"+ username);
        return "success";
    }
05.自定义请求参数类型转换器
在项目中我们需要从前端传递日期类型(2019-07-01)到后端,但是SpringMVC无法转换字符串为Date日期类型。这时我们可以通过自定义类型转换器,实现把请求参数值转换为指定的类型。
1.自定义一个类实现Converter接口(自定义的转换器)
2.在springMVC.xml配置类型转换器, 需要把自定义类型的转换器存储到类型转换器的工厂中,到时候如果再遇到该类型的时候,springmvc会自动从工厂中取出转换器帮你去转换。
自定义类
public class StringToDateConverter implements Converter<String,Date> {

    @Override
    public Date convert(String s) {
        SimpleDateFormat dateFormat = new SimpleDateFormat("yyyy-MM-dd");
        Date date = null;
        try {
            date = dateFormat.parse(s);
        } catch (ParseException e) {
            e.printStackTrace();
        }
        return date;
    }
}
2.在springMVC.xml配置类型转换器
    <bean id="stringToDateConverter" class="com.itheima.utils.StringToDateConverter"/>

    <bean id="conversionFactory" class="org.springframework.context.support.ConversionServiceFactoryBean">
        <property name="converters">
            <set>

                <ref bean="stringToDateConverter"/>
            set>
        property>
    bean>


    <mvc:annotation-driven conversion-service="conversionFactory"/>
7.控制器方法请求参数 Model与ModelMap
- 使用Model或者ModelMap作为控制器方法参数
- 作用:可以往request域中存储数据。 与request.setAttribute(key, value)一样 ;
1.springmvc提供了一个Model与ModelMap的类给你往request域中存储数据
-
往request域中存储数据,
-
两个Api都有一个共同的实现类:BindingAwareModelMap类,而且运行时都是一个对象!
那么就意味着以后大家如果想往request域中存储数据,可以使用model与ModelMap是一样的效果。
2 .Model接口和ModelMap底层怎么放数据到request域对象?
*用 DispathcerServlet的doDispatcher方法*
往域中存储数据,然后转发给jsp页面使用el表达式显示出来。
数据到request
/*
目标: 往域中存储数据,然后转发给jsp页面使用el表达式显示出来。

springmvc提供了一个Model与ModelMap的类给你往与中存储的数据
 */
@Controller
public class ModelController {
	//方式一: 传统方式,直接往reqeust对象存储数据。
    @RequestMapping("/request")
    public String request(HttpServletRequest request){
        request.setAttribute("username","狗娃");
        return "model";
    }
    //方式二: 直接往model对象存储数据。
    @RequestMapping("/model")
    public String model(Model model){
       model.addAttribute("model","狗剩");
        return "model";
    }
    // 方式三: 往modelMap存储数据
    @RequestMapping("/modelMap")
    public String request(ModelMap modelMap){
       modelMap.addAttribute("modelMap","铁蛋");
        return "model";
    }

}
获取request数据
<%--
  Created by IntelliJ IDEA.
  User: ztl
  Date: 2019/9/24
  Time: 10:02
  To change this template use File | Settings | File Templates.
--%>
<%@ page contentType="text/html;charset=UTF-8" language="java" %>


    Title


    从request域中获取数据: ${username}

    从model域中获取数据: ${model}

    从ModelMap域中获取数据: ${modelMap}
8.控制器方法返回值
控制器返回值的写法:
-
字符串
1.1 普通字符串(代表页面名称,不是完整路径,最后经过视图解析器的解析)
经过了视图解析器的解析,最终页面的地址: /pages/index.jsp (默认就是转发)
//返回的只是的页面名称而已,并不是完整的路径
return “index”;1.2 转发字符串
forward:页面的完整的页面地址,而不是页面名称
例如:forward:/pages/index.jsp
注意:可以转发到当前项目下的任何资源,用请求转发,但是不经过视图解析器
1.3 重定向字符串
redirect:页面的完整的页面地址,而不是页面名称
redirect:/pages/index.jsp注意:可以重定向到项目内和项目外的资源,用请求重定向,但是不经过视图解析器
-
void (原生的)
-
ModelAndView
需求:存入数据到request中,转发到/pages/index.jsp页面
ModelAndView mv = new ModelAndView();
mv.addObject(“name”,“小苍”); // 存入数据到request中
mv.setViewName(“index”); // 转发到/pages/index.jsp页面 -
Java对象 (转换为json字符串)
1.编写ReturnController
package com.itheima.controller.b_return;

import org.springframework.stereotype.Controller;
import org.springframework.ui.Model;
import org.springframework.web.bind.annotation.RequestMapping;
import org.springframework.web.servlet.ModelAndView;

import javax.servlet.http.HttpServletResponse;
import java.io.*;

/**
 * 演示控制器的方法返回值的问题
 *   1. 字符串
         1.1 普通字符串(代表页面名称,不是完整路径,最后经过视图解析器的解析)
         1.2 转发字符串
         1.3 重定向字符串
     2. void (原生的)
     3. ModelAndView
     4. Java对象 (转换为json字符串)

 */
@Controller
@RequestMapping("/return")
public class ReturnController {

    /**
     * 1)字符串 -  普通字符串
     *   注意:只能转发到视图解析器指定的前缀目录下
     */
    @RequestMapping("/string")
    public String string(){
        //经过了视图解析器的解析,最终页面的地址: /pages/index.jsp (默认就是转发)
        //返回的只是的页面名称而已,并不是完整的路径
        return "index";
    }

    /**
     * 2)字符串 -  转发字符串
     *    规则:
     *        forward:页面的完整的页面地址,而不是页面名称
     *        例如:forward:/pages/index.jsp
     *    注意:可以转发到当前项目下的任何资源,不经过视图解析器
     */
    @RequestMapping("/forward")
    public String forward(){

        return "forward:/index.jsp";
    }

    /**
     * 3)字符串 -  重定向字符串
     * 规则:
     *        redirect:页面的完整的页面地址,而不是页面名称
     *
     *    注意:可以重定向到项目内和项目外的资源,不经过视图解析器
     */
    @RequestMapping("/redirect")
    public String redirect(){

        return "redirect:http://www.baidu.com";
    }

    /**
     * 4) void   使用Servlet  Api
     */
    @RequestMapping("/void")
   public void  servlet(HttpServletRequest request, HttpServletResponse response){

        //请求转发
		//request.getRequestDispatcher("路径").forward(request,response);
		//请求重定向
		//response.sendRedirect("路径");
    }

    /**
     * 5)返回ModelAndView
     *    ModelAndView对象:
     *       Model+View
     *         Model: 存入数据到request的对象
     *         View: 设置页面信息的对象
     如果viewName的前面没有forward或者redirect字符串,
   那么就会经过视图解析器,如果有则不经过视图解析器。
     */
    @RequestMapping("/mv")
    public ModelAndView mv(){

        //需求:存入数据到request中,转发到/pages/index.jsp页面
        ModelAndView mv = new ModelAndView();
        mv.addObject("name","小苍"); // 存入数据到request中
        mv.setViewName("index"); // 转发到/pages/index.jsp页面
         //不经过视图解析器
        modelAndView.setViewName("redirect:/index.html");
        return mv;
    }


}
9.JSON数据:@RequestBody与@ResponseBody注解
1.json格式的字符串
String user = ‘{“id”:110,“username”:“狗娃”,“age”:12}’;
2.@ResponseBody 和@RequestBody区别
@ResponseBody: 这个注解会自动把一个java对象转换为json对象
@RequestBody: 该注解是用于形参上的,作用:是把前段传过来的json格式的字符串转为为java对象。
    /*
     @ResponseBody : 这个注解会自动把对象转换为json对象
     @RequestBody : 该注解是用于形参上的,作用:是把前段传过来的json格式的字符串转为为java对象。
     */
    @ResponseBody
    @RequestMapping("/getJson")
    public User getUserJson(@RequestBody User user2){
        System.out.println("接收的User数据:"+ user2);
        User user = new User();
        user.setId(110);
        user.setUsername("狗娃");
        user.setAge(12);
        return user;
需要在Json字符串和Java之间转换,必须先在项目导入jackson支持包:
<dependency>
  <groupId>com.fasterxml.jackson.coregroupId>
  <artifactId>jackson-coreartifactId>
  <version>2.9.5version>
dependency>
<dependency>
  <groupId>com.fasterxml.jackson.coregroupId>
  <artifactId>jackson-annotationsartifactId>
  <version>2.9.5version>
dependency>
<dependency>
  <groupId>com.fasterxml.jackson.coregroupId>
  <artifactId>jackson-databindartifactId>
  <version>2.9.5version>
dependency>
2.SpringMVC 实现文件上传 (重点)
1.页面文件上传的三要素
1.表单必须是Post
2.表单类型是multipart/form-data
3.表单必须有至少一个file组件:
<form action="/upload1" method="post" enctype="multipart/form-data">

    用户名:<input type="text" name="userName" /><br/>
    大头照:<input type="file" name="fileImage"/><br/>
    <input type="submit" value="提交"/>
form>
2.springmvc的文件上传步骤
- 导包 commons-fileupload
- 形参中的文件上传表单项的类型:
MultipartFile - 把MultipartFile写入到目标目录:
transferTo方法 - 在springmvc文件中配置文件上传解析器
    <dependency>
      <groupId>commons-fileuploadgroupId>
      <artifactId>commons-fileuploadartifactId>
      <version>1.3.1version>
    dependency>
3.实现
01. 编写upload.html
1.表单必须是Post
2.表单类型是multipart/form-data
3.表单必须有至少一个file组件:
<form action="/upload1" method="post" enctype="multipart/form-data">

    用户名:<input type="text" name="userName" /><br/>
    大头照:<input type="file" name="fileImage"/><br/>
    <input type="submit" value="提交"/>
form>
02. 编写Controller
/**
* SpringMVC方式上传文件
*/
@Controller
public class Upload2Controller {
/**
* 解析上传的文件
* MultipartFile: 用于接收(封装)页面上传的文件信息的对象
* 注意:变量名称和页面的file的name一致
*/
@RequestMapping("/upload2")
public String upload(HttpServletRequest request, MultipartFile imgFile){
//使用springMVC接收页面的文件
//获取upload目录的路径: ServletContext
//getRealPath: 获取项目下某个目录的路径
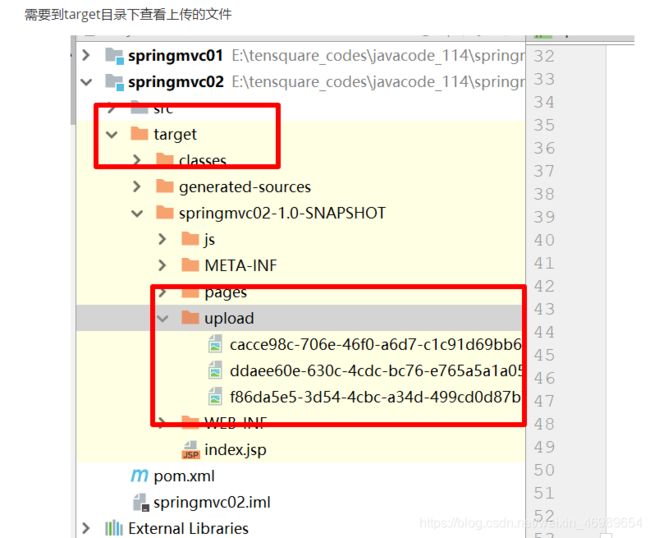
String uploadPath = request.getServletContext().getRealPath("/upload");
//如果upload目录不存在,则创建该目录
File uploadFile = new File(uploadPath);
if(!uploadFile.exists()){
//创建目录
uploadFile.mkdir();
}
//获取文件名称
String fileName = imgFile.getOriginalFilename();
//使用随机文件名称 :UUID
String uuid = UUID.randomUUID().toString(); // 没有文件后缀 fdfdferer
//从文件名称获取文件后缀 .jpg
String extName = fileName.substring(fileName.lastIndexOf("."));
String newFileName = uuid+extName; //fdfdferer.jpg
try {
imgFile.transferTo(new File(uploadFile+"/"+newFileName));
} catch (IOException e) {
e.printStackTrace();
}
return "success";
}
}
03. 配置springMVC.xml文件上传解析器
    <bean id="multipartResolver" class="org.springframework.web.multipart.commons.CommonsMultipartResolver">

        <property name="maxUploadSize" value="10485760"/>
    bean>
4 Fileupload使用
传统文件上传
/*
Fileupload使用的步骤:
    1. 创建一个文件解析器的工厂
    2. 得到一个文件解析器
    3.利用解析器解析request对象,得到一个集合,集合中存储的就是一个FileItem.
    每一个FileItem则代表了每一个表单项的数据
    4. 判断是普通文本表单项还是文件表单项然后做出相应的逻辑处理。
 */
     @RequestMapping("/upload1")
    public String upload1(HttpServletRequest request) throws Exception {
//        1. 创建一个文件解析器的工厂
        DiskFileItemFactory factory = new DiskFileItemFactory();
//        2. 得到一个文件解析器
        ServletFileUpload servletFileUpload = new ServletFileUpload(factory);
//        3.利用解析器解析request对象,得到一个集合,集合中存储的就是一个FileItem.
//                每一个FileItem则代表了每一个表单项的数据
        List<FileItem> fileItems = servletFileUpload.parseRequest(request);

//        4. 判断是普通文本表单项还是文件表单项然后做出相应的逻辑处理。
        for (FileItem fileItem : fileItems) {
            if(fileItem.isFormField()){
                //普通的文本表单项  getFieldName() 获取表单项的name的属性值, file.getString() 获取项输入的vlaue值。
                System.out.println(fileItem.getFieldName()+":"+ fileItem.getString("utf-8"));
            }else{
                //文件上传表单项

                //获取上传文件的文件名
                String fileName = fileItem.getName();
                //获取上传文件的拓展名   aa.jpg
                String ext = fileName.substring(fileName.lastIndexOf("."));
                //为了防止文件名重复,我们对上传文件名我们使用uuid
                String uuid = UUID.randomUUID().toString();
                String newFileName = uuid+ext;

                //找到目标的存储目录
                String dirPath = request.getServletContext().getRealPath("/upload");
                File targetDir = new File(dirPath);
                if(!targetDir.exists()){
                    targetDir.mkdirs();
                }


                //把文件写入目标目录的文件上
                fileItem.write(new File(targetDir,newFileName));
                //删除缓存
                fileItem.delete();
            }
        }
        return "success";
    }
3.SpringMVC 文件上传跨服务器
把图片上传到另外一个服务器,这种处理我们称作为跨域。
在实际场景中,我们的服务器也是分类型的,
- 存储代码的服务器 应用服务器
- 存储文件 文件服务器
- 数据库 数据库的服务器
在实际开发中我们不同类型的数据我们往往是放入不同的服务器中,所以对于文件上传我们是把文件上传到另外一个服务器中。目前该知识点我们只是作为了解即可,因为后期我们单独学习文件上传服务器,项目一:七牛云存储.
1 编写upload.html
<form action="/upload3" method="post" enctype="multipart/form-data">
    选择文件:<input type="file" name="imgFile"><br/>
    <input type="submit" value="开始上传">
form>
2 编写Controller
先导入jersey依赖:
	<dependency>
      <groupId>com.sun.jerseygroupId>
      <artifactId>jersey-coreartifactId>
      <version>1.18.1version>
    dependency>
    <dependency>
      <groupId>com.sun.jerseygroupId>
      <artifactId>jersey-clientartifactId>
      <version>1.18.1version>
    dependency>
    /*
        把图片上传到另外一个服务器,这种处理我们称作为跨域。
   */
    @RequestMapping("/upload3")
    public String upload3(HttpServletRequest request,String userName,MultipartFile fileImage) throws Exception {

        //1。 创建一个客户端
        Client client = new Client();

        //2. 编写网络的上传地址
        String uri= "http://localhost:6080/fileSystem/upload/"+fileImage.getOriginalFilename();
        //3. 建立网络的传输通道
        WebResource webResource = client.resource(uri);

        //4 把数据写入到通道即可 , 获取文件的二进制数据写入
        webResource.put(fileImage.getBytes());
        return "success";
    }
4.SpringMVC异常处理异常处理实现【掌握】
1. Java异常分类
|–Throwable
|-- Error
|-- Exception 检查异常(编译异常)
|–RuntimeException 运行时期异常
检查异常: 会给调用者带来麻烦。调用者必须处理异常,不处理异常程序无法继续。
运行时期异常:调用者可以处理异常,也可以不处理异常。更灵活。
2.项目中如何处理异常?
01. 代码层面:
dao 抛异常 throw
service 抛异常
web 处理异常
能够控制器每个方法都写try…catch… 太麻烦!
02. 异常处理方案
(使用SpringMVC异常处理)
1 表现层,处理异常,写try.catch 不推荐
2 自定义异常过滤器 (处理所有的异常) 不推荐
3 使用框架自带异常处理机制(使用SpringMVC异常处理)更加简单 推荐。
3.SpringMVC异常处理HandlerExceptionResolver(重点)
springMVC提供的异常处理机制实现异常处理(重点)
-
自定义异常处理类
MyExceptionHandler实现HandlerExceptionResolver -
把异常处理类放入到spring的容器中
有两种方式让异常处理类生效:
方式一:
//自定义异常处理类MyExceptionHandler实现**HandlerExceptionResolver
@Component
public class MyExceptionHandler implements HandlerExceptionResolver{

}


    	//在xml 开启注解扫描
     <context:component-scan base-package="com.itheima"/>
方式二:
1.搭建springmvc环境
(依赖、web.xml、springMVC.xml)
<project xmlns="http://maven.apache.org/POM/4.0.0"
         xmlns:xsi="http://www.w3.org/2001/XMLSchema-instance"
         xsi:schemaLocation="http://maven.apache.org/POM/4.0.0 http://maven.apache.org/xsd/maven-4.0.0.xsd">
    <modelVersion>4.0.0modelVersion>

    <groupId>com.itheimagroupId>
    <artifactId>springmvc03_01_exception_interceptorartifactId>
    <version>1.0-SNAPSHOTversion>

    <dependencies>
        <dependency>
            <groupId>org.springframeworkgroupId>
            <artifactId>spring-webmvcartifactId>
            <version>5.0.2.RELEASEversion>
        dependency>
        <dependency>
            <groupId>javax.servletgroupId>
            <artifactId>servlet-apiartifactId>
            <version>2.5version>
        dependency>
    dependencies>
project>
web.xml
<web-app xmlns:xsi="http://www.w3.org/2001/XMLSchema-instance"
	xmlns="http://java.sun.com/xml/ns/javaee"
	xsi:schemaLocation="http://java.sun.com/xml/ns/javaee http://java.sun.com/xml/ns/javaee/web-app_2_5.xsd"
	version="2.5">


	<servlet>
		<servlet-name>dispatcherServletservlet-name>
		<servlet-class>org.springframework.web.servlet.DispatcherServletservlet-class>
		<init-param>
			<param-name>contextConfigLocationparam-name>
			<param-value>classpath:springMVC.xmlparam-value>
		init-param>
		<load-on-startup>1load-on-startup>
	servlet>
	<servlet-mapping>
		<servlet-name>dispatcherServletservlet-name>
		<url-pattern>/url-pattern>
	servlet-mapping>


web-app>
springMVC.xml
<beans xmlns="http://www.springframework.org/schema/beans"
       xmlns:xsi="http://www.w3.org/2001/XMLSchema-instance"
       xmlns:context="http://www.springframework.org/schema/context"
       xmlns:mvc="http://www.springframework.org/schema/mvc"
       xsi:schemaLocation="http://www.springframework.org/schema/beans http://www.springframework.org/schema/beans/spring-beans.xsd http://www.springframework.org/schema/context http://www.springframework.org/schema/context/spring-context.xsd http://www.springframework.org/schema/mvc http://www.springframework.org/schema/mvc/spring-mvc.xsd">


    <context:component-scan base-package="com.itheima"/>

    <bean class="org.springframework.web.servlet.view.InternalResourceViewResolver">
        <property name="prefix" value="/pages/"/>
        <property name="suffix" value=".jsp"/>
    bean>

    <mvc:annotation-driven/>


beans>
2 .传统的异常处理如何实现?
@Controller
public class ExceptionController {


    @RequestMapping("/exception")
    public String exception(Model model){

        try {
            int i = 1/0;
        } catch (Exception e) {
            //把异常的信息存储到了request域中
           model.addAttribute("errorMsg",e.getMessage());
           //调整到错误的页面给用户温馨提示
           return "error";
        }
        return "success";
    }

}
error.jsp
<%@ page contentType="text/html;charset=UTF-8" language="java" %>


    Title


    当前访问的人数过大,服务器压力过大,请稍后!
    异常的信息:${errorMsg}
3.改为springMVC异常处理机制
01. 定义异常处理类(重点 必须要)
实现HandlerExceptionResolver
/*
自定义异常的处理器

自定义异常处理器的步骤:
    1. 自定义一个类实现HandlerExceptionResolver
    2. 把该类放入spring的容器中即可。
 */
@Component
public class MyExceptionHandler  implements HandlerExceptionResolver {
    /*
    方法的调用的时机: 任何一个Controller出现异常。
    参数的说明:
        request:   请求
        response :  响应
        object:   当前出异常的方法对象  ,   MethodHandler实现类
        Exception:  当前异常对象
     */
    @Override
    public ModelAndView resolveException(HttpServletRequest request, HttpServletResponse response, Object o, Exception e) {
       //1.先异常的信息存储到ModelAndView、
        ModelAndView modelAndView = new ModelAndView();
        modelAndView.addObject("errorMsg",e.getMessage());
        //2. 设置跳转的页面
        modelAndView.setViewName("error");

        return modelAndView;
    }
}
02. 异常处理器放入到容器中
有两种方式让异常处理类生效:
方式一:
//自定义异常处理类MyExceptionHandler实现**HandlerExceptionResolver
@Component
public class MyExceptionHandler implements HandlerExceptionResolver{

}


    	//在xml 开启注解扫描
        <context:component-scan base-package="com.itheima"/>
方式二:
<bean class="异常类的包名"/>
03. 测试
 //SpringMVC异常处理
    @RequestMapping("/save")
    public String save(Model model){
        System.out.println("执行save方法");
        //模拟异常
        int i = 10 / 0;
        return "success";
    }
5.SpringMVC拦截器作用
执行流程

过滤器、Servlet容器、拦截器、AOP、Controller之间的关系
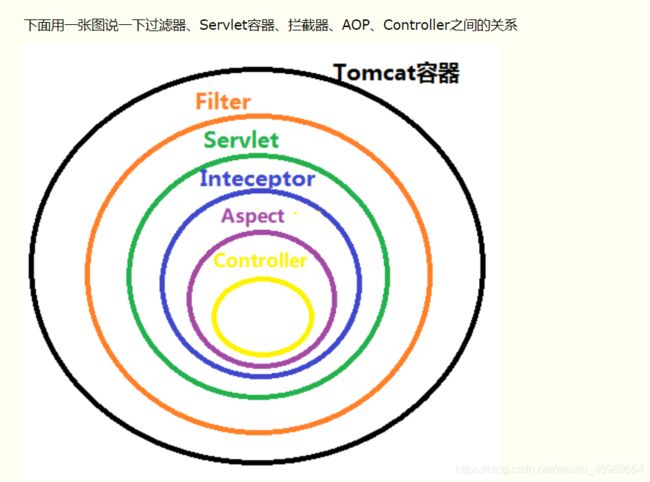
1.过滤器作用(Filter)
-
拦截请求
-
可以拦截所有的请求(/*):jsp、html、css、js、img、servlet、controller
-
作用
过滤用户的请求与响应
-
是servlet的技术,应用范围比较广
2.拦截器作用(Interceptor)
- springmvc的拦截器是属于springmvc的技术,只能在使用springmvc的技术上,才可以使用其拦截器
- 拦截的请求: 只能拦截springmvc的请求(只能拦截控制器)
- 作用:同filter
3 过滤器与拦截器的区别
过滤器与拦截器,都可以拦截请求。
过滤器可以拦截所有请求,拦截器只能拦截控制器的请求。
过滤器应用范围更广。只要是javaweb项目,无论使用什么前端控制框架都可以应用filter。
拦截器和过滤器的区别
1、拦截器不依赖与servlet容器是SpringMVC自带的,过滤器依赖于Servlet容器。
2、拦截器是基于java的反射机制的,而过滤器是基于函数回调。
3、拦截器只能对action请求起作用,而过滤器则可以对几乎所有的请求起作用。
4、拦截器可以访问controller上下文、值栈里的对象,而过滤器不能访问。
(拦截器的preHandle方法在进入controller前执行,而拦截器的postHandle方法在执行完controller业务流程后,在视图解析器解析ModelAndView之前执行,可以操控Controller的ModelAndView内容。而afterCompletion是在视图解析器解析渲染ModelAndView完成之后执行的)
( 过滤器是在服务器启动时就会创建的,只会创建一个实例,常驻内存,也就是说服务器一启动就会执行Filter的init(FilterConfig config)方法.当Filter被移除或服务器正常关闭时,会执行destroy方法)
5、拦截器可以获取IOC容器中的各个bean,而过滤器就不行,这点很重要,在拦截器里注入一个service,可以调用业务逻辑。
(关于这句话的解读是:我们知道拦截器是SprinMVC自带的,而SpringMVC存在Controller层的,而controller层可以访问到service层,service层是不能访问service层的,而过滤器是客户端和服务端之间请求与响应的过滤)
6、过滤器和拦截器触发时机、时间、地方不一样
(过滤器是在请求进入容器后,但请求进入servlet之前进行预处理的。请求结束返回也是在servlet处理完后,返回给前端之前,如果看不懂可以看7完后再来理解)
7、过滤器包裹住servlet,servlet包裹住拦截器
3. SpringMVC自定义拦截器类实现HandlerInterceptor接口
定义拦截器的步骤:
1.自定义一个类实现HandlerInterceptor的接口
注意:public boolean preHandle()如果返回的为False,则不允许后面的方法执行。

2.在springmvc的配置上配置拦截的路径
01.定义一个拦截器
/*
 定义拦截器的步骤:
    1. 自定义一个类实现HandlerInterceptor的接口
    2. 在springmvc的配置上配置拦截的路径
 */
public class Demo1Intercepter implements HandlerInterceptor {


    @Override
    public boolean preHandle(HttpServletRequest request, HttpServletResponse response, Object handler) throws Exception {
        System.out.println("1.执行目标方法之前的方法:preHandle");
        return true;//如果返回的为False,则不允许后面的方法执行
    }

    @Override
    public void postHandle(HttpServletRequest request, HttpServletResponse response, Object handler, ModelAndView modelAndView) throws Exception {
        System.out.println("2.目标方法执行完毕之后:postHandle");
    }

    @Override
    public void afterCompletion(HttpServletRequest request, HttpServletResponse response, Object handler, Exception ex) throws Exception {
        System.out.println("3.最终的方法:afterCompletion");
    }
}
02. springMVC.xml中,配置拦截器
<beans xmlns="http://www.springframework.org/schema/beans"
       xmlns:xsi="http://www.w3.org/2001/XMLSchema-instance"
       xmlns:context="http://www.springframework.org/schema/context"
       xmlns:mvc="http://www.springframework.org/schema/mvc"
       xsi:schemaLocation="http://www.springframework.org/schema/beans
        http://www.springframework.org/schema/beans/spring-beans.xsd http://www.springframework.org/schema/context http://www.springframework.org/schema/context/spring-context.xsd http://www.springframework.org/schema/cache http://www.springframework.org/schema/cache/spring-cache.xsd http://www.springframework.org/schema/mvc http://www.springframework.org/schema/mvc/spring-mvc.xsd">

    <bean class="org.springframework.web.servlet.view.InternalResourceViewResolver">
        <property name="suffix" value=".jsp"/>
        <property name="prefix" value="/pages/"/>
    bean>
    <context:component-scan base-package="com.itheima.web"/>


    <bean class="com.itheima.utils.MyExceptionHandler"/>

    <mvc:annotation-driven/>


    <mvc:interceptors>

        <mvc:interceptor>

            <mvc:mapping path="/findAll"/>
            <bean class="自定义拦截器类的包名"/>
        mvc:interceptor>


        <mvc:interceptor>

            <mvc:mapping path="/findAll"/>
            <bean class="com.itheima.utils.Demo2Intercepter"/>
        mvc:interceptor>
    mvc:interceptors>
beans>

6. Restful 风格的 URL简介
01. Restful 风格好处
1)客户端和服务端之间的URL规则更简洁
2)客户端和服务端之间的URL更有层次
3) 更易于实现在服务端缓存客户端资源
RESTful的核心思想 : 通过请求的方式区分用户要做增删改查的操作。
使用RESTFul之后 (GET、POST、PUT、DELETE)
增加: http://localhost:8080/user POST
修改: http://localhost:8080/user PUT
删除: http://localhost:8080/user DELETE
查询: http://localhost:8080/user GET
1.restful作用?与核心思想
作用简化url的写法,核心思想:通过不同的请求方式区分了用户对数据不同的处理方式’
2.使用restful风格的步骤
- 在web.xml文件上配置HiddenHttpmethodFilter.'
- 如果表单需要使用put与delete的方式的要求:
- 表单真实提交方式一定要使用post
- 表单要带一个隐藏域,名称_method,值可以是put或者是delete.
- PUT和DELETE最后只能返回json数据字符串!!!添加@ResponseBody注解
3. restful传递参数的一种格式
/url/参数1/参数2
注意:PUT和DELETE方法最后无法转发或者重定向页面的!!!
原因:页面不支持PUT和DELETE方法,所以无法接受后台发送PUT和DELETE的响应!
结论**:PUT和DELETE最后只能返回json数据字符串!!!添加@ResponseBody注解**
02. 前置条件
在web.xml配置转换请求方式的过滤器 引入SpringMVC提供的HiddenHttpMethodFilter
该过滤器需要前端页面传递一个参数名叫 _method的请求方式
<filter>
   <filter-name>hiddenHttpMethodFilterfilter-name>
   <filter-class>org.springframework.web.filter.HiddenHttpMethodFilterfilter-class>
filter>
<filter-mapping>
   <filter-name>hiddenHttpMethodFilterfilter-name>
   <url-pattern>/*url-pattern>
filter-mapping>
03. 实现
1.编写restful.html
<html lang="en">
<head>
<meta charset="UTF-8">
<title>Titletitle>
head>
<body>
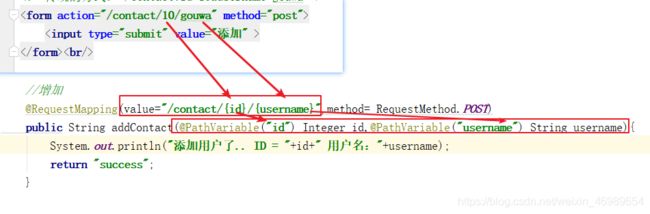
<form action="/contact/10/gouwa" method="post">
<input type="submit" value="添加" >
form><br/>
<form action="/contact" method="get">
<input type="submit" value="查询" >
form><br/>
<form action="/contact" method="post">
<input type="hidden" name="_method" value="put">
<input type="submit" value="修改" >
form><br/>
<form action="/contact" method="post">
<input type="hidden" name="_method" value="delete">
<input type="submit" value="删除" >
form><br/>
body>
html>
2.编写UserController
package com.itheima.web;

import org.springframework.stereotype.Controller;
import org.springframework.web.bind.annotation.PathVariable;
import org.springframework.web.bind.annotation.RequestMapping;
import org.springframework.web.bind.annotation.RequestMethod;
import org.springframework.web.bind.annotation.ResponseBody;

@Controller
@ResponseBody
public class RestFulController {

    //增加
    @RequestMapping(value="/contact/{id}/{username}",method= RequestMethod.POST)
    public String addContact(@PathVariable("id") Integer id,@PathVariable("username") String username){
        System.out.println("添加用户了.. ID = "+id+" 用户名:"+username);
        return "success";
    }


    //查询
    @RequestMapping(value="/contact",method= RequestMethod.GET)
    public String selectContact(){
        System.out.println("查询用户了..");
        return "success";
    }


    /*
        注意: 浏览器由于只是支持了get与post的请求方式,所以浏览器一样也只能支持了
        get与post的响应方式,所以对于put与delete的方式,不能使用页面跳转,唯独只能
        范湖一个json格式的字符串。


     */

    //修改
    @RequestMapping(value="/contact",method= RequestMethod.PUT)
    public String update(){
        System.out.println("修改了用户..");
        return "success";
    }


    //删除
    @RequestMapping(value="/contact",method= RequestMethod.DELETE)
   public String deleteContact(){
        System.out.println("删除用户了..");
        return "success";
    }


}
04.restful风格如何传递参数?

=“post”>
```
2.编写UserController
package com.itheima.web;

import org.springframework.stereotype.Controller;
import org.springframework.web.bind.annotation.PathVariable;
import org.springframework.web.bind.annotation.RequestMapping;
import org.springframework.web.bind.annotation.RequestMethod;
import org.springframework.web.bind.annotation.ResponseBody;

@Controller
@ResponseBody
public class RestFulController {

    //增加
    @RequestMapping(value="/contact/{id}/{username}",method= RequestMethod.POST)
    public String addContact(@PathVariable("id") Integer id,@PathVariable("username") String username){
        System.out.println("添加用户了.. ID = "+id+" 用户名:"+username);
        return "success";
    }


    //查询
    @RequestMapping(value="/contact",method= RequestMethod.GET)
    public String selectContact(){
        System.out.println("查询用户了..");
        return "success";
    }


    /*
        注意: 浏览器由于只是支持了get与post的请求方式,所以浏览器一样也只能支持了
        get与post的响应方式,所以对于put与delete的方式,不能使用页面跳转,唯独只能
        范湖一个json格式的字符串。


     */

    //修改
    @RequestMapping(value="/contact",method= RequestMethod.PUT)
    public String update(){
        System.out.println("修改了用户..");
        return "success";
    }


    //删除
    @RequestMapping(value="/contact",method= RequestMethod.DELETE)
   public String deleteContact(){
        System.out.println("删除用户了..");
        return "success";
    }


}
04.restful风格如何传递参数?