Flutter 布局(四)- Baseline、FractionallySizedBox、IntrinsicHeight、IntrinsicWidth详解
本文主要介绍Flutter布局中的Baseline、FractionallySizedBox、IntrinsicHeight、IntrinsicWidth四种控件,详细介绍了其布局行为以及使用场景,并对源码进行了分析。
系列文章目录
Flutter 布局详解
Flutter 布局(一)- Container详解
Flutter 布局(二)- Padding、Align、Center详解
Flutter 布局(三)- FittedBox、AspectRatio、ConstrainedBox详解
Flutter 布局(四)- Baseline、FractionallySizedBox、IntrinsicHeight、IntrinsicWidth详解
Flutter 布局(五)- LimitedBox、Offstage、OverflowBox、SizedBox详解
Flutter 布局(六)- SizedOverflowBox、Transform、CustomSingleChildLayout详解
Flutter 布局(七)- Row、Column详解
Flutter 布局(八)- Stack、IndexedStack、GridView详解
Flutter 布局(九)- Flow、Table、Wrap详解
Flutter 布局(十)- ListBody、ListView、CustomMultiChildLayout详解
1. Baseline
A widget that positions its child according to the child's baseline.
1.1 简介
Baseline这个控件,做过移动端开发的都会了解过,一般文字排版的时候,可能会用到它。它的作用很简单,根据child的baseline,来调整child的位置。例如两个字号不一样的文字,希望底部在一条水平线上,就可以使用这个控件,是一个非常基础的控件。
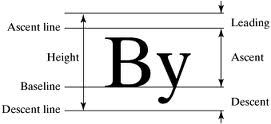
关于字符的Baseline,可以看下下面这张图,这具体就涉及到了字体排版,感兴趣的同学可以自行了解。
1.2 布局行为
Baseline控件布局行为分为两种情况:
如果child有baseline,则根据child的baseline属性,调整child的位置;
如果child没有baseline,则根据child的bottom,来调整child的位置。
1.3 继承关系
Object > Diagnosticable > DiagnosticableTree > Widget > RenderObjectWidget > SingleChildRenderObjectWidget > Baseline1.4 示例代码
new Row(
  mainAxisAlignment: MainAxisAlignment.spaceBetween,
  children: [
    new Baseline(
      baseline: 50.0,
      baselineType: TextBaseline.alphabetic,
      child: new Text(
        'TjTjTj',
        style: new TextStyle(
          fontSize: 20.0,
          textBaseline: TextBaseline.alphabetic,
        ),
      ),
    ),
    new Baseline(
      baseline: 50.0,
      baselineType: TextBaseline.alphabetic,
      child: new Container(
        width: 30.0,
        height: 30.0,
        color: Colors.red,
      ),
    ),
    new Baseline(
      baseline: 50.0,
      baselineType: TextBaseline.alphabetic,
      child: new Text(
        'RyRyRy',
        style: new TextStyle(
          fontSize: 35.0,
          textBaseline: TextBaseline.alphabetic,
        ),
      ),
    ),
  ],
)
上述运行结果是左右两个文本跟中间的Container底部在一个水平线上,这也印证了Baseline的布局行为。
1.5 源码解析
const Baseline({
  Key key,
  @required this.baseline,
  @required this.baselineType,
  Widget child
})
1.5.1 属性解析
baseline:baseline数值,必须要有,从顶部算。
baselineType:bseline类型,也是必须要有的,目前有两种类型:
alphabetic:对齐字符底部的水平线;
ideographic:对齐表意字符的水平线。
1.5.2 源码
我们来看看源码中具体计算尺寸的这段代码
child.layout(constraints.loosen(), parentUsesSize: true);
final double childBaseline = child.getDistanceToBaseline(baselineType);
final double actualBaseline = baseline;
final double top = actualBaseline - childBaseline;
final BoxParentData childParentData = child.parentData;
childParentData.offset = new Offset(0.0, top);
final Size childSize = child.size;
size = constraints.constrain(new Size(childSize.width, top + childSize.height));
getDistanceToBaseline这个函数是获取baseline数值的,存在的话,就取这个值,不存在的话,则取其高度。
整体的计算过程:
获取child的 baseline 值;
计算出top值,其为 baseline - childBaseline,这个值有可能为负数;
计算出Baseline控件尺寸,宽度为child的,高度则为 top + childSize.height。
1.6 使用场景
跟字符对齐相关的会用到,其他场景暂时没有想到。
2. FractionallySizedBox
A widget that sizes its child to a fraction of the total available space
2.1 简介
FractionallySizedBox控件会根据现有空间,来调整child的尺寸,所以说child就算设置了具体的尺寸数值,也不起作用。
2.2 布局行为
FractionallySizedBox的布局行为主要跟它的宽高因子两个参数有关,当参数为null或者有具体数值的时候,布局表现不一样。当然,还有一个辅助参数alignment,作为对齐方式进行布局。
当设置了具体的宽高因子,具体的宽高则根据现有空间宽高 * 因子,有可能会超出父控件的范围,当宽高因子大于1的时候;
当没有设置宽高因子,则填满可用区域;
2.3 继承关系
Object > Diagnosticable > DiagnosticableTree > Widget > RenderObjectWidget > SingleChildRenderObjectWidget > FractionallySizedBox2.4 示例代码
new Container(
    color: Colors.blue,
    height: 150.0,
    width: 150.0,
    padding: const EdgeInsets.all(10.0),
    child: new FractionallySizedBox(
      alignment: Alignment.topLeft,
      widthFactor: 1.5,
      heightFactor: 0.5,
      child: new Container(
        color: Colors.red,
      ),
    ),
  )
运行效果如下所示
2.5 源码解析
const FractionallySizedBox({
  Key key,
  this.alignment = Alignment.center,
  this.widthFactor,
  this.heightFactor,
  Widget child,
})
2.5.1 属性解析
alignment:对齐方式,不能为null。
widthFactor:宽度因子,跟之前介绍的控件类似,宽度乘以这个值,就是最后的宽度。
heightFactor:高度因子,用作计算最后实际高度的。
其中widthFactor和heightFactor都有一个规则
如果不为null,那么实际的最大宽高度则为child的宽高乘以这个因子;
如果为null,那么child的宽高则会尽量充满整个区域。
2.5.2 源码
FractionallySizedBox内部具体渲染是由RenderFractionallySizedOverflowBox来实现的,通过命名就可以看出,这个控件可能会Overflow。
我们直接看实际计算尺寸的代码
double minWidth = constraints.minWidth;
double maxWidth = constraints.maxWidth;
if (_widthFactor != null) {
  final double width = maxWidth * _widthFactor;
  minWidth = width;
  maxWidth = width;
}
double minHeight = constraints.minHeight;
double maxHeight = constraints.maxHeight;
if (_heightFactor != null) {
  final double height = maxHeight * _heightFactor;
  minHeight = height;
  maxHeight = height;
}
源代码中,根据宽高因子是否存在,来进行相对应的尺寸计算。这个过程非常简单,不再赘述。
2.6 使用场景
当需要在一个区域里面取百分比尺寸的时候,可以使用这个,比方说,高度40%宽度70%的区域。当然,AspectRatio也可以达到近似的效果。
3. IntrinsicHeight
A widget that sizes its child to the child's intrinsic height.
3.1 简介
IntrinsicHeight的作用是调整child到固定的高度。这个控件笔者也是看了很久,不知道它的作用是什么,官方说这个很有用,但是应该尽量少用,因为其效率问题。
3.2 布局行为
这个控件的作用,是将可能高度不受限制的child,调整到一个合适并且合理的尺寸。
3.3 继承关系
Object > Diagnosticable > DiagnosticableTree > Widget > RenderObjectWidget > SingleChildRenderObjectWidget > IntrinsicHeight3.4 示例代码
new IntrinsicHeight(
  child: new Row(
    mainAxisAlignment: MainAxisAlignment.spaceBetween,
    children: [
      new Container(color: Colors.blue, width: 100.0),
      new Container(color: Colors.red, width: 50.0,height: 50.0,),
      new Container(color: Colors.yellow, width: 150.0),
    ],
  ),
);
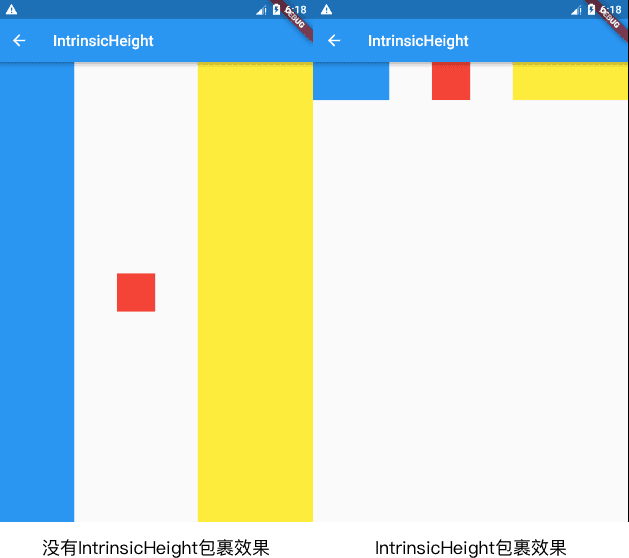
当没有IntrinsicHeight包裹着,可以看到,第一三个Container高度是不受限制的,当外层套一个IntrinsicHeight,第一三个Container高度就调整到第二个一样的高度。
3.5 源码解析
构造函数如下:
const IntrinsicHeight({ Key key, Widget child })3.5.1 属性解析
除了child,没有提供额外的属性。
3.5.2 源码
当child不为null的时候,具体的布局代码如下:
BoxConstraints childConstraints = constraints;
if (!childConstraints.hasTightHeight) {
  final double height = child.getMaxIntrinsicHeight(childConstraints.maxWidth);
  assert(height.isFinite);
  childConstraints = childConstraints.tighten(height: height);
}
child.layout(childConstraints, parentUsesSize: true);
size = child.size;
首先会检测是否只有一个高度值满足约束条件,如果不是的话,则返回一个最小的高度。然后调整尺寸。
3.6 使用场景
说老实话,不知道在什么场景使用,可以替代的控件也有的。谷歌说很有用,效率会有问题,建议一般的就别用了。
4. IntrinsicWidth
A widget that sizes its child to the child's intrinsic width.
4.1 简介
IntrinsicWidth从描述看,跟IntrinsicHeight类似,一个是调整高度,一个是调整宽度。同样是会存在效率问题,能别使用就尽量别使用。
4.2 布局行为
IntrinsicWidth不同于IntrinsicHeight,它包含了额外的两个参数,stepHeight以及stepWidth。而IntrinsicWidth的布局行为跟这两个参数相关。
当stepWidth不是null的时候,child的宽度将会是stepWidth的倍数,当stepWidth值比child最小宽度小的时候,这个值不起作用;
当stepWidth为null的时候,child的宽度是child的最小宽度;
当stepHeight不为null的时候,效果跟stepWidth相同;
当stepHeight为null的时候,高度取最大高度。
4.3 继承关系
Diagnosticable > DiagnosticableTree > Widget > RenderObjectWidget > SingleChildRenderObjectWidget > IntrinsicWidth4.4 示例代码
new Container(
  color: Colors.green,
  padding: const EdgeInsets.all(5.0),
  child: new IntrinsicWidth(
    stepHeight: 450.0,
    stepWidth: 300.0,
    child: new Column(
      children: [
        new Container(color: Colors.blue, height: 100.0),
        new Container(color: Colors.red, width: 150.0, height: 100.0),
        new Container(color: Colors.yellow, height: 150.0,),
      ],
    ),
  ),
)
分别对stepWidth以及stepHeight设置不同的值,可以看到不同的效果,当step值比最小宽高小的时候,这个值其实是不起作用的。感兴趣的同学可以自己试试。
4.5 源码解析
构造函数
const IntrinsicWidth({ Key key, this.stepWidth, this.stepHeight, Widget child })4.5.1 属性解析
stepWidth:可以为null,效果参看上面所说的布局行为。
stepHeight:可以为null,效果参看上面所说的布局行为。
4.5.2 源码
我们先来看看布局代码中_applyStep函数
static double _applyStep(double input, double step) {
assert(input.isFinite);
if (step == null)
  return input;
return (input / step).ceil() * step;
}
如果存在step数值的话,则会是step的倍数,如果step为null,则返回原始的尺寸。
接下来我们看看child不为null时候的布局代码
BoxConstraints childConstraints = constraints;
if (!childConstraints.hasTightWidth) {
  final double width = child.getMaxIntrinsicWidth(childConstraints.maxHeight);
  assert(width.isFinite);
  childConstraints = childConstraints.tighten(width: _applyStep(width, _stepWidth));
}
if (_stepHeight != null) {
  final double height = child.getMaxIntrinsicHeight(childConstraints.maxWidth);
  assert(height.isFinite);
  childConstraints = childConstraints.tighten(height: _applyStep(height, _stepHeight));
}
child.layout(childConstraints, parentUsesSize: true);
size = child.size;
宽度方面的布局跟IntrinsicHeight高度部分相似,只是多了一个step的额外数值。总体的布局表现跟上面分析的布局行为一致,根据step值是否是null来进行判断,但是注意其对待高度与宽度的表现略有差异。
4.6 使用场景
这个控件,说老实话,笔者还是不知道该在什么场景下使用,可能会有些特殊的场景。但是从IntrinsicWidth与IntrinsicHeight布局差异看,Flutter基础控件封的确实很随性,一些可有可无甚至是重复的控件,我觉得精简精简挺好的,哈哈。


