开源代码DLT日志调试过程(linux环境下调试)
一、整体架构
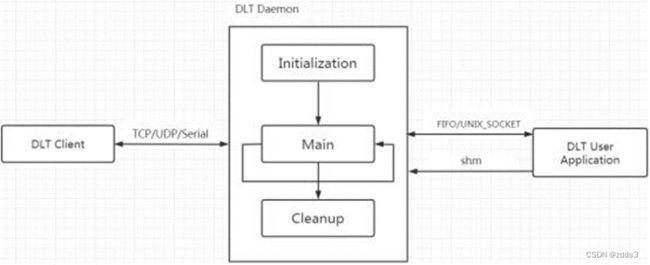
DLT Daemon是一个后台服务程序;DLT Library是用户使用DLT时需要连接的动态库;DLT Client是上位机程序,用于展示日志,比如DLT viewer程序。这三个组件之间的连接方式如下图
二、优缺点
优点:
1、本地存储可以指定缓存多少字节后写磁盘
2、可以动态修改保存的日志等级
3、可以修改dlt.conf来控制是否打印到console
4、可以电脑端用dl-viewer来实时抓取日志并保存
5、性能比较稳定
缺点:
暂时未发现
三、使用说明(ubuntu中调试)
3.1 代码下载与编译过程
获取dlt-daemon源码
git clone https://github.com/GENIVI/dlt-daemon.git
cd dlt-daemon
mkdir build
cd build
apt-get update
apt-get install –y build-essential
cmake ..
make
make install
ldconfig
dlt-daemon编译安装就完成了
注释:在/dlt-daemon/build/src/lib下生成libdlt.so.2.18.8,libdlt.so.2和libdlt.so是软链接文件,如果要适应其他平台,只要交叉编译就好。生成的dlt-daemon在/dlt-daemon/build/src/daemon下
获取dlt-viewer工具
git clone https://github.com/GENIVI/dlt-viewer.git
mkdir build
cd build
apt-get install ros-melodic-qt-create
apt-get install ros-melodic-qt-build
apt-get install libqt5serialport5-dev libudev-dev
cmake ..
make
这时,build/bin目录下就生成了可执行文件dlt-viewer
3.2 构造测试进程
日志等级如下:
example.c内容如下:
#include
#include
DLT_DECLARE_CONTEXT(myContext1);
DLT_DECLARE_CONTEXT(myContext2);
DLT_DECLARE_CONTEXT(myContext3);
int main()
{
DLT_REGISTER_APP(“MAPP”,”Application for Logging”);
DLT_REGISTER_CONTEXT(myContext1,”ai”,”Test1 1 for log”);
DLT_REGISTER_CONTEXT(myContext2,”chen”,”Test2 2 for log”);
DLT_REGISTER_CONTEXT(myContext3,”bo”,”Test3 3 for log”);
DLT_SET_APPLICATION_LL_TS_LIMIT(DLT_LOG_VERBOSE,DLT_TRACE_STATUS_ON);
For (int i = 0; i < 2; i++)
{
DLT_LOG(myContext3,DLT_LOG_FATAL,DLT_STRING(“11111 This is a fatal”),DLT_INT(i));
DLT_LOG(myContext2,DLT_LOG_ERROR,DLT_STRING(“22222 This is a ERROR”),DLT_INT(i));
DLT_LOG(myContext3,DLT_LOG_WARN,DLT_STRING(“3333 This is a WARN”),DLT_INT(i));
DLT_LOG(myContext1,DLT_LOG_INFO,DLT_STRING(“4444 This is a INFO”),DLT_INT(i));
DLT_LOG(myContext3,DLT_LOG_DEBUG,DLT_STRING(“5555 This is a debug”),DLT_INT(i));
DLT_LOG(myContext3,DLT_LOG_VERBOSE,DLT_STRING(“6 This is a VERBOSE”),DLT_INT(i));
}
sleep(3);
DLT_UNREGISTER_CONTEXT(myContext1);
DLT_UNREGISTER_CONTEXT(myContext2);
DLT_UNREGISTER_CONTEXT(myContext3);
DLT_UNREGISTER_APP();
Return 0;
}
说明:1、通过ECU ID来区分模块,比如SOC、NAD
2、先要注册APP,类似于指定进程名字,比如PM
3、再注册CONTEXT,一个APP下可以有多个CONTEXT,这个相当于进程中的应用划分,比如receive
4、如果不使用了,调用解除注册
3.3 本地日志存储
查看/dlt-daemon/doc/dlt_offline_logstorage.md说明文档,进行以下操作:
cd dlt-daemon/src/daemon
cp dlt.conf /etc
vi /etc/dlt.conf
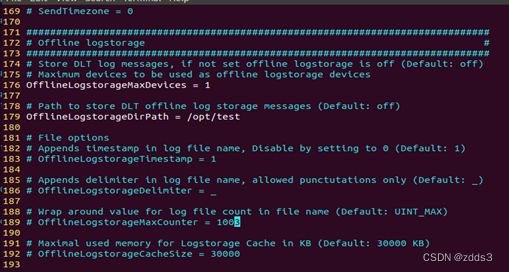
修改dlt.conf:
然后再在offlineLogstorageDirPath路径下创建本地log规则文件:dlt_logstorage.conf
在文件中写入过滤规则:
[Filter
LogAppName=
ContextName=
LogLevel=
File=
FileSize=
NOFiles=
SyncBehavior=
EcuID=
SpecificSize=
注:其中”SyncBehavior”、”EcuID”和”SpecificSize”是可选的,其他的都是必选。
再启动dlt-daemon –c /etc/dlt.conf –d,这样就可以让dlt针对LOG这个app中以TEST为名的log(log等级大于DLT_LOG_WARN)都保存在/opt/test下的dlt文件中
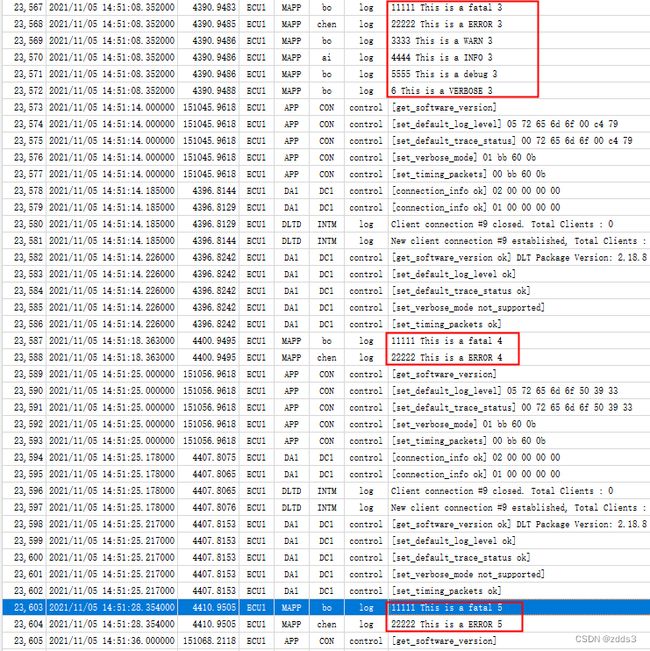
运行测试进程,结果如下:
根据测试,总结如下:
- 根据dlt_logstorage.conf日志来过滤内容
- 当文件数达到最大个数时且文件内容达到最大限制,删除一个最旧的文件,创建一个新的文件
3.4 PC端日志抓取与存储
- 使用的虚拟机跑的ubuntu,该测试使用VMnet1(仅主机模式)
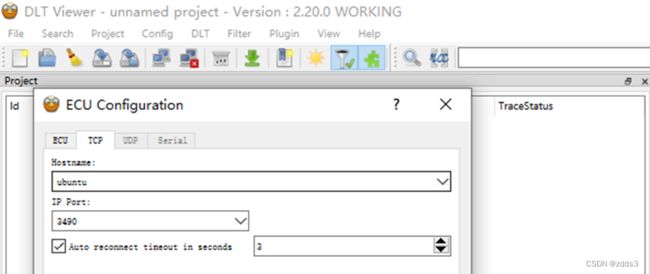
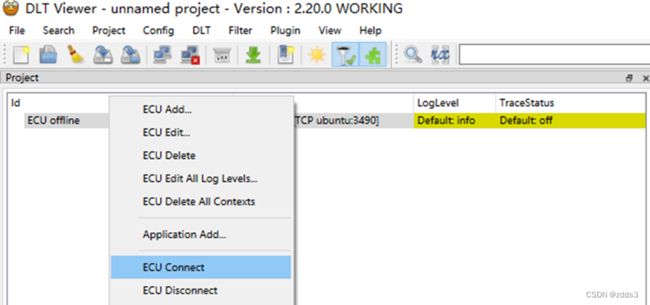
- 电脑端打开dlt-viewer.exe软件
默认dlt-damon的tcp端口默认值是3490
在ubuntu中执行命令,dlt-daemon -c /etc/dlt.conf –d
3.5 前期调试日志输出到console
- dlt-daemon -c /etc/dlt.conf /*注:不要在后台运行*/
- 修改/etc/dlt.conf内容,修改如下内容
运行测试程序,输出如下:
3.6 日志等级动态调整
查看AUTOSAR_SWS_DiagnosticLogAndTrace.pdf中存在修改日志等级的API Dlt_SetLogLevel,但是该开源代码中未有相关函数,经过查看,有控制设置整个模块日志等级的DLT_SET_APPLICATION_LL_TS_LIMIT函数,构造测试程序:
example.c内容如下:
#include
#include
#include
DLT_DECLARE_CONTEXT(myContext1);
DLT_DECLARE_CONTEXT(myContext2);
DLT_DECLARE_CONTEXT(myContext3);
int main()
{
DLT_REGISTER_APP(“MAPP”,”Application for Logging”);
DLT_REGISTER_CONTEXT(myContext1,”ai”,”Test1 1 for log”);
DLT_REGISTER_CONTEXT(myContext2,”chen”,”Test2 2 for log”);
DLT_REGISTER_CONTEXT(myContext3,”bo”,”Test3 3 for log”);
DLT_SET_APPLICATION_LL_TS_LIMIT(DLT_LOG_VERBOSE,DLT_TRACE_STATUS_ON);
For (int i = 0; i < 10; i++)
{
if (0 == access(“/tmp/testfile”,F_OK))
{
printf(“file is exist\n”);
DLT_SET_APPLICATION_LL_TS_LIMIT(DLT_LOG_ERROR,DLT_TRACE_STATUS_ON);
}
else
{
printf(“file is not exist\n”);
}
DLT_LOG(myContext3,DLT_LOG_FATAL,DLT_STRING(“11111 This is a fatal”),DLT_INT(i));
DLT_LOG(myContext2,DLT_LOG_ERROR,DLT_STRING(“22222 This is a ERROR”),DLT_INT(i));
DLT_LOG(myContext3,DLT_LOG_WARN,DLT_STRING(“3333 This is a WARN”),DLT_INT(i));
DLT_LOG(myContext1,DLT_LOG_INFO,DLT_STRING(“4444 This is a INFO”),DLT_INT(i));
DLT_LOG(myContext3,DLT_LOG_DEBUG,DLT_STRING(“5555 This is a debug”),DLT_INT(i));
DLT_LOG(myContext3,DLT_LOG_VERBOSE,DLT_STRING(“6 This is a VERBOSE”),DLT_INT(i));
sleep(10);
}
sleep(3);
DLT_UNREGISTER_CONTEXT(myContext1);
DLT_UNREGISTER_CONTEXT(myContext2);
DLT_UNREGISTER_CONTEXT(myContext3);
DLT_UNREGISTER_APP();
Return 0;
}
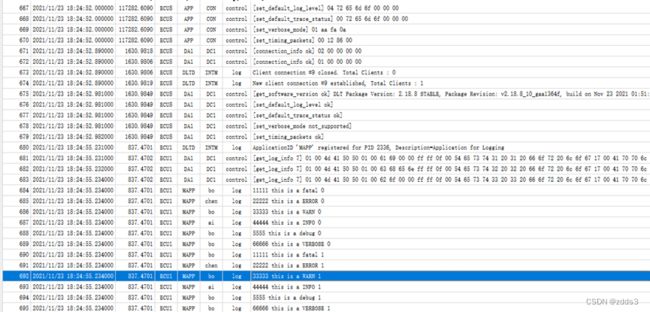
运行程序,在输入命令touch /tmp/ testfile,查看dlt-viewer抓取的内容如下:
可以实现动态修改
注:这是一次性,永久修改等级,需要调整文件
3.7 网关功能
说明:
如果存在多个passive Mode(即多个模块,比如SOC、NAD、MCU都使用),那么需要配置一个网关,把这些模块的日志统一由网关输出,dlt viewer直接连接网关即可收集这些模块的日志。
配置:
使用两个虚拟机(仅主机模式VMnet1)
虚拟机1的IP为192.168.94.131,将dlt.conf中ECUId=1,这里不开启网关功能
虚拟机2的IP为192.168.94.132,将dlt.conf中ECUId=8,将Gateway Configuration内容打开,开启网关功能,内容如下:
在虚拟机2中/etc下创建dlt_gateway.conf
[PassiveNode
IPaddress #必须字段 模块的IP
Port #为其端口号,默认端口号是3490
EcuID #必须字段 是该模块的ECUID,在dlt.conf中配置
Connect #网关端连接模块节点的方式
Timeout #网关与模块建立连接的超时时间(配置为0为无休止连接)
SendControl #网关端与模块端建立后发给模块端的消息
DLT_SERVICE_ID_GET_LOG_INFO 0x03
DLT_SERVICE_ID_GET_DEFAULT_LOG_LEVEL 0x04
DLT_SERVICE_ID_GET_SOFTWARE_VERSION 0x13
SendSerialHeader #控制消息带串行头
SendPeriodicControl #定期发送下面的控制信息
格式:control:interval[in seconds]
注:参考dlt_gateway.conf.5.md文档
验证过程:
1、启动虚拟机1中dlt-daemon:
dlt-daemon –c /etc/dlt.conf -d
2、启动虚拟机2网关端的dlt-daemon:
dlt-daemon –c /etc/dlt.conf -d
3、启动windows上的DLT Viewer软件
Hostname使用虚拟机2(网关端)的主机名
4、在虚拟机1中执行测试程序,发送dlt日志
Dlt-viewer目前连接的是ECU8(网关端),但却打印ECU1的日志,证明网关功能已经成功
3.8 Verbose与Non-Verbose模式
介绍:
程序默认使用Verbose模式,如果需要使用Non-Verbose模式,那么日志打印前需要调用
DLT_NONVERBOSE_MODE()来切换;
注:参考dlt_for_developers.md ### Logging command
验证过程:
Non-Verbose模式验证,测试代码如下:
DLT_NONVERBOSE_MODE();
DLT_LOG_ID(myContext3,DLT_LOG_FATAL,42,DLT_STRING(“00000 this is a fatal”),DLT_UNIT8(18));
生成的日志大小为71字节
Verbose模式验证,测试代码如下:
DLT_VERBOSE_MODE();
DLT_LOG(myContext3,DLT_LOG_FATAL,DLT_STRING(“00000 this is a fatal”),DLT_UNIT8(18));
生成的日志大小为75字节
经过多组测试发现Non-Verbose模式的日志比Verbose节省空间
日志内容:
使用dlt-viewer查看,相同的一条日志,verbose模式非常直观,non-verbose打印的内容不直观(需要生成插件)
3.9 DLT Injection功能
介绍:
默认情况下是允许Injection(配置在dlt.conf的InjectionMode)
注:参考dlt_for_developers.md ## DLT Injection Messages
验证过程:
1、启dlt-daemon程序
dlt-daemon –c /etc/dlt.conf
2、启一个测试程序一直跑在那(appId:MAPP ContextId:ai)
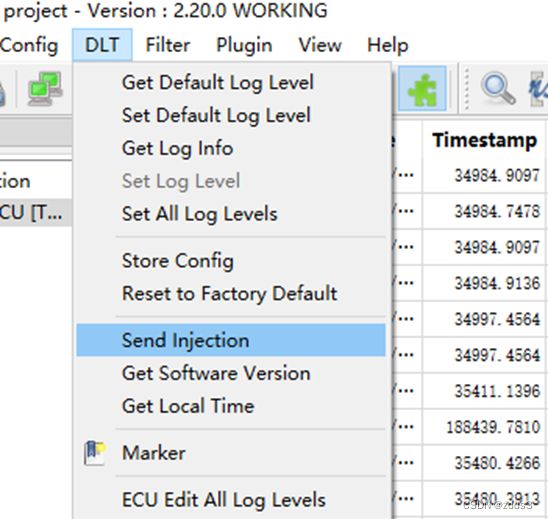
3、启动DLT-Viewer
可以看出injection成功
3.10 syslog适配器
1、apt install libsystemd-dev 命令安装 libsystemd-dev 包
2、CMakeLists.txt 的64行将WITH_DLT_SYSTEM置为ON,重新编译dlt-daemon
3、将dlt-system.conf拷入/etc下,内容如下:
4、/etc/rsyslog.d/50-default.conf下增加*.* @localhost:47111
sudo systemctl restart rsyslog.service
5、运行dlt-daemon、dlt-system
dlt-daemon –c /etc/dlt.conf -d
dlt-system –c /etc/dlt-system.conf –d
6、运行测试程序
7、查看结果
3.11 Systemd Journal适应器
1、CMakeLists.txt 的50行将WITH_DLT_JOURNAL置为ON, 重新编译dlt-daemon
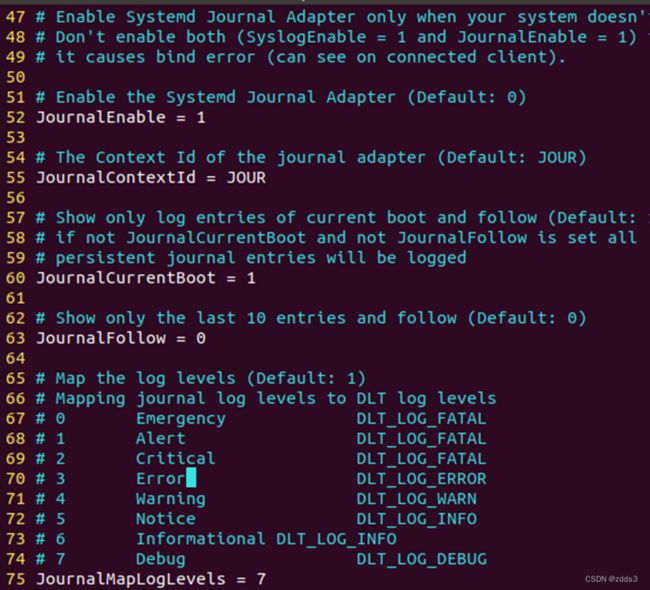
2、修改/etc下的dlt-system.conf,如下
3、运行dlt-daemon、dlt-system
dlt-daemon –c /etc/dlt.conf -d
dlt-system –c /etc/dlt-system.conf –d
4、运行测试程序
5、查看结果

