使用OSS搭建私有云内网yum仓库的方法
使用OSS搭建私有云内网yum仓库的方法
文字&图片内容已脱敏
#、前几天接到一个搭建内网yum源的任务。刚接到这个任务的时候还是比较头疼的,因为内部有很多VPC。VPC与VPC之间是不互通的,又不能打高速通道,也不可能每个VPC下边都建一个yum仓库,也很不现实!
#、我想到了两种方法:
一、在任意VPC下建一个ECS,然后创建一个公共读的OSS作为yum源,因为OSS可以设置不绑定VPC,这样的话任意VPC下的ECS都可以去访问它了。
二、在任意VPC下建一个ECS作为yum源,然后绑定一个内网SLB。内网机器通过访问SLB到后端的ECS上拉取软件包。

#、这里我选择了第一种方法。因为是内网环境,在自己的电脑上下载了VMware,安装了Anolis7/8的系统,通过VM虚拟机访问公网,下载所有rpm包(网速太慢了。。。下了3天),拷包到内网oss,形成一个yum仓库后为内网机器提供yum源。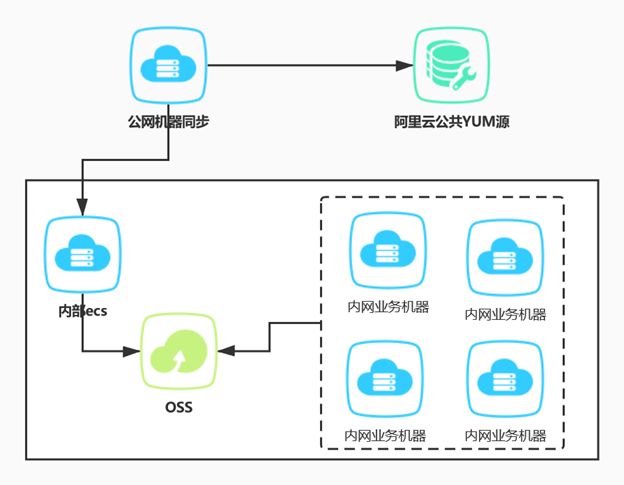
一、环境准备
1.1、资源申请
#1、 申请一台ECS
配置为:
anolis8.6-X86系统、4C8G+SSD100GB+高效云盘500GB

#2、申请一台OSS
配置为:500GB
1.2、下载公共yum源
#、准备公网机器
1、因现场环境不能连外网。在自己的电脑上安装的VMware虚拟机,安装的Anolis7/8系统。硬盘空间500G,挂载到/home/目录。连接外网,下载yum源

2、检查是否能正常请求公共yum源:
ping www.baidu.com

3、安装包下载工具(该工具是YUM工具包的子集)
yum install -y yum-utils

4、启用epel软件源
yum install -y  epel-release
1.2.1、Anolis7下载
reposync -r $(源名称) -p $(下载目录)
#、使用方法示例:
[root@anolis7 ~]# reposync -r base -p /home/anolis7/

#、参数解释:
-r :指定本地已经配置的yum仓库的repo源名称
-p :指定下载的文件保存路径
1.2.2、Anolis8下载
#、使用方法示例:
[root@anolis8 ~]# reposync --repo BaseOS -p /home/anolis8/

#、参数解释:
--repo :指定本地已经配置的yum仓库的repo源名称
-p :指定下载的文件保存路径
二、配置步骤
2.1、安装createrepo工具
#、createrepo是一个对rpm文件进行索引建立的工具。 大体功能就是对指定目录下的rpm文件进行检索,把每个rpm文件的信息存储到指定的索引文件中,这样方便远程yum命令在安装更新时进行检索。
yum install -y createrepo
2.2、安装python2
#、createrepo工具需要用python2使用
yum install -y python2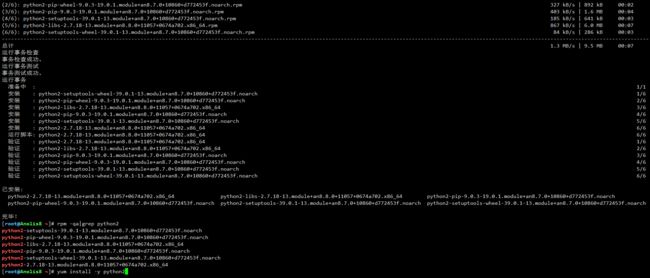
2.3、索引建立
#1、yum软件包下载完成后,进入对应的软件包存放的目录执行索引建立命令
#、使用方法示例:
[root@anolis7 ~]# cd /home/Anolis7.9/os/Packages/
[root@anolis7 /home/Anolis7.9/os/Packages]# createrepo .

#2、等待一会儿,软件包比较多的话,执行时间比较长。
索引建立完成后会出现一个`repodata`目录,里面存放检索文件repomd.xml

#3、注意!!每个源目录下的Packages/目录下都要执行`createrepo .`命令创建索引。没有软件包的无需创建,删除空目录即可
2.4、打包yum软件包目录,上传至内网机中
 tar -zcvf Anolis7.tar.gz /home/Anolis7.9
tar -zcvf Anolis8.tar.gz /home/Anolis8.62.5、下载ossutil工具上传到内网机器中并配置
https://gosspublic.alicdn.com/ossutil/1.7.1/ossutil642.5.1、安装ossutil工具
#、将下载好的ossutil工具上传到内网机器中,然后执行以下命令
chmod +x ossutil64
mv ossutil64 /usr/local/bin/
2.5.2、配置ossutil工具(交互式配置)
#、根据提示配置:oss endpoint、accessKeyID、accessKeySecret信息,其它默认回车即可
ossutil64 config

The command creates a configuration file and stores credentials.
Please enter the config file name,the file name can include path(default /root/.ossutilconfig, carriage return will use the default file. If you specified this option to other file, you should specify --config-file option to the file when you use other commands):
No config file entered, will use the default config file /root/.ossutilconfig
For the following settings, carriage return means skip the configuration. Please try "help config" to see the meaning of the settings
Please enter language(CH/EN, default is:EN, the configuration will go into effect after the command successfully executed):
Please enter endpoint:·`xxxxxxxxxxxxxxxx`
Please enter accessKeyID:`xxxxxxxxxxxx`
Please enter accessKeySecret:`xxxxxxxxxxxx`
Please enter stsToken: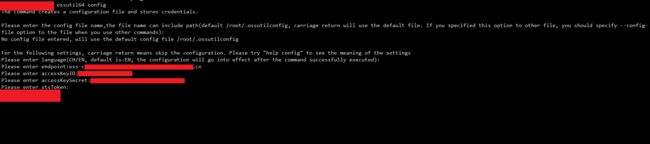
2.5.3、确认配置是否正确,执行以下命令是否能正常返回oss的bucket
ossutil64 ls oss://test

#、注意://test请替换为对应的bucket
2.6、解压上传的tar包
tar xvf Anolis7.tar.gz -C /home/anolis7-x86/
tar xvf Anolis8.tar.gz -C /home/anolis8-x86/
2.7、上传包到公开读的oss
ossutil64 cp -r home/ oss://$(bucket)/mirrors/
2.8、客户端修改环境yum配置
2.8.1、登录到分配的 ECS云主机系统后,执行如下命令:
cd /etc/
mv /etc/yum.repos.d /etc/yum.repos.d.bak
mkdir /etc/yum.repos.d
cd /etc/yum.repos.d
2.8.2、Anolis7使用以下配置:
cat >> /etc/yum.repos.d/store.repo <2.8.3、Anolis8使用以下配置:
三、验证方法
3.1、客户端确认yum源可用
3.1.1、 执行以下命令清空缓存并创建
cat >> /etc/yum.repos.d/store.repo <Anolis7

Anolis8

3.2、执行yum repolist可以看到如下信息即为正常
yum repolistAnolis7

Anolis8

3.3、回退方法
#、执行已下命令:
cd /etc/
rm -rf yum.repos.d
mv yum.repos.d.bak/ yum.repos.d文章转载自:kirin(麒麟)
原文链接:https://www.cnblogs.com/kirin365/p/17860778.html