阿里的easyexcal包实现表格动态导出
阿里的easyexcal包实现表格动态导出
1.介绍
在日常开发中,我们或多或少会遇到导入excal,导出excal等业务需求,那么了解这一技能就很有必要了。
市场中针对这个,我知道的有两个包,一个是poi(Poor Obfuscation Implementation),一个是easyexcal(阿里的);但poi存在oom内存溢出的风险,在正式环境中,导出的数据往往成千上万条,很容易就触发oom,所以,一般情况下公司都不建议使用poi,阿里的easyexcal包的底层实现也是使用了poi,也就是说easyexcal是对poi的进一步封装改造,成功规避了oom。
2.场景需求
现在有一个需求:实现表头信息动态,表数据动态,表中单元格具有各自的样式(比如背景颜色,字体样式,字体颜色等)。
3.设计方案思路
我这里使用easyexcal包实现该需求,首先注意表头信息是变动的,那也就意味着没法使用easyexcal的一系列注解(就是常规的先创建一个导出的实体类,然后再加注解),这里有个坑:我最开始的想法是,创建包含所有表头信息的导出实体,然后通过反射的技术对具体需要展示的表头字段进行标识,然后发现easyexcal中的注解@ExcelIgnore 忽略项是没有value属性的,这样就出现了尴尬的情况:反射能给字段添加或删除注解吗???,我查了很多资料,最后是没找到,应该不能实现添加或删除,但给注解中的属性值修改是可以做到的,但@ExcelIgnore没有属性供我们修改,至此,该方法行不通了;然后我看了easyexcal源码,大致知道了导出excal的流程:先渲染表头,再渲染数据,他们都是一个个单元格,每一个单元格有自己的行列数,一个excal表就是由一个个单元格以此拼接起来的。于是,我就使用单独给表头数据,表体数据,需要给单元格加样式的行列坐标数据和样式数据。需要注意的是表头和表体数据格式是二维数组,我是用list中套list,外层list中的元素是一行,内部list中的元素是列。
4.具体代码实现
我这里分别使用了3.0.5和2.2.8的easyexcal包,需要注意的是3.0版本之前和之后有较大改动,其实现的方法不一样,注意:以下案例在springboot项目中实现
4.1easyexcal3.0.5版本实现代码
4.1.1导核心依赖
            com.alibaba
            easyexcel
            3.0.5
4.1.2写一个类继承AbstractCellWriteHandler或者也可以实现CellWriteHandler接口
public class MyCellStyleWriteHandler extends AbstractCellWriteHandler {
    private List xyInfo;
    /*
    给样式模板两个
     */
    private CellStyle style1;
    private CellStyle style2;
    public MyCellStyleWriteHandler(){

    }
    public MyCellStyleWriteHandler(List xyInfo){
        this.xyInfo=xyInfo;
    }
    @Override
    public void beforeCellCreate(WriteSheetHolder writeSheetHolder, WriteTableHolder writeTableHolder,
                                 Row row, Head head, Integer columnIndex, Integer relativeRowIndex, Boolean isHead) {
        // 设置行高测试
    }

    @Override
    public void afterCellDispose(CellWriteHandlerContext context) {
        Cell cell = context.getCell();
        // 拿到poi的workbook
        Workbook workbook = context.getWriteWorkbookHolder().getWorkbook();
        // 自定义宽度处理

        // 自定义样式处理
        // 当前事件会在 数据设置到poi的cell里面才会回调
        // 判断不是头的情况 如果是fill 的情况 这里会==null 所以用not true
        if (BooleanUtils.isNotTrue(context.getHead())) {
            //循环样式信息,进行横纵坐标的匹配,给对应的单元格样式
            for (XyInfo item:xyInfo
                 ) {
                if (cell.getRowIndex() == item.getX() && cell.getColumnIndex() == item.getY()) {
                    //现在已经锁定的单元格,下面只需要给样式
                    //样式: 1:红字,紫色背景;2:黄字,红色背景
                    // 这里千万记住 想办法能复用的地方把他缓存起来 一个表格最多创建6W个样式,我这就直接样式模板化,避免其发生
                    if(item.getContent()==1){
                        cell.setCellStyle(this.getCellStyle(workbook,1));
                    }
                    if(item.getContent()==2){
                        cell.setCellStyle(this.getCellStyle(workbook,2));
                    }
                    // 由于这里没有指定dataformat 最后展示的数据 格式可能会不太正确
                    // 这里要把 WriteCellData的样式清空, 不然后面还有一个拦截器 FillStyleCellWriteHandler 默认会将 WriteCellStyle 设置到
                    // cell里面去 会导致自己设置的不一样(很关键)
                    context.getFirstCellData().setWriteCellStyle(null);
                }
            }
        }
    }
    //优化代码,给个样式方法
    /**
     *  对于可确定的样式,进行样式模板化,避免每一个单元格都创建一个样式
     * @param workbook 工作簿对象
     * @param content 具体设置样式信息
     * @return
     */
    public CellStyle getCellStyle(Workbook workbook,Integer content){
        //样式: 1:红字,紫色背景;2:黄字,红色背景
        if(null==this.style1 && content==1){
            //避免多次创建
            //这里有个坑:我最初的想法是自己创建CellStyle 对象,通过new的方式,然后这个地方不认他,设置完全不起效果,所以这里只能从weekbook中拿。
            style1=workbook.createCellStyle();
            Font font=workbook.createFont();
            //红字
            font.setColor((short)016);
            //蓝色背景
            style1.setFillForegroundColor((short)030);
            //加载字体
            style1.setFont(font);
            // 这里需要指定 FillPatternType 为FillPatternType.SOLID_FOREGROUND
            style1.setFillPattern(FillPatternType.SOLID_FOREGROUND);
        }
        if(null==style2 && content==2){
            //避免多次创建
            style2=workbook.createCellStyle();
            Font font=workbook.createFont();
            //白字
            font.setColor((short)011);
            //红色背景
            style2.setFillForegroundColor((short)016);
            //加载字体
            style2.setFont(font);
            // 这里需要指定 FillPatternType 为FillPatternType.SOLID_FOREGROUND
            style2.setFillPattern(FillPatternType.SOLID_FOREGROUND);
        }
        //返回样式模板
        if(content==1){
            return this.style1;
        }
        if (content==2){
            return this.style2;
        }
        return null;
    }
}
4.1.3导出关键代码
public class Test9 {
    public static void main(String[] args) {

        //你要导出的文件存放路径和文件名字
        String filePath = "D:\\ttt\\Download\\";
        String fileName=System.currentTimeMillis() + ".xlsx";
        File file = new File(filePath);
        if (!file.exists()){
            file.mkdirs();
        }
        //解析表头容器
        List>headss=new LinkedList<>();
        //解析数据容器
        List>datas=new LinkedList<>();
        //解析单元格样式容器
        ListxyInfo=new LinkedList<>();
        //手动添加假数据模拟真实数据(表头信息)
        headss.add( new ArrayList(new LinkedList(Arrays.asList("A","AA"))));
        headss.add( new ArrayList(new LinkedList(Arrays.asList("B","AAA"))));
        headss.add( new ArrayList(new LinkedList(Arrays.asList("C","A2","A3","A4"))));
        //手动添加假数据模拟真实数据(标体数据)
        datas.add(new LinkedList(Arrays.asList("aaa","bbb","")));
        datas.add(new LinkedList(Arrays.asList("aaa","bbb","ccc")));
        datas.add(new LinkedList(Arrays.asList("aaa","","")));
        //手动添加需要设置样式的单元格信息
        xyInfo.add(new XyInfo(6,0,1));
        xyInfo.add(new XyInfo(5,1,2));
        EasyExcel.write(filePath+fileName)
                // 这里放入动态头
                .head(headss).sheet("模板(sheet名字)")
                //加载单元格样式
                .registerWriteHandler(new MyCellStyleWriteHandler(xyInfo))
                .doWrite(datas);
        System.out.println("导出成功");
    }
}
XyInfo实体类
@Data
public class XyInfo {
    /**
     * 行
     */
    private Integer x=0;
    /**
     * 列
     */
    private Integer y=0;
    /**
     *   样式: 1:红字,紫色背景;2:黄字,红色背景
     */
    private Integer content;
    public XyInfo(Integer x,Integer y,Integer content){
        this.x=x;
        this.y=y;
        this.content=content;
    }
}
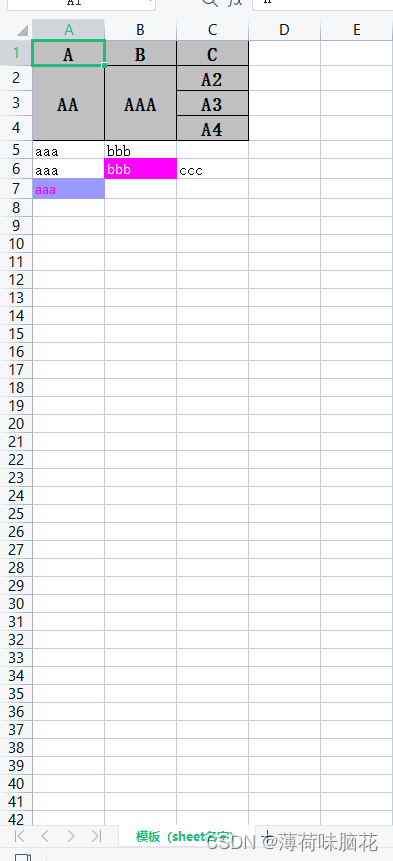
4.1.4效果展示


4.2easyexcal2.2.8版本实现代码
4.2.1导核心依赖
            com.alibaba
            easyexcel
            2.2.8
4.2.2写一个类实现CellWriteHandler接口
public class My2 implements CellWriteHandler {
    private List xyInfo;
    /*
    给样式模板两个
     */
    private CellStyle style1;
    private CellStyle style2;
    public My2(List xyInfo){
        this.xyInfo=xyInfo;
    }
    /**
     * 在创建单元格之前调用
     */
    @Override
    public void beforeCellCreate(WriteSheetHolder writeSheetHolder, WriteTableHolder writeTableHolder, Row row, Head head, Integer columnIndex, Integer relativeRowIndex, Boolean isHead) {
    }

    /**
     * 在单元格创建后调用
     */
    @Override
    public void afterCellCreate(WriteSheetHolder writeSheetHolder, WriteTableHolder writeTableHolder, Cell cell, Head head, Integer relativeRowIndex, Boolean isHead) {
    }

    /**
     * 在单元上的所有操作完成后调用
     */
    @Override
    public void afterCellDispose(WriteSheetHolder writeSheetHolder, WriteTableHolder writeTableHolder, List> cellDataList, Cell cell, Head head, Integer relativeRowIndex, Boolean isHead) {
        // 拿到poi的workbook
        Workbook workbook = cell.getSheet().getWorkbook();
        // 自定义宽度处理

        // 自定义样式处理
        // 当前事件会在 数据设置到poi的cell里面才会回调
        // 判断不是头的情况 如果是fill 的情况 这里会==null 所以用not true
            //循环样式信息,进行横纵坐标的匹配,给对应的单元格样式
            for (XyInfo item:xyInfo
            ) {
                if (cell.getRowIndex() == item.getX() && cell.getColumnIndex() == item.getY()) {
                    //现在已经锁定的单元格,下面只需要给样式
                    //样式: 1:红字,紫色背景;2:黄字,红色背景
                    // 这里千万记住 想办法能复用的地方把他缓存起来 一个表格最多创建6W个样式,我这就直接样式模板化,避免其发生
                    if(item.getContent()==1){
                        cell.setCellStyle(this.getCellStyle(workbook,1));
                    }
                    if(item.getContent()==2){
                        cell.setCellStyle(this.getCellStyle(workbook,2));
                    }
                }
            }
    }
    //优化代码,给个样式方法
    /**
     *  对于可确定的样式,进行样式模板化,避免每一个单元格都创建一个样式
     * @param workbook 工作簿对象
     * @param content 具体设置样式信息
     * @return
     */
    public CellStyle getCellStyle(Workbook workbook,Integer content){
        //样式: 1:红字,紫色背景;2:黄字,红色背景
        if(null==this.style1 && content==1){
            //避免多次创建
            style1=workbook.createCellStyle();
            Font font=workbook.createFont();
            //红字
            font.setColor((short)016);
            //蓝色背景
            style1.setFillForegroundColor((short)030);
            //加载字体
            style1.setFont(font);
            // 这里需要指定 FillPatternType 为FillPatternType.SOLID_FOREGROUND
            style1.setFillPattern(FillPatternType.SOLID_FOREGROUND);
        }
        if(null==style2 && content==2){
            //避免多次创建
            style2=workbook.createCellStyle();
            Font font=workbook.createFont();
            //白字
            font.setColor((short)011);
            //红色背景
            style2.setFillForegroundColor((short)016);
            //加载字体
            style2.setFont(font);
            // 这里需要指定 FillPatternType 为FillPatternType.SOLID_FOREGROUND
            style2.setFillPattern(FillPatternType.SOLID_FOREGROUND);
        }
        //返回样式模板
        if(content==1){
            return this.style1;
        }
        if (content==2){
            return this.style2;
        }
        return null;
    }
}
4.2.3导出关键代码
public class Test10 {
    public static void main(String[] args) {

        //你要导出的文件存放路径和文件名字
        String filePath = "D:\\ttt\\Download\\";
        String fileName=System.currentTimeMillis() + ".xlsx";
        File file = new File(filePath);
        if (!file.exists()){
            file.mkdirs();
        }
        //解析表头容器
        List>headss=new LinkedList<>();
        //解析数据容器
        List>datas=new LinkedList<>();
        //解析单元格样式容器
        ListxyInfo=new LinkedList<>();
        //手动添加假数据模拟真实数据(表头信息)
        headss.add( new ArrayList(new LinkedList(Arrays.asList("A","AA"))));
        headss.add( new ArrayList(new LinkedList(Arrays.asList("B","AAA"))));
        headss.add( new ArrayList(new LinkedList(Arrays.asList("C","A2","A3","A4"))));
        //手动添加假数据模拟真实数据(标体数据)
        datas.add(new LinkedList(Arrays.asList("aaa","bbb","")));
        datas.add(new LinkedList(Arrays.asList("aaa","bbb","ccc")));
        datas.add(new LinkedList(Arrays.asList("aaa","","")));
        //手动添加需要设置样式的单元格信息
        xyInfo.add(new XyInfo(6,0,1));
        xyInfo.add(new XyInfo(5,1,2));
        EasyExcel.write(filePath+fileName)
                // 这里放入动态头
                .head(headss).sheet("模板(sheet名字)")
                //加载单元格样式
                .registerWriteHandler(new My2(xyInfo))
                .doWrite(datas);
        System.out.println("导出成功");
    }
}
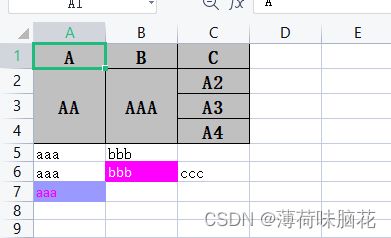
4.2.3效果展示


5.总结
到此,该需求基本实现,现在就简单说说easyexcal包中的技术,使用了拦截器技术,aop思想,动态代理等,具体的,我后续会做整理,目前还在研究源码,最后希望此文章能给你带来灵感。