SpringSecurity原理剖析及其实战(一)
SpringSecurity原理剖析及其实战(一)
- 1.Spring Security介绍
-
- 1.1 Spring Security定义
- 1.2Spring Security和Shiro比较
- 1.3 Spring Security模块
- 2 Spring Security使用
-
- 2.1 用户身份认证
- 2.2设置用户名密码
1.Spring Security介绍
1.1 Spring Security定义
Spring Security是一个能够为基于Spring的企业应用系统提供声明式的安全访问控制解决方案的安全框架。Spring Security主要实现了Authentication(认证,解决who are you?)和AccessControl(访问控制,也就是what are you allowed to do?,也称为Authorization)。Spring Security在架构上将认证与授权分离,并提供了扩展点。
FROM 《Spring Security 官网》
Spring Security is a powerful and highly customizable authentication and access-control framework. It is the de-facto standard for securing Spring-based applications. Spring Security 是一个功能强大且高度可定制的身份验证和访问控制框架。它是用于保护基于 Spring 的 应用程序。
Spring Security is a framework that focuses on providing both authentication and authorization to Java applications. Like all Spring projects, the real power of Spring Security is found in how easily it can be extended to meet custom requirements Spring Security 是一 个框架,侧重于为 Java 应用程序提供身份验证和授权。与所有 Spring 项目一样,Spring 安全性 的真正强大之处,在于它很容易扩展以满足定制需求。
认证(Authentication):用户认证就是判断一个用户的身份是否合法的过程,用户去访问系统资源时系统要求验证用户的身份信息,身份合法方可继续访问,不合法则拒绝访问。常见的用户身份认证方式用:用户名密码登录,二维码登录,手机短信登录,指纹认证等方式。
授权(Authorization):授权是用户认证通过根据用户的权限来控制用户访问资源的过程,拥有资源的访问权限则正常访问,没有权限则拒绝访问。
1.2Spring Security和Shiro比较
在java生态中,目前有Spring Security和Apache shiro两个安全框架,可以完成认证和授权的功能。
- Spring Security
- Apache Shiro: 一个功能强大且易于使用的java安全框架,提供了认证,授权,加密,和会话管理。
相同点:
1:认证功能
2:授权功能
3:加密功能
4:会话管理
5:缓存支持
6:rememberMe功能.....
不同点:
优点:
1:Spring Security基于Srpring开发,项目中如果使用Spring作为基础,配合Spring Security做权限更加方便,而Shiro需要和Spring进行整合开发
2:Spring Security功能比Shiro更加丰富些,例如安全防护
3:Spring Security社区资源比Shiro丰富
缺点:
1:Shiro的配置和使用比较简单,Spring Security上手复杂
2:Shiro依赖性低,不需要任何框架和容器,可以独立运行,而Spring Security依赖于Spring容器,一般来说,常见的安全管理技术栈的组合是这样的:  SSM + Shiro • Spring Boot/Spring Cloud + Spring Security
1.3 Spring Security模块
- 核心模块 - spring -security-core.jar:包含核心验证和访问控制类和接口,远程支持的基本配置API,是基本模块
- 远程调用 - spring-security-remoting.jar:提供与 Spring Remoting 集成
- 网页 - spring-security-web.jar:包括网站安全的模块,提供网站认证服务和基于URL访问控制
- 配置 - spring-security-config.jar:包含安全命令空间解析代码,若使用XML进行配置则需要
- LDAP - spring-security-ldap.jar:LDAP 验证和配置,若需要LDAP验证和管理LDAP用户实体
- ACL访问控制表 - spring-security-acl.jar:ACL(Access Control List)专门领域对象的实现
- CAS - spring-security-cas.jar:CAS(Central Authentication Service)客户端继承,若想用CAS的 SSO服务器网页验证
- OpenID - spring-security-openid.jar:OpenID网页验证支持
- Test - spring-security-test.jar:支持Spring Security的测试
2 Spring Security使用
2.1 用户身份认证
快速开始
废话到此为止,下面正式开始
创建项目 - 引入依赖 - 编写controller - 运行。。。
-
- 使用idea打开文件夹并创建服务
-
- 点击Next,展开Web下拉并勾选Spring Web,展开Security并勾选Spring Security,这样的话就免去了导入依赖的操作
- 点击Next,展开Web下拉并勾选Spring Web,展开Security并勾选Spring Security,这样的话就免去了导入依赖的操作
-
- 点开我们可以看到依赖都已经帮我们导好了,下面的报红是idea缓存问题,我们只需要点开 File - Invalidate Caches清理一下缓存即可
- 使用idea打开文件夹并创建服务
(依赖引入如下:)
 <dependency>
    <groupId>org.springframework.bootgroupId>
    <artifactId>spring-boot-starter-webartifactId>
dependency>
 <dependency>
    <groupId>org.springframework.bootgroupId>
    <artifactId>spring-boot-starter-securityartifactId>
dependency>
上面是创建服务基本教程,下面正式开始。。。
编写controller
@RestController
@RequestMapping("/admin")
public class AdminController {
    @GetMapping("/demo")
    public String demo() {
        return "spring security demo";
    }
}
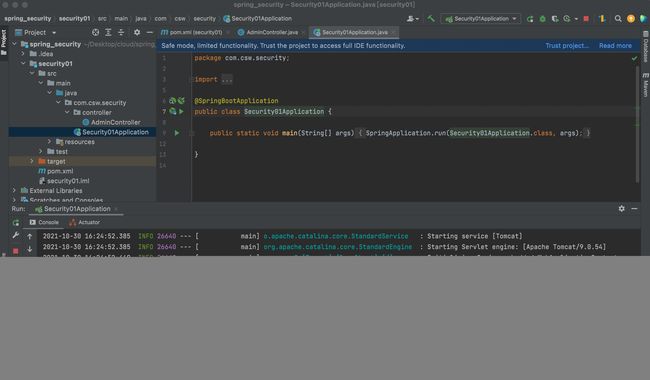
在浏览器上输入:http://localhost:8080/login说明我们项目运行成功,注意:(Spring Security默认用户名是User,密码是上图运行项目时控制台日志生成的 password :3c532ef0-6ce4-463c-9079-99a4ac302e2c)如下图:
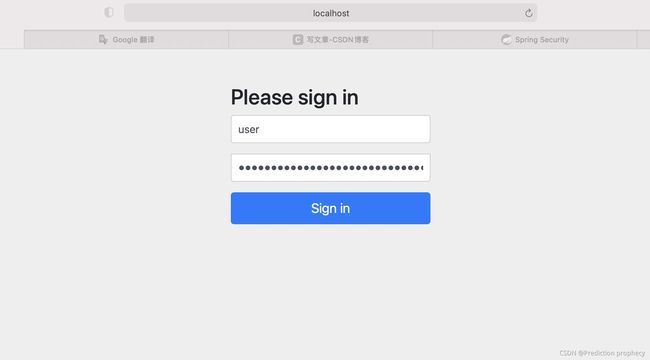
登录认证服务器(Authentication) 成功之后如下:

到这里说明我们基本的Spring Security已经成功认证(Authentication),下面我将介绍我们自定义登录模式
2.2设置用户名密码
基于application.yaml
spring:
  # Spring Security 配置项,对应 SecurityProperties 配置类
  security:
    # 配置默认的 InMemoryUserDetailsManager 的用户账号与密码。
    user:
      name: chengsw # 账号
      password: 123456  # 密码
      roles: AMIND # 拥有角色
原理:
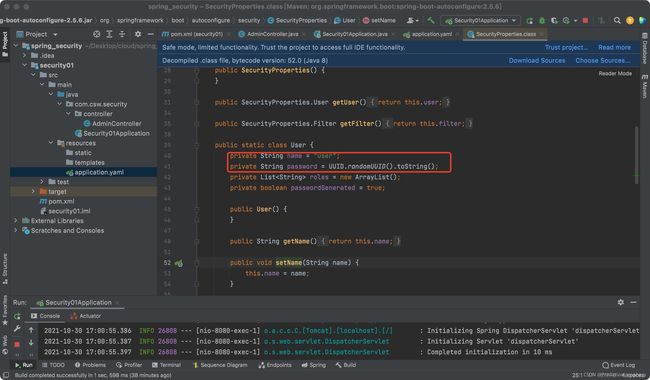
默认情况下,UserDetailsServiceAutoConfiguration自动化配置类,会创建一个内存级别的 InMemoryUserDetailsManager对象,提供认证的用户信息。
- 添加 spring.security.user 配置项,UserDetailsServiceAutoConfiguration 会基于配置 的信息在内存中创建一个用户User。
- 未添加 spring.security.user 配置项,UserDetailsServiceAutoConfiguration 会自动在 内存中创建一个用户名为 user,密码为 UUID 随机的用户 User。
基于UserDetailsService接口 我们创建service目录,定义一个UserDetailsServiceImpl类去实现UserDetailsService
@Service
public class UserDetailsServiceImpl implements UserDetailsService {

    @Override
    public UserDetails loadUserByUsername(String username) throws
            UsernameNotFoundException {
        //String hashpw = BCrypt.hashpw("123456", BCrypt.gensalt());
        UserDetails userDetails = User.withUsername("chengsw")
                .password("{noop}123456").authorities("admin").build();
        return userDetails;
    }
}
Spring security5中新增加了加密方式,并把原有的spring security的密码存储格式改了,修改后的密码 存储格式为:
{id}encodedPassword
如果密码不指定{id}会抛异常:
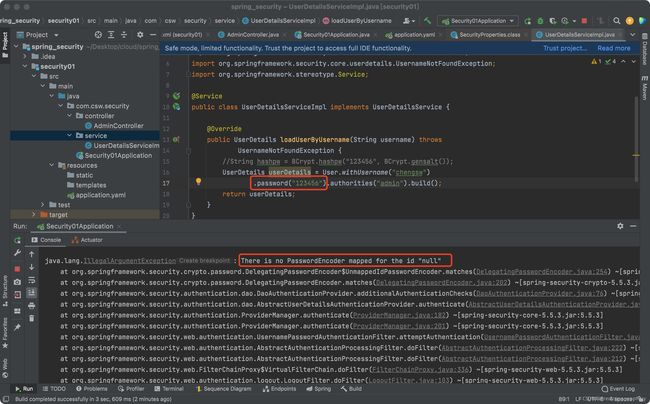
支持的加密方式可以通过PasswordEncoderFactories查看
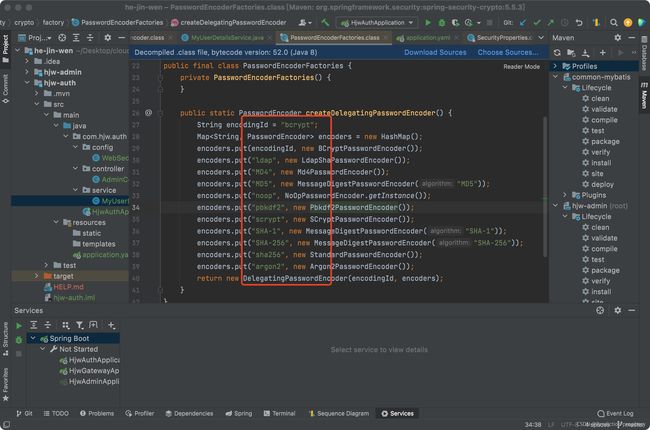
也可以通过增加PasswordEncoder配置指定加密方式,我们创建一个config的目录,再创建一个WebSecurityConfig类
/**
 * 自定义加密方式
 * @author shengwencheng
 * @Date 2021-10-30
 */

@Configuration
public class WebSecurityConfig extends WebSecurityConfigurerAdapter {

    @Bean
    public PasswordEncoder passwordEncoder() {
        return new BCryptPasswordEncoder();
    }
}
spring security官方推荐的加密方式BCrypt完成登录认证
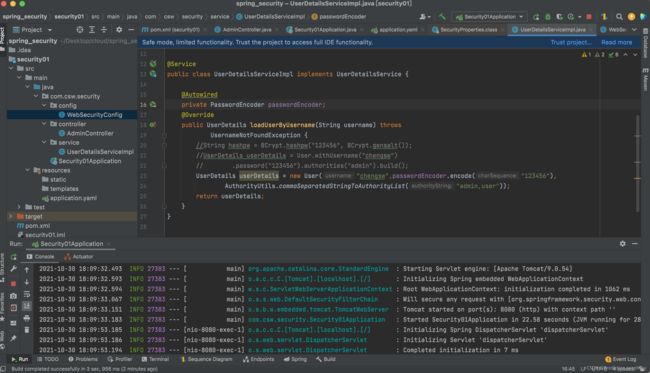
基于配置类WebSecurityConfigurerAdapter
@Configuration
public class WebSecurityConfig extends WebSecurityConfigurerAdapter {
}
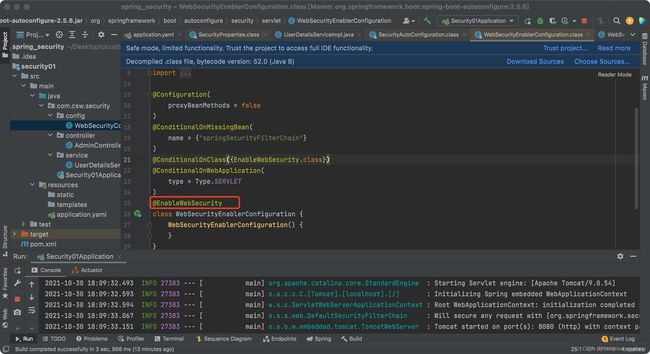
思考: 是否需要添加@EnableWebSecurity注解?
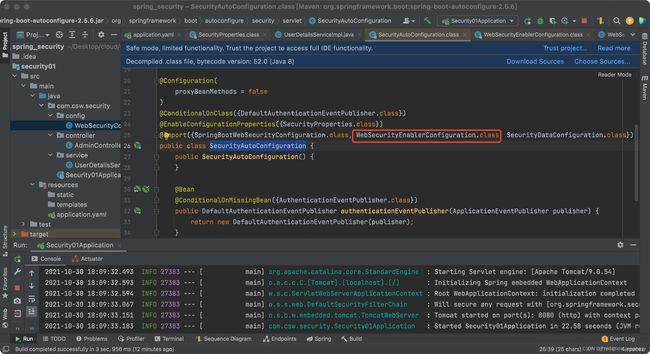
springboot项目中如果引入的是spring-boot-starter-security依赖不需要添加
@EnableWebSecurity,可以参考自动配置类:
spring-boot-autoconfigure-2.3.5.RELEASE.jar!/META-INF/spring.factories 下 SecurityAutoConfiguration
如果引入的是spring-security-config和spring-security-web依赖,则需要添加 @EnableWebSecurity注解。
重写 #configure(AuthenticationManagerBuilder auth) 方法,实现 AuthenticationManager认 证管理器。
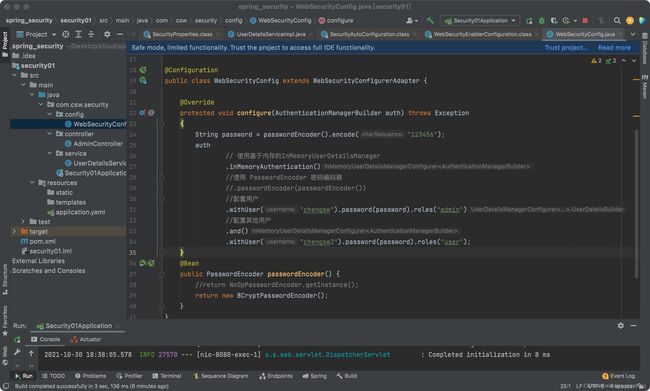
也可以重写WebSecurityConfigurerAdapter#userDetailsService()方法或者 WebSecurityConfigurerAdapter#userDetailsServiceBean(),并通过@Bean交给spring管理
@Configuration
public class WebSecurityConfig2 extends WebSecurityConfigurerAdapter {

    @Bean
    @Override
    protected UserDetailsService userDetailsService()
    {
        return new UserDetailsService() {
            @Override
            public UserDetails loadUserByUsername(String username) throws
                    UsernameNotFoundException {
                String pw = passwordEncoder().encode("123456");
                return new User("chengsw", pw,
                        AuthorityUtils.commaSeparatedStringToAuthorityList("admin,user"));
            }
        };
    }
    @Bean
    public PasswordEncoder passwordEncoder() {
        //return NoOpPasswordEncoder.getInstance();
        return new BCryptPasswordEncoder();
    }
}
以上就是自定义认证登录,喜欢的朋友点个关注(一起学习,有写的不好的地方欢迎评论下方指正一下),下篇将讲实现Spring Security数据库认证,目前的规划是写完SSO,如果有时间还会单独写一篇通过源码解析Spring Security里面所使用到的设计模式,最后面将推出Spring Cloud Alibaba这套体系的前后端分离项目
这里先贴出Spring Security数据库认证需要的表
CREATE TABLE `tb_user` (
`id` bigint(20) NOT NULL AUTO_INCREMENT,
`username` varchar(50) NOT NULL COMMENT '用户名', `password` varchar(64) NOT NULL COMMENT '密码,加密存储', `phone` varchar(20) DEFAULT NULL COMMENT '注册手机号', `email` varchar(50) DEFAULT NULL COMMENT '注册邮箱', `created` datetime NOT NULL,
`updated` datetime NOT NULL,
PRIMARY KEY (`id`),
UNIQUE KEY `username` (`username`) USING BTREE,
UNIQUE KEY `phone` (`phone`) USING BTREE,
UNIQUE KEY `email` (`email`) USING BTREE
) ENGINE=InnoDB AUTO_INCREMENT=38 DEFAULT CHARSET=utf8 COMMENT='用户表';
insert into `tb_user`(`id`,`username`,`password`,`phone`,`email`,`created`,`updated`) values (37,'fox','$2a$10$9ZhDOBp.sRKat4l14ygu/.LscxrMUcDAfeVOEPiYwbcRkoB09gCmi','158xxx xxxx','[email protected]','2019-04-04 23:21:27','2019-04-04 23:21:29');
CREATE TABLE `tb_role` (
`id` bigint(20) NOT NULL AUTO_INCREMENT,
`parent_id` bigint(20) DEFAULT NULL COMMENT '父角色', `name` varchar(64) NOT NULL COMMENT '角色名称', `enname` varchar(64) NOT NULL COMMENT '角色英文名称', `description` varchar(200) DEFAULT NULL COMMENT '备注', `created` datetime NOT NULL,
`updated` datetime NOT NULL,
PRIMARY KEY (`id`)
) ENGINE=InnoDB AUTO_INCREMENT=38 DEFAULT CHARSET=utf8 COMMENT='角色表'; insert into `tb_role`(`id`,`parent_id`,`name`,`enname`,`description`,`created`,`updated`) values
(37,0,'超级管理员','fox',NULL,'2019-04-04 23:22:03','2019-04-04 23:22:05');
CREATE TABLE `tb_user_role` (
`id` bigint(20) NOT NULL AUTO_INCREMENT, `user_id` bigint(20) NOT NULL COMMENT '用户 ID', `role_id` bigint(20) NOT NULL COMMENT '角色 ID', PRIMARY KEY (`id`)
) ENGINE=InnoDB AUTO_INCREMENT=38 DEFAULT CHARSET=utf8 COMMENT='用户角色表'; insert into `tb_user_role`(`id`,`user_id`,`role_id`) values
(37,37,37);
CREATE TABLE `tb_permission` (
  `id` bigint(20) NOT NULL AUTO_INCREMENT,
`parent_id` bigint(20) DEFAULT NULL COMMENT '父权限', `name` varchar(64) NOT NULL COMMENT '权限名称', `enname` varchar(64) NOT NULL COMMENT '权限英文名称', `url` varchar(255) NOT NULL COMMENT '授权路径', `description` varchar(200) DEFAULT NULL COMMENT '备注', `created` datetime NOT NULL,
  `updated` datetime NOT NULL,
PRIMARY KEY (`id`)
) ENGINE=InnoDB AUTO_INCREMENT=44 DEFAULT CHARSET=utf8 COMMENT='权限表';
insert into `tb_permission`(`id`,`parent_id`,`name`,`enname`,`url`,`description`,`created`,` updated`) values
(37,0,'系统管理','System','/',NULL,'2019-04-04 23:22:54','2019-04-04 23:22:56'), (38,37,'用户管理','SystemUser','/users/',NULL,'2019-04-04 23:25:31','2019-04-04 23:25:33'),
(39,38,'查看用户','SystemUserView','',NULL,'2019-04-04 15:30:30','2019-04-04 15:30:43'),
(40,38,'新增用户','SystemUserInsert','',NULL,'2019-04-04 15:30:31','2019-04-04 15:30:44'),
(41,38,'编辑用户','SystemUserUpdate','',NULL,'2019-04-04 15:30:32','2019-04-04 15:30:45'),
(42,38,'删除用户','SystemUserDelete','',NULL,'2019-04-04 15:30:48','2019-04-04 15:30:45'),
(44,37,'内容管理','SystemContent','/contents/',NULL,'2019-04-06 18:23:58','2019- 04-06 18:24:00'), (45,44,'查看内容','SystemContentView','/contents/view/**',NULL,'2019-04-06 23:49:39','2019-04-06 23:49:41'), (46,44,'新增内容','SystemContentInsert','/contents/insert/**',NULL,'2019-04-06 23:51:00','2019-04-06 23:51:02'), (47,44,'编辑内容','SystemContentUpdate','/contents/update/**',NULL,'2019-04-06 23:51:04','2019-04-06 23:51:06'), (48,44,'删除内容','SystemContentDelete','/contents/delete/**',NULL,'2019-04-06 23:51:08','2019-04-06 23:51:10');
CREATE TABLE `tb_role_permission` (
`id` bigint(20) NOT NULL AUTO_INCREMENT,
`role_id` bigint(20) NOT NULL COMMENT '角色 ID', `permission_id` bigint(20) NOT NULL COMMENT '权限 ID', PRIMARY KEY (`id`)
) ENGINE=InnoDB AUTO_INCREMENT=43 DEFAULT CHARSET=utf8 COMMENT='角色权限表'; insert into `tb_role_permission`(`id`,`role_id`,`permission_id`) values (37,37,37),
(38,37,38),
(39,37,39),
(40,37,40),
(41,37,41),
(42,37,42),
(43,37,44),
(44,37,45),
(45,37,46),
(46,37,47),
(47,37,48);
-> SpringSecurity原理剖析及其实战(二)


