Egg.js 中 Service 的使用
Service 服务
Service是用来编写和数据库直接交互的业务逻辑代码。Service就是在复杂业务场景下用于做业务逻辑封装的一个抽象层。
简单来说,就是把业务逻辑代码进一步细化和分类,所以和数据库交互的代码都放到Service中。这样作有三个明显的好处。
- 保持Controller中的逻辑更加简介,
- 保持业务逻辑的独立性,抽象出来的Service可以被多个Controller调用。
- 将逻辑和展现分离,更容易编写测试用例。
只要是和数据库的交互操作,都写在Service里,用了Egg框架,就要遵守它的约定。
在/app/service目录下新建一个zhuba.js文件,编写自己的服务:
'use strict'
const Service = require("egg").Service
class zhuBaService extends Service {
async getGirl(id) (// 模拟数据
  return{
    id: id,
    name: 'kunkun',
    age: 28
  }
}
module.exports = zhuBaService;
// 调用service
async getGir12() {
  const {ctx} = this;
  const res = await ctx.service.zhuba.getGirl('18');
  ctx.body = res
}
service方法的可调用性
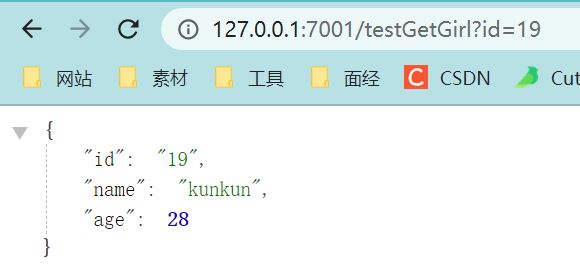
一个service方法完成后,可以在其它的Controller里进行使用。比如在home.js中进行使用。打开/app/controller/home.js文件下,新建一个testGetGirl( )方法,然后新增好路由,这样id即可被数据库得到
async testGetGir1() (
  const ctx = this.ctx;
  let id = ctx.query.id;
  const res = await ctx.service.zhuba.getGirl(id)
  ctx.body = res;
}
起名的时候最好和Controller对应起来。写法和Controller类似,并且在任何Controller下都可以得到Service提供的数据。
View中使用EJS模板引擎
模板引擎
可选的模板不少,具体参考官方文档。
服务端渲染的好处
- 对SEO非常友好,单页应用,比如Vue是到客户端才生成的。这种应用对于国内的搜索引擎是没办法爬取的,这样SEO就不会有好的结果。所以如果是官网、新闻网站、博客这些展示类、宣传类的网址,必须要使用服务端渲染技术。
- 后端渲染是老牌开发模式,渲染性能也是得到一致认可的。在PHP时代,这种后端渲染的技术达到了顶峰。
- 对前后端分离开发模式的补充,并不是所有的功能都可以实现前后端分离的。特别现在流行的中台系统,有很多一次登录,处处可用的原则。这时候就需要服务端渲染来帮忙。
EJS1
在plugin.js中编写:
'use strict'
/**@type Egg.EggPLugin */

module.exports = {
  // had enabLed by egg
  //static: {
  //   enable: true,
  //}
  ejs: {
   enable: true,
   package: "egg-view-ejs"
  }
}
在config.default.js中
'use strict';
const path = require('path');

/**
 * @param {Egg.EggAppInfo} appInfo app info
 */
module.exports = appInfo => {
  /**
   * built-in config
   * @type {Egg.EggAppConfig}
   **/
  const config = exports = {};

  // use for cookie sign key, should change to your own and keep security
  config.keys = appInfo.name + '_1575812978932_7706';

  // add your middleware config here
  config.middleware = [];

  config.security = {
    csrf: {
      enable: false,
    },
  };

  config.view = {
    mapping: {
      ".html": "ejs"
    },
    root: [
      path.join(appInfo.baseDir, "app/html"),
      path.join(appInfo.baseDir, "app/view")
    ].join(",")
  };

  config.ejs = {
    delimiter: "%"
  };

  config.static = {
    prefix: "/assets/",
    dir: path.join(appInfo.baseDir, "app/assets")
  };

  config.session = {
    key: "MUKE_SESS",
    httpOnly: true,
    maxAge: 1000 * 50,
    renew: true
  };

  // add your user config here
  const userConfig = {
    // myAppName: 'egg',
  };

  return {
    ...config,
    ...userConfig,
  };
};
在zhuba.js中
class zhubaController extends Controller (
async index() {
  const ctx = this.ctx;
  await ctx.render('zhuba.html' )
}
/app/view/下新建 zhuba.html文件即可被渲染,访问该路由地址即可
EJS2
显示controller中数据 (<%= 参数 %>)
class zhubaController extends Controller{
async index() {
  const {ctx} = this;
  await ctx.render('zhuba.html',{
    id: 2001,
    name: 'kunkun',
    age: 18,
    skills: ['唱',"跳','Rap','篮球']
  })
}
数据的循环显示 (for)
<h1>Hello ZhuBa!</h1>
<h2>id: <%= id%>,name: <%= name%>, age: <%= age%>
</h2>
<br />
<ul>
  <% for(let i=; i < skills.length; i++)( %>
    <li>
      <%= skills[i] %>
    </li>
    <%}%>
</ul>
修改默认分隔符
config.ejs={
  delimiter: "$"
}
EJS3
公共代码片段的使用 只需要写一些代码片段,即抽离公共部分(组件思想)
<%- include('header.html') %>
配置静态资源:/app/public目录下,可以直接访问,不需配置路由,直接显示文件内容,因为Egg使用了egg-static插件
修改config.default.js可以将访问public变成assets,当然此时使用public会404
onfig.static = {
  prefix:"/assets/"
}
使用静态资源 在.html中
和正常使用一致
<!DOCTYPE html>
<html lang="en">
<head>
  <meta charset="UTF-8">
  <meta name="viewport" content="width=device-width, initial-scale=1.0">
  <title>user</title>
  <link rel="stylesheet" type="text/css" href="assets/css/user.css"/>
</head>
<body>
  <h2>
    id: <%= id%>,name: <%= name%>,age: <%= age%>
  </h2>
  <script src="assets/js/user.js"></script>
</body>
</html>


