Egg.js的方法扩展
Extend-application 方法扩展
eggjs的方法的扩展和编写
Egg.js可以对内部的五种对象进行扩展,以下是可扩展的对象、说明、this指向和使用方式。
application对象方法拓展
按照Egg的约定,扩展的文件夹和文件的名字必须是固定的。比如要对application扩展,要在/app目录下,新建一个/extend文件夹,然后在建立一个application.js文件。
module.exports = {
  // 方法扩展
  currentTime() {
    const current = getTime();
    return current;
  },
};
function getTime() {
  const now = new Date();
  const year = now.getFullYear(); // 得到年份
  const month = now.getMonth() + 1; // 得到月份
  const date = now.getDate(); // 得到日期
  const hour = now.getHours(); // 得到小时数
  const minute = now.getMinutes(); // 得到分钟数
  const second = now.getSeconds(); // 得到秒数
  const nowTime = year + '年' + month + '月' + date + '日 ' + hour + ':' + minute + ':' + second;
  return nowTime;
}
使用:
// .js
async index() {
  const { ctx ,app } = this;
  await ctx.render(
    'zhuba.html',{
      nowTime: app.currentTime()
    })
}
// .html 模板
<%= nowTime %>
application对象属性拓展
对属性( property) 的扩展的关键字是get,也需要写在application.js文件里。
module.exports = {
    //方法扩展
    currentTime(){
        const current = getTime();
        return current;
    },
    //属性扩展
    get timeProp(){
        return getTime();
    }
};
加入get,就会默认是一个属性,可以直接以属性的形式在controller方法里进行调用。
Extend-context 上下文对象的方法拓展
之前通过上下文来获取传递参数时,get方法请求和post方法请求的获取方式是不同的,我们编写的方法可以让这两个请求获取参数的方法统一化,都用params( )方法。新建context.js,配置好页面和路由后使用
// context.js
module.exports = {
  params(key) {
    const method = this.request.method
    if (method === 'GET') {
      return key ? this.query[key] : this.query;
    }
    return key ? this.request.body[key] : this.request.body;
  },
};

// newContext zhuba.js
async newContext() {
  const {
    ctx,
  } = this;
  const params = ctx.params();
  console.log(params);
  ctx.body = 'newContext';
}
// router.js
router.get('/newContext', controller.zhuba.newContext);
router.post('/newContext', controller.zhuba.newContext);
Extend-request
Request 中的扩展一般是扩展的属性。比如扩展 Request 中的一个属性,通过属性直接得到请求头中的 token 属性。
// Extend-request
  async newRequest() {
    const {
      ctx,
    } = this;
    const token = ctx.request.token;
    ctx.body = {
      status: 200,
      body: token,
    };
  }
Egg.js 对 Request 的扩展也需要在/app/extend文件夹下,新建一个request.js文件,然后在这个文件里写扩展属性。
module.exports = {
  get token() {
    console.log('token', this.get('token'));
    return this.get('token');
  },
};
// http测试
POST http://127.0.0.1:7001/newRequest
Content-Type: application/json
token: 'zhuba'

{
    "name":"小红",
    "age":18
}
response
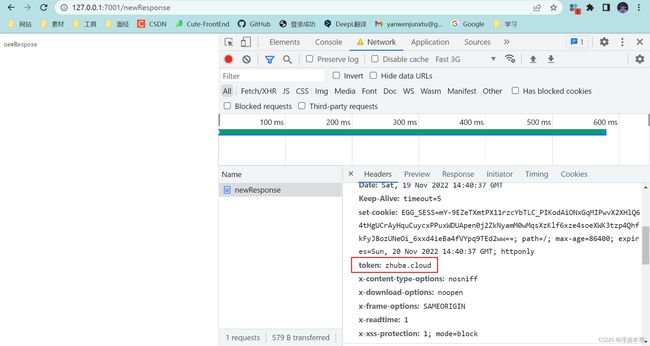
和上一个是差不多的, 需要设置的方法以set关键字开头,然后用this.set( )就可以设置返回的token了。
module.exports = {
  set token(token) {
    this.set('token', token);
  },
};

// zhuba.js
// newRespose
async newResponse() {
  const {
    ctx,
  } = this;
  ctx.response.token = 'zhuba.cloud';
  ctx.body = 'newRespose';
}
// router.js
router.get('/newResponse', controller.zhuba.newResponse);
helper
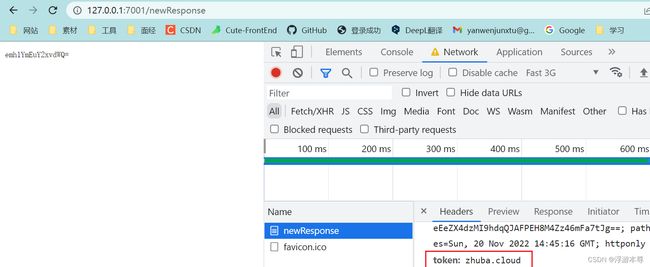
demo是编写一个字符串进行base64加密的方法。
module.exports = {
  base64Encode(str = '') {
    return new Buffer(str).toString('base64');
  },
};

// 重新利用一下原本的 newRespose
// newRespose
async newResponse() {
  const {
    ctx,
  } = this;
  ctx.response.token = 'zhuba.cloud';
  // ctx.body = 'newRespose';
  const testBase64 = ctx.helper.base64Encode('zhuba.cloud');
  ctx.body = testBase64;
}
定时任务编写
定时任务需要按照Egg的约定,/app目录下,新建shedule文件夹。然后在shedule文件夹下,新建一个get_time.js文件。设置每3秒钟,在控制台输出当前时间戳。
const Subscription = require('egg').Subscription;

class GetTime extends Subscription {
  static get schedule() {
    return {
      interval: '10s',
      type: 'worker',
    };
  }

  async subscribe() {
    console.log(Date.now());
  }
}

module.exports = GetTime;
也可以使用更复杂的cron属性进行定时。cron属性有6个参数。
*    *    *    *    *    *
┬    ┬    ┬    ┬    ┬    ┬
│    │    │    │    │    |
│    │    │    │    │    └ day of week (0 - 7) (0 or 7 is Sun)
│    │    │    │    └───── month (1 - 12)
│    │    │    └────────── day of month (1 - 31)
│    │    └─────────────── hour (0 - 23)
│    └──────────────────── minute (0 - 59)
└───────────────────────── second (0 - 59, optional)

比如设置每3秒钟,返回时间戳,可以写成下面的样子。

static get schedule(){
  return {
    cron: '*/3 * * * * *',
    type:'worker'
  };
}


