2022/6/21 今日好用方法整理
目录
目录
一.获取随机16进制时间
二.只能输入正整数
三.用replace修改数组中对象的key(字段名)
四.添加this.$forceUpdate();进行强制渲染,效果实现
五.随机生成八位随机数 字母加数字组合
六.js获取当前页面的url网址信息
七.el-select获取选中label的值
八.Vue设置token拦截以及给每个api加上Authorization请求头
九.使用JS的forEach遍历数组跳出循环
十.el-table表格内文本超出隐藏省略号
十一.解决Element-ui的el-table出现的表格错位问题
十二.element-ui 自定义$notify 内容
十三.Socket中send()函数
十四.Vue - 图片浏览组件v-viewer
十五.监听滚动条到底事件
十六.Vue进度条组件
十七.application/x-www-form-urlencoded方式对post请求传参
十八.el-tab-pane 增加自定义图标
十九.ElementUI日期选择器时间选择范围限制
二十:Vue 封装 loading 插件
二十一.el-upload自定义上传文件显示进度条(整合前端+后端上传进度)
一.获取随机16进制时间
//获取随机颜色
    getRandomColor() {
      var str = "#";
      var arr = [
        "0",
        "1",
        "2",
        "3",
        "4",
        "5",
        "6",
        "7",
        "8",
        "9",
        "a",
        "b",
        "c",
        "d",
        "e",
        "f",
      ];
      for (var i = 0; i < 6; i++) {
        var num = parseInt(Math.random() * 16);
        str += arr[num];
      }
      this.RandomColor = str;
      return str;
    },
二.只能输入正整数
//只能输入正整数(不包括0)
    Numericallimit(e) {
      let value = e.replace(/^(0+)|[^\d]+/g, ""); // 以0开头或者输入非数字,会被替换成空
    },
三.用replace修改数组中对象的key(字段名)
//这里把children换成了pvalue
change() {
      let arr = JSON.parse(
        JSON.stringify(this.data).replace(/children/g, "pvalue")
      );
      console.log(arr, "转换完的");
    },
四.添加this.$forceUpdate();进行强制渲染,效果实现
this.$forceUpdate();使用场景:element-ui的单选框组选中值以及画面选择样式无法切换,但是绑定的v-model值已发生变化
五.随机生成八位随机数 字母加数字组合
  getRand() {
      // 生成八位随机数
      var chars = [
        "0",
        "1",
        "2",
        "3",
        "4",
        "5",
        "6",
        "7",
        "8",
        "9",
        "A",
        "B",
        "C",
        "D",
        "E",
        "F",
        "G",
        "H",
        "I",
        "J",
        "K",
        "L",
        "M",
        "N",
        "O",
        "P",
        "Q",
        "R",
        "S",
        "T",
        "U",
        "V",
        "W",
        "X",
        "Y",
        "Z",
        "a",
        "b",
        "c",
        "d",
        "e",
        "f",
        "g",
        "h",
        "i",
        "j",
        "k",
        "l",
        "m",
        "n",
        "o",
        "p",
        "q",
        "r",
        "s",
        "t",
        "u",
        "v",
        "w",
        "x",
        "y",
        "z",
      ];
      var res = "";
      for (var i = 0; i < 8; i++) {
        var id = Math.floor(Math.random() * 62);
        res += chars[id];
      }

      console.log(res, "随机");
    },
六.js获取当前页面的url网址信息
window.location.host; //返回url 的主机部分,例如:www.xxx.com
window.location.hostname; //返回www.xxx.com
window.location.href; //返回整个url字符串(在浏览器中就是完整的地址栏),例如:www.xxx.com/index.php?class_id=3&id=2
window.location.pathname; //返回/a/index.php或者/index.php
window.location.protocol; //返回url 的协议部分,例如: http:,ftp:,maito:等等。
window.location.port //url 的端口部分,如果采用默认的80端口,那么返回值并不是默认的80而是空字符
window.location.hash //设置或获取 href 属性中在井号“#”后面的分段
window.location.search //设置或获取 href 属性中跟在问号后面的部分
七.el-select获取选中label的值
//通过 $refs 拿到 el-select 组件实例,该实例拥有 selectedLabel 属性,为当前选中的 label。
//或者可以通过 selected 拿到选中的 option 的组件实例,拥有 label 和 value 两个属性。


getLabel(){
	this.$nextTick(()=>{
   		console.log(this.$refs.selectLabel.selectedLabel);
   		console.log(this.$refs.selectLabel.selected.label);
	})
}
八.Vue设置token拦截以及给每个api加上Authorization请求头
this.$axios.defaults.headers.common["Authorization"] = "Bearer vGmP42xN31CBrfDu";九.使用JS的forEach遍历数组跳出循环
提示:在数组中用forEach循环如要退出整个循环呢?使用break会报错,使用return也不能跳出循环。(使用return只能跳过当前循环)
var testReturn = function (name, typed) {
    try {
        let arr = [1, 2, 3];
        arr.forEach((item) => {
            console.log("开始抓取异常");
            if (item === 2) {
                throw new Error("不能等于2");
            }
            console.log('能被输出的item值: ' + item);
        });
    }

    catch (e) {
        console.log('异常已经获取:' + e.message);
    }
    finally {
        console.log('结束')
        return false;
    }
};
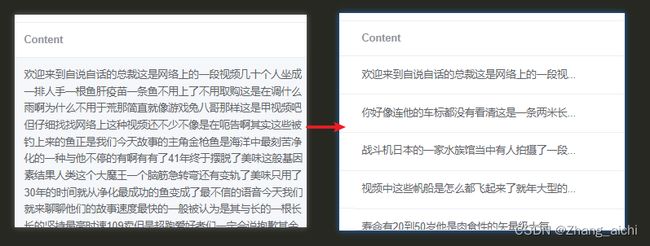
十.el-table表格内文本超出隐藏省略号
如下图:
html部分
{{ scope.row.content| ellipsis }}
配置一个过滤器,表格内容长度超出固定范围用…代替
filters: {
    ellipsis(value) {
      if (!value) return "";
      if (value.length > 20) {
        return value.slice(0, 20) + "...";
      }
      return value;
    },
  },
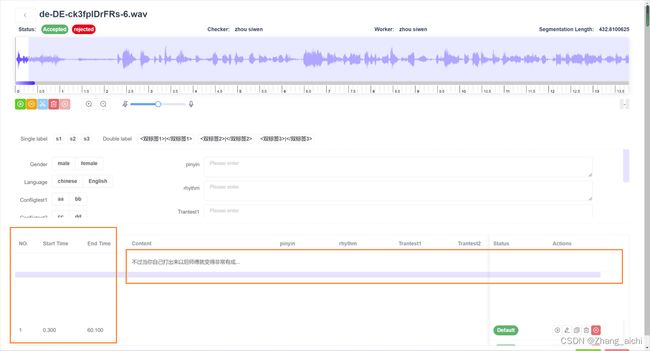
十一.解决Element-ui的el-table出现的表格错位问题
出现上图所示问题,是因为表头有动态新增的列,需要对table进行重新布局
方法一:在第一个el-table-column中加上:key="Math.random()"
方法二:在生命周期updated里执行doLayout方法
 updated() {
    // myTable是表格的ref属性值
    if (this.$refs.myTable && this.$refs.myTable.doLayout) {
      this.$refs.myTable.doLayout();
    }
},
十二.element-ui 自定义$notify 内容
效果图如下:
需要在notify循环添加数据
const confirmText = [
                      "1、文本不能为空。",
                      "2、文本中不能有阿拉伯数字或连续的空格。",
                      "3、每段不大于120个字符。",
                    ];
                    const newDatas = [];
                    const h = this.$createElement;
                    for (const i in confirmText) {
                      newDatas.push(h("p", null, confirmText[i]));
                    }
                    this.$notify({
                      title: "Verification Error",
                      message: h("div", null, newDatas),
                      duration: 0,
                    });
十三.Socket中send()函数
不论是客户端还是服务端都用send函数来向TCP发送连接的另一端发送数据。
客户端一般用send函数向服务器发送请求,服务器用send发送应答
参数:
1. s 指定发送端套接字描述符。2. buff 表示存放发送数据的缓冲区。 3. 实际要发送的字节数, 4.第四个参数一般置零
十四.Vue - 图片浏览组件v-viewer
v-viewer组件可以实现图片点击放大,缩小,旋转,切换等操作
在Vue项目中打开终端,npm引入v-viewer组件
1.下载依赖
npm install v-viewer --save
2.在main.js中配置
import Viewer from 'v-viewer'
import 'viewerjs/dist/viewer.css'
Vue.use(Viewer)
Viewer.setDefaults({
    Options: { 'inline': true, 'button': true, 'navbar': true, 'title': true, 'toolbar': true, 'tooltip': true, 'movable': true, 'zoomable': true, 'rotatable': true, 'scalable': true, 'transition': true, 'fullscreen': true, 'keyboard': true, 'url': 'data-source' }

})
3.使用
-
![图片]()
imgUrlList: [
	{path:require('../../image/Admin/department_example.png')},
    {path:require('../../image/Admin/professional_example.png')},
    {path:require('../../image/Admin/teacher_example.png')},
    {path:require('../../image/Admin/student_example.png')},
    {path:require('../../image/Admin/historyTitle_example.png')}
]
4.注意
imgUrlList一定以数组的方式来存储
用这个组件时网上都说用数组数据,我的需求是一次预览一张图片,就没有用数组,也可以实现
![]()
数组中的路径,如果不是网络路径(比如: http://… 或 https://…),要像上述例子一样使用require()来包裹,不然图片可能会无法显示出来
效果图
十五.监听滚动条到底事件
  //监听滚动条
      this.$nextTick(() => {
        if (document.getElementById("conversa-start")) {
          const selectWrap = document.getElementById("conversa-start");
          selectWrap.addEventListener("scroll", this.scrollLoadMore);
        }
      });
/**
* 监听滚动条
* scrollTop为滚动条在Y轴上的滚动距离。
* clientHeight为内容滚动区域的高度。
* scrollHeight为内容可视区域的高度加上溢出(滚动)的距离。
* */
scrollLoadMore() {
let scrollWrap = document.getElementById("conversa-start");
let scrollTop = scrollWrap.scrollTop;
let clientHeight = scrollWrap.clientHeight;
let scrollHeight = scrollWrap.scrollHeight;
this.isTop = true;
if (scrollTop + clientHeight >= scrollHeight - 5 || scrollTop == 0) {
console.log("到底啦");
this.isTop = false;
}
},十六.Vue进度条组件
可自定义设置以下属性:
- 进度条总宽度(width),默认600px
- 当前进度(progress),默认36
- 进度条线的宽度(strokeWidth),默认8px
- 是否显示进度数值或状态图标(showInfo),默认true
效果图:
①创建进度条组件Progress.vue:
{{ progress >= 100 ? 100 : progress }}%
②在要使用的页面引入:
import Progress from '@/components/Progress'
components: {
    Progress
}
十七.application/x-www-form-urlencoded方式对post请求传参
问题:vue项目中,axios用application/x-www-form-urlencoded方式对post请求传参,但是按正常的data方式传一直获取不到参数。
解决方法:
 async setToken() {

 		/* let data = {
	  		grant_type: 'client_credentials',
	  		client_id: '62vwjyr7tdeizy0dx4',
	  		client_secret: 'caf3a9aa8a28432aa36a18b12fa6fdcc',
	  	} */

	  	const params = new URLSearchParams();
	  	params.append('grant_type', 'client_credentials');
	  	params.append('client_id', '62vwjyr7tdeizy0dx4');
	  	params.append('client_secret', 'caf3a9aa8a28432aa36a18b12fa6fdcc');

	  	this.$axios({
	  		method: 'post',
	  		url: '/spbms/accessToken',
	  		headers: {
	  			'Content-Type': 'application/x-www-form-urlencoded;'
	  		},
	  		data: params,
	  	}).then(res => {

	  	 if(res.data.access_token){
	  		 //console.log(res.data.access_token)
	  		 localStorage.setItem('accessToken',res.data.access_token)
	  	 }
	  	})


	  },
十八.el-tab-pane 增加自定义图标
{{ item.name }}
十九.ElementUI日期选择器时间选择范围限制
选择今天以及今天之后的日期
data (){
   return {
     pickerOptions0: {
         disabledDate(time) {
            //选择今天以及今天之后的日期
            return time.getTime() < Date.now() - 8.64e7;//如果没有后面的-8.64e7就是不可以选择            今天的
            //选择今天以及今天以前的日期
            return time.getTime() > Date.now() - 8.64e6;//如果不包括今天。就是return   time.getTime() > Date.now() - 24*3600*1000;
         }
    },

    }
 }
原文链接:【ElementUI】日期选择器时间选择范围限制,根据接口灵活设置可选时间。只能选今天之前的时间,或者是只能选今天之后的时间。今天是否可以选。限制结束日期不能大于开始日期_夏天想的博客-CSDN博客_8.64e7
二十:Vue 封装 loading 插件
代码如下:
vp-loading.vue
{{ message }}
loading.js
import VpLoading from "./vp-loading.vue";

let loading = {};

loading.install = Vue => {
  Vue.prototype.$loading = function(option = {}) {
    let options = {
      ele: option && option.ele || document.body,
      message: option && option.message || "loading...",
      color: option && option.color || "#000000",
      iconfont: option && option.iconfont || "",
      backgroundColor: option && option.backgroundColor || "rgba(44, 62, 80, .7)" // 建议使用 rgba 格式,并设置透明度
    }
    let vploadingInstance = Vue.extend(VpLoading);
    let vploading
    let loadingEle = document.createElement("div");
    let loadEle;
    Vue.nextTick().then(() => {
      vploading = new vploadingInstance({
        propsData: {
          message: options.message,
          iconfont: options.iconfont
        }
      });
      vploading.$mount(loadingEle);
      let el = vploading.$el;
      loadEle = options.ele;
      if (loadEle !== document.body) {
        loadEle.setAttribute("style", "position: relative");
        el.setAttribute("style", "position: absolute; top: 0; right: 0; left: 0; bottom: 0")
      }
      el.style.color = options.color;
      el.style.backgroundColor = options.backgroundColor;

      loadEle.appendChild(el);
    });

    return {
      close: () => {
        vploading.$el.remove();
      }
    };
  };
};

export default loading;
main.js
import vploading from  './components/loading';
Vue.use(vploading);
组件使用
mounted() {
  let loadObj = this.$loading({
    // ele: document.getElementsByClassName("test")[0],
    color: "#00a8ff",
    iconfont: "icon-redupaixu",
  });
  setTimeout(() => {
    loadObj.close();
  }, 3000);
},
二十一.el-upload自定义上传文件显示进度条(整合前端+后端上传进度)
希望达到的效果:上传文件后,进度条就开始加载,前端上传完毕后调接口传给后端,同时加载一个定时器每次获取文件上传进度。整体的进度条实际上是前端*40%+后端*60%。
上传部分html
点击或将文件拖拽到这里上传
定义变量
 data() {
    return {
      progress: 0, //整体进度条
      frontprogress: 0, //前端上传进度
      behindprogress: 0, //后端上传进度
           }
  }
方法
//监听前端上传进度
    handleChange(file) {
      //刚开始上传的时候,可以拿到ready状态,给个定时器,让进度条显示
      if (file.status === "ready") {
        let that = this;
        const interval = setInterval(() => {
          if (this.frontprogress >= 100) {
            clearInterval(interval);
            //前端上传成功后调上传接口
            that.handleSuccess(file.raw);
            return;
          }
          this.frontprogress += 1; //进度条进度
          //总进度条此时只有前端进度
          this.progress = Math.floor(this.frontprogress * 0.4); //进度条进度
          // console.log(file.status, this.progress, "进度条进度");
        }, 100);
      }
    },
 handleSuccess(file) {
      this.sjs = [];
      this.sjs.push(this.getRand());
      this.fd = new FormData();
      this.fd.append("uploadFile", file);
      this.onUpload();
    },
 //上传文件
    onUpload() {
      this.$axios({
        method: "POST",
        url: ``,
        data: this.fd,
      }).then((res) => {
        if (res.data.code == "1") {
          if (res.data.response.s3FileUrl) {
            this.form.annexUrl = res.data.response.s3FileUrl;
            this.progress = 100;
          }
        }
      });
      var that = this;
      if (this.progress !== 100) {
        timer = setInterval(function () {
          that.getProgress();
        }, 2000);
      }
    },
// 获取上传文件后台进度
    getProgress() {
      this.$axios({
        method: "POST",
        url: ``,
        data: this.sjs,
      }).then((res) => {
        if (res.data.code == "1") {
          if (Number(res.data.response[this.sjs[0]]) > 0) {
            this.behindprogress = res.data.response[this.sjs[0]];
            console.log(
              "总进度",
              Math.floor(this.behindprogress * 0.6 + this.frontprogress * 0.4)
            );
            this.progress = Math.floor(
              this.behindprogress * 0.6 + this.frontprogress * 0.4
            );
          }

          if (this.progress >= 100) {
            //调用方法,关闭指定的定时器
            clearInterval(timer);
          }
        }
      });
    },
注意:每次移除文件记得把进度条重置


