Android入门小实验
从一个Activity页面启动另一个Activity页面。
1、页面布局:activity.xml
<?xml version="1.0" encoding="utf-8"?>
<LinearLayout xmlns:android="http://schemas.android.com/apk/res/android"
    android:orientation="vertical" android:layout_width="match_parent"
    android:layout_height="match_parent">

    <Button
        android:id="@+id/btnStartAnotherAty"
        android:layout_width="247dp"
        android:layout_height="75dp"
        android:text="启动另一个Activity" />
</LinearLayout>
2、java文件:mainactivity.java
package com.example.test1;

import androidx.appcompat.app.AppCompatActivity;

import android.content.Intent;
import android.os.Bundle;
import android.view.View;

public class MainActivity extends AppCompatActivity {

    @Override
    protected void onCreate(Bundle savedInstanceState) {
        super.onCreate(savedInstanceState);
        // setContentView(R.layout.activity_main);
        setContentView(R.layout.activity_main);

        findViewById(R.id.btnStartAnotherAty).setOnClickListener(new View.OnClickListener() {

            public void onClick(View v) {
                //在onClick()中启动另一个Activity

                startActivity(new Intent(MainActivity.this,AnotherAty.class));
            }
        });

    }
}
3、页面布局:activity_another.xml
<?xml version="1.0" encoding="utf-8"?>
<androidx.constraintlayout.widget.ConstraintLayout xmlns:android="http://schemas.android.com/apk/res/android"
    xmlns:app="http://schemas.android.com/apk/res-auto"
    xmlns:tools="http://schemas.android.com/tools"
    android:layout_width="match_parent"
    android:layout_height="match_parent"
    tools:context=".AnotherAty">

    <TextView
        android:id="@+id/textView"
        android:layout_width="153dp"
        android:layout_height="35dp"
        android:layout_alignParentTop="true"
        android:layout_marginTop="172dp"
        android:text="这是另一个Activity"
        app:layout_constraintEnd_toEndOf="parent"
        app:layout_constraintStart_toStartOf="parent"
        app:layout_constraintTop_toTopOf="parent" />

</androidx.constraintlayout.widget.ConstraintLayout>
4、java文件:anotheraty
package com.example.test1;

import androidx.appcompat.app.AppCompatActivity;

import android.os.Bundle;

public class AnotherAty extends AppCompatActivity {

    @Override
    protected void onCreate(Bundle savedInstanceState) {
        super.onCreate(savedInstanceState);
        setContentView(R.layout.activity_another_aty);
    }
}
依次完成四个文件即可
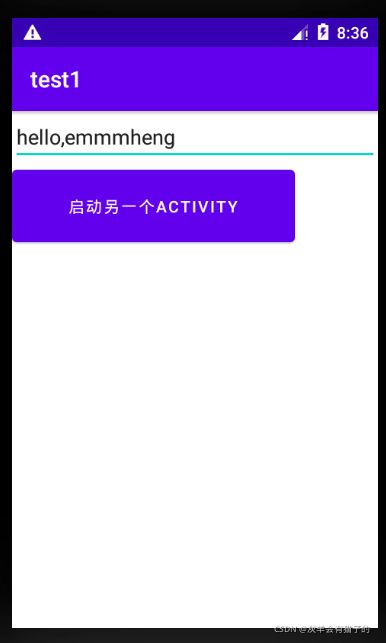
运行结果:


当我们在完成上面小功能后,可以尝试着传送一下消息!
因为我很懒!所以直接在上面代码改的,有些地方为了适配代码略有改动。
【页面布局:activity.xml】
<?xml version="1.0" encoding="utf-8"?>
<LinearLayout xmlns:android="http://schemas.android.com/apk/res/android"
    android:orientation="vertical" android:layout_width="match_parent"
    android:layout_height="match_parent">

    <EditText
        android:id="@+id/ediText1"
        android:layout_width="match_parent"
        android:layout_height="wrap_content">
        <requestFocus />
        </EditText>
    <Button
        android:id="@+id/btnStartAnotherAty"
        android:layout_width="247dp"
        android:layout_height="75dp"
        android:text="启动另一个Activity" />
【java文件:mainactivity.java】
package com.example.test1;

import androidx.appcompat.app.AppCompatActivity;

import android.content.Intent;
import android.os.Bundle;
import android.view.View;
import android.widget.EditText;

public class MainActivity extends AppCompatActivity {

    @Override
    protected void onCreate(Bundle savedInstanceState) {
        super.onCreate(savedInstanceState);
        // setContentView(R.layout.activity_main);
        setContentView(R.layout.activity_main);

        findViewById(R.id.btnStartAnotherAty).setOnClickListener(new View.OnClickListener() {

            public void onClick(View v) {
                //在onClick()中启动另一个Activity
                Intent intent =new Intent();
                intent.setClass(MainActivity.this,AnotherAty.class);
                EditText txt =(EditText)findViewById(R.id.ediText1);
                Bundle bundle= new Bundle();
                bundle.putString("text",txt.getText().toString());
                intent.putExtras(bundle);
                startActivity(intent);
                //startActivity(new Intent(MainActivity.this,AnotherAty.class));
            }
        });

    }
}
【页面布局:activity_another.xml】
<?xml version="1.0" encoding="utf-8"?>
<androidx.constraintlayout.widget.ConstraintLayout xmlns:android="http://schemas.android.com/apk/res/android"
xmlns:app="http://schemas.android.com/apk/res-auto"
xmlns:tools="http://schemas.android.com/tools"
android:layout_width="match_parent"
android:layout_height="match_parent"
tools:context=".AnotherAty">
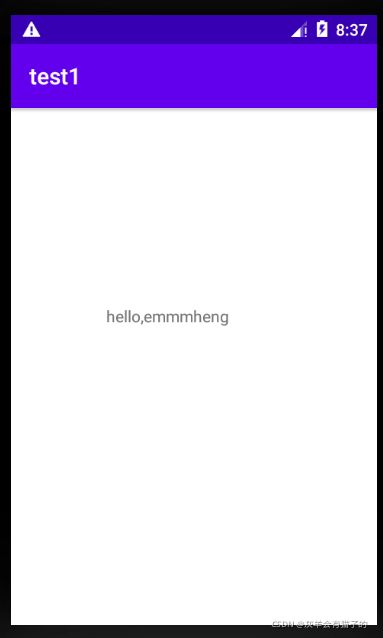
<TextView
android:id="@+id/TextView2"
android:layout_width="153dp"
android:layout_height="35dp"
android:layout_alignParentTop="true"
android:layout_marginTop="172dp"
app:layout_constraintEnd_toEndOf="parent"
app:layout_constraintStart_toStartOf="parent"
app:layout_constraintTop_toTopOf="parent" />
</androidx.constraintlayout.widget.ConstraintLayout>
【java文件:anotheraty】
package com.example.test1;

import androidx.appcompat.app.AppCompatActivity;

import android.os.Bundle;
import android.widget.TextView;

public class AnotherAty extends AppCompatActivity {

    @Override
    protected void onCreate(Bundle savedInstanceState) {
        super.onCreate(savedInstanceState);
        setContentView(R.layout.activity_another_aty);
        TextView txt2=(TextView)findViewById(R.id.TextView2);
        Bundle bunde =this.getIntent().getExtras();

        String str =bunde.getString("text");
        txt2.setText(str);

    }
}
运行结果: