SpringBoot 配置文件
SpringBoot 配置文件
- 配置文件的格式
- 特殊说明
- properties 基本语法
-
- 使⽤ properties 连接数据库
- 读取配置文件
- yml 基本语法
-
- 使⽤ yml 连接数据库
- yml 配置不同数据类型
- yml 配置读取
- 注意事项:value值加单双引号
- 配置对象
- 配置集合
- 配置Map
- 优缺点分析
-
- properties
- yml
配置文件的格式

Spring Boot 配置⽂件有以下三种:
• application.properties
• application.yml
• application.yaml
yml为yaml的简写,实际开发中出现频率最⾼.yaml和yml的使⽤⽅式⼀样
当应⽤程序启动时,SpringBoot会⾃动从classpath路径找到并加载
application.properties 和 application.yaml 或者 application.yml ⽂件.
特殊说明
- 理论上讲 .properties 和 .yml 可以并存在于⼀个项⽬中,当.properties 和 .yml
并存时,两个配置都会加载.如果配置⽂件内容有冲突,则以 .properties 为主,也就是.properties 优先级更高. - 虽然理论上来讲 .properties 可以和 .yml 共存,但实际的业务当中,我们通常会采取⼀种统⼀的配置⽂件格式,这样可以更好的维护(降低故障率).
properties 基本语法
properties是以键值的形式配置的,key和value之间是以"="连接的,如
使⽤ properties 连接数据库
spring.datasource.url=jdbc:mysql://127.0.0.0:3306/dbname?characterEncoding=utf8&useSSL=false
spring.datasource.username=root
spring.datasource.password=root
读取配置文件
如果在项目中,想要主动的读取配置⽂件中的内容,可以使用 @Value 注解来实现。
@Value 注解使用" ${} "的格式读取,如下代码所示
properties 配置如下:
Key.key1 = hello
package com.example.demo;

import org.springframework.beans.factory.annotation.Value;
import org.springframework.web.bind.annotation.RequestMapping;
import org.springframework.web.bind.annotation.RestController;

@RestController
public class PropertiesController {
    @Value("${Key.key1}")
    private String key1;
    @RequestMapping("/key")
    public String key(){
        return "获取到properties配置key:"+key1;
    }
}
通过url访问得到

yml 基本语法
yml 是树形结构的配置⽂件,它的基础语法是"key: value".
key 和 value 之间使⽤英⽂冒号加空格的⽅式组成,空格不可省略
基础语法如下
使⽤ yml 连接数据库
Spring:
  datasourse:
    url: jdbc:mysql://127.0.0.0:3306/dbname?characterEncoding=utf8&useSSL=false
    username: root
    password: root
yml 配置不同数据类型
#字符串
string:
  value: Hello
#布尔类型
boolean:
  value: true
  value1: false
#整型
int:
  value: 12
#浮点型
float:
  value: 3.1415
#NULL
null:
  value: ~
#空字符串
empty:
  value:
  value1: ''
yml 配置读取
package com.example.demo;

import org.springframework.beans.factory.annotation.Value;
import org.springframework.util.StringUtils;
import org.springframework.web.bind.annotation.RequestMapping;
import org.springframework.web.bind.annotation.RestController;

@RestController
public class YmlController {
    @Value("${empty.value}")
    private String str;
    @RequestMapping("/IsNull")
    public Boolean IsHasLength(){
        return StringUtils.hasLength(str);
    }
}

注意事项:value值加单双引号
字符串默认不⽤加上单引号或者双引号,如果加英⽂的单双引号可以表⽰特殊的含义
string:
  str1: Hello \n Spring Boot.
  str2: 'Hello \n Spring Boot.'
  str3: "Hello \n Spring Boot."
    @Value("${string.str1}")
    private String str1;
    @Value("${string.str2}")
    private String str2;
    @Value("${string.str3}")
    private String str3;

    @PostConstruct
    public void Init(){
        System.out.println(str1);
        System.out.println(str2);
        System.out.println(str3);
    }
这里通过@PostConstruct注解来实现在tomcat启动之前初始化程序的功能
结果为
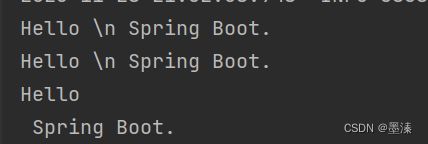
从上述结果可以看出:
• 字符串默认不⽤加上单引号或者双引号。
• 单引号会转义特殊字符,使其失去特殊功能,始终是⼀个普通的字符串.
• 双引号不会转义字符串⾥⾯的特殊字符,特殊字符会表⽰本⾝的含义
这里的\n的作用就是换行符
配置对象
yml配置
student:
  id: 12
  name: lisi
  age: 23
这里的yml配置也可以使用以下格式:
student: {id: 12,name: lisi,age: 23}
创建一个实体类,将配置中的数据通过@ConfigurationProperties(prefix = "student")这个注解注入到实体类中,并将实体类存到spring中,将对象的创建控制权交给spring
import lombok.Data;
import org.springframework.boot.context.properties.ConfigurationProperties;
import org.springframework.stereotype.Component;

@ConfigurationProperties(prefix = "student")
@Data
@Component
public class Student {
     private int id;
     private String name;
     private int age;
}
创建一个Controller类来从spring中获取到student对象
import com.example.demo.model.Student;
import org.springframework.beans.factory.annotation.Autowired;
import org.springframework.web.bind.annotation.RequestMapping;
import org.springframework.web.bind.annotation.RestController;

@RestController
public class StudentController {
    @Autowired
    private Student student;
    @RequestMapping("/student")
    public String readStudent(){
        return student.toString();
    }
}
通过url访问得到以下结果

配置集合
配置文件也可以配置list集合,如下所示:
yml配置
list:
  name:
    - zhangsan
    - lisi
    - wangwu
创建一个实体类,将配置中的数据通过@ConfigurationProperties(prefix = "list")这个注解注入到实体类中,以实体类中的变量名去配置中去寻找相同的变量,如果有就赋值,如果没有就赋值为null,之后就将实体类存到spring中,将对象的创建控制权交给spring
import lombok.Data;
import org.springframework.boot.context.properties.ConfigurationProperties;
import org.springframework.stereotype.Component;

import java.util.List;
@ConfigurationProperties(prefix = "list")
@Data
@Component
public class ListName {
    private List<String> name;
}
创建一个Controller类来从spring中获取到student对象
import com.example.demo.model.ListName;
import org.springframework.beans.factory.annotation.Autowired;
import org.springframework.web.bind.annotation.RequestMapping;
import org.springframework.web.bind.annotation.RestController;

import java.util.List;
@RestController
public class ListController {
    @Autowired
    private ListName name;
    @RequestMapping("/list")
    public String readList(){
        return name.toString();
    }
}
通过url访问得到以下结果

配置Map
配置文件也可以配置map,如下所示
具体步骤如上
map:
  user:
    u1: zhangsan
    u2: lisi
    u3: wangwu
import lombok.Data;
import org.springframework.boot.context.properties.ConfigurationProperties;
import org.springframework.web.bind.annotation.RestController;

import java.util.Map;
@ConfigurationProperties(prefix = "map")
@Data
@RestController
public class MapUser {
    Map<String,String> user;
}
import com.example.demo.model.MapUser;
import org.springframework.beans.factory.annotation.Autowired;
import org.springframework.web.bind.annotation.RequestMapping;
import org.springframework.web.bind.annotation.RestController;

@RestController
public class MapUserController {
    @Autowired
    private MapUser mapUser;
    @RequestMapping("/map")
    public String readMap(){
        return mapUser.toString();
    }
}

优缺点分析
properties

如图所示,properties格式的配置会比较冗余,yml就能够很好的解决这个问题
yml
优点:
- 可读性高,写法简单,易于理解
- 支持更多的数据类型,可以简单表达对象,数组,List,Map等数据形态
- 支持更多的编程语言,不止是Java中可以使用,在Golang,Python,Ruby,JavaScript中也可以使用
缺点:
1.不适合写复杂的配置文件:
比如properties格式如下:
keycloak.realm = demo
keycloak.resource = fm-cache-cloud
keycloak.credentials.secret = d4589683-Oce7-4982-bcd3
keycloak.security[0].authRoles[0]= user
keycloak.security[0].collections[0].name = ssologinurl
keycloak.security[0].collections[0].patterns[0] = /login/*
转换为yml
keycloak:
  realm: demo
  resource: fm-cache-cloud
  credentials:
    secret: d4589683-Oce7-4982-bcd3
  security:
    - authRoles:
      - user
      collections:
      - name: ssologinurl
        patterns:
          - /login/*
转换的过程也比较花费精⼒,如果配置更复杂⼀点,可读性会更差,代码也会更难写
2. 对格式有较强的要求,对空格的要求比较大