Java日志源码详解,SpringBoot日志 slf4j、logback、log4j
- 日志视频讲解—上
- 日志视频讲解—下
- 学习文档集合
一、前提
在Java中说起日志,定听过这样几个名词:slf4j、logback、log4j,在正式开始之前,先了解几个简单的概念
- slf4j、logback、log4j 的作者都是一个人
- slf4j 的全名是 Simple Logging Facade for Java,它只是一个门面,可以简单理解是一个接口,具体实现由logback和log4j去实现
- logback、log4j 都是出自一个人,而logback是后面出来的,那不言而喻,一个人做了两个东西,肯定是对一个东西不是很满意,实际上logback也比log4j更有优势
- SpringBoot项目默认的日志就是用 logback,从侧面体现了它确有优势
二、原生Java使用日志
1、证明 slf4j 是一个门面
在一个基本的Java项目(只引入JDK)要想打印日志,只需要引入 slf4j 和 它的实现类基本包就可以了。

<project xmlns="http://maven.apache.org/POM/4.0.0"
         xmlns:xsi="http://www.w3.org/2001/XMLSchema-instance"
         xsi:schemaLocation="http://maven.apache.org/POM/4.0.0 http://maven.apache.org/xsd/maven-4.0.0.xsd">
    <modelVersion>4.0.0modelVersion>

    <groupId>cn.xdxgroupId>
    <artifactId>logLookartifactId>
    <version>1.0-SNAPSHOTversion>

    <properties>
        <maven.compiler.source>8maven.compiler.source>
        <maven.compiler.target>8maven.compiler.target>
    properties>

    <dependencies>


        <dependency>
            <groupId>org.slf4jgroupId>
            <artifactId>slf4j-apiartifactId>
            <version>1.7.30version>
        dependency>


        <dependency>
            <groupId>ch.qos.logbackgroupId>
            <artifactId>logback-classicartifactId>
            <version>1.2.3version>
        dependency>


        <dependency>
            <groupId>org.apache.logging.log4jgroupId>
            <artifactId>log4j-slf4j-implartifactId>
            <version>2.13.3version>
            <scope>compilescope>
        dependency>
        <dependency>
            <groupId>org.apache.logging.log4jgroupId>
            <artifactId>log4j-coreartifactId>
            <version>2.13.3version>
            <scope>compilescope>
        dependency>

    dependencies>
project>
1-1、空实现-证明
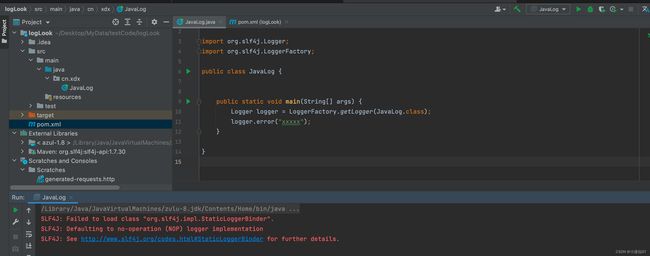
去掉pom文件中的 log4j和logback的依赖,运行代码异常如下:找不到实现类
Failed to load class “org.slf4j.impl.StaticLoggerBinder” 注意这个包名后面会用到
1-2、独自logback、独自 log4j、一起使用
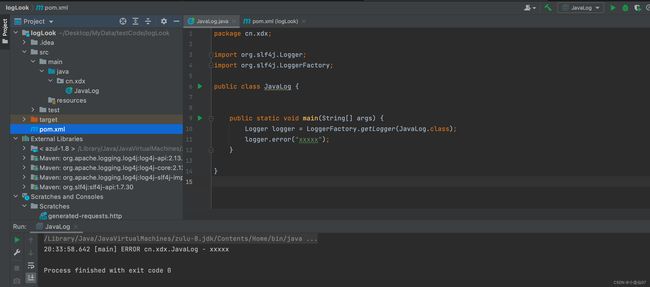
单独使用logback——只需要注释log4j的依赖。正常运行

单独使用 log4j——只需要注释logback的依赖。正常运行
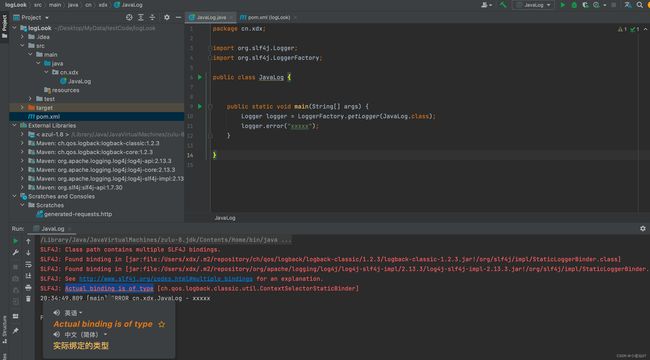
一起使用——会提示找到多个实现类,最终按照pom文件的引用依赖顺序选择一个(可以试试把log4j依赖放前面)
2、Logger工厂创建 (ILoggerFactory)重要
Logger logger = LoggerFactory.getLogger(JavaLog.class);

public static Logger getLogger(String name) {
    ILoggerFactory iLoggerFactory = getILoggerFactory();
    return iLoggerFactory.getLogger(name);
}
- 创建Logger之前,先创建了一个工厂,再基于这个工厂来创建具体的Logger。(ILoggerFactory)
- 工厂就是来创建对象的,刚刚我们看到logback和log4j不同的实现,其本质就是不同的工厂创建的不同的对象。
2-1、工厂创建的开始
- INITIALIZATION_STATE 是当前工厂的状态,根据不同的状态执行不同的代码,默认是 UNINITIALIZED 未初始化。
StaticLoggerBinder.getSingleton().getLoggerFactory();初始化好就会创建工厂类,这行就是返回创建好的工厂。
public static ILoggerFactory getILoggerFactory() {
    // 默认未初始化状态
    if (INITIALIZATION_STATE == UNINITIALIZED) {
        synchronized (LoggerFactory.class) {
            if (INITIALIZATION_STATE == UNINITIALIZED) {
                // 正在初始化
                INITIALIZATION_STATE = ONGOING_INITIALIZATION;
                // 初始化代码
                performInitialization();
            }
        }
    }
    switch (INITIALIZATION_STATE) {
    case SUCCESSFUL_INITIALIZATION:  // 初始化成功所执行的代码
        return StaticLoggerBinder.getSingleton().getLoggerFactory();
    case NOP_FALLBACK_INITIALIZATION:
        return NOP_FALLBACK_FACTORY;
    case FAILED_INITIALIZATION:
        throw new IllegalStateException(UNSUCCESSFUL_INIT_MSG);
    case ONGOING_INITIALIZATION:
        // support re-entrant behavior.
        // See also http://jira.qos.ch/browse/SLF4J-97
        return SUBST_FACTORY;
    }
    throw new IllegalStateException("Unreachable code");
}
2-2、绑定真正的工厂类
private final static void performInitialization() {
    bind();
    if (INITIALIZATION_STATE == SUCCESSFUL_INITIALIZATION) {
        versionSanityCheck();
    }
}


private final static void bind() {
    try {
        Set<URL> staticLoggerBinderPathSet = null;
        // 判断是否是安卓,Java不是安卓,所以会执行
        // 这个if中的代码没有实际的作用【作用就是如果你有多个工厂实现,就打印日志提醒你】
        if (!isAndroid()) {
            // 找到当前可以被绑定的工厂
            staticLoggerBinderPathSet = findPossibleStaticLoggerBinderPathSet();
            // 如果找到多个就打印日志,上面看到的多个绑定日志就是这里打印的
            reportMultipleBindingAmbiguity(staticLoggerBinderPathSet);
        }
        // 初始化LoggerFactory,这里就是按照顺序读取一个工厂bean
        StaticLoggerBinder.getSingleton();

        // 设置初始化状态为成功
        INITIALIZATION_STATE = SUCCESSFUL_INITIALIZATION;
        reportActualBinding(staticLoggerBinderPathSet);
    } catch (NoClassDefFoundError ncde) {
        // 异常处理
    } catch (java.lang.NoSuchMethodError nsme) {
         // 异常处理
    } catch (Exception e) {
         // 异常处理
    } finally {
        postBindCleanUp();
    }
}
2-3、slf4j 如何做到不同实现的随机切换
其实很简单,它里面写死了真正工厂类的权限定名:org.slf4j.impl.StaticLoggerBinder,也就是谁要使用slf4j这个门面,谁就要写一个这个类,用这个类去生成工厂。
##### 2-3-1、找到多个实现类,怎么做提示?
上面验证,当引入log4j和logback的时候,会提示有多个实现类,它是怎么做的呢?
就是用了一个写死的完整的类权限定名,如果加载到多个,就返回多个,就打印日志。
private static String STATIC_LOGGER_BINDER_PATH = "org/slf4j/impl/StaticLoggerBinder.class";

static Set<URL> findPossibleStaticLoggerBinderPathSet() {
    // use Set instead of list in order to deal with bug #138
    // LinkedHashSet appropriate here because it preserves insertion order
    // during iteration
    Set<URL> staticLoggerBinderPathSet = new LinkedHashSet<URL>();
    try {
        ClassLoader loggerFactoryClassLoader = LoggerFactory.class.getClassLoader();
        Enumeration<URL> paths;
        if (loggerFactoryClassLoader == null) {
            paths = ClassLoader.getSystemResources(STATIC_LOGGER_BINDER_PATH);
        } else {
            paths = loggerFactoryClassLoader.getResources(STATIC_LOGGER_BINDER_PATH);
        }
        while (paths.hasMoreElements()) {
            URL path = paths.nextElement();
            staticLoggerBinderPathSet.add(path);
        }
    } catch (IOException ioe) {
        Util.report("Error getting resources from path", ioe);
    }
    return staticLoggerBinderPathSet;
}


private static void reportMultipleBindingAmbiguity(Set<URL> binderPathSet) {
    if (isAmbiguousStaticLoggerBinderPathSet(binderPathSet)) {
        Util.report("Class path contains multiple SLF4J bindings.");
        for (URL path : binderPathSet) {
            Util.report("Found binding in [" + path + "]");
        }
        Util.report("See " + MULTIPLE_BINDINGS_URL + " for an explanation.");
    }
}

private static boolean isAmbiguousStaticLoggerBinderPathSet(Set<URL> binderPathSet) {
    return binderPathSet.size() > 1;
}
2-3-2、如果引入多个实现类,最终用哪个呢?
答案是谁先引入就用谁,在绑定的时候,会有下面的代码,这代码就是去初始化工厂类。
现在已经很明了它是怎么选择实现类了,而log4j和logback都是同一个作者,作者说logback比log4j好,那我们后续对日志的解读当然都是基于logback来了。
StaticLoggerBinder.getSingleton();

public static StaticLoggerBinder getSingleton() {
    return SINGLETON;
}

private static StaticLoggerBinder SINGLETON = new StaticLoggerBinder();

private StaticLoggerBinder() {
    defaultLoggerContext.setName(CoreConstants.DEFAULT_CONTEXT_NAME);
}

private LoggerContext defaultLoggerContext = new LoggerContext();
2-4、工厂类的初始化
- 创建了工厂类class LoggerContext implements ILoggerFactory
- 创建了根Logger,并为其设置了默认的配置(这个根Logger是干嘛的后面再说)
-
- 默认的level:DEBUG
-
- 默认的layout:%d{HH:mm:ss.SSS} [%thread] %-5level %logger{36} - %msg%n
-
- 默认的appende:ConsoleAppender
StaticLoggerBinder.getSingleton();

public static StaticLoggerBinder getSingleton() {
    return SINGLETON;
}

private static StaticLoggerBinder SINGLETON = new StaticLoggerBinder();

static {
    SINGLETON.init();
}
StaticLoggerBinder 里面有个静态代码块,里面执行了 init 方法。
// 使用logback的工厂是 LoggerContext
private LoggerContext defaultLoggerContext = new LoggerContext();

void init() {
    try {
        try {
            // 创建默认的工厂,并进行初始化
            new ContextInitializer(defaultLoggerContext).autoConfig();
        } catch (JoranException je) {
            Util.report("Failed to auto configure default logger context", je);
        }
        // logback-292
        if (!StatusUtil.contextHasStatusListener(defaultLoggerContext)) {
            StatusPrinter.printInCaseOfErrorsOrWarnings(defaultLoggerContext);
        }
        // 把当前的工厂放入上下午绑定器里面
        contextSelectorBinder.init(defaultLoggerContext, KEY);
        initialized = true;
    } catch (Exception t) { // see LOGBACK-1159
        Util.report("Failed to instantiate [" + LoggerContext.class.getName() + "]", t);
    }
}
创建根Logger,设置默认的等级为 DEBUG
public LoggerContext() {
    super();
    this.loggerCache = new ConcurrentHashMap<String, Logger>();
    this.loggerContextRemoteView = new LoggerContextVO(this);
    this.root = new Logger(Logger.ROOT_LOGGER_NAME, null, this);
    this.root.setLevel(Level.DEBUG);
    loggerCache.put(Logger.ROOT_LOGGER_NAME, root);
    initEvaluatorMap();
    size = 1;
    this.frameworkPackages = new ArrayList<String>();
}
设置根Logger的 Layout和Appender
public void autoConfig() throws JoranException {
    StatusListenerConfigHelper.installIfAsked(loggerContext);
    URL url = findURLOfDefaultConfigurationFile(true);
    if (url != null) {
        configureByResource(url);
    } else {
        Configurator c = EnvUtil.loadFromServiceLoader(Configurator.class);
        if (c != null) {
            try {
                c.setContext(loggerContext);
                c.configure(loggerContext);
            } catch (Exception e) {
                throw new LogbackException(String.format("Failed to initialize Configurator: %s using ServiceLoader", c != null ? c.getClass()
                                .getCanonicalName() : "null"), e);
            }
        } else {
            BasicConfigurator basicConfigurator = new BasicConfigurator();
            basicConfigurator.setContext(loggerContext);
            basicConfigurator.configure(loggerContext);
        }
    }
}


public void configure(LoggerContext lc) {
    addInfo("Setting up default configuration.");

    ConsoleAppender<ILoggingEvent> ca = new ConsoleAppender<ILoggingEvent>();
    ca.setContext(lc);
    ca.setName("console");
    LayoutWrappingEncoder<ILoggingEvent> encoder = new LayoutWrappingEncoder<ILoggingEvent>();
    encoder.setContext(lc);


    // same as
    // PatternLayout layout = new PatternLayout();
    // layout.setPattern("%d{HH:mm:ss.SSS} [%thread] %-5level %logger{36} - %msg%n");
    TTLLLayout layout = new TTLLLayout();
    layout.setContext(lc);
    layout.start();
    encoder.setLayout(layout);

    ca.setEncoder(encoder);
    ca.start();

    Logger rootLogger = lc.getLogger(Logger.ROOT_LOGGER_NAME);
    rootLogger.addAppender(ca);
}

// 这里可以先看看,只有 ROOT的Logger才有这个 Appender,数据是存在 aai 中
public synchronized void addAppender(Appender<ILoggingEvent> newAppender) {
    if (aai == null) {
        aai = new AppenderAttachableImpl<ILoggingEvent>();
    }
    aai.addAppender(newAppender);
}
3、Logger 创建
上面已经得出来最终的工厂类是 LoggerContext,现在只需要看它里面的 getLogger方法是如何创建Logger的即可。
Logger的创建并不像我们想象的那样每个类创建一个,它是有子父级概念的,和我们的包路径一样的结构,比如类权限定名为 cn.xdx.JavaLog,则会创建4个Logger,分别是 ROOT、cn、cn.xdx、cn.xdx.JavaLog,并且它是一个树结构,ROOT节点的字节点包含了下面的三个。
@Override
public final Logger getLogger(final String name) {

    if (name == null) {
        throw new IllegalArgumentException("name argument cannot be null");
    }
    // 判断是不是获取 根 Logger
    if (Logger.ROOT_LOGGER_NAME.equalsIgnoreCase(name)) {
        return root;
    }

    int i = 0;
    Logger logger = root;

    // 判断当前Logger 是否已经创建过了,如果存在就返回
    Logger childLogger = (Logger) loggerCache.get(name);
    // if we have the child, then let us return it without wasting time
    if (childLogger != null) {
        return childLogger;
    }

    String childName;
    while (true) {
        // 用【.】去切割权限定名,h就是返回有几层
        int h = LoggerNameUtil.getSeparatorIndexOf(name, i);
        // 获取当前层级
        if (h == -1) {
            childName = name;
        } else {
            childName = name.substring(0, h);
        }
        i = h + 1;
        // 从根节点开始便利,直到找到了当前的Logger
        synchronized (logger) {
            childLogger = logger.getChildByName(childName);
            if (childLogger == null) {
                // 创建 Logger
                childLogger = logger.createChildByName(childName);
                // 放入缓存
                loggerCache.put(childName, childLogger);
                incSize();
            }
        }
        logger = childLogger;
        if (h == -1) {
            return childLogger;
        }
    }
}
新Logger的创建
Logger createChildByName(final String childName) {
    int i_index = LoggerNameUtil.getSeparatorIndexOf(childName, this.name.length() + 1);
    if (i_index != -1) {
        throw new IllegalArgumentException("For logger [" + this.name + "] child name [" + childName
                        + " passed as parameter, may not include '.' after index" + (this.name.length() + 1));
    }

    if (childrenList == null) {
        childrenList = new CopyOnWriteArrayList<Logger>();
    }
    Logger childLogger;
    childLogger = new Logger(childName, this, this.loggerContext);
    childrenList.add(childLogger);
    childLogger.effectiveLevelInt = this.effectiveLevelInt;
    return childLogger;
}

Logger(String name, Logger parent, LoggerContext loggerContext) {
    this.name = name;
    this.parent = parent;
    this.loggerContext = loggerContext;
}
4、Logger 输出到控制台的过程
public static void main(String[] args) {
    Logger logger = LoggerFactory.getLogger(JavaLog.class);
    logger.error("xxxxx");
}
上面已经得到了Logger的实现类 ch.qos.logback.classic.Logger,现在就来看看这个 logger.error 是如何输出到控制的。
4-1、方法的重载
每种级别的方法参数都有很多,所以都会做参数不同的方法重载。
public void error(String msg) {
    filterAndLog_0_Or3Plus(FQCN, null, Level.ERROR, msg, null, null);
}

private void filterAndLog_0_Or3Plus(final String localFQCN, final Marker marker, final Level level, final String msg, final Object[] params,
                final Throwable t) {
    // 循环去运行过滤器
    final FilterReply decision = loggerContext.getTurboFilterChainDecision_0_3OrMore(marker, this, level, msg, params, t);
    // 如果状态是 中性,就判断当前是否要判断过滤级别
    if (decision == FilterReply.NEUTRAL) {
        if (effectiveLevelInt > level.levelInt) {
            return;
        }
    } else if (decision == FilterReply.DENY) {
        return;
    }
    buildLoggingEventAndAppend(localFQCN, marker, level, msg, params, t);
}
4-2、过滤掉不想输出的日志
有两种情况,即便是调用了日志打印方法也不会输出日志
- 被过滤器过滤了
- 日志的级别过低(比如我们设置的是error级别,但是你打印 info级别的就行)
final FilterReply getTurboFilterChainDecision_0_3OrMore(final Marker marker, final Logger logger, final Level level, final String format,
                final Object[] params, final Throwable t) {
    // 如果没有过滤器就返回 中性状态
    if (turboFilterList.size() == 0) {
        return FilterReply.NEUTRAL;
    }
    // 循环去运行所有过滤器
    return turboFilterList.getTurboFilterChainDecision(marker, logger, level, format, params, t);
}
自定义过滤器
public class MyLogBackFilter extends TurboFilter {
    @Override
    public FilterReply decide(Marker marker, Logger logger, Level level, String format, Object[] params, Throwable t) {

        System.out.println("kkkkkk");
        return FilterReply.ACCEPT;
    }
}


public static void main(String[] args) {
    Logger logger = LoggerFactory.getLogger(JavaLog.class);
    LoggerContext loggerContext =  (LoggerContext)LoggerFactory.getILoggerFactory();
    loggerContext.addTurboFilter(new MyLogBackFilter());

    logger.error("xxxxx");
}
4-3、构建日志事件
其实就是组装这次日志打印的信息
private void buildLoggingEventAndAppend(final String localFQCN, final Marker marker, final Level level, final String msg, final Object[] params,
                final Throwable t) {
    LoggingEvent le = new LoggingEvent(localFQCN, this, level, msg, t, params);
    le.setMarker(marker);
    callAppenders(le);
}

public LoggingEvent(String fqcn, Logger logger, Level level, String message, Throwable throwable, Object[] argArray) {
    this.fqnOfLoggerClass = fqcn;
    this.loggerName = logger.getName();
    this.loggerContext = logger.getLoggerContext();
    this.loggerContextVO = loggerContext.getLoggerContextRemoteView();
    this.level = level;

    this.message = message;
    this.argumentArray = argArray;

    if (throwable == null) {
        throwable = extractThrowableAnRearrangeArguments(argArray);
    }

    if (throwable != null) {
        this.throwableProxy = new ThrowableProxy(throwable);
        LoggerContext lc = logger.getLoggerContext();
        if (lc.isPackagingDataEnabled()) {
            this.throwableProxy.calculatePackagingData();
        }
    }

    timeStamp = System.currentTimeMillis();
}
4-4、日志输出
- 这里面的调用链很长,但逻辑都很简单,就直接把代码给出吧
- doAppend 方法之后就是一些正常的操作,就不再截图了,可以自行去看(ROOT 里面默认的是ConsoleAppender)
public void callAppenders(ILoggingEvent event) {
    int writes = 0;
    // 循环便利每个层级的Logger,如果当前Logger 有Appender 就输出
    // 上面创建 Logger的时候,其实就知道了只有ROOT_Logger 才有Appender,所里这里也是等到ROOT才会输出
    for (Logger l = this; l != null; l = l.parent) {
        writes += l.appendLoopOnAppenders(event);

        // 这个参数默认都是 true 不用管
        if (!l.additive) {
            break;
        }
    }
    // No appenders in hierarchy
    if (writes == 0) {
        loggerContext.noAppenderDefinedWarning(this);
    }
}


private int appendLoopOnAppenders(ILoggingEvent event) {
    if (aai != null) {
        return aai.appendLoopOnAppenders(event);
    } else {
        return 0;
    }
}

// ROOT 里面默认的是ConsoleAppender
public int appendLoopOnAppenders(E e) {
    int size = 0;
    Appender<E>[] appenderArray = (Appender[])this.appenderList.asTypedArray();
    int len = appenderArray.length;

    for(int i = 0; i < len; ++i) {
        appenderArray[i].doAppend(e);
        ++size;
    }

    return size;
}
4-4-1、日志格式化
上面看到最终输出日志的是ROOT_Logger,而ROOT中的 layout是 TTLLLayout,日志格式化的时候会调用doLayout 方法
@Override
public String doLayout(ILoggingEvent event) {
    if (!isStarted()) {
        return CoreConstants.EMPTY_STRING;
    }
    StringBuilder sb = new StringBuilder();

    long timestamp = event.getTimeStamp();

    sb.append(cachingDateFormatter.format(timestamp));
    sb.append(" [");
    sb.append(event.getThreadName());
    sb.append("] ");
    sb.append(event.getLevel().toString());
    sb.append(" ");
    sb.append(event.getLoggerName());
    sb.append(" - ");
    sb.append(event.getFormattedMessage());
    sb.append(CoreConstants.LINE_SEPARATOR);
    IThrowableProxy tp = event.getThrowableProxy();
    if (tp != null) {
        String stackTrace = tpc.convert(event);
        sb.append(stackTrace);
    }
    return sb.toString();
}
三、SpringBoot中的日志
使用SpringBoot就要引入相关的pom文件,这里需要把pom文件替换成下面的
<groupId>cn.xdx</groupId>
<artifactId>logLook</artifactId>
<version>1.0-SNAPSHOT</version>

<properties>
    <maven.compiler.source>8</maven.compiler.source>
    <maven.compiler.target>8</maven.compiler.target>
</properties>

<parent>
    <groupId>org.springframework.boot</groupId>
    <artifactId>spring-boot-starter-parent</artifactId>
    <version>2.4.5</version>
    <relativePath/>
</parent>

<dependencies>
    <!--Use undertow, 设置服务器,和日志没关系哈-->
    <dependency>
        <groupId>org.springframework.boot</groupId>
        <artifactId>spring-boot-starter-undertow</artifactId>
    </dependency>
    <dependency>
        <groupId>org.springframework.boot</groupId>
        <artifactId>spring-boot-starter-web</artifactId>
        <exclusions>
            <exclusion>
                <groupId>org.springframework.boot</groupId>
                <artifactId>spring-boot-starter-tomcat</artifactId>
            </exclusion>
        </exclusions>
    </dependency>
</dependencies>
启动服务,使用日志功能,发现在不做任何配置的时候,它默认使用的是 logback打印
1、如何加载、选择日志工厂
1-1、前置:SpringBoot 自动加载流程
在SpringBoot项目启动的时候会自动做很多的操作,这里需要了解两点
- SpringFactoriesLoader 这个类会去加载所有 META-INF/spring.factories 文件,loadFactoryNames这个方法就是通过name找到所有spring.factories文件中对应的类。
- ApplicationListener 是一个接口,SpringBoot项目在启动的每个阶段都会投递事件到 onApplicationEvent 方法中。
在SpringBoot的 spring.factories 下有三个工厂构造器,启动的时候会把它们三个都加载进去(按照顺序加载第一个就是 logback)
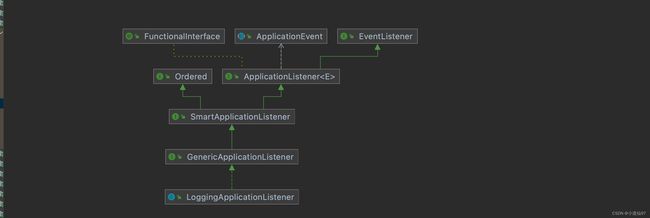
在SpringBoot的中有一个 LoggingApplicationListener,它的继承关系如下,所以它本质上是一个ApplicationListener,并且重写了onApplicationEvent方法。
1-2、logback和log4j切换、默认的为何是logback
在原始日志中,知道LoggerFactory的实现类是取决于引用了什么包。而在SpringBoot项目中它默认就引入了 logback的包,所以它默认是用 logback。
如果在SpringBoot中想切换成 log4j,原理也是一样,去除logback的包,引入log4j
<dependency>
    <groupId>org.springframework.bootgroupId>
    <artifactId>spring-boot-starter-webartifactId>
    <exclusions>
        <exclusion>
            <groupId>org.springframework.bootgroupId>
            <artifactId>spring-boot-starter-tomcatartifactId>
        exclusion>
        <exclusion>
            <groupId>org.springframework.bootgroupId>
            <artifactId>spring-boot-starter-loggingartifactId>
        exclusion>
    exclusions>
dependency>


<dependency>
    <groupId>org.springframework.bootgroupId>
    <artifactId>spring-boot-starter-log4jartifactId>
    <version>1.3.8.RELEASEversion>
dependency>
1-3、准备:初始化LoggerFactory
其实在SpringBoot中 LoggerFactory的构建也是基于上面原生的方式,只不过在原生方式创建了 LoggerFactory之后,SpringBoot再基于自己的配置,去修改、填充LoggerFactory中配置。
- 基于原生方式构建出 LoggerFactory
- SpringBoot基于启动阶段来做初始化(LoggingApplicationListener)
public void onApplicationEvent(ApplicationEvent event) {
    // 启动时候的事件 —— 进行日志前置初始化
    if (event instanceof ApplicationStartingEvent) {
        this.onApplicationStartingEvent((ApplicationStartingEvent)event);
    }
    // 环境变量准备好的事件 —— 进行日志初始化
    else if (event instanceof ApplicationEnvironmentPreparedEvent) {
        this.onApplicationEnvironmentPreparedEvent((ApplicationEnvironmentPreparedEvent)event);
    }
    //  全部启动好之后的事件 —— 暂不关注
    else if (event instanceof ApplicationPreparedEvent) {
        this.onApplicationPreparedEvent((ApplicationPreparedEvent)event);
    } else if (event instanceof ContextClosedEvent && ((ContextClosedEvent)event).getApplicationContext().getParent() == null) {
        this.onContextClosedEvent();
    } else if (event instanceof ApplicationFailedEvent) {
        this.onApplicationFailedEvent();
    }
}
1-4、前置:初始化LoggerFactory
- 找到 loggingSystem,这个就是SpringBoot对各种日志实现的包装,对应的包装就是对应的实现类
- 初始化前置,这里其实是一个空实现,如果有必要可以实现这个接口做一些操作
private void onApplicationStartingEvent(ApplicationStartingEvent event) {
    this.loggingSystem = LoggingSystem.get(event.getSpringApplication().getClassLoader());
    this.loggingSystem.beforeInitialize();
}
private static final LoggingSystemFactory SYSTEM_FACTORY = LoggingSystemFactory.fromSpringFactories();

public static LoggingSystem get(ClassLoader classLoader) {
    String loggingSystemClassName = System.getProperty(SYSTEM_PROPERTY);
    // 这里默认为 null
    if (StringUtils.hasLength(loggingSystemClassName)) {
        return (LoggingSystem)("none".equals(loggingSystemClassName) ? new LoggingSystem.NoOpLoggingSystem() : get(classLoader, loggingSystemClassName));
    } else {
        // 走这个
        LoggingSystem loggingSystem = SYSTEM_FACTORY.getLoggingSystem(classLoader);
        Assert.state(loggingSystem != null, "No suitable logging system located");
        return loggingSystem;
    }
}
public interface LoggingSystemFactory {
    LoggingSystem getLoggingSystem(ClassLoader classLoader);

    static LoggingSystemFactory fromSpringFactories() {
        // 创建一个 DelegatingLoggingSystemFactory
        return new DelegatingLoggingSystemFactory((classLoader) -> {
            // 这里就是前面说的,通过name去获取 spring.factories 对应的数据,有兴趣自己去看看
            // 这里获取的数据会按照 @Order 排序,但是这三个实现类的 @Order是一样的,所以是默认顺序
            return SpringFactoriesLoader.loadFactories(LoggingSystemFactory.class, classLoader);
        });
    }
}
循环去遍历每一个factory,找到了就返回,其本质也是看当前项目下有没有具体的类
public LoggingSystem getLoggingSystem(ClassLoader classLoader) {
    List<LoggingSystemFactory> delegates = this.delegates != null ? (List)this.delegates.apply(classLoader) : null;
    if (delegates != null) {
        Iterator var3 = delegates.iterator();

        while(var3.hasNext()) {
            LoggingSystemFactory delegate = (LoggingSystemFactory)var3.next();
            LoggingSystem loggingSystem = delegate.getLoggingSystem(classLoader);
            if (loggingSystem != null) {
                return loggingSystem;
            }
        }
    }

    return null;
}
logback和log4j的实现,就是判断isPresent中的这个权限定名有没有。
@Order(2147483647)
public static class Factory implements LoggingSystemFactory {
    private static final boolean PRESENT = ClassUtils.isPresent("ch.qos.logback.core.Appender", LogbackLoggingSystem.Factory.class.getClassLoader());

    public Factory() {
    }

    public LoggingSystem getLoggingSystem(ClassLoader classLoader) {
        return PRESENT ? new LogbackLoggingSystem(classLoader) : null;
    }
}

@Order(2147483647)
public static class Factory implements LoggingSystemFactory {
    private static final boolean PRESENT = ClassUtils.isPresent("org.apache.logging.log4j.core.impl.Log4jContextFactory", Log4J2LoggingSystem.Factory.class.getClassLoader());

    public Factory() {
    }

    public LoggingSystem getLoggingSystem(ClassLoader classLoader) {
        return PRESENT ? new Log4J2LoggingSystem(classLoader) : null;
    }
}
1-5、开始:初始化LoggerFactory
前面已经创建好了LoggerFactory > LoggerContext,这里的初始化是对LoggerContext里面的一些数据进行赋值,主要是读取配置文件 自定义的 logback.xml 和 application
private void onApplicationEnvironmentPreparedEvent(ApplicationEnvironmentPreparedEvent event) {
   // 在前置里面已经生成了 loggingSystem,准确来说是它的实现类  LogbackLoggingSystem
   if (this.loggingSystem == null) {
      this.loggingSystem = LoggingSystem.get(event.getSpringApplication().getClassLoader());
   }
   // 初始化就是读取配置文件中的信息,来重新填充LoggerFactory——它的实现类 LoggerContext
   initialize(event.getEnvironment(), event.getSpringApplication().getClassLoader());
}
如果你配置过logback.xml,那你肯定在application里面配置过它的位置logging.config: classpath:logback.xml
protected void initialize(ConfigurableEnvironment environment, ClassLoader classLoader) {
   // ...
   initializeSystem(environment, this.loggingSystem, this.logFile);
   // ...
}


public static final String CONFIG_PROPERTY = "logging.config";

private void initializeSystem(ConfigurableEnvironment environment, LoggingSystem system, LogFile logFile) {
   String logConfig = StringUtils.trimWhitespace(environment.getProperty(CONFIG_PROPERTY));
   try {
      LoggingInitializationContext initializationContext = new LoggingInitializationContext(environment);
      if (ignoreLogConfig(logConfig)) {
         system.initialize(initializationContext, null, logFile);
      }
      else {
         system.initialize(initializationContext, logConfig, logFile);
      }
   }
   catch (Exception ex) {
      // ...
   }
}
这里用的是 logback,所以最终是:org.springframework.boot.logging.logback.LogbackLoggingSystem#initialize
@Override
public void initialize(LoggingInitializationContext initializationContext, String configLocation, LogFile logFile) {
   LoggerContext loggerContext = getLoggerContext();
   if (isAlreadyInitialized(loggerContext)) {
      return;
   }
   super.initialize(initializationContext, configLocation, logFile);
   loggerContext.getTurboFilterList().remove(FILTER);
   markAsInitialized(loggerContext);
   if (StringUtils.hasText(System.getProperty(CONFIGURATION_FILE_PROPERTY))) {
      getLogger(LogbackLoggingSystem.class.getName()).warn("Ignoring '" + CONFIGURATION_FILE_PROPERTY
            + "' system property. Please use 'logging.config' instead.");
   }
}
2、如何解析配置信息、自定义配置信息
在读取配置文件的时候无非就几种情况,既然有多种情况,那肯定是有一个优先级的——即下面的排序
- 指定自己的配置文件 (logging.config: classpath:logback.xml)
- 默认读取的配置文件,本质上和【1】一样,只是文件的位置不同
-
- logback自己的默认配置文件 (“logback-test.groovy”, “logback-test.xml”, “logback.groovy”, “logback.xml”)
-
- 在Spring中 logback默认的配置文件(“logback-test-spring.groovy”, “logback-test-spring.xml”, “logback.groovy”, “logback-spring.xml”)
- 使用 application 配置
- 没有任何配置文件,默认策略
这也就是为什么说logback的在SpringBoot中的默认配置文件是 logback-spring.xml, 因为其它几个后缀基本上不会有。
从代码角度来看的logback日志配置也可以看成是:
- 读取 xml 配置
- 读取 application 配置
org.springframework.boot.logging.AbstractLoggingSystem#initialize
public void initialize(LoggingInitializationContext initializationContext, String configLocation, LogFile logFile) {
   // 读取 logging.config 配置的文件 也就是 logback.xml
   if (StringUtils.hasLength(configLocation)) {
      initializeWithSpecificConfig(initializationContext, configLocation, logFile);
      return;
   }
   // 没有单独的配置文件,读取 默认/application 的配置
   initializeWithConventions(initializationContext, logFile);
}
private void initializeWithConventions(LoggingInitializationContext initializationContext, LogFile logFile) {
   // 获取logback的默认配置  "logback-test.groovy", "logback-test.xml", "logback.groovy", "logback.xml"
   String config = getSelfInitializationConfig();
   if (config != null && logFile == null) {
      // self initialization has occurred, reinitialize in case of property changes
      reinitialize(initializationContext);
      return;
   }
   if (config == null) {
      // 获取Srping的默认配置  logback-test-spring.groovy", "logback-test-spring.xml", "logback.groovy", "logback-spring.xml
      config = getSpringInitializationConfig();
   }
   if (config != null) {
      // 加载配置
      loadConfiguration(initializationContext, config, logFile);
      return;
   }
   // 默认的配置 application
   loadDefaults(initializationContext, logFile);
}
2-1、application 读取
先来看没有自定义配置的情况,也就是没有配置 logging.config,也没有读取到logback默认配置和spring中logback的默认配置
org.springframework.boot.logging.logback.LogbackLoggingSystem#loadDefaults
@Override
protected void loadDefaults(LoggingInitializationContext initializationContext, LogFile logFile) {
   LoggerContext context = getLoggerContext();
   stopAndReset(context);
   boolean debug = Boolean.getBoolean("logback.debug");
   if (debug) {
      StatusListenerConfigHelper.addOnConsoleListenerInstance(context, new OnConsoleStatusListener());
   }
   Environment environment = initializationContext.getEnvironment();
   // 读取 application 中的配置存入 LoggerContext 中
   new LogbackLoggingSystemProperties(environment, context::putProperty).apply(logFile);
   LogbackConfigurator configurator = debug ? new DebugLogbackConfigurator(context)
         : new LogbackConfigurator(context);
   // 基于读取到的配置进行配置
   new DefaultLogbackConfiguration(initializationContext, logFile).apply(configurator);
   context.setPackagingDataEnabled(true);
}
2-1-1、读取 application 配置
这里的代码很清晰,具体如何去解析字段(比如 logging.pattern.console),可以自行去看。
public final void apply(LogFile logFile) {
   PropertyResolver resolver = getPropertyResolver();
   apply(logFile, resolver);
}

protected void apply(LogFile logFile, PropertyResolver resolver) {
   setSystemProperty(resolver, EXCEPTION_CONVERSION_WORD, "logging.exception-conversion-word");
   setSystemProperty(PID_KEY, new ApplicationPid().toString());
   setSystemProperty(resolver, CONSOLE_LOG_PATTERN, "logging.pattern.console");
   setSystemProperty(resolver, CONSOLE_LOG_CHARSET, "logging.charset.console", getDefaultCharset().name());
   setSystemProperty(resolver, LOG_DATEFORMAT_PATTERN, "logging.pattern.dateformat");
   setSystemProperty(resolver, FILE_LOG_PATTERN, "logging.pattern.file");
   setSystemProperty(resolver, FILE_LOG_CHARSET, "logging.charset.file", getDefaultCharset().name());
   setSystemProperty(resolver, LOG_LEVEL_PATTERN, "logging.pattern.level");
   applyDeprecated(resolver);
   if (logFile != null) {
      logFile.applyToSystemProperties();
   }
}
2-1-2、基于配置文件初始化
在开始之前需要回顾一下logback里面基本内容:
- Appender 日志如何输出,里面包含了输出的格式
- ROOT_log 日志是以包名来建立的层级,根目录是 ROOT
- 所以大部分的配置其实就是围绕上面两个对象
配置的主流程
- 把从application 中读取的内容变成配置
- 基于配置创建 Appender
- 把 Appender 放到 ROOT上
void apply(LogbackConfigurator config) {
   synchronized (config.getConfigurationLock()) {
      defaults(config);
      Appender<ILoggingEvent> consoleAppender = consoleAppender(config);
      if (this.logFile != null) {
         Appender<ILoggingEvent> fileAppender = fileAppender(config, this.logFile.toString());
         config.root(Level.INFO, consoleAppender, fileAppender);
      }
      else {
         config.root(Level.INFO, consoleAppender);
      }
   }
}
配置文件放入 LoggerContext
private void defaults(LogbackConfigurator config) {
   config.conversionRule("clr", ColorConverter.class);
   config.conversionRule("wex", WhitespaceThrowableProxyConverter.class);
   config.conversionRule("wEx", ExtendedWhitespaceThrowableProxyConverter.class);
   config.getContext().putProperty("CONSOLE_LOG_PATTERN", resolve(config, "${CONSOLE_LOG_PATTERN:-"
         + "%clr(%d{${LOG_DATEFORMAT_PATTERN:-yyyy-MM-dd HH:mm:ss.SSS}}){faint} %clr(${LOG_LEVEL_PATTERN:-%5p}) "
         + "%clr(${PID:- }){magenta} %clr(---){faint} %clr([%15.15t]){faint} %clr(%-40.40logger{39}){cyan} "
         + "%clr(:){faint} %m%n${LOG_EXCEPTION_CONVERSION_WORD:-%wEx}}"));
   config.getContext().putProperty("CONSOLE_LOG_CHARSET", resolve(config, "${CONSOLE_LOG_CHARSET:-default}"));
   config.getContext().putProperty("FILE_LOG_PATTERN", resolve(config, "${FILE_LOG_PATTERN:-"
         + "%d{${LOG_DATEFORMAT_PATTERN:-yyyy-MM-dd HH:mm:ss.SSS}} ${LOG_LEVEL_PATTERN:-%5p} ${PID:- } --- [%t] "
         + "%-40.40logger{39} : %m%n${LOG_EXCEPTION_CONVERSION_WORD:-%wEx}}"));
   config.getContext().putProperty("FILE_LOG_CHARSET", resolve(config, "${FILE_LOG_CHARSET:-default}"));
   config.logger("org.apache.catalina.startup.DigesterFactory", Level.ERROR);
   config.logger("org.apache.catalina.util.LifecycleBase", Level.ERROR);
   config.logger("org.apache.coyote.http11.Http11NioProtocol", Level.WARN);
   config.logger("org.apache.sshd.common.util.SecurityUtils", Level.WARN);
   config.logger("org.apache.tomcat.util.net.NioSelectorPool", Level.WARN);
   config.logger("org.eclipse.jetty.util.component.AbstractLifeCycle", Level.ERROR);
   config.logger("org.hibernate.validator.internal.util.Version", Level.WARN);
   config.logger("org.springframework.boot.actuate.endpoint.jmx", Level.WARN);
}
Appender 创建
private Appender<ILoggingEvent> consoleAppender(LogbackConfigurator config) {
   ConsoleAppender<ILoggingEvent> appender = new ConsoleAppender<>();
   PatternLayoutEncoder encoder = new PatternLayoutEncoder();
   encoder.setPattern(resolve(config, "${CONSOLE_LOG_PATTERN}"));
   encoder.setCharset(resolveCharset(config, "${CONSOLE_LOG_CHARSET}"));
   config.start(encoder);
   appender.setEncoder(encoder);
   config.appender("CONSOLE", appender);
   return appender;
}
绑定到ROOT
final void root(Level level, Appender<ILoggingEvent>... appenders) {
   Logger logger = this.context.getLogger(org.slf4j.Logger.ROOT_LOGGER_NAME);
   if (level != null) {
      logger.setLevel(level);
   }
   for (Appender<ILoggingEvent> appender : appenders) {
      logger.addAppender(appender);
   }
}
2-2、xml 读取
读取文件的规则可以是很多,而且很复杂,我暂时不想去了解这么复杂的逻辑,所以这里只说明入口,不做深入。
不管是怎么得到的xml,最终解析入口都是
protected abstract void loadConfiguration(LoggingInitializationContext initializationContext, String location,
      LogFile logFile);
如果配置了 logging.config 那就直接读取到了xml,来看看没有配置的时候怎么读取到的默认文件
private void initializeWithConventions(LoggingInitializationContext initializationContext, LogFile logFile) {
   String config = getSelfInitializationConfig();
   if (config != null && logFile == null) {
      // self initialization has occurred, reinitialize in case of property changes
      reinitialize(initializationContext);
      return;
   }
   if (config == null) {
      config = getSpringInitializationConfig();
   }
   if (config != null) {
      loadConfiguration(initializationContext, config, logFile);
      return;
   }
   loadDefaults(initializationContext, logFile);
}


// logback默认配置的原因
protected String getSelfInitializationConfig() {
   return findConfig(getStandardConfigLocations());
}
@Override
protected String[] getStandardConfigLocations() {
   return new String[] { "logback-test.groovy", "logback-test.xml", "logback.groovy", "logback.xml" };
}

// spring默认配置,其实它就是获取logback的默认配置,然后加上一个【-spring】后缀
protected String getSpringInitializationConfig() {
   return findConfig(getSpringConfigLocations());
}
protected String[] getSpringConfigLocations() {
   String[] locations = getStandardConfigLocations();
   for (int i = 0; i < locations.length; i++) {
      String extension = StringUtils.getFilenameExtension(locations[i]);
      locations[i] = locations[i].substring(0, locations[i].length() - extension.length() - 1) + "-spring."
            + extension;
   }
   return locations;
}
3、日志的输出
在原生的日志输出里面已经讲解了整个流程,输出过程都是一样的。
K、扩展
1、log读取MDC和application的数据
在日志输出的时候可能会要设置一些自己的参数
- 比如全局 traceId,这种情况可以把它设置到MDC里面去,本质上是放入 ThreadLocal中
- 读取application中的数据比如 spring.application.name
spring:
  application:
    name: xdx97

logging:
  pattern:
    console: "[${spring.application.name}] [%X{userId}] [%thread] %-5level %logger{36} - %msg%n"
2、lomback 的 @Slf4j 注解
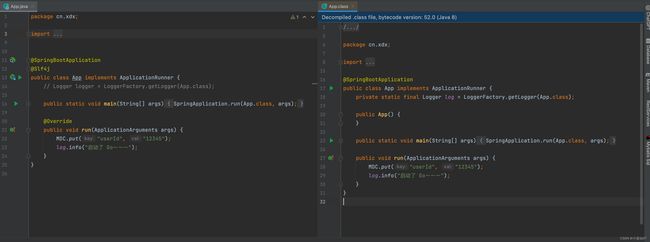
在项目中大多数时候并不是直接自己注入log类,而是使用 @Slf4j,其本质上是一样的。
但为什么在没有编译之前就可以使用log这个参数,大概率是idea做了什么操作吧,这个等后续有空再研究。
