spring cloud Nacos配置管理
文章目录
- Nacos配置管理
-
- 统一配置管理
-
- 在nacos中添加配置文件
- 2021.5之前的版本从微服务拉取配置
- 2021.5之前的版本从微服务拉取配置
- 配置热更新
-
- 方式一
- 方式二
Nacos配置管理
Nacos除了可以做注册中心,同样可以做配置管理来使用。
统一配置管理
当微服务部署的实例越来越多,达到数十、数百时,逐个修改微服务配置就会让人抓狂,而且很容易出错。我们需要一种统一配置管理方案,可以集中管理所有实例的配置。

Nacos一方面可以将配置集中管理,另一方可以在配置变更时,及时通知微服务,实现配置的热更新。
在nacos中添加配置文件
如何在nacos中管理配置呢?

然后在弹出的表单中,填写配置信息:

注意:项目的核心配置,需要热更新的配置才有放到nacos管理的必要。基本不会变更的一些配置还是保存在微服务本地比较好。
2021.5之前的版本从微服务拉取配置
微服务要拉取nacos中管理的配置,并且与本地的application.yml配置合并,才能完成项目启动。
但如果尚未读取application.yml,又如何得知nacos地址呢?
因此spring引入了一种新的配置文件:bootstrap.yaml文件,会在application.yml之前被读取,流程如下:

1)引入nacos-config依赖
首先,在user-service服务中,引入nacos-config的客户端依赖:
<dependency>
    <groupId>com.alibaba.cloudgroupId>
    <artifactId>spring-cloud-starter-alibaba-nacos-configartifactId>
dependency>
2)添加bootstrap.yaml
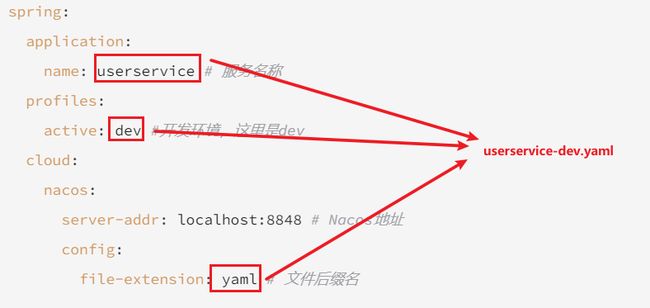
然后,在user-service中添加一个bootstrap.yaml文件,内容如下:
spring:
  application:
    name: userservice # 服务名称
  profiles:
    active: dev #开发环境,这里是dev
  cloud:
    nacos:
      server-addr: localhost:8848 # Nacos地址
      config:
        file-extension: yaml # 文件后缀名
这里会根据spring.cloud.nacos.server-addr获取nacos地址,再根据
${spring.application.name}-${spring.profiles.active}.${spring.cloud.nacos.config.file-extension}作为文件id,来读取配置。
本例中,就是去读取userservice-dev.yaml:
3)读取nacos配置
在user-service中的UserController中添加业务逻辑,读取pattern.dateformat配置:

完整代码:
package cn.onenewcode.user.web;

import cn.onenewcode.user.pojo.User;
import cn.onenewcode.user.service.UserService;
import lombok.extern.slf4j.Slf4j;
import org.springframework.beans.factory.annotation.Autowired;
import org.springframework.beans.factory.annotation.Value;
import org.springframework.web.bind.annotation.*;

import java.time.LocalDateTime;
import java.time.format.DateTimeFormatter;

@Slf4j
@RestController
@RequestMapping("/user")
public class UserController {

    @Autowired
    private UserService userService;

    @Value("${pattern.dateformat}")
    private String dateformat;

    @GetMapping("now")
    public String now(){
        return LocalDateTime.now().format(DateTimeFormatter.ofPattern(dateformat));
    }
    // ...略
}
在页面访问,可以看到效果:

2021.5之前的版本从微服务拉取配置
因为之后的版本spring cloud取消了bootstrap.yaml配置,所以我们需要把内容配置在application.yml。我们只需要把内容改为以下就行
spring:
  application:
    name: userservice
  profiles:
    active: dev
  datasource:
    url: jdbc:mysql://192.168.218.134:3306/cloud?useSSL=false
    username: root
    password: root
    driver-class-name: com.mysql.cj.jdbc.Driver
  config:
    import:
      - optional:nacos:${spring.application.name}-${spring.profiles.active}.${spring.cloud.nacos.config.file-extension}
  cloud:
    nacos:
      config:
        server-addr: 192.168.218.134:8848
#        import-check:
#          enabled: false
#        group: DEFAULT_GROUP
        file-extension: yaml
#        namespace: public
      discovery:
        cluster-name: HZ # 集群名称
        server-addr: 192.168.218.134:8848
配置热更新
我们最终的目的,是修改nacos中的配置后,微服务中无需重启即可让配置生效,也就是配置热更新。
要实现配置热更新,可以使用两种方式:
方式一
在@Value注入的变量所在类上添加注解@RefreshScope:

方式二
使用@ConfigurationProperties注解代替@Value注解。
在user-service服务中,添加一个类,读取patterrn.dateformat属性:
package cn.onenewcode.user.config;

import lombok.Data;
import org.springframework.boot.context.properties.ConfigurationProperties;
import org.springframework.stereotype.Component;

@Component
@Data
@ConfigurationProperties(prefix = "pattern")
public class PatternProperties {
    private String dateformat;
}
在UserController中使用这个类代替@Value:

完整代码:
package cn.onenewcode.user.web;

import cn.onenewcode.user.config.PatternProperties;
import cn.onenewcode.user.pojo.User;
import cn.onenewcode.user.service.UserService;
import lombok.extern.slf4j.Slf4j;
import org.springframework.beans.factory.annotation.Autowired;
import org.springframework.web.bind.annotation.GetMapping;
import org.springframework.web.bind.annotation.PathVariable;
import org.springframework.web.bind.annotation.RequestMapping;
import org.springframework.web.bind.annotation.RestController;

import java.time.LocalDateTime;
import java.time.format.DateTimeFormatter;

@Slf4j
@RestController
@RequestMapping("/user")
public class UserController {

    @Autowired
    private UserService userService;

    @Autowired
    private PatternProperties patternProperties;

    @GetMapping("now")
    public String now(){
        return LocalDateTime.now().format(DateTimeFormatter.ofPattern(patternProperties.getDateformat()));
    }

    // 略
}