PyQt5实现图像抠图交互式系统【环境搭建+GUI界面+功能实现】附完整代码
目录
1. 安装PyQt5
1.1 pip安装PyQt5
1.2 pip 安装 QtTools
1.3 配置PyCharm + QtDesigner
1.4 配置PyCharm+PyUic快捷菜单工具配置
1.5 验证安装是否成功
2、设计GUI界面
3、按钮功能实现
3.1 加载图像
3.2 轮廓查找
3.3 边缘检测
3.4 固定阈值抠图
3.5 自适应阈值抠图
3.6 HSV颜色抠图
1. 安装PyQt5
1.1 pip安装PyQt5
打开cmd窗口,使用命令 conda env list 查看当前虚拟环境,可以切换到你想要的虚拟环境进行下载,命令 activate 你的环境名字。
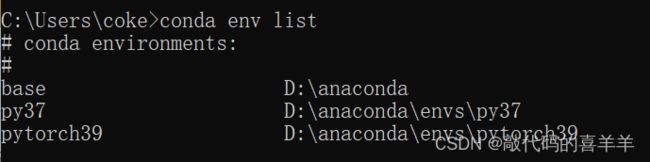
这里我就使用默认的环境base。使用命令 pip install PyQt5 安装PyQt5,若指定版本使用命令 pip install PyQt5==version。
pip install PyQt5 -i https://pypi.tuna.tsinghua.edu.cn/simple/1.2 pip 安装 QtTools
注意,若PyQt5指定了版本,pyqt5-tools也要指定版本,否则pyqt5-tools安装为最新版本后,会将PyQt5也重新安装为最新版本。
pip install PyQt5-tools -i https://pypi.tuna.tsinghua.edu.cn/simple/
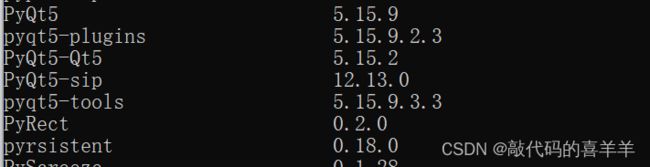
安装完毕后,可以使用命令 pip list查看已安装的第三方库:
1.3 配置PyCharm + QtDesigner
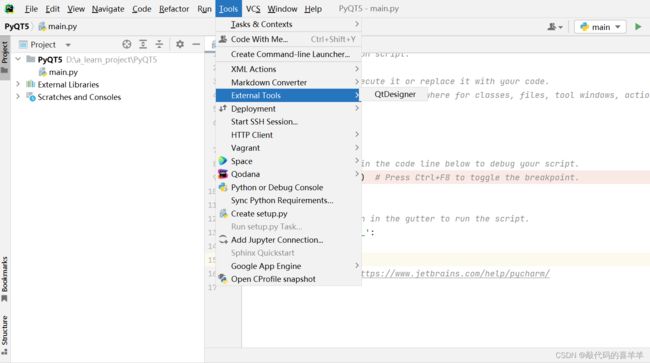
打开pycharm,菜单栏File -> Settings打开设置界面
进入Tools->External Tools->点击加号(+)
找到你的designer.exe所在位置,一般在你的虚拟环境下的 Lib\site-packages\ 下面。
Program:D:\anaconda\Lib\site-packages\qt5_applications\Qt\bin\designer.exe
Working directory: $FileDir$

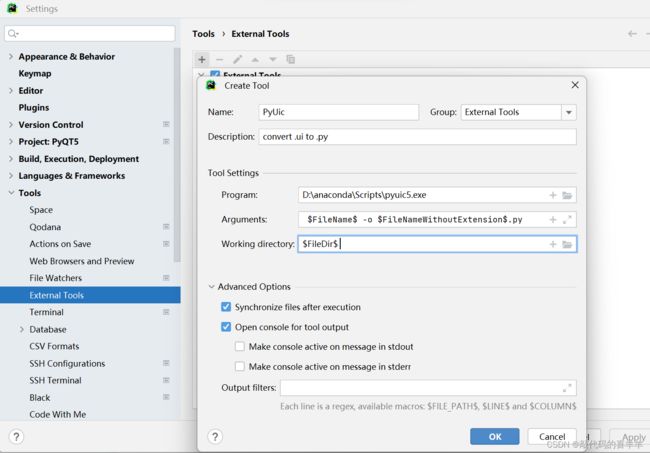
1.4 配置PyCharm+PyUic快捷菜单工具配置
便于将Qt的ui文件转换成.py文件,配置参数如下:
Description: convert .ui to .py
Program:D:\anaconda\Scripts\pyuic5.exe(对应pyuic5.exe的路径)
Arguments: $FileName$ -o $FileNameWithoutExtension$.py
Working directory: $FileDir$
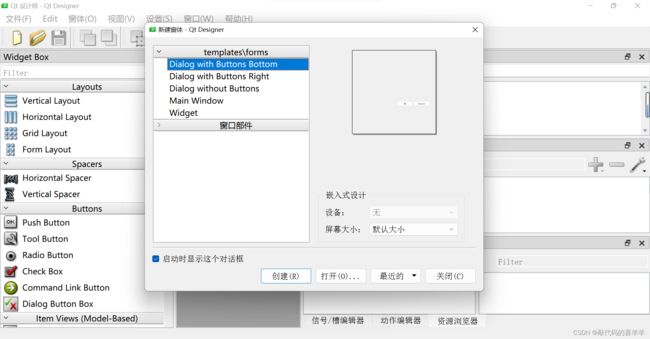
1.5 验证安装是否成功
打开是这个界面就是安装成功了:
2、设计GUI界面
你可以在Qt Designer中选择组件来构建你想要的界面,然后再将其转换为py文件,再写一个main.py文件来给各个组件赋予功能。也可以直接写一个py文件来实现界面和功能的交互式操作。如下示例:
代码如下:
def init_ui(self):
    self.setWindowTitle("图像处理")
    self.setGeometry(100, 100, 800, 600)
    # 创建一个标签用于显示上传的图片
    self.uploaded_image_label = QLabel(self)
    self.uploaded_image_label.setAlignment(Qt.AlignCenter)
    # 创建五个标签用于显示抠图后的图片
    self.contours_image_label = QLabel(self)
    self.contours_image_label.setAlignment(Qt.AlignCenter)
    # 边缘检测
    self.edges_image_label = QLabel(self)
    self.edges_image_label.setAlignment(Qt.AlignCenter)
    # 固定阈值抠图
    self.segmented_image_label_fixed = QLabel(self)
    self.segmented_image_label_fixed.setAlignment(Qt.AlignCenter)
    # 自适应阈值抠图
    self.segmented_image_label_ada = QLabel(self)
    self.segmented_image_label_ada.setAlignment(Qt.AlignCenter)
    # HSV颜色范围抠图
    self.segmented_image_label_hsv = QLabel(self)
    self.segmented_image_label_hsv.setAlignment(Qt.AlignCenter)
    # 创建按钮
    self.load_button = QPushButton("选择图像", self)
    self.load_button.clicked.connect(self.load_image)
    self.contours_button = QPushButton("轮廓查找", self)
    self.contours_button.clicked.connect(self.display_contour)
    self.canny_button = QPushButton("Canny边缘检测", self)
    self.canny_button.clicked.connect(self.display_canny_edge)
    self.threshold_button = QPushButton("固定阈值抠图", self)
    self.threshold_button.clicked.connect(self.threshold_segmentation_dialog)
    self.adaptive_threshold_button = QPushButton("自适应阈值抠图", self)
    self.adaptive_threshold_button.clicked.connect(self.adaptive_threshold_segmentation_dialog)
    self.hsv_button = QPushButton("HSV颜色范围抠图", self)
    self.hsv_button.clicked.connect(self.hsv_segmentation_dialog)
    self.close_button = QPushButton("关闭", self)
    self.close_button.clicked.connect(self.close)
    self.spacer_button = QPushButton("帮助", self)
    self.spacer_button.setEnabled(False)  # 禁用按钮,使其看起来为空
    # 创建一个网格布局,并将按钮和标签添加到布局中
    layout = QGridLayout()
    layout.addWidget(self.load_button, 0, 0)
    layout.addWidget(self.contours_button, 0, 1)
    layout.addWidget(self.canny_button, 0, 2)
    layout.addWidget(self.spacer_button, 0, 3)
    layout.addWidget(self.threshold_button, 1, 0)
    layout.addWidget(self.adaptive_threshold_button, 1, 1)
    layout.addWidget(self.hsv_button, 1, 2)
    layout.addWidget(self.close_button, 1, 3)
    layout.addWidget(self.uploaded_image_label, 2, 0)
    layout.addWidget(self.contours_image_label, 2, 1)
    layout.addWidget(self.edges_image_label, 2, 2)
    layout.addWidget(self.segmented_image_label_fixed, 3, 0)
    layout.addWidget(self.segmented_image_label_ada, 3, 1)
    layout.addWidget(self.segmented_image_label_hsv, 3, 2)
    # 设置load_button的样式
    self.load_button.setStyleSheet("background-color: green; color: white; font-weight: bold;")
    # 设置close_button的样式
    self.close_button.setStyleSheet("background-color: orange; color: white; font-weight: bold;")
    self.spacer_button.setStyleSheet("background-color: blue; color: white; font-weight: bold;")
    # 设置其他按钮的样式
    button_style = "QPushButton { background-color: gray; color: white; font-weight: bold;}"
    self.contours_button.setStyleSheet(button_style)
    self.canny_button.setStyleSheet(button_style)
    self.threshold_button.setStyleSheet(button_style)
    self.adaptive_threshold_button.setStyleSheet(button_style)
    self.hsv_button.setStyleSheet(button_style)
    # 设置按钮的宽度
    self.load_button.setFixedWidth(200)
    self.contours_button.setFixedWidth(200)
    self.canny_button.setFixedWidth(200)
    self.threshold_button.setFixedWidth(200)
    self.adaptive_threshold_button.setFixedWidth(200)
    self.hsv_button.setFixedWidth(200)
    self.close_button.setFixedWidth(100)
    self.spacer_button.setFixedWidth(100)
    # 创建一个部件,将布局设置为部件的布局
    widget = QWidget()
    widget.setLayout(layout)
    # 设置部件为主窗口的中心部件
    self.setCentralWidget(widget)
3、按钮功能实现
- 文件处理模块:导入、导出数据文件和图像;
- 显示图像中间处理过程:轮廓查找、边缘检测;
- 抠图算法选择模块:固定阈值抠图、自适应阈值抠图、HSV颜色范围抠图;
- 系统模块:帮助和退出。
3.1 加载图像
代码如下:
def load_image(self):
    self.image_path = QFileDialog.getOpenFileName(self, "选择图像", "", "Images (*.png *.xpm *.jpg *.bmp)")[0]
    if self.image_path:
        pixmap = QPixmap(self.image_path)
        self.uploaded_image_label.setPixmap(
            pixmap.scaled(self.uploaded_image_label.size(),Qt.KeepAspectRatio, Qt.SmoothTransformation))

def display_image_segment(self,segmented_image_path,segment):
    if segmented_image_path:
        pixmap = QPixmap(segmented_image_path)
        segment.setPixmap(pixmap.scaled(segment.size(), Qt.KeepAspectRatio, Qt.SmoothTransformation))
3.2 轮廓查找
代码如下:
def perform_contour_detection(self):
    image = cv2.imread(self.image_path)
    gray_image = cv2.cvtColor(image, cv2.COLOR_BGR2GRAY)
    _, thresholded = cv2.threshold(gray_image, 128, 255, cv2.THRESH_BINARY)
    contours, _ = cv2.findContours(thresholded, cv2.RETR_EXTERNAL, cv2.CHAIN_APPROX_SIMPLE)
    contours_image = np.zeros_like(image)
    cv2.drawContours(contours_image, contours, -1, (255, 255, 255), 2)
    segmented_image_path_contour = "contours_image.png"
    cv2.imwrite(segmented_image_path_contour, contours_image)
self.display_image_segment(segmented_image_path_contour, self.contours_image_label)
3.3 边缘检测
代码如下:
def perform_canny_edge_detection(self):
    image = cv2.imread(self.image_path, cv2.IMREAD_GRAYSCALE)
    edges = cv2.Canny(image, 100, 200)
    segmented_image_path_edge = "edges_image.png"
    cv2.imwrite(segmented_image_path_edge, edges)
self.display_image_segment(segmented_image_path_edge, self.edges_image_label)
3.4 固定阈值抠图
代码如下:
def threshold_segmentation_dialog(self):
    threshold = QInputDialog.getInt(self, "固定阈值抠图", "阈值:", 128, 0, 255)
    image = cv2.imread(self.image_path, cv2.IMREAD_GRAYSCALE)
    _, thresholded = cv2.threshold(image, threshold[0], 255, cv2.THRESH_BINARY)
    segmented_image_path = "fixed_threshold.png"  # 保存抠图后的图像路径
    cv2.imwrite(segmented_image_path, thresholded)
    self.display_image_segment(segmented_image_path,self.segmented_image_label_fixed)
3.5 自适应阈值抠图
代码如下:
def adaptive_threshold_segmentation_dialog(self):
    image = cv2.imread(self.image_path, cv2.IMREAD_GRAYSCALE)
    thresholded = cv2.adaptiveThreshold(image, 255, cv2.ADAPTIVE_THRESH_MEAN_C, cv2.THRESH_BINARY, 11, 2)
    segmented_image_path = "adaptive_threshold.png"  # 保存抠图后的图像路径
    cv2.imwrite(segmented_image_path, thresholded)
    self.display_image_segment(segmented_image_path,self.segmented_image_label_ada)
3.6 HSV颜色抠图
代码如下:
def hsv_segmentation_dialog(self):
lower_hue, _ = QInputDialog.getInt(self, "HSV颜色范围抠图", "下限Hue:", 0, 0, 179)
upper_hue, _ = QInputDialog.getInt(self, "HSV颜色范围抠图", "上限Hue:", 179, 0, 179)
lower_saturation, _ = QInputDialog.getInt(self, "HSV颜色范围抠图", "下限Saturation:", 0, 0, 255)
upper_saturation, _ = QInputDialog.getInt(self, "HSV颜色范围抠图", "上限Saturation:", 255, 0, 255)
lower_value, _ = QInputDialog.getInt(self, "HSV颜色范围抠图", "下限Value:", 0, 0, 255)
upper_value, _ = QInputDialog.getInt(self, "HSV颜色范围抠图", "上限Value:", 255, 0, 255)
image = cv2.imread(self.image_path)
image_hsv = cv2.cvtColor(image, cv2.COLOR_BGR2HSV)
lower_range = np.array([lower_hue, lower_saturation, lower_value])
upper_range = np.array([upper_hue, upper_saturation, upper_value])
mask = cv2.inRange(image_hsv, lower_range, upper_range)
thresholded = cv2.bitwise_and(image, image, mask=mask)
segmented_image_path = "hsv_threshold.png" # 保存抠图后的图像路径
cv2.imwrite(segmented_image_path, thresholded)
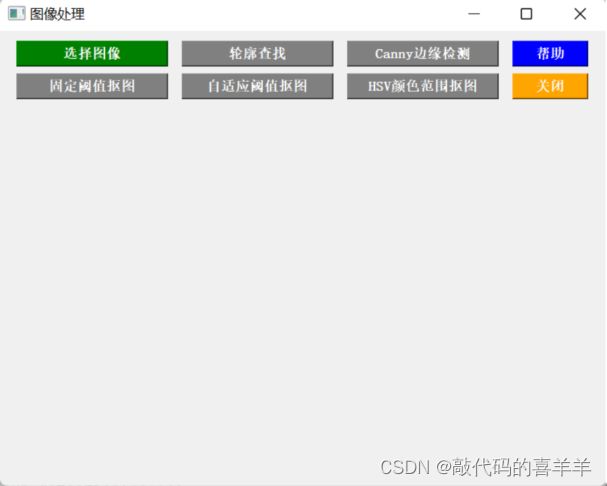
self.display_image_segment(segmented_image_path,self.segmented_image_label_hsv)将各个按钮的功能代码实现后,点击运行,结果如下:

这只是一个示例,可以根据需要对算法进行优化,抠出理想的结果。完整代码上传到gitee,自取:https://gitee.com/ury-u/pytorch.git
(Cutout文件夹里面)
参考文章:
PyCharm安装配置PyQt5/QtDesigner/PyUic的超详细教程_pycharm安装pyqt-CSDN博客