【运维知识大神篇】超详细的ELFK日志分析教程8(filebeat多行匹配+filestream替换log类型+ES集群修复脚本+ES集群加密+角色访问控制+ES集群配置HTTPS加密)
本篇文章继续给大家介绍ELFK日志分析,主要内容可以见下面目录。
目录
filebeat进行多行匹配
一、tomcat错误日志
二、自定义日志格式匹配多行
filestream替换log类型
配置集群免密登录及同步脚本
配置ES集群加密
角色访问控制
一、角色的访问控制(RBAC)
二、创建普通用户给filebeat,logstash权限
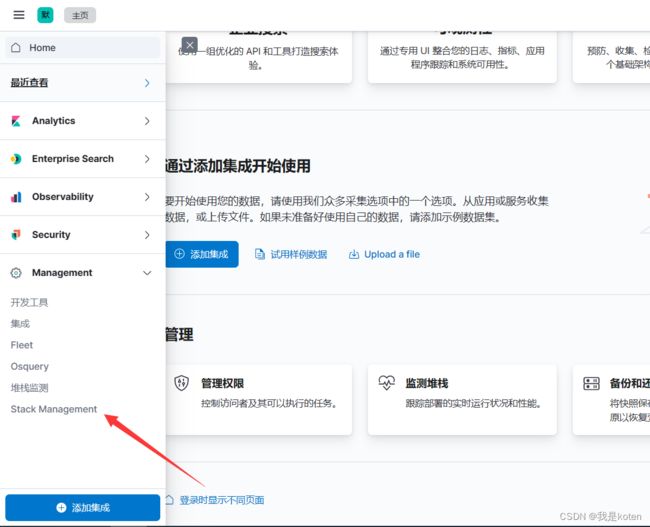
1、创建角色
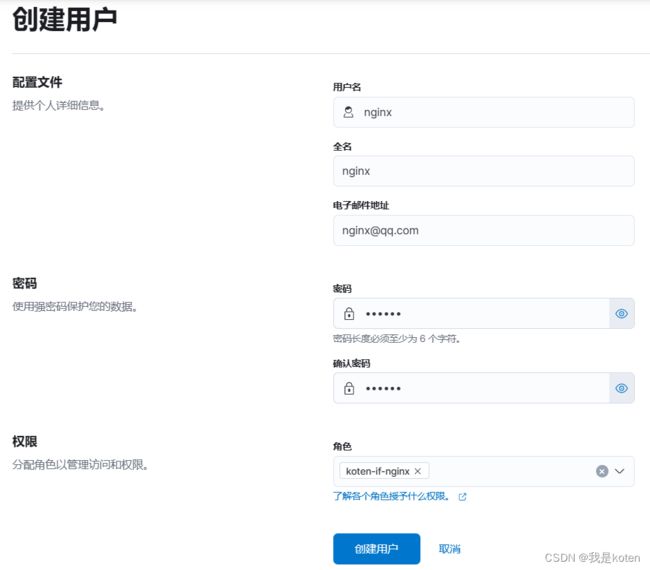
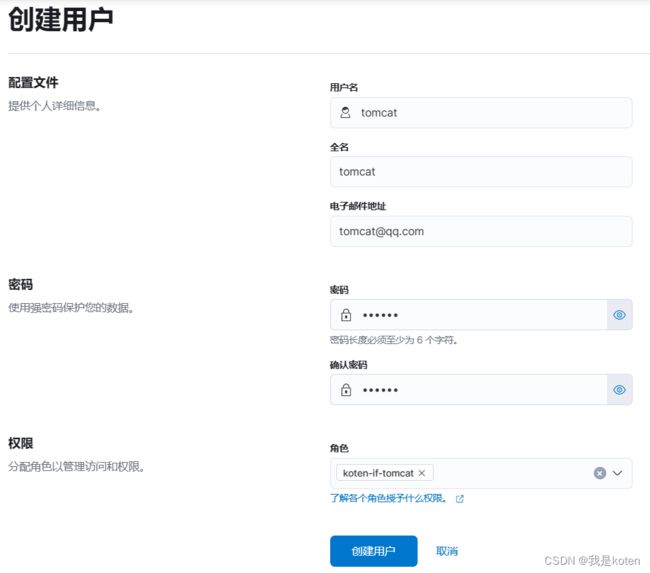
2、创建用户
3、编写filebeat配置文件,用nginx用户写入ES
4、编写logstash配置文件,用tomcat用户写入ES
5、注意事项
实战练习
一、修改ES集群配置文件启用加密和kibana配置文件修改
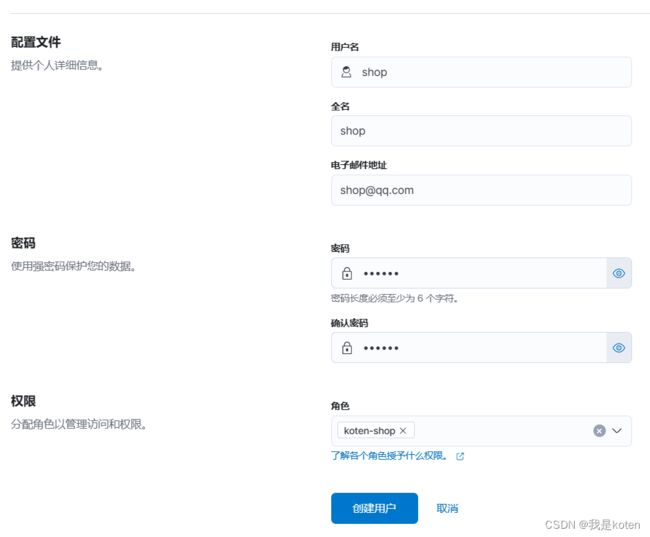
二、在kibana中创建普通角色和用户
三、修改logstash配置文件
四、运行logstash、filebeat,查看是否能正常写入
扩展
一、ES配置https
二、Elasticsearch与Kibana加密连接
三、Kibana配置https
filebeat进行多行匹配
参考官网链接:https://www.elastic.co/guide/en/beats/filebeat/7.17/multiline-examples.html
我们在进行日志采集的时候,会有多行日志信息其实应该在一行的情况,我们就有把它们放在同一行的需求,例如tomcat的错误日志、一些其他自定义的日志格式。
一、tomcat错误日志
1、修改tomcat配置文件,生成一些错误日志
[root@ELK101 ~]# cd /koten/softwares/apache-tomcat-9.0.75/
[root@ELK101 apache-tomcat-9.0.75]# cat conf/server.xml|grep 111
 	<111Host name="localhost"  appBase="webapps"
[root@ELK101 apache-tomcat-9.0.75]# bin/startup.sh
2、使用filebeat采集tomcat错误日志
[root@ELK101 apache-tomcat-9.0.75]# cat logs/catalina.out
......
01-Jun-2023 18:59:45.297 SEVERE [main] org.apache.tomcat.util.digester.Digester.fatalError Parse fatal error at line [161] column [4]
	org.xml.sax.SAXParseException; systemId: file:/koten/softwares/apache-tomcat-9.0.75/conf/server.xml; lineNumber: 161; columnNumber: 4; The content of elements must consist of well-formed character data or markup.
		at com.sun.org.apache.xerces.internal.util.ErrorHandlerWrapper.createSAXParseException(ErrorHandlerWrapper.java:204)
		at com.sun.org.apache.xerces.internal.util.ErrorHandlerWrapper.fatalError(ErrorHandlerWrapper.java:178)
		at com.sun.org.apache.xerces.internal.impl.XMLErrorReporter.reportError(XMLErrorReporter.java:400)
		at com.sun.org.apache.xerces.internal.impl.XMLErrorReporter.reportError(XMLErrorReporter.java:327)
		at com.sun.org.apache.xerces.internal.impl.XMLScanner.reportFatalError(XMLScanner.java:1472)
		at com.sun.org.apache.xerces.internal.impl.XMLDocumentFragmentScannerImpl$FragmentContentDriver.startOfMarkup(XMLDocumentFragmentScannerImpl.java:2637)
		at com.sun.org.apache.xerces.internal.impl.XMLDocumentFragmentScannerImpl$FragmentContentDriver.next(XMLDocumentFragmentScannerImpl.java:2734)
		at com.sun.org.apache.xerces.internal.impl.XMLDocumentScannerImpl.next(XMLDocumentScannerImpl.java:605)
		at com.sun.org.apache.xerces.internal.impl.XMLDocumentFragmentScannerImpl.scanDocument(XMLDocumentFragmentScannerImpl.java:507)
		at com.sun.org.apache.xerces.internal.parsers.XML11Configuration.parse(XML11Configuration.java:867)
		at com.sun.org.apache.xerces.internal.parsers.XML11Configuration.parse(XML11Configuration.java:796)
		at com.sun.org.apache.xerces.internal.parsers.XMLParser.parse(XMLParser.java:142)
		at com.sun.org.apache.xerces.internal.parsers.AbstractSAXParser.parse(AbstractSAXParser.java:1216)
		at com.sun.org.apache.xerces.internal.jaxp.SAXParserImpl$JAXPSAXParser.parse(SAXParserImpl.java:644)
		at org.apache.tomcat.util.digester.Digester.parse(Digester.java:1535)
		at org.apache.catalina.startup.Catalina.parseServerXml(Catalina.java:617)
		at org.apache.catalina.startup.Catalina.load(Catalina.java:709)
		at org.apache.catalina.startup.Catalina.load(Catalina.java:746)
		at sun.reflect.NativeMethodAccessorImpl.invoke0(Native Method)
		at sun.reflect.NativeMethodAccessorImpl.invoke(NativeMethodAccessorImpl.java:62)
		at sun.reflect.DelegatingMethodAccessorImpl.invoke(DelegatingMethodAccessorImpl.java:43)
		at java.lang.reflect.Method.invoke(Method.java:498)
		at org.apache.catalina.startup.Bootstrap.load(Bootstrap.java:307)
		at org.apache.catalina.startup.Bootstrap.main(Bootstrap.java:477)
......
3、filebeat采集tomcat错误日志
[root@ELK101 ~]# cd /koten/softwares/filebeat-7.17.5-linux-x86_64/config/
[root@ELK101 config]# cat 10-tomcat-to-es.yaml
filebeat.inputs:
- type: log
  paths:
  - "/koten/softwares/apache-tomcat-9.0.75/logs/catalina.out*"
  # 表示指定多行匹配的类型
  multiline.type: pattern
  # 指定多行匹配的模式
  multiline.pattern: '^[0-9]{2}'
  # 匹配方式,匹配内容在前面,其他内容在后面,遇到下一个匹配内容前换行
  multiline.negate: true
  multiline.match: after

output.console:
  pretty: true
[root@ELK101 filebeat-7.17.5-linux-x86_64]# rm -rf data/
[root@ELK101 filebeat-7.17.5-linux-x86_64]# ./filebeat -e -c config/10-tomcat-to-es.yaml
......
"message": "01-Jun-2023 18:59:45.306 WARNING [main] org.apache.catalina.startup.Catalina.parseServerXml Unable to load server configuration from [/koten/softwares/apache-tomcat-9.0.75/conf/server.xml]\n\torg.xml.sax.SAXParseException; systemId: file:/koten/softwares/apache-tomcat-9.0.75/conf/server.xml; lineNumber: 161; columnNumber: 4; The content of elements must consist of well-formed character data or markup.\n\t\tat com.sun.org.apache.xerces.internal.parsers.AbstractSAXParser.parse(AbstractSAXParser.java:1243)\n\t\tat com.sun.org.apache.xerces.internal.jaxp.SAXParserImpl$JAXPSAXParser.parse(SAXParserImpl.java:644)\n\t\tat org.apache.tomcat.util.digester.Digester.parse(Digester.java:1535)\n\t\tat org.apache.catalina.startup.Catalina.parseServerXml(Catalina.java:617)\n\t\tat org.apache.catalina.startup.Catalina.load(Catalina.java:709)\n\t\tat org.apache.catalina.startup.Catalina.load(Catalina.java:746)\n\t\tat sun.reflect.NativeMethodAccessorImpl.invoke0(Native Method)\n\t\tat sun.reflect.NativeMethodAccessorImpl.invoke(NativeMethodAccessorImpl.java:62)\n\t\tat sun.reflect.DelegatingMethodAccessorImpl.invoke(DelegatingMethodAccessorImpl.java:43)\n\t\tat java.lang.reflect.Method.invoke(Method.java:498)\n\t\tat org.apache.catalina.startup.Bootstrap.load(Bootstrap.java:307)\n\t\tat org.apache.catalina.startup.Bootstrap.main(Bootstrap.java:477)",
......
二、自定义日志格式匹配多行
将如下json数据匹配为3行
[root@ELK101 ~]# cat /tmp/hobby.txt
{
  "name": "koten1",
  "hobby": ["nginx","tomcat","apache"]
}
{
  "name": "koten2",
  "hobby": ["zabbix","jenkins","sonarqube"]
}
{
  "name": "koten3",
  "hobby": ["elk","docker","k8s"]
}
解法1,以{开头匹配
[root@ELK101 ~]# cat config/05-01-pattern.yaml
filebeat.inputs:
- type: log
  paths:
  - "/tmp/hobby.txt"
  multiline.type: pattern
  multiline.pattern: '^{'
  multiline.negate: true
  multiline.match: after

output.console:
  pretty: true
[root@ELK101 ~]# rm -rf /var/lib/filebeat/*
[root@ELK101 ~]# filebeat -e -c config/05-pattern.yaml | grep message
......
  "message": "{\n  \"name\": \"koten1\",\n  \"hobby\": [\"nginx\",\"tomcat\",\"apache\"]\n}"
  "message": "{\n  \"name\": \"koten2\",\n  \"hobby\": [\"zabbix\",\"jenkins\",\"sonarqube\"]\n}",
  "message": "{\n  \"name\": \"koten3\",\n  \"hobby\": [\"elk\",\"docker\",\"k8s\"]\n}",
解法2,以}结尾匹配,以}开头的也可以,把negate改为true,match改为before即可
[root@ELK101 ~]# cat config/05-02-pattern.yaml
filebeat.inputs:
- type: log
  paths:
  - "/tmp/hobby.txt"
  multiline.type: pattern
  multiline.pattern: '}$'
  multiline.negate: true
  multiline.match: before

output.console:
  pretty: true
[root@ELK101 ~]# rm -rf /var/lib/filebeat/*
[root@ELK101 ~]# filebeat -e -c config/05-02-pattern.yaml | grep message
......
  "message": "{\n  \"name\": \"koten1\",\n  \"hobby\": [\"nginx\",\"tomcat\",\"apache\"]\n}",
  "message": "{\n  \"name\": \"koten2\",\n  \"hobby\": [\"zabbix\",\"jenkins\",\"sonarqube\"]\n}",
  "message": "{\n  \"name\": \"koten3\",\n  \"hobby\": [\"elk\",\"docker\",\"k8s\"]\n}",
.....
解法3,以{开头,}结尾的匹配到,此匹配方法效率最高,速度最快
[root@ELK101 ~]# cat config/05-03-pattern.yaml
filebeat.inputs:
- type: log
  paths:
  - /tmp/hobby.txt
  multiline.type: pattern
  multiline.pattern: '{'
  multiline.negate: true
  multiline.match: after
  multiline.flush_pattern: '}'

output.console:
  pretty: true
[root@ELK101 ~]# rm -rf /var/lib/filebeat/*
[root@ELK101 ~]# filebeat -e -c config/05-03-pattern.yaml |grep message
......
  "message": "{\n  \"name\": \"koten1\",\n  \"hobby\": [\"nginx\",\"tomcat\",\"apache\"]\n}",
  "message": "{\n  \"name\": \"koten2\",\n  \"hobby\": [\"zabbix\",\"jenkins\",\"sonarqube\"]\n}",
  "message": "{\n  \"name\": \"koten3\",\n  \"hobby\": [\"elk\",\"docker\",\"k8s\"]\n}",
......
解法4,四行一匹配,此方法速度也快,但容易受局限,若json文本为一行显示,就无法把json列为一行了
[root@ELK101 ~]# cat config/05-04-pattern.yaml
filebeat.inputs:
- type: log
  paths:
  - /tmp/hobby.txt
  multiline:
    type: count
    count_lines: 4
output.console:
  pretty: true
[root@ELK101 ~]# rm -rf /var/lib/filebeat/*
[root@ELK101 ~]# filebeat -e -c config/05-04-pattern.yaml |grep message
......
  "message": "{\n  \"name\": \"koten1\",\n  \"hobby\": [\"nginx\",\"tomcat\",\"apache\"]\n}"
  "message": "{\n  \"name\": \"koten2\",\n  \"hobby\": [\"zabbix\",\"jenkins\",\"sonarqube\"]\n}",
  "message": "{\n  \"name\": \"koten3\",\n  \"hobby\": [\"elk\",\"docker\",\"k8s\"]\n}",
......
filestream替换log类型
现在filebeat的input的log类型逐渐被弃用了,我们可以使用filestream替换log,具体使用方法与log大同小异,会一个就会另一个,具体的参数语法看官网文档就行。
[root@ELK101 ~]# cat config/06-01-filestream-to-console.yaml
filebeat.inputs:
- type: filestream
  paths:
  - /tmp/hobby.txt
  # 定义解析器,解析器的执行顺序从上到下哟~
  parsers:
      # 进行多行匹配
    - multiline:
        type: pattern
        pattern: '^{'
        negate: true
        match: after
      # 对文本进行json格式解析
    - ndjson:
        # 将解析的字段放在指定的位置,""代表放在顶级字段
        target: ""
        # 指定要解析的字段
        message_key: message
output.console:
  pretty: true
[root@ELK101 ~]# rm -rf /var/lib/filebeat/*
[root@ELK101 ~]# filebeat -e -c config/06-01-filestream-to-console.yaml
......
{
  "@timestamp": "2023-06-01T12:20:26.467Z",
  "@metadata": {
    "beat": "filebeat",
    "type": "_doc",
    "version": "7.17.5"
  },
  "input": {
    "type": "filestream"
  },
  "ecs": {
    "version": "1.12.0"
  },
  "host": {
    "name": "ELK101"
  },
  "agent": {
    "version": "7.17.5",
    "hostname": "ELK101",
    "ephemeral_id": "9c6d6443-288e-4ce7-a4ba-6aa19dcd6488",
    "id": "c47a6941-4e9d-4526-85b4-b5db7139dc78",
    "name": "ELK101",
    "type": "filebeat"
  },
  "log": {
    "file": {
      "path": "/tmp/hobby.txt"
    },
    "flags": [
      "multiline"
    ],
    "offset": 187
  },
  "hobby": [
    "elk",
    "docker",
    "k8s"
  ],
  "name": "koten3"        #成功将整合后的行json解析出来
}
......
其他的解决办法也可以实现,以{开头,}结尾
[root@ELK101 ~]# cat config/06-02-filestream-to-console.yaml
filebeat.inputs:
- type: filestream
  paths:
  - /tmp/hobby.txt
  # 定义解析器,解析器的执行顺序从上到下哟~
  parsers:
      # 进行多行匹配
    - multiline:
        type: pattern
        pattern: '{'
        negate: true
        match: after
        flush_pattern: '}'
      # 对文本进行json格式解析
    - ndjson:
        # 将解析的字段放在指定的位置,""代表放在顶级字段
        target: ""
        # 指定要解析的字段
        message_key: message
output.console:
  pretty: true
也支持用4行为分割的解决办法
[root@ELK101 ~]# cat config/06-03-filestream-to-console.yaml
filebeat.inputs:
- type: filestream
  paths:
  - /tmp/hobby.json
  # 定义解析器,解析器的执行顺序从上到下哟~
  parsers:
      # 进行多行匹配
    - multiline:
        # 指定匹配的类型
        type: count
        # 指定匹配的行数
        count_lines: 4
      # 对文本进行json格式解析
    - ndjson:
        # 将解析的字段放在指定的位置,""代表放在顶级字段
        target: ""
        # 指定要解析的字段
        message_key: message
output.console:
  pretty: true
配置集群免密登录及同步脚本
之前我介绍过用脚本和ansible一键部署ES集群,但是在工作的过程中,我们不会总是从零开始部署,有的时候因为某种原因,可能会去修复某一节点,这时我们可以用到同步脚本去修复,假设我们需要在elk103上去修复,修复101和102,同时也起到将101也设置成数据节点的作用
1、修改主机列表
[root@ELK103 ~]# cat >> /etc/hosts <<'EOF'
> 10.0.0.101 elk101
> 10.0.0.102 elk102
> 10.0.0.103 elk103
> EOF
2、elk103上节点生成密钥对
[root@ELK103 ~]# ssh-keygen -t rsa -P '' -f ~/.ssh/id_rsa -q
3、elk103配置所有集群节点的免密登录
[root@ELK103 ~]# for ((host_id=101;host_id<=103;host_id++));do ssh-copy-id elk${host_id} ;done4、ssh链接测试
[root@ELK103 ~]# ssh 'elk101'
Last login: Thu Jun  1 09:41:19 2023 from 10.0.0.1
[root@ELK101 ~]# logout
Connection to elk101 closed.
[root@ELK103 ~]# ssh 'elk102'
Last login: Wed May 31 23:30:34 2023 from 10.0.0.1
[root@ELK102 ~]# logout
Connection to elk102 closed.
[root@ELK103 ~]# ssh 'elk103'
Last login: Thu Jun  1 09:41:07 2023 from 10.0.0.1
[root@ELK103 ~]# logout
Connection to elk103 closed.
5、所有节点安装rsync数据同步工具
[root@ELK101 ~]# yum -y install rsync
[root@ELK102 ~]# yum -y install rsync
[root@ELK103 ~]# yum -y install rsync
6、编写同步目录脚本
[root@elk103 ~]# cat > /usr/local/sbin/data_rsync.sh <<'EOF'
#!/bin/bash

if  [ $# -ne 1 ];then
   echo "Usage: $0 /path/to/file(绝对路径)"
   exit
fi

# 判断文件是否存在
if [ ! -e $1 ];then
    echo "[ $1 ] dir or file not find!"
    exit
fi

# 获取父路径
fullpath=`dirname $1`

# 获取子路径
basename=`basename $1`

# 进入到父路径
cd $fullpath

for ((host_id=101;host_id<=102;host_id++))
  do
    # 使得终端输出变为绿色
    tput setaf 2
    echo ===== rsyncing elk${host_id}: $basename =====
    # 使得终端恢复原来的颜色
    tput setaf 7
    # 将数据同步到其他两个节点
    rsync -apz $basename  `whoami`@elk${host_id}:$fullpath
    if [ $? -eq 0 ];then
      echo "命令执行成功!"
    fi
done
EOF
7、给脚本授权
[root@elk103 ~]# chmod +x /usr/local/sbin/data_rsync.sh8、执行脚本,直接将elk103所有目录同步给elk101和elk102
[root@ELK103 ~]# egrep -v '^$|^*#' /koten/softwares/elasticsearch-7.17.5/config/elasticsearch.yml
cluster.name: koten-es7
path.data: /koten/data/es7
path.logs: /koten/logs/es7
network.host: 0.0.0.0
http.port: 19200
transport.tcp.port: 19300
discovery.seed_hosts: ["10.0.0.101","10.0.0.102","10.0.0.103"]
cluster.initial_master_nodes: ["10.0.0.101"]
# node.data: true            #取消注释,都设置为数据节点
# node.master: false

[root@ELK103 ~]# /usr/local/sbin/data_rsync.sh /koten/softwares/elasticsearch-7.17.5/
===== rsyncing elk101: elasticsearch-7.17.5 =====
命令执行成功!
===== rsyncing elk102: elasticsearch-7.17.5 =====
命令执行成功!
9、重启elk101、elk102、elk103,查看集群状态
[root@ELK101 ~]# systemctl restart es7
[root@ELK102 ~]# systemctl restart es7
[root@ELK103 ~]# systemctl restart es7

[root@ELK101 ~]# curl 10.0.0.101:19200/_cat/nodes
10.0.0.101 62 97 73 1.62 0.65 0.32 cdfhilmrstw * ELK101    全部都设置成了数据节点了
10.0.0.103 83 28 14 0.73 0.36 0.22 cdfhilmrstw - ELK103
10.0.0.102 68 27 38 0.76 0.36 0.22 cdfhilmrstw - ELK102
配置ES集群加密
我们的ES集群要设置密码,不能让人随意登录访问
1、生成证书文件
由于刚刚在elk103设置了同步脚本,所以我们在elk103上生成证书文件
[root@ELK103 ~]# cd /koten/softwares/elasticsearch-7.17.5/
[root@ELK103 elasticsearch-7.17.5]# ./bin/elasticsearch-certutil cert -out config/koten-elastic-certificates.p12 -pass ""
2、为证书修改属主属组
[root@ELK103 elasticsearch-7.17.5]# chown koten:koten config/koten-elastic-certificates.p12 3、同步证书文件到其他节点
[root@ELK103 elasticsearch-7.17.5]# data_rsync.sh `pwd`/config/koten-elastic-certificates.p12
===== rsyncing elk101: koten-elastic-certificates.p12 =====
命令执行成功!
===== rsyncing elk102: koten-elastic-certificates.p12 =====
命令执行成功!
4、修改ES集群配置文件
[root@ELK103 elasticsearch-7.17.5]# egrep -v '^$|^*#' config/elasticsearch.yml
cluster.name: koten-es7
path.data: /koten/data/es7
path.logs: /koten/logs/es7
network.host: 0.0.0.0
http.port: 19200
transport.tcp.port: 19300
discovery.seed_hosts: ["10.0.0.101","10.0.0.102","10.0.0.103"]
cluster.initial_master_nodes: ["10.0.0.101"]
xpack.security.enabled: true
xpack.security.transport.ssl.enabled: true
xpack.security.transport.ssl.verification_mode: certificate
xpack.security.transport.ssl.keystore.path: koten-elastic-certificates.p12
xpack.security.transport.ssl.truststore.path: koten-elastic-certificates.p12
5、同步ES配置文件到其他节点
[root@ELK103 elasticsearch-7.17.5]# data_rsync.sh /koten/softwares/elasticsearch-7.17.5/config/elasticsearch.yml     #注意参数写绝对路径
===== rsyncing elk101: elasticsearch.yml =====
命令执行成功!
===== rsyncing elk102: elasticsearch.yml =====
命令执行成功!
6、所有节点重启ES集群
[root@ELK101 ~]# systemctl restart es7
[root@ELK102 ~]# systemctl restart es7
[root@ELK103 ~]# systemctl restart es7
7、访问集群节点,无法访问,是正常的
[root@ELK102 ~]# curl 10.0.0.103:19200/_cat/nodes
{"error":{"root_cause":[{"type":"security_exception","reason":"missing authentication credentials for REST request [/_cat/nodes]","header":{"WWW-Authenticate":"Basic realm=\"security\" charset=\"UTF-8\""}}],"type":"security_exception","reason":"missing authentication credentials for REST request [/_cat/nodes]","header":{"WWW-Authenticate":"Basic realm=\"security\" charset=\"UTF-8\""}},"status":401}
8、生成随机密码,我们选择自动生成,否则要手动生成六个,可以-h查看帮助
[root@ELK103 elasticsearch-7.17.5]# ./bin/elasticsearch-setup-passwords auto
......
Please confirm that you would like to continue [y/N]y
......
Changed password for user apm_system
PASSWORD apm_system = Bkk9HLQkt3EIh2QBJeVN

Changed password for user kibana_system
PASSWORD kibana_system = KiC6toqVWIDbeLUEJq0I

Changed password for user kibana
PASSWORD kibana = KiC6toqVWIDbeLUEJq0I

Changed password for user logstash_system
PASSWORD logstash_system = sdn4q1ops6olEuEpSM1w

Changed password for user beats_system
PASSWORD beats_system = kU63nWm83JZID0lE1wZs

Changed password for user remote_monitoring_user
PASSWORD remote_monitoring_user = n0jSsdJ9fSYrqNNcoWbK

Changed password for user elastic
PASSWORD elastic = NGbfjHDrJnH1Uucqf0Ai

[root@ELK103 elasticsearch-7.17.5]#
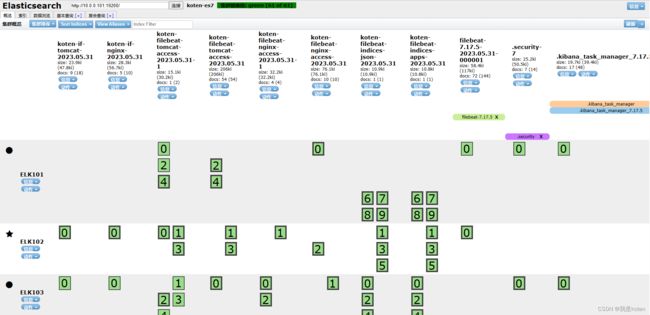
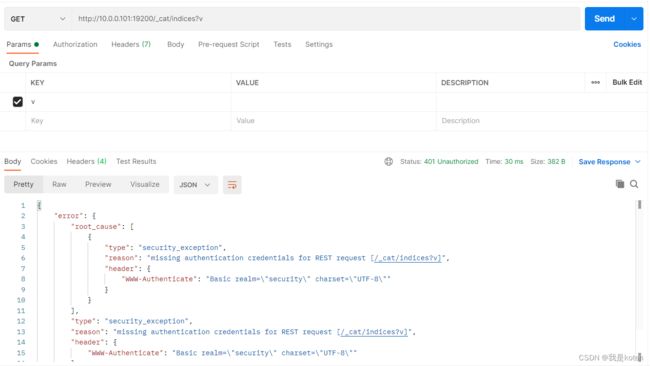
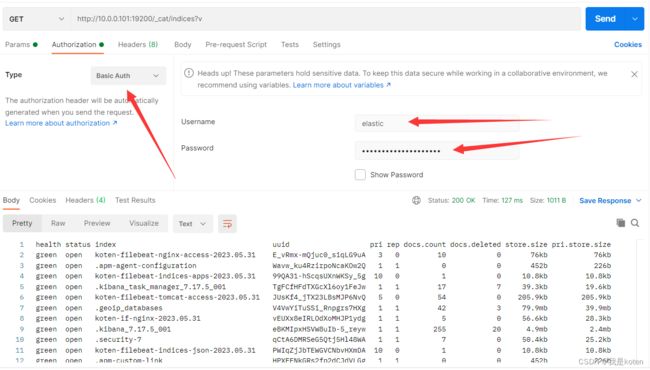
9、es-head、postman、curl测试不带密码与带密码访问
账号:elastic,密码:NGbfjHDrJnH1Uucqf0Ai
es-head
postman
curl
[root@ELK103 elasticsearch-7.17.5]# curl 10.0.0.101:19200/_cat/nodes
{"error":{"root_cause":[{"type":"security_exception","reason":"missing authentication credentials for REST request [/_cat/nodes]","header":{"WWW-Authenticate":"Basic realm=\"security\" charset=\"UTF-8\""}}],"type":"security_exception","reason":"missing authentication credentials for REST request [/_cat/nodes]","header":{"WWW-Authenticate":"Basic realm=\"security\" charset=\"UTF-8\""}},"status":401}

[root@ELK103 elasticsearch-7.17.5]# curl -u elastic:NGbfjHDrJnH1Uucqf0Ai 10.0.0.101:19200/_cat/nodes
10.0.0.103 62 30 1 0.09 0.17 0.20 cdfhilmrstw - ELK103
10.0.0.102 64 30 3 0.02 0.20 0.25 cdfhilmrstw * ELK102
10.0.0.101 63 96 7 0.12 0.30 0.39 cdfhilmrstw - ELK101
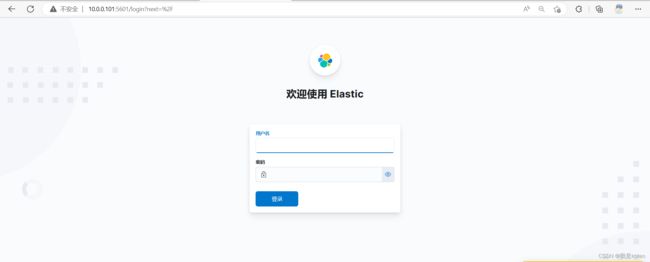
10、配置kibana访问es,登录kibana
直接访问显示
[root@ELK101 ~]# egrep -v '^$|^*#' /etc/kibana/kibana.yml
server.host: "0.0.0.0"
elasticsearch.hosts: ["http://10.0.0.101:19200","http://10.0.0.102:19200","http://10.0.0.103:19200"]
elasticsearch.username: "kibana_system"
elasticsearch.password: "KiC6toqVWIDbeLUEJq0I"
i18n.locale: "zh-CN"
[root@ELK101 ~]# systemctl restart kibana
再次访问提示需要账号密码,我们用elastic用户登录,elastic用户相当于root用户,并且修改管理员密码
注销之后,更改的密码会生效,用更改后的密码登录即可
角色访问控制
一、角色的访问控制(RBAC)
我们可以创建指定的角色,给用户分配指定的角色,由角色负责分配管理哪个索引,这样用户如果离职后直接修改角色下的用户即可,比一个用户直接对应索引要方便。
二、创建普通用户给filebeat,logstash权限
我们要给filebeat和logstash尽量少的权限,因为我们需要把账号密码明文直接写入配置文件中,有人拿到我们的配置文件,就相当于拿到了ES的账号密码了,非常危险,所以我们的filebeat尽量只给创建索引、创建字段、写入文档的权限就可以,读的权限也不用给。
需要注意集群权限和索引权限的配合,集群权限给monitor,索引权限就需要给all,集群权限给manager,索引权限就需要给create_doc,create_index
1、创建角色
不知道应该添加哪些权限可以点了解详情,有英文文档可以看吗,选择自己需要的权限添加
以索引权限举例,此时create和下面另外两个不是包含权限的关系,而是各有各的作用,所以使用时候要注意,并不是选择了create就不用选下面的了,而create_index和create都是与索引有关,选择一个即可,选择多个反而冲突,而create_doc则都需要选择,不选择就创建不了新的文档,总之就是要学会看文档,不要拿自己的想法想当然!
create_doc是为新文档编制索引的权限,不允许覆盖或更新现有的。
create_index是创建索引或数据流的权限。
create是索引文档的权限,允许覆盖任何现有文档,但不允许更新一个。
此时我更改create为create_doc只是允不允许覆盖的区别
2、创建用户
3、编写filebeat配置文件,用nginx用户写入ES
[root@ELK101 ~]# cat config/07-log-to-es_passwd.yaml
filebeat.inputs:
- type: log
  paths:
  - /tmp/nginx.log

output.elasticsearch:
  username: "nginx"
  password: "123456"
  hosts:
  - "http://10.0.0.101:19200"
  - "http://10.0.0.102:19200"
  - "http://10.0.0.103:19200"
  index: "koten-if-nginx-%{+yyyy.MM.dd}"

setup.ilm.enabled: false
setup.template.name: "koten-if-nginx"
setup.template.pattern: "koten-if-nginx*"
setup.template.overwrite: true
setup.template.settings:
  index.number_of_shards: 5
  index.number_of_replicas: 0
[root@ELK101 ~]# rm -rf /var/lib/filebeat/*
[root@ELK101 ~]# filebeat -e -c config/07-log-to-es_passwd.yaml
[root@ELK101 ~]# echo nginx666 >> /tmp/nginx.log
[root@ELK101 ~]# echo nginx888 >> /tmp/nginx.log
4、编写logstash配置文件,用tomcat用户写入ES
[root@ELK101 ~]# cat config/08-tomcat-to-es_passwd.yaml
filebeat.inputs:
- type: log
  paths:
  - /tmp/tomcat.log

output.elasticsearch:
  username: "tomcat"
  password: "123456"
  hosts:
  - "http://10.0.0.101:19200"
  - "http://10.0.0.102:19200"
  - "http://10.0.0.103:19200"
  index: "koten-if-tomcat-%{+yyyy.MM.dd}"

setup.ilm.enabled: false
setup.template.name: "koten-if-tomcat"
setup.template.pattern: "koten-if-tomcat*"
setup.template.overwrite: true
setup.template.settings:
  index.number_of_shards: 5
  index.number_of_replicas: 0

[root@ELK101 ~]# rm -rf /var/lib/filebeat/*
[root@ELK101 ~]# filebeat -e -c config/08-tomcat-to-es_passwd.yaml
[root@ELK101 ~]# echo tomcat666 >> /tmp/tomcat.log
[root@ELK101 ~]# echo tomcat888 >> /tmp/tomcat.log
5、注意事项
由于没有给用户kibana权限,所以用这些用户登录kibana会提示无权访问
实战练习
前情提要:【运维知识大神篇】超详细的ELFK日志分析教程7(filebeat常用模块+filebeat采集固定格式日志+自定义日志格式写入ES+EFK架构转ELFK架构+两个业务实战练习)
将商品信息和30万条nginx记录实现ELFK架构后,要求ES集群经过加密,本篇文章的联系与上篇文章互通,我们将ES集群加密启用后,将logstash,kibana配置文件加上加密的账号密码即可,filebeat由于是采集数据,输出到logstash,与ES集群无关,所以不用修改配置文件,两个业务原理相同,配置文件并无区别,所以我们以商品信息的业务为例。
一、修改ES集群配置文件启用加密和kibana配置文件修改
见本篇文章上面位置,ES配置好后可以curl测试有没有出现权限不足的提示
[root@ELK103 ~]# curl 10.0.0.103:19200/_cat/nodes
{"error":{"root_cause":[{"type":"security_exception","reason":"missing authentication credentials for REST request [/_cat/nodes]","header":{"WWW-Authenticate":"Basic realm=\"security\" charset=\"UTF-8\""}}],"type":"security_exception","reason":"missing authentication credentials for REST request [/_cat/nodes]","header":{"WWW-Authenticate":"Basic realm=\"security\" charset=\"UTF-8\""}},"status":401}
kibana配置好后可以开个隐私模式开个页面看是否会让提示登录
二、在kibana中创建普通角色和用户
三、修改logstash配置文件
[root@ELK102 ~]# egrep -v '^$|^*#' /etc/logstash/logstash.yml
path.data: /var/lib/logstash
path.logs: /var/log/logstash
xpack.monitoring.enabled: true
xpack.monitoring.elasticsearch.username: shop
xpack.monitoring.elasticsearch.password: 123456
xpack.monitoring.elasticsearch.hosts: ["http://10.0.0.101:9200","http://10.0.0.102:9200","http://10.0.0.103:9200"]
四、运行logstash、filebeat,查看是否能正常写入
[root@ELK102 ~]# logstash -rf config_logstash/18-filebeat-to-es.conf
[root@ELK101 ~]# filebeat -e -c config/10-txt-bulk-json-to-logstash.yaml
扩展
搭建一套以https方式访问的es集群,上面我们为了加密ES集群创建了证书,这次我们可以新建一个证书也可以用之前的证书,我们以采用之前证书作为演示
一、ES配置https
以ELK1010为例,其他节点同理
[root@ELK101 ~]# egrep -v '^$|^*#' /koten/softwares/elasticsearch-7.17.5/config/elasticsearch.yml
cluster.name: koten-es7
path.data: /koten/data/es7
path.logs: /koten/logs/es7
network.host: 0.0.0.0
http.port: 19200
transport.tcp.port: 19300
discovery.seed_hosts: ["10.0.0.101","10.0.0.102","10.0.0.103"]
cluster.initial_master_nodes: ["10.0.0.101"]
xpack.security.enabled: true
xpack.security.transport.ssl.enabled: true
xpack.security.transport.ssl.verification_mode: certificate
xpack.security.transport.ssl.keystore.path: koten-elastic-certificates.p12
xpack.security.transport.ssl.truststore.path: koten-elastic-certificates.p12
# 在 elasticsearch.yml 文件中添加以下配置内容
xpack.security.http.ssl.enabled: true  # 启用 SSL/TLS 功能
xpack.security.http.ssl.keystore.path: koten-elastic-certificates.p12  # 证书路径
xpack.security.http.ssl.truststore.path: koten-elastic-certificates.p12  # 受信任的证书路径
[root@ELK101 ~]# systemctl restart es7
二、Elasticsearch与Kibana加密连接
[root@ELK101 ~]# cd /koten/softwares/elasticsearch-7.17.5/config/
[root@ELK101 config]# ls
elasticsearch.keystore             jvm.options                     log4j2.properties  users
elasticsearch-plugins.example.yml  jvm.options.d                   role_mapping.yml   users_roles
elasticsearch.yml                  koten-elastic-certificates.p12  roles.yml
[root@ELK101 config]# openssl pkcs12 -in koten-elastic-certificates.p12 -nocerts -nodes > client.key    #分解文件为私钥
Enter Import Password:
MAC verified OK
[root@ELK101 config]# openssl pkcs12 -in koten-elastic-certificates.p12 -clcerts -nokeys  > client.cer    #分解文件为公共证书
Enter Import Password:
MAC verified OK
[root@ELK101 config]# openssl pkcs12 -in koten-elastic-certificates.p12 -cacerts -nokeys -chain > client-ca.cer    #签署公共证书的CA
Enter Import Password:
MAC verified OK
Kibana根目录下创建目录:config/certs,将文件client.cer、client.key、client-ca.cer复制到该目录,编辑Kibana配置文件,重启kibana
[root@ELK101 ~]# mkdir -p /usr/share/kibana/config/certs
[root@ELK101 kibana]# cd /koten/softwares/elasticsearch-7.17.5/config/
[root@ELK101 config]# cp client.cer client.key client-ca.cer /usr/share/kibana/config/certs/
[root@ELK101 ~]# egrep -v '^$|^*#' /etc/kibana/kibana.yml
server.host: "0.0.0.0"
elasticsearch.hosts: ["https://10.0.0.101:19200","https://10.0.0.102:19200","https://10.0.0.103:19200"]
elasticsearch.username: "kibana_system"
elasticsearch.password: "KiC6toqVWIDbeLUEJq0I"
i18n.locale: "zh-CN"
#添加以下内容
elasticsearch.ssl.certificate: /usr/share/kibana/config/certs/client.cer
elasticsearch.ssl.key: /usr/share/kibana/config/certs/client.key
elasticsearch.ssl.certificateAuthorities: [ "/usr/share/kibana/config/certs/client-ca.cer" ]
elasticsearch.ssl.verificationMode: certificate
[root@ELK101 ~]# systemctl restart kibana
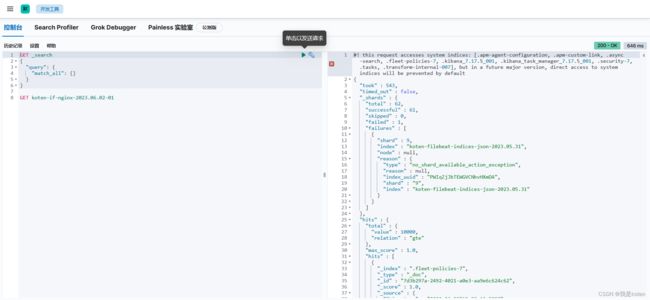
重启后可以在kibana开发者工具去发送请求查看是否能正常返回
三、Kibana配置https
kibana配置文件添加以下内容,配置好后重启,就可以用https访问kibana页面了,http就弃用了
[root@ELK101 ~]# cat /etc/kibana/kibana.yml
......
server.ssl.enabled: true
server.ssl.certificate: /usr/share/kibana/config/certs/client.cer
server.ssl.key: /usr/share/kibana/config/certs/client.key
[root@ELK101 ~]# systemctl restart kibana
我是koten,10年运维经验,持续分享运维干货,感谢大家的阅读和关注!

