实用篇 | 关于Gradio快速构建人工智能模型实现界面,你想知道的都在这里
本文描述了gradio的各函数使用,以及关于图像,自然语言护理基于音频相关的所有实例模版~
目录
1.简介
视图框架
Gradio
Streamlit
其他API设计Flask:
2.安装
3.构建Gradio应用
3.1.gr.Textbox()
gr.Textbox()和gr.TextArea()的区别?
3.2.gr.Slider()
3.3.gr.Audio()
3.4.gr.Number()
3.5.gr.components()
3.6.gradio.interface()
4.实例进阶
4.0.Hello World
4.1.图像实例
4.1.1.图像转换
4.1.2.图像分类
4.2.语音实例
4.2.1.多语言语音合成
4.2.2.指定权重语音合成
4.3.自然语言处理相关
4.3.1.文本生成
4.3.1.1.简约版本
4.3.1.2.输入多个文本,输出多个文本
4.3.1.3.输入1个文本,输出多个文本
4.3.2.机器人对话
5.在huggingface的spaces中调用自己model下的文件及项目
5.1.下载指定文件
5.2.如果在huggingface设置好模型后,Spaces内可直接设置API
6.把gradio实现嵌入到自己的网站
过程中遇到的问题及解决【PS】
参考文献
1.简介
视图框架
快速构建针对人工智能的 python 的 webApp 库,封装前端页面 + 后端接口 + AI 算法模型推理,方便 AI 算法工程师快速展示成果,常用的两个展示层框架:
Gradio
优势在于易用性,代码结构相比 Streamlit 简单,只需简单定义输入和输出接口即可快速构建简单的交互页面,更轻松部署模型。适合场景相对简单,想要快速部署应用的开发者;
Streamlit
优势在于可扩展性,相比 Gradio 复杂。适合场景相对复杂,想要构建丰富多样交互页面的开发者。
其他API设计Flask:
更多内容请参考本主页博客
2.安装
pip install gradio指定源安装,版本是会指定的,更多查看Gradio Interface Docs
pip install gradio==3.50.2 -i https://pypi.python.org/pypi3.构建Gradio应用
最常用的基础模块构成
- 应用界面:gr.Interface(简易场景), gr.Blocks(定制化场景)
- 输入输出:gr.Image(图像), gr.Textbox(文本框), gr.DataFrame(数据框), gr.Dropdown(下拉选项), gr.Number(数字), gr.Markdown, gr.Files
- 控制组件:gr.Button(按钮)
- 布局组件:gr.Tab(标签页), gr.Row(行布局), gr.Column(列布局)
gradio的核心是它的gr.Interface函数,用来构建可视化界面。
- fn:放你用来处理的函数
- inputs:写你的输入类型,这里输入的是图像,所以是"image"
- outputs:写你的输出类型,这里输出的是图像,所以是"image"
然后在现实编写过程中,会更加复杂一些~
3.1.gr.Textbox()
gradio.inputs.Textbox(self, lines=1, placeholder=None, default="", label=None, optional=False)
该组件为用户提供一个输入框,需提供一个字符串为参数的包装函数
输入类型:str(字符型)
参数:
- lines (int) - 输入区域行数
- placeholder (str) - placeholder学过前端的应该都知道,就是在输入框中的一个提示文本。
- default (str) - 默认文本
- label (str) - 在接口中的该输入组件的组件名(下面所有组件同理)
gr.Textbox()和gr.TextArea()的区别?
3.2.gr.Slider()
可通过 gr.Textbox() 来细化输入的组件 inputs,这里设置了输入框的行数为2,提示词为 Name Here...;
3.3.gr.Audio()
Gradio的Audio模块的一些重要方法:pause、stop、stream、start_recording、stop_recording和upload。这些方法可以帮助我们实现音频组件的暂停、停止、实时流式处理、录制和上传功能。
gr.Audio(label="Output")
3.4.gr.Number()
gradio.inputs.Number(self, default=None, label=None, optional=False)
该组件为用户提供一个数字输入框,需提供一个数字为参数的包装函数
输入类型:float
参数:
- default (float) - 默认值
- label (str) - 组件名
- optional (bool) - 如果为True,可以没输入值就点击Submit提交
3.5.gr.components()
定义各种输入输出组件,常搭配各种输入使用,例如图片文本音频视频等~
实例
import gradio as gr

# 定义一个处理多种 Gradio 输入组件值的函数
def greet(textbox, dropdown, radio, checkbox, slider, image, audio, video, file, number, dataframe, color):
    # 创建一个包含用户选择的字符串
    output_text = f"您选择了:{textbox},{dropdown},{radio},{checkbox},滑块值:{slider},数字:{number},颜色:{color}"
    # 创建一个包含用户选择的 Markdown 字符串(加粗文本)
    output_markdown = f"**您选择了**:{textbox},{dropdown},{radio},{checkbox},滑块值:{slider},数字:{number},颜色:{color}"
    # 创建一个包含用户输入选项的 JSON 字典
    output_json = {
        "textbox": textbox,
        "dropdown": dropdown,
        "radio": radio,
        "checkbox": checkbox,
        "slider": slider,
        "number": number,
        "color": color
    }

    # 保存图像(如果提供了输入图像)
    output_image = None
    if image is not None:
        output_image = "output_image.png"
        image.save(output_image)

    # 保存音频(如果提供了输入音频)
    output_audio = None
    if audio is not None:
        output_audio = "output_audio.wav"
        with open(output_audio, "wb") as f:
            f.write(audio)

    # 保存视频(如果提供了输入视频)
    output_video = None
    if video is not None:
        output_video = "output_video.mp4"
        with open(output_video, "wb") as f:
            f.write(video)

    # 保存文件(如果提供了输入文件)
    output_file = None
    if file:
        output_file = 'example_output.txt'
        with open(output_file, 'w') as f:
            f.write(output_text)

    # 处理数据框(如果提供了输入数据框)
    output_dataframe = None
    if dataframe is not None:
        output_dataframe = dataframe.to_html(index=False)

    # 返回颜色
    output_color = "您选择的颜色是:{color}"

    # 返回处理后的各种输出组件值
    return None, output_text, None, output_markdown, output_image, output_audio, output_json, output_file, output_video, output_dataframe, output_color

# 创建一个 Gradio Interface 实例,包含多个输入和输出组件
iface2 = gr.Interface(
    greet,
    [
        gr.components.Textbox(lines=2, placeholder="请输入文本…"),
        gr.components.Dropdown(choices=["选项A", "选项B", "选项C"]),
        gr.components.Radio(choices=["选项1", "选项2", "选项3"]),
        gr.components.Checkbox(label="选择此选项"),
        gr.components.Slider(minimum=10, maximum=90),
        gr.components.Image(shape=(100, 100)),
        gr.components.Audio(),
        gr.components.Video(),
        gr.components.File(),
        gr.components.Number(),
        gr.components.Dataframe(headers=["列A", "列B", "列C"]),
        gr.components.ColorPicker(),  # 添加颜色选择器输入组件
    ],
    outputs=[
        gr.components.Textbox(),
        gr.components.Textbox(),
        gr.components.Textbox(),
        gr.components.Markdown(),
        gr.components.Image(),
        gr.components.Audio(),
        gr.components.Json(),
        gr.components.File(),
        gr.components.Video(),
        gr.components.HTML(),
        gr.components.Textbox(),  # 添加新的输出组件
    ],
    title="Gradio 示例",
    description="这是一个 Gradio 示例应用。",
    examples=[
        [
            "您好",
            "选项A",
            "选项1",
            True,
            25,
            "path/to/image.png",
            "path/to/audio.wav",
            "path/to/video.mp4",
            "path/to/file.txt",
            42,
            [
                ["值A1", "值B1", "值C1"],
                ["值A2", "值B2", "值C2"],
            ],
            "#FF0000",  # 颜色选择器示例值
        ]
    ],
).launch()
3.6.gradio.interface()
使用 gradio.Interface 类定义了一个对象。Interface 类几乎可以实现:以 UI 的方式装饰任何 python 函数。在示例中,我们使用了一个简单的、与文本相关的函数。但实际上,这个函数可以是任何东西:从音乐生成器到税收计算器,再到(最常见的)预训练机器学习模型的预测函数。
核心 Interface 类需要使用三个参数进行初始化:
- fn:被 UI 装饰的函数
- inputs:输入组件。如"text"、"image"、"audio"等
- outputs:输出组件。如"text"、"image"、"label"等
输入
- 单输入:inputs='text',
- 多输入:inputs=[gr.Text(label='input_text_a'), gr.Text(label='input_text_b')],
输出
- 单输出:outputs='text',
- 多输出: outputs=[gr.Text(label=''), gr.Text(label='output_text_b')]
gr.Text():表示输出一个文本框
其中的label指的是展示界面显示的文字。
Interface.launch()方法返回三个值
- app,为 Gradio 演示提供支持的 FastAPI 应用程序
- local_url,本地地址
- share_url,公共地址,当share=True时生成
还可以生成公共链接,只需要在launch函数里面指定share=True即可
interface.launch(share=True)这样就除了一个本地URL之外还有一个72小时有效期的公共外链,很方便的让不同地区的用户来体验。
4.实例进阶
Gradio支持许多类型的组件,如image、dataframe、video。使用示例如下:
https://www.gradio.app/demos
4.0.Hello World
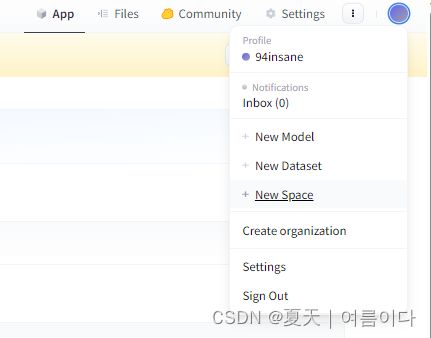
在自己的huggingface上新建一个New Space
然后克隆此项目到本地
git clone https://huggingface.co/spaces/94insane/tts-fastspeech2-myvoice-ko创建一个app.py
import gradio as gr

def greet(name):
    return "Hello " + name + "!!"

iface = gr.Interface(fn=greet, inputs="text", outputs="text")
iface.launch()
在本地运行 python app.py后,结果如图
再将代码推送到huggingface
git add app.py
git commit -m "Add application file"
git push
如果中间出现
则需要输入
git config --global user.email "注册huggingface的邮箱"
git config --global user.name "注册huggingface的名称"
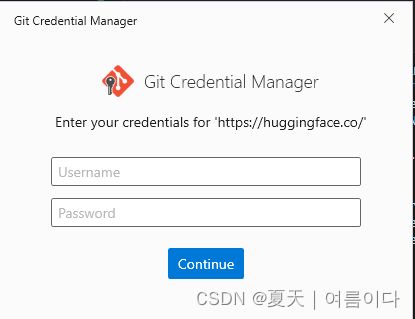
如果git push 后出现
则需要输入huggingface的账号和密码~
最后成功
如果更新文件时出现错误,请参考【PS1】.
4.1.图像实例
当使用Image组件作为输入时,函数将收到一个维度为(w,h,3)的numpy数组,按照RGB的通道顺序排列。要注意的是,我们的输入图像组件带有一个编辑按钮,可以对图像进行裁剪和放大。以这种方式处理图像可以帮助揭示机器学习模型中的偏差或隐藏的缺陷。此外对于输入组件有个shape参数,指的设置输入图像大小。但是处理方式是保持长宽比的情况下,将图像最短边缩放为指定长度,然后按照中心裁剪方式裁剪最长边到指定长度。当图像不大的情况,一种更好的方式是不设置shape,这样直接传入原图。输入组件Image也可以设置输入类型type,比如type=filepath设置传入处理图像的路径。具体可以查看官方文档,文档写的很清楚。
import gradio as gr
import torch
import requests
from torchvision import transforms

model = torch.hub.load('pytorch/vision:v0.6.0', 'resnet18', pretrained=True).eval()
response = requests.get("https://git.io/JJkYN")
labels = response.text.split("\n")

def predict(inp):
  inp = transforms.ToTensor()(inp).unsqueeze(0)
  with torch.no_grad():
    prediction = torch.nn.functional.softmax(model(inp)[0], dim=0)
    confidences = {labels[i]: float(prediction[i]) for i in range(1000)}
  return confidences

demo = gr.Interface(fn=predict,
             inputs=gr.inputs.Image(type="pil"),
             outputs=gr.outputs.Label(num_top_classes=3),
             examples=[["cheetah.jpg"]],
             )

demo.launch()
4.1.1.图像转换
import numpy as np
import gradio as gr

def sepia(input_img):
    sepia_filter = np.array([
        [0.393, 0.769, 0.189],
        [0.349, 0.686, 0.168],
        [0.272, 0.534, 0.131]
    ])
    sepia_img = input_img.dot(sepia_filter.T)
    sepia_img /= sepia_img.max()
    return sepia_img

demo = gr.Interface(sepia, gr.Image(), "image")
demo.launch()
4.1.2.图像分类
import gradio as gr
from transformers import pipeline

pipeline = pipeline(task="image-classification", model="julien-c/hotdog-not-hotdog")

def predict(image):
  predictions = pipeline(image)
  return {p["label"]: p["score"] for p in predictions}

gr.Interface(
    predict,
    inputs=gr.inputs.Image(label="Upload hot dog candidate", type="filepath"),
    outputs=gr.outputs.Label(num_top_classes=2),
    title="Hot Dog? Or Not?",
    allow_flagging="manual"
).launch()
4.2.语音实例
4.2.1.多语言语音合成
import tempfile
import gradio as gr

# 借用第三方语音合成库
from neon_tts_plugin_coqui import CoquiTTS

# 把模型中的所有语言显示出来
LANGUAGES = list(CoquiTTS.langs.keys())
coquiTTS = CoquiTTS()

#
def tts(text: str, language: str):
    with tempfile.NamedTemporaryFile(suffix=".wav", delete=False) as fp:
        coquiTTS.get_tts(text, fp, speaker = {"language" : language})
        return fp.name

# 前端实现:
#### 一个文本框(框上标着“Input”,框内调用的是tts库中的值,显示三行)
#### 一个语音(框上标着“Language”,在可选择的语言中,默认英文)
inputs = [gr.Textbox(label="Input", value=CoquiTTS.langs["en"]["sentence"], max_lines=3),
            gr.Radio(label="Language", choices=LANGUAGES, value="en")]

# 前端输出:一个语音
#### 一个语音(框上标着“Output”)
outputs = gr.Audio(label="Output")

#
demo = gr.Interface(fn=tts, inputs=inputs, outputs=outputs)

demo.launch()
4.2.2.指定权重语音合成
# @ 2023.10.23
# @ Elena
import sys, os
import logging
import re
from scipy.io.wavfile import write

import torch
import argparse
import utils
from models import SynthesizerTrn
from text.symbols import symbols
from text import text_to_sequence
import gradio as gr
import webbrowser
import numpy as np

net_g = None

if sys.platform == "darwin" and torch.backends.mps.is_available():
    device = "mps"
    os.environ["PYTORCH_ENABLE_MPS_FALLBACK"] = "1"
else:
    device = "cuda"

model = './G_1000.pth'
config = './config.json'
share = True
hps = utils.get_hparams_from_file(config)
if "use_mel_posterior_encoder" in hps.model.keys() and hps.model.use_mel_posterior_encoder == True:
        print("Using mel posterior encoder for VITS2")
        posterior_channels = 80  # vits2
        hps.data.use_mel_posterior_encoder = True
else:
    print("Using lin posterior encoder for VITS1")
    posterior_channels = hps.data.filter_length // 2 + 1
    hps.data.use_mel_posterior_encoder = False
device = (
    "cuda:1"
    if torch.cuda.is_available()
    else (
        "mps"
        if sys.platform == "darwin" and torch.backends.mps.is_available()
        else "cpu"
    )
)
net_g = SynthesizerTrn(
    len(symbols),
    posterior_channels,
    hps.train.segment_size // hps.data.hop_length,
    n_speakers=hps.data.n_speakers, #- >0 for multi speaker
    **hps.model
).to(device)
_ = net_g.eval()

_ = utils.load_checkpoint(model, net_g, None)

speakers = hps.data.n_speakers
languages = ["KO"]

def intersperse(lst, item):
    result = [item] * (len(lst) * 2 + 1)
    result[1::2] = lst
    return result

def get_text(text, hps):
    text_norm = text_to_sequence(text, hps.data.text_cleaners)
    if hps.data.add_blank:
        text_norm = intersperse(text_norm, 0)
    text_norm = torch.LongTensor(text_norm)
    return text_norm

def infer(text, sdp_ratio, noise_scale, noise_scale_w, length_scale, sid):
    global net_g
    fltstr = re.sub(r"[\[\]\(\)\{\}]", "", text)
    stn_tst = get_text(fltstr, hps)

    speed = 1
    output_dir = 'output'
    sid = 0
    with torch.no_grad():
        x_tst = stn_tst.to(device).unsqueeze(0)
        x_tst_lengths = torch.LongTensor([stn_tst.size(0)]).to(device)
        audio = net_g.infer(x_tst, x_tst_lengths, noise_scale=.667, noise_scale_w=0.8, length_scale=1 / speed)[0][
                0, 0].data.cpu().float().numpy()

    return audio

def tts_fn(
    text, speaker, sdp_ratio, noise_scale, noise_scale_w, length_scale
):
    slices = text.split("|")
    audio_list = []
    with torch.no_grad():
        for slice in slices:
            audio = infer(
                slice,
                sdp_ratio=sdp_ratio,
                noise_scale=noise_scale,
                noise_scale_w=noise_scale_w,
                length_scale=length_scale,
                sid=speaker,

            )
            audio_list.append(audio)
            silence = np.zeros(hps.data.sampling_rate)
            audio_list.append(silence)
    audio_concat = np.concatenate(audio_list)
    return "Success", (hps.data.sampling_rate, audio_concat)

if __name__ == "__main__":
    with gr.Blocks() as app:
        with gr.Row():
            with gr.Column():
                text = gr.TextArea(
                    label="Text",
                    placeholder="Input Text Here",
                    value="TTS是语音合成",
                )

                speaker = gr.Slider(
                    minimum=0, maximum=speakers-1, value=0, step=1, label="0"
                )
                sdp_ratio = gr.Slider(
                    minimum=0, maximum=1, value=0.2, step=0.1, label="SDP Ratio"
                )
                noise_scale = gr.Slider(
                    minimum=0.1, maximum=2, value=0.6, step=0.1, label="Noise Scale"
                )
                noise_scale_w = gr.Slider(
                    minimum=0.1, maximum=2, value=0.8, step=0.1, label="Noise Scale W"
                )
                length_scale = gr.Slider(
                    minimum=0.1, maximum=2, value=1, step=0.1, label="Length Scale"
                )
                language = gr.Dropdown(
                    choices=languages, value=languages[0], label="Language"
                )
                btn = gr.Button("Generate!", variant="primary")
            with gr.Column():
                text_output = gr.Textbox(label="Message")
                audio_output = gr.Audio(label="Output Audio")

        btn.click(
            tts_fn,
            inputs=[
                text,
                speaker,
                sdp_ratio,
                noise_scale,
                noise_scale_w,
                length_scale,
            ],
            outputs=[text_output, audio_output],
        )

    webbrowser.open("http://127.0.0.1:7878")
    app.launch(share=True)
4.3.自然语言处理相关
4.3.1.文本生成
4.3.1.1.简约版本
import gradio as gr
from transformers import pipeline

generator = pipeline('text-generation', model = 'gpt2')

def generate_text(text_prompt):
  response = generator(text_prompt, max_length = 30, num_return_sequences=5)
  return response[0]['generated_text']

textbox = gr.Textbox()

demo = gr.Interface(generate_text, textbox, textbox)

demo.launch()
4.3.1.2.输入多个文本,输出多个文本
import gradio as gr

def greet(a, b):
    return f"Hello {a} ", f"Greet {b}"

demo = gr.Interface(
    fn=greet,
    inputs=[gr.Text(label='input_text_a'), gr.Text(label='input_text_b')],
    outputs=[gr.Text(label='output_text_a'), gr.Text(label='output_text_b')]
)

demo.launch(auth=("user_name", "pwd"),   # 设置这个demo需要输入的认证信息
           )
4.3.1.3.输入1个文本,输出多个文本
# V1.0
import gradio as gr
from transformers import pipeline, AutoTokenizer, AutoModelForCausalLM, StoppingCriteriaList
import os
import torch


title = " 大语言模型生成 Demo"

bad_words = [
  '...',
  '....',
  'http'
]

description = "模型参数 12.8B "
examples = [
    ["问题: 今天吃什么? \n回答:"],
    ["问题: 天空为什么是蓝色? \n回答:"],
    ["问题: 怎么缓解压力? \n回答:"]
]


model_name = 'Polyglot-12.8B'

model = AutoModelForCausalLM.from_pretrained(
    model_name,
    torch_dtype=torch.float16,
    low_cpu_mem_usage=True,
).to(device=f"cuda", non_blocking=True)
model.eval()

pipe = pipeline(
    'text-generation',
    model=model,
    tokenizer=model_name,
    device=0
)

chat_history = []
for i in range(3):
    chat_history.append({"###问题":"","###回答":""})


def ask(text, context='', is_input_full=False):
    history = str(chat_history[-1]) + '\n' + str(chat_history[-2]) + '\n' + str(chat_history[-3]) + '\n'
    ans = pipe(
        f"### 以前对话内容: {history}\n" +
        f"### 问题: {text}\n\n### 上下文: {context}\n\n### 回答:" if context else f"### 提问: {text}\n\n### 回答:",
        do_sample=True,
        max_new_tokens=512,
        temperature=0.7,
        top_p=0.9,
        return_full_text=False,
        eos_token_id=2,
    )
    return ans[0]['generated_text']

def API(input_text):
    result = ask(input_text)
    chat_history.append({"###问题":str(input_text),"###回答":str(result)})
    return result,input_text,chat_history[-3:]

##########################################################################################################
# Interface building
##########################################################################################################
iface = gr.Interface(
  fn=API,
  inputs='text',
  outputs=[
        gr.Textbox(label="@ LLM"),
        gr.Textbox(label="@ 输入文本"),
        gr.Textbox(label="@ 历史记录"),
    ],
  examples=examples
)


iface.launch(share=True)
4.3.2.机器人对话
import random
import gradio as gr

def random_response(message, history):
    return random.choice(["Yes", "No"])

demo = gr.ChatInterface(random_response)

demo.launch()
参考【2】
5.在huggingface的spaces中调用自己model下的文件及项目
5.1.下载指定文件
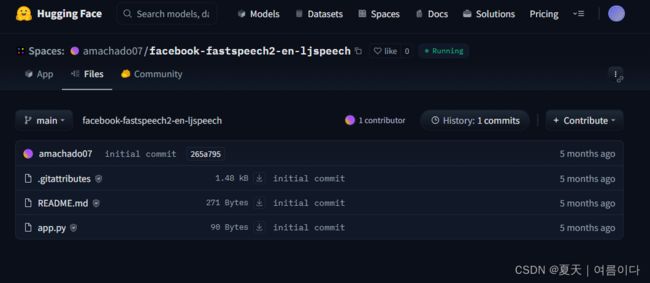
打开自己的Spaces,例如我的
编辑app.py
# 导入huggingface_hub
from huggingface_hub import hf_hub_download

config_path=hf_hub_download(repo_id="94insane/tts-fastspeech-mydata",
                            filename="synthesize.py", )
运行日志:
运行时就会下载指定文件python文件~
5.2.如果在huggingface设置好模型后,Spaces内可直接设置API
例如
app.py如下
import gradio as gr

gr.Interface.load("models/facebook/fastspeech2-en-ljspeech").launch()
在这里直接调用模型。
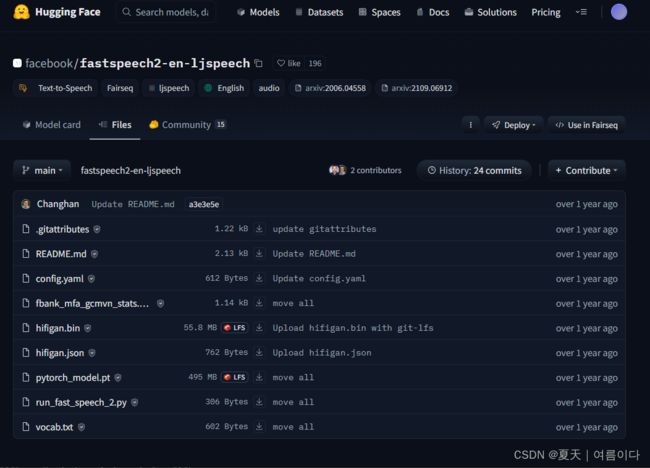
且【Models】模型内容如下
API相关设置可查看Hub API Endpoints
* 其中,使用,模型的方法如下
最常见的是huggingface_hub.hf_hub_down下载的是单个文件
关于下载的详细参数可参考Downloading files (huggingface.co)
6.把gradio实现嵌入到自己的网站
也就是使用 WebComponent 嵌入
基于 Gradio 的嵌入可以使用 Web 组件来嵌入空间。WebComponent 比 IFrame 更快,并且会自动调整以适应网页,因此无需配置width或height。
需要通过将以下脚本添加到 HTML 中来导入与 Space 中的 Gradio 版本相对应的 Gradio JS 库。
然后,gradio-app在要嵌入空间的位置添加一个元素。
< gradio-app src = “ https://.hf.space ” >
过程中遇到的问题及解决【PS】
[PS1] SyntaxError: invalid syntax 语法错误
空格换行问题~
[PS2]RuntimeError: CUDA error: CUBLAS_STATUS_NOT_INITIALIZED when calling `cublasCreate(handle)`
没有初始化成功有可能是当前GPU正在忙,
需要将正在训练的文件停止或者指定诶用的GPU
[PS3]gradio无法生成可分享的外部连接Could not create share link. Please check your internet connection or our status page: https://status.gradio.app
cd进入位置(应该在.conda/envs/ChatGLM2/lib/python3.11/site-packages/gradio),输入以下命令给予权限:chmod +x frpc_linux_amd64_v0.2
意思是给一个文件添加可执行权限,可以使用以下命令:
chmod +x 文件名更多可查看 掌握文件权限管理:Mac和Linux中的chmod +x命令详解-CSDN博客
每个人的地址可能不一样
我的:/opt/conda/lib/python3.8/site-packages/gradio
cd /jf-training-home/src/elena
尝试
sudo chmod +x /opt/conda/lib/python3.8/site-packages/gradio/frpc_linux_amd64_v0.2未解决
此时版本为
- gradio 4.7.1
- gradio_client 0.7.0
根据Could not create share link, please check your internet connection. · Issue #3498 · gradio-app/gradio (github.com)改为
pip install gradio==3.38.0
pip install gradio_client 0.2.10

chmod +x /opt/conda/lib/python3.8/site-packages/gradio/frpc_linux_amd64_v0.2
使用代理时出错
可参考https://stackoverflow.com/questions/19080352/how-to-get-pip-to-work-behind-a-proxy-server
[PS4]ImportError: cannot import name 'soft_unicode' from 'markupsafe' (/opt/conda/lib/python3.8/site-packages/markupsafe/__init__.py)
原因分析:版本不匹配
pip install MarkupSafe==1.1.1类似错误:Could not create share link. Missing file,按照给出的提示下载frpc_linux_amd64文件,并且按照要求修改名称,移动到提示指定的位置
[PS5]gradio文件运行后,网页正常显示,在文本生成任务中,exmple示例没反应,点击生成显示Error,且后端并未提示错误且什么都没显示。
在不同的gradio版本中,可能会出现代码运行错误的情况,原本的版本是gradio 4.27.1,使用3.38.0版本后好使~
参考文献
【1】探索Gradio Audio模块的change、clear和play方法-CSDN博客
【2】Creating A Custom Chatbot With Blocks (gradio.app)
【3】从零开始-与大语言模型对话学技术-gradio篇(2)-CSDN博客
【4】Quickstart (gradio.app)
【5】从零开始-与大语言模型对话学技术-gradio篇(2)-CSDN博客
扩展
语音合成模版1
import os
os.system('pip install gradio==2.3.0a0')
os.system('pip freeze')
import gradio as gr
from subprocess import call
if (not os.path.exists("korean.py")):
os.system("wget https://raw.githubusercontent.com/TensorSpeech/TensorFlowTTS/master/tensorflow_tts/utils/korean.py -O korean.py")
import korean
def run_cmd(command):
try:
print(command)
call(command)
except KeyboardInterrupt:
print("Process interrupted")
sys.exit(1)
def inference(text):
cmd = ['tts', '--text', "".join(korean.tokenize(text)), '--model_path', 'vits-kss-checkpoint_90000.pth', '--config_path', 'vits-kss-config.json']
run_cmd(cmd)
return 'tts_output.wav'
if (not os.path.exists("vits-kss-checkpoint_90000.pth")):
os.system("wget -q https://huggingface.co/youngs3/coqui-vits-ko/resolve/main/vits-kss-checkpoint_90000.pth -O vits-kss-checkpoint_90000.pth")
os.system("wget -q https://huggingface.co/youngs3/coqui-vits-ko/resolve/main/vits-kss-config.json -O vits-kss-config.json")
inputs = gr.inputs.Textbox(lines=5, label="Input Text")
outputs = gr.outputs.Audio(type="file",label="Output Audio")
title = "Korean Language coqui-ai-TTS"
description = "Gradio demo for coqui-ai-TTS, using a VITS model trained on the kss dataset. To use it, simply add your text, or click one of the examples to load them. Read more at the links below."
article = "TTS is a library for advanced Text-to-Speech generation | Github Repo
"
examples = [
["공부가 가장 쉬웠어요!"]
]
gr.Interface(inference, inputs, outputs, title=title, description=description, article=article, examples=examples, enable_queue=True).launch()实例模版2
Gradio应用介绍与零基础部署实践 - 飞桨AI Studio星河社区 (baidu.com)


