Spring Boot 集成Redis
总体概述
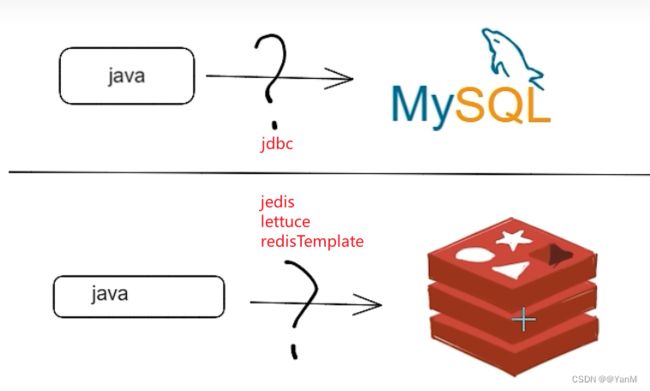
java要通过程序访问redis服务器。需要一个中间件或驱动包,初代使用的就是jedis,Jedis Client是Redis官网推荐的一个面向java客户端,库文件实现了对各类API进行封装调用,随着出现一些问题,如线程池不安全等,就出现了lettuce,是一个Redis的java驱动包,是对jedis的优化,之后出现了redisTemplate,使用spring整合了redis,redisTemplate底层包含了lettuce。
Jedis和Lettuce的区别
jedis和Lettuce都是Redis的客户端,它们都可以连接Redis服务器,但是在SpringBoot2.0之后默认都是使用的Lettuce这个客户端连接Redis服务器。因为当使用Jedis客户端连接Redis服务器的时候,每个线程都要拿自己创建的Jedis实例去连接Redis客户端,当有很多个线程的时候,不仅开销大需要反复的创建关闭一个Jedis连接,而且也是线程不安全的,一个线程通过Jedis实例更改Redis服务器中的数据之后会影响另一个线程;
但是如果使用Lettuce这个客户端连接Redis服务器的时候,就不会出现上面的情况,Lettuce底层使用的是Netty,当有多个线程都需要连接Redis服务器的时候,可以保证只创建一个Lettuce连接,使所有的线程共享这一个Lettuce连接,这样可以减少创建关闭一个Lettuce连接时候的开销;而且这种方式也是线程安全的,不会出现一个线程通过Lettuce更改Redis服务器中的数据之后而影响另一个线程的情况。
本地java连接redis常见问题
- bind配置请注释掉保护模式设置为no
- Linux系统的防火墙设置
- redis服务器的IP地址和密码是否正确忘记写访问redis的服务端口号和auth密码
集成Jedis
建Module:redis7_study
改POM
    4.0.0

    com.atguigu.redis7
    redis7_study
    1.0-SNAPSHOT


        org.springframework.boot
        spring-boot-starter-parent
        2.3.4.RELEASE


        UTF-8
        1.8
        1.8
        4.12
        1.2.17
        1.16.18


            org.springframework.boot
            spring-boot-starter-web


            redis.clients
            jedis
            4.3.1


            junit
            junit
            ${junit.version}


            org.springframework.boot
            spring-boot-starter-test
            test


            log4j
            log4j
            ${log4j.version}


            org.projectlombok
            lombok
            ${lombok.version}
            true


                org.springframework.boot
                spring-boot-maven-plugin
写YML
server:
  port: 7777
spring:
  application:
    name: redis7_study
主启动
import org.springframework.boot.SpringApplication;
import org.springframework.boot.autoconfigure.SpringBootApplication;
@SpringBootApplication
public class Redis7Study7777
{
    public static void main(String[] args)
    {
        SpringApplication.run(Redis7Study7777.class,args);
    }
}
业务类
入门案例
import lombok.extern.slf4j.Slf4j;
import redis.clients.jedis.Jedis;
@Slf4j
public class JedisDemo {
public static void main(String[] args) {
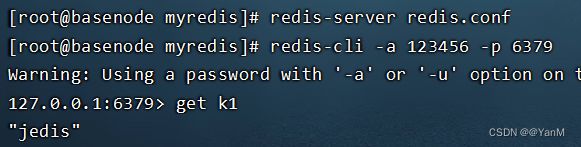
Jedis jedis = new Jedis("192.168.67.100", 6379);
jedis.auth("123456");
log.info("redis conn status:{}","连接成功");
log.info("redis ping retvalue:{}",jedis.ping());
jedis.set("k1","jedis");
log.info("k1 value:{}",jedis.get("k1"));
}
}
效果:

我的redis并不是集群模式,需要修改replica-read-only属性为no,使这个实例可读可写就可以了。


常用5大数据类型的使用
import lombok.extern.slf4j.Slf4j;
import redis.clients.jedis.Jedis;
import java.util.*;
@Slf4j
public class JedisDemo {
    public static void main(String[] args) {
        Jedis jedis = new Jedis("192.168.67.100", 6379);
        jedis.auth("123456");
        //key
        Set keys = jedis.keys("*");
        for (Iterator iterator= keys.iterator();iterator.hasNext();){
            String key = (String) iterator.next();
            System.out.println(key);
        }
        System.out.println("jedis.exists:"+jedis.exists("k1"));
        System.out.println(jedis.ttl("k1"));
        //String
        jedis.append("k6","append_v6");
        System.out.println(jedis.get("k6"));
        jedis.set("k2","k2_redis");
        System.out.println(jedis.get("k2"));
        jedis.mset("k3","v3","k4","v4","k5","v5");
        System.out.println(jedis.mget("k3", "k4", "k5"));
        //list
        jedis.lpush("mylist","1","2","3","4","5");
        List list = jedis.lrange("mylist", 0, -1);
        for (String element : list) {
            System.out.println(element);
        }
        //set
        jedis.sadd("orders","jd001");//添加元素
        jedis.sadd("orders","jd002");
        jedis.sadd("orders","jd003");
        Set set1 = jedis.smembers("orders");//获取所有元素
        Iterator iterator=set1.iterator();
        if (iterator.hasNext()){
            String order= (String) iterator.next();
            System.out.println(order);
        }
        jedis.srem("orders","jd002");//删除元素
        System.out.println(jedis.smembers("orders").size());
        //hash
        jedis.hset("hash1","userName","lisi");//添加hash类型key的field的值
        System.out.println(jedis.hget("hash1", "userName"));

        Map map = new HashMap<>();
        map.put("telphone","138xxxxxxxx");
        map.put("address","atguigu");
        map.put("email","[email protected]");
        jedis.hmset("hash2",map);
        List result = jedis.hmget("hash2", "telphone", "email");
        for (String element : result) {
            System.out.println(element);
        }
        //zset
        jedis.zadd("zset1",60d,"v1");
        jedis.zadd("zset1",70d,"v2");
        jedis.zadd("zset1",80d,"v3");
        jedis.zadd("zset1",90d,"v4");
        List zset1 = jedis.zrange("zset1", 0, -1);
        zset1.forEach(System.out::println);
    }
}
集成lettuce
改pom(添加依赖)
            io.lettuce
            lettuce-core
            6.2.1.RELEASE
业务类
import io.lettuce.core.RedisClient;
import io.lettuce.core.SortArgs;
import io.lettuce.core.api.StatefulRedisConnection;
import io.lettuce.core.api.sync.RedisCommands;
import lombok.extern.slf4j.Slf4j;
import io.lettuce.core.RedisURI;
import java.util.HashMap;
import java.util.List;
import java.util.Map;
import java.util.Set;

@Slf4j
public class lettuceDemo {
    public static void main(String[] args) {
        //使用构建器构建RedisURI.builder(链式编程)
        RedisURI uri = RedisURI.builder()
                .redis("192.168.67.100")
                .withPort(6379)
                .withAuthentication("default","123456")
                .build();
        //创建连接客户端
        RedisClient client = RedisClient.create(uri);
        StatefulRedisConnection connect = client.connect();
        //操作命令api
        RedisCommands commands = connect.sync();

        //keys
        List list = commands.keys("*");
        list.forEach(System.out::println);
        //String
        commands.set("001","111");
        System.out.println(commands.get("001"));
        //list
        commands.lpush("mylist2","a","b","c");
        List list2 = commands.lrange("mylist2", 0, -1);
        list2.forEach(System.out::println);
        //set
        commands.sadd("mySet2","d","e","f");
        Set set2 = commands.smembers("mySet2");
        set2.forEach(System.out::println);
        //hash
        Map map = new HashMap<>();
        map.put("k1","138xxxxx");
        map.put("k2","atguigu");
        map.put("k3","[email protected]");
        commands.hmset("myhash2",map);
        Map hashMap2 = commands.hgetall("myhash2");
        for (String k : hashMap2.keySet()) {
            System.out.println("hash k="+k+",v="+hashMap2.get(k));
        }
        //zset
        commands.zadd("myzset2",100.0,"z1",110.0,"z2",120.0,"z3");
        List list3 = commands.zrange("myzset2", 0, 10);
        list3.forEach(System.out::println);
        //sort
        SortArgs sortArgs = new SortArgs();
        //SortArgs是Lettuce提供的一个用于构建SORT命令参数的类。SORT命令可以对存储在Redis中的列表、集合和有序集合进行排序。
        sortArgs.alpha();//对列表进行按字母顺序排序
        sortArgs.desc();//降序排序
        List list4 = commands.sort("mylist2", sortArgs);
        list4.forEach(System.out::println);
        //关闭
        connect.close();
        client.shutdown();
    }
}
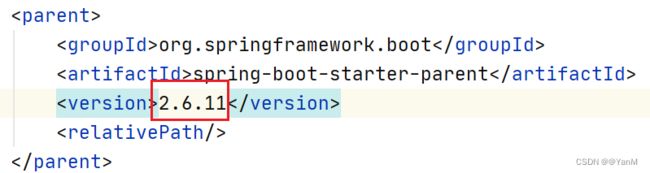
结果:
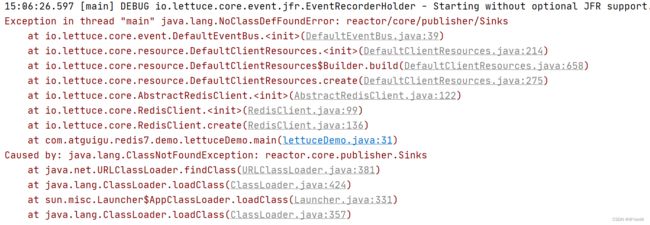
Spring boot的版本问题将版本换为如下就可以了
集成redisTemplate-推荐使用
连接单机
改POM(添加依赖)
            org.springframework.boot
            spring-boot-starter-data-redis


            org.apache.commons
            commons-pool2


            io.springfox
            springfox-swagger2
            2.9.2


            io.springfox
            springfox-swagger-ui
            2.9.2
写YML
server:
  port: 7777
spring:
  application:
    name: redis7_study
  redis:
    database: 0
    host: 192.168.67.100
    port: 6379
    password: 123456
    lettuce:
      pool:
        max-active: 8
        max-wait: -1ms
        max-idle: 8
        min-idle: 0
  swagger2:
    enabled: true
  mvc:
    pathmatch:
      matching-strategy: ant_path_matcher
#在springboot2.6.X结合swagger2.9.X会提示documentationPluginsBootstrapper空指针异常,
#原因是在springboot2.6.X中将SpringMVC默认路径匹配策略从AntPathMatcher更改为PathPatternParser,
# 导致出错,解决办法是matching-strategy切换回之前ant_path_matcher
业务类
配置类
swaggerconfig
package com.atguigu.redis7.config;
import org.springframework.beans.factory.annotation.Value;
import org.springframework.context.annotation.Bean;
import org.springframework.context.annotation.Configuration;
import springfox.documentation.builders.ApiInfoBuilder;
import springfox.documentation.builders.PathSelectors;
import springfox.documentation.builders.RequestHandlerSelectors;
import springfox.documentation.service.ApiInfo;
import springfox.documentation.spi.DocumentationType;
import springfox.documentation.spring.web.plugins.Docket;
import springfox.documentation.swagger2.annotations.EnableSwagger2;

import java.time.LocalDateTime;
import java.time.format.DateTimeFormatter;
@Configuration
@EnableSwagger2
public class SwaggerConfig
{
    @Value("${spring.swagger2.enabled}")
    private Boolean enabled;

    @Bean
    public Docket createRestApi() {
        return new Docket(DocumentationType.SWAGGER_2)
                .apiInfo(apiInfo())
                .enable(enabled)
                .select()
                .apis(RequestHandlerSelectors.basePackage("com.atguigu.redis7")) //你自己的package
                .paths(PathSelectors.any())
                .build();
    }
    public ApiInfo apiInfo() {
        return new ApiInfoBuilder()
                .title("springboot利用swagger2构建api接口文档 "+"\t"+ DateTimeFormatter.ofPattern("yyyy-MM-dd").format(LocalDateTime.now()))
                .description("springboot+redis整合")
                .version("1.0")
                .build();
    }
}
service
package com.atguigu.redis7.service;
import lombok.extern.slf4j.Slf4j;
import org.springframework.data.redis.core.RedisTemplate;
import org.springframework.stereotype.Service;
import javax.annotation.Resource;
import java.util.UUID;
import java.util.concurrent.ThreadLocalRandom;
@Service
@Slf4j
public class OrderService {
    public static final String ORDER_KEY = "order:";//前缀,这里使用前缀+随机keyId组合订单key
    @Resource
    private RedisTemplate redisTemplate;

    public void addOrder() {
        int keyId = ThreadLocalRandom.current().nextInt(100) + 1;
        String orderNo = UUID.randomUUID().toString();
        redisTemplate.opsForValue().set(ORDER_KEY + keyId, "京东订单" + orderNo);
        log.info("=======>编号" + keyId + "的订单流水生成:{}", orderNo);
    }
    public String getOrderByKeyId(Integer keyId){
        return (String) redisTemplate.opsForValue().get(ORDER_KEY+keyId);
    }
}
controller
package com.atguigu.redis7.controller;
import com.atguigu.redis7.service.OrderService;
import io.swagger.annotations.Api;
import io.swagger.annotations.ApiOperation;
import lombok.extern.slf4j.Slf4j;
import org.springframework.web.bind.annotation.*;
import javax.annotation.Resource;
@Api(tags = "订单接口")
@RestController
@Slf4j
public class OrderController {
    @Resource
    private OrderService orderService;

    @ApiOperation("新增订单")
    @PostMapping("/order/add")
    public void addOrder(){
        orderService.addOrder();
    }
    @ApiOperation("按keyId查找订单")
    @GetMapping("/order/{keyId}")
    public String etOrderByKeyId(@PathVariable Integer keyId){
        return orderService.getOrderByKeyId(keyId);
    }
}
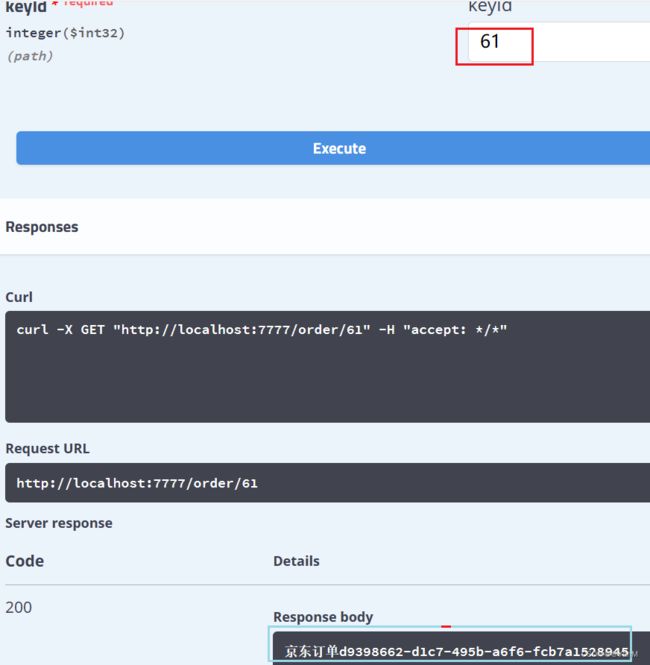
测试
访问:http://localhost:7777/swagger-ui.html#/

后端控制台查看:
![]()
swagger控制台输出keyId查询该订该订单:
序列化问题
如果在linux中查询,出现了以下乱码,

当获取值时,还是出现了乱码:
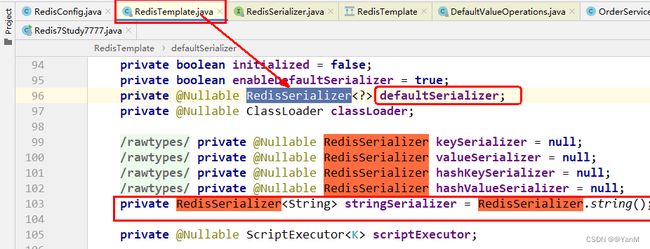
 键(key)和值(value)都是通过Spring提供的Serializer序列化到数据库的。
RedisTemplate默认使用的是JdkSerializationRedisSerializer,stringRedisTemplate默认使用的是StringRedisSerializer。使用RedisTemplate默认的序列化就会上面图中那样,源码如下:

这里有两种解决方案:
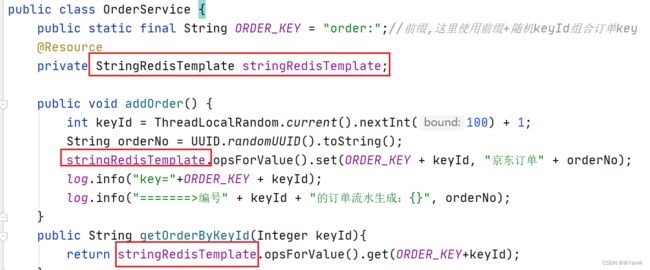
解决方案1
直接使用StringRedisTemplate,修改orderService
再次在虚拟机中查询,key保存没问题了,但查询出来的值还是乱码,,swagger中没问题,前面是京东快递,说明仅仅是在redis客户端展示有问题。

在redis客户端登录时加上--raw,表示redis客户端对中文的支持。

解决方案2
恢复前面的orderService,添加RedisConfig配置类,使用GenericJackson2JsonRedisSerializer替换默认序列化。
import org.springframework.context.annotation.Bean;
import org.springframework.context.annotation.Configuration;
import org.springframework.data.redis.connection.lettuce.LettuceConnectionFactory;
import org.springframework.data.redis.core.RedisTemplate;
import org.springframework.data.redis.serializer.GenericJackson2JsonRedisSerializer;
import org.springframework.data.redis.serializer.StringRedisSerializer;
@Configuration
public class RedisConfig
{
    /**
     * redis序列化的工具配置类,下面这个请一定开启配置
     * 127.0.0.1:6379> keys *
     * 1) "ord:102"  序列化过
     * 2) "\xac\xed\x00\x05t\x00\aord:102"   野生,没有序列化过
     * this.redisTemplate.opsForValue(); //提供了操作string类型的所有方法
     * this.redisTemplate.opsForList(); // 提供了操作list类型的所有方法
     * this.redisTemplate.opsForSet(); //提供了操作set的所有方法
     * this.redisTemplate.opsForHash(); //提供了操作hash表的所有方法
     * this.redisTemplate.opsForZSet(); //提供了操作zset的所有方法
     * @param lettuceConnectionFactory
     * @return
     */
    @Bean
    public RedisTemplate redisTemplate(LettuceConnectionFactory lettuceConnectionFactory)
    {
        RedisTemplate redisTemplate = new RedisTemplate<>();

        redisTemplate.setConnectionFactory(lettuceConnectionFactory);
        //设置key序列化方式string
        redisTemplate.setKeySerializer(new StringRedisSerializer());
        //设置value的序列化方式json,使用GenericJackson2JsonRedisSerializer替换默认序列化
        redisTemplate.setValueSerializer(new GenericJackson2JsonRedisSerializer());
        redisTemplate.setHashKeySerializer(new StringRedisSerializer());
        redisTemplate.setHashValueSerializer(new GenericJackson2JsonRedisSerializer());
        redisTemplate.afterPropertiesSet();
        return redisTemplate;
    }
} 
连接集群
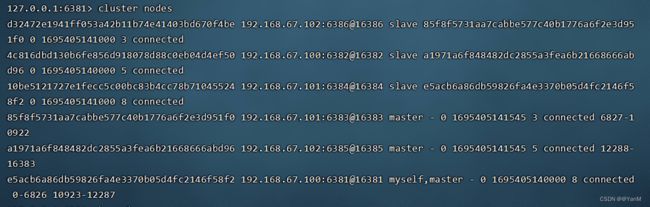
启动redis集群6台实例
集群状态如下:
redis集群参考:
Redis集群(cluster)_@YanM的博客-CSDN博客 https://blog.csdn.net/m0_54239478/article/details/133078997?spm=1001.2014.3001.5501修改yml
server:
  port: 7777
spring:
  application:
    name: redis7_study
  redis:
    password: 123456
    lettuce:
      pool:
        max-active: 8
        max-wait: -1ms
        max-idle: 8
        min-idle: 0
    cluster:
      nodes: 192.168.67.100:6381,192.168.67.100:6382,192.168.67.101:6383,192.168.67.101:6384,192.168.67.102:6385,192.168.67.102:6386
  swagger2:
    enabled: true
  mvc:
    pathmatch:
      matching-strategy: ant_path_matcher
启动项目,添加三个订单:


人为模拟,master-6381机器意外宕机,手动shutdown。
先对redis集群命令方式,手动验证各种读写命令,看看6384是否上位
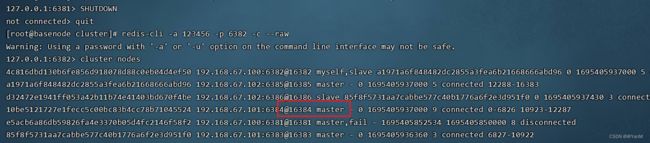
Redis Cluster集群能自动感知并自动完成主备切换,对应的slave6384会被选举为新的master节点
微服务客户端再次读写访问,错误信息是不能连接到6381。

![]()
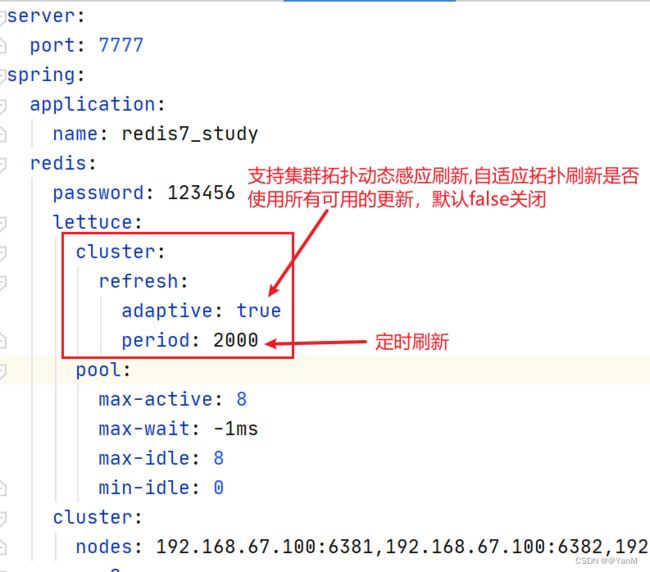
结论:SpringBoot客户端没有动态感知到RedisCluster的最新集群信息。
SpringBoot 2.X版本,Redis默认的连接池采用Lettuce,当Redis集群节点发生变化后,Letture默认是不会刷新节点拓扑。
解决方案:修改yml,添加支持集群拓扑动态感应刷新配置。
再起启动项目,进行读写访问。
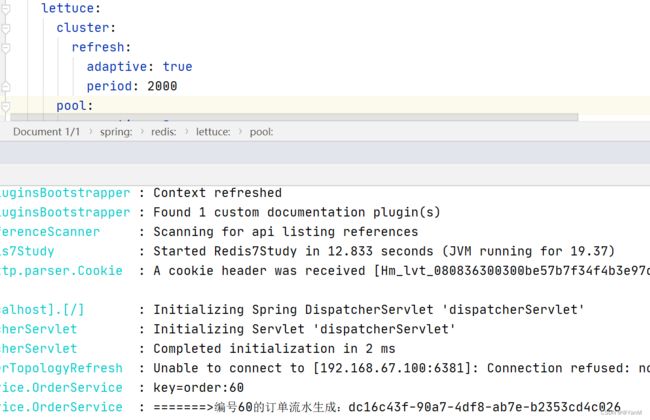
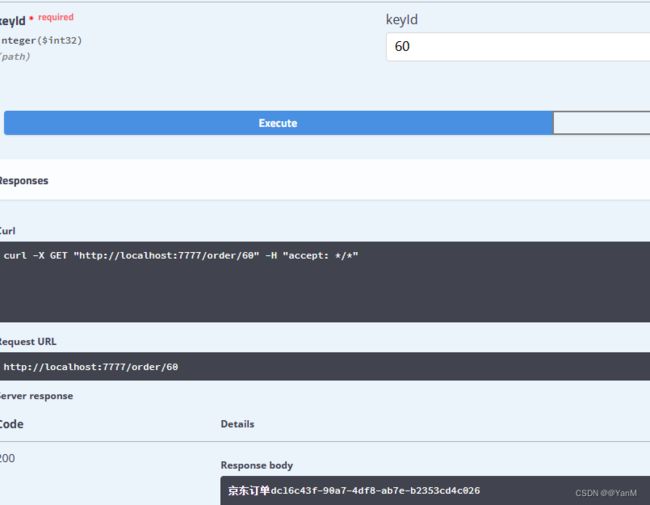
此时就OK了。