56.windows docker 安装ES、Go操作ES(github.com/olivere/elastic/v7库)
文章目录
- 一、环境准备
-
- 1、 docker安装ES
- 2、启动容器
- 3、图像化客户端工具ElasticSearch-Head
- 二、Go ES连接与认证
-
- 1、 连接ES
- 2、配置ES认证
- 三、索引的增删改查
- 四、文档的增删改
-
- 创建单个文档
- 根据文档id删除文档
- 批量删除文档
- 批量创建文档
- 五、文档查询
-
- 列表查询
- 精确匹配
- 模糊匹配
- 嵌套字段的搜索
- 六、 更新文档
代码地址: https://gitee.com/lymgoforIT/golang-trick/tree/master/34-go-es
一、环境准备
1、 docker安装ES
首先需要先安装docker,这个网上教程很多,这里就默认docker已经安装好了。当然如果不想用docker的话,也可以和redis、kafka等组件一样,下载后加压、配置环境变量便可以开始使用了。
拉取elasticsearch的镜像
docker pull elasticsearch:7.12.0
创建docker容器挂载的目录
之所以在容器启动的时候要配置挂载的宿主机目录,是因为想要在宿主机(本机)上记录下来当前ES容器的配置信息,数据以及插件等,这样即使到时候我们把容器删了,重新用镜像生成容器时,只要挂载的还是这三个目录,那么即使镜像变了,端口变了,但是启动的容器和之前的会是一样的。
PS:挂载指是是宿主机(本机)的目录映射到容器中的某个目录,一方改动,另一方会相应的改动,通过容器启动时 -v 选项配置。
主要是三个目录:config 、data 、plugins,其实我们如果是自己安装ES,而不是通过docker安装的话,也是可以看到这三个目录的。

既然我们本次是用docker演示的,那就手动创建一下这三个目录吧,如下,放到了自己建的docker-es目录下

然后在config目录下建立配置文件elasticsearch.yml并写入内容 http.host: 0.0.0.0,表示监听本机上的所有IP地址, 也就是接收本机所有网卡发到本进程端口的请求

如果是linux的话,通过命令就可以完成上述步骤了,当然目录名字就稍微换了,毕竟linux没有盘符的概念
# linux的命令
mkdir -p /opt/es/config & mkdir -p /opt/es/data & mkdir -p /opt/es/plugins

chmod 777 /opt/es/data

echo "http.host: 0.0.0.0" > /opt/es/config/elasticsearch.yml
2、启动容器
linux
docker run --name es -p 9200:9200 -p 9300:9300 -e "discovery.type=single-node" -e ES_JAVA_OPTS="-Xms84m -Xmx512m" -v /opt/es/config/elasticsearch.yml:/usr/share/elasticsearch/config/elasticsearch.yml -v /opt/es/data:/usr/share/elasticsearch/data -v /opt/es/plugins:/usr/share/elasticsearch/plugins -d elasticsearch:7.12.0
windows
docker run --name es -p 9200:9200 -p 9300:9300 -e "discovery.type=single-node" -e ES_JAVA_OPTS="-Xms84m -Xmx512m" -v D:\\GoDevKit\\ElasticSearch\\docker-es\\config\\elasticsearch.yml:/usr/share/elasticsearch/config/elasticsearch.yml -v D:\\GoDevKit\\ElasticSearch\\docker-es\\data:/usr/share/elasticsearch/data -v D:\\GoDevKit\\ElasticSearch\\docker-es\\plugins:/usr/share/elasticsearch/plugins -d elasticsearch:7.12.0
解释:
docker run:运行容器的命令--name:启动后容器的名字-p:port端口映射,表示访问宿主机的9200端口,会映射访问到容器的9200端口,9200是外部访问es的restful端口,9300是es集群内部节点之间通信的端口。-e:env环境变量,ES_JAVA_OPTS="-Xms84m -Xmx512m":es是Java写的,这里是设置Java虚拟机相关参数-v:volume目录挂载映射,这里也可以看到es容器是自带了那三个目录的,就像我们自己安装es一样,只是现在我们想将宿主机的三个目录与之映射,这样即使删除了容器,之前新建的容器只要还是挂载的宿主机这三个目录,那就还是会和原来的容器一样的。-d:daemon后台运行- 最后的参数时镜像名字
docker run参数补充
-i interactive 交互
-t terminal 伪终端运行
-u 指定用户启动docker ps -q 中,-q表示仅打印 容器ID | 镜像ID
如 docker ps -f name=^mys 会打印出所有名字以mys开头的容器全部信息,-f为filter
而 docker ps -q -f name=^mys 只会打印出所有名字以mys开头的容器的ID
通过docker desktop可以看到容器正在运行中了
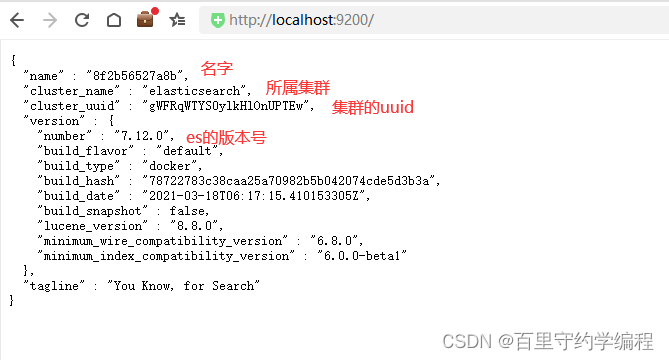
访问本机的9200端口
并且可以看到我们创建的data空目录中也就有一些数据了
3、图像化客户端工具ElasticSearch-Head
ElasticSearch-Head的安装和使用可以参考:https://www.cnblogs.com/xuwenjin/p/8792919.html
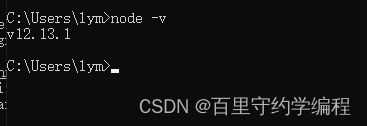
1、elasticsearch-head是一个基于node.js的前端工程,所以需要先安装node.js,下载地址:https://nodejs.org/en/download,下载完成后,基本就是无脑式下一步即可,安装完成后使用node -v查看版本判断是否安装成功。
2、安装grunt为全局命令,grunt是基于node.js的项目构建工具
npm install -g grunt-cli
将grunt需要的一些jar包也安装上,需要联网下载,可能需要一点时间
npm instll
3、下载elasticsearch-head配置包,下载地址:https://github.com/mobz/elasticsearch-head
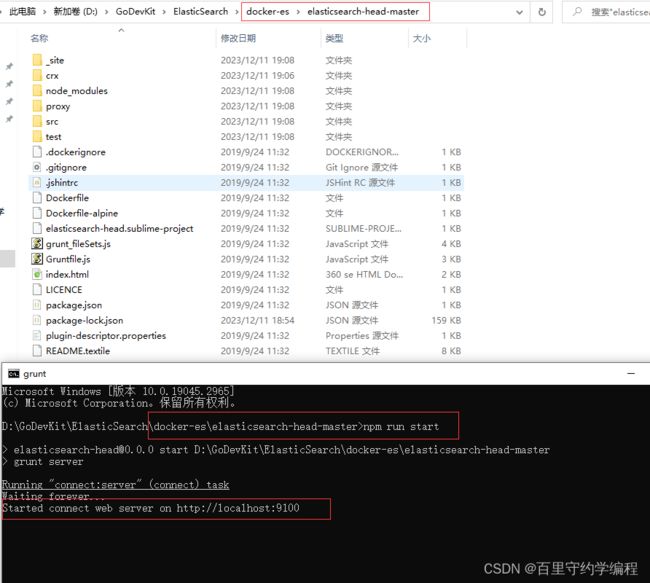
下载后,进入到该目录中,打开cmd,输入npm run start
打开浏览器连接,绿色表示连接成功了,事实上第一次操作是连接不上的,因为9100去连接9200端口,属于跨域了,是会被拒绝了,所以需要在elasticsearch.yml配置文件中加上允许跨域连接的配置
http.cors.enabled: true
http.cors.allow-origin: "*"
然后通过docker desktop 重启重启容器,就可以看到连接成功啦
二、Go ES连接与认证
安装依赖包
go get github.com/olivere/elastic/v7
1、 连接ES
对于连接操作,我们一般都是会定义一个包级别的变量,然后提供一个显示的Init方法,然后在main方法中初始化,如下
es_connect.go
package core

import (
	"fmt"

	"github.com/olivere/elastic/v7"
)

var EsClient *elastic.Client

func InitEsConn() {
	client, err := elastic.NewClient(
		elastic.SetURL("http://127.0.0.1:9200"), // ES服务器地址
		// 我们的ES是通过docker启动的,所以会有docker为其分配的IP地址,但是我们想用本机的,然后通过端口映射访问到docker中的,所以这里设置false,表示跳过IP检查
		elastic.SetSniff(false),
		elastic.SetBasicAuth("", ""),
	)
	if err != nil {
		panic(any(err))
	}
	EsClient = client
	fmt.Println(EsClient)
}
main.go
package main

import "golang-trick/34-go-es/core"

func main() {
	core.InitEsConn()
}
运行后,可以看到连接成功
2、配置ES认证
不需要认证的情况
- 服务器自己使用,
9200,9300端口不对外开放 - 本身跑在
127.0.0.1上
需要认证的情况:
ES需要对外提供服务的,我们总不能让外部也能随意通过ip:端口的方式随意的访问到我们的ES数据,所以需要配置认证
配置认证的方式参考:https://blog.csdn.net/qq_38669698/article/details/130529829
- 启用认证,由于我们配置了目录映射,所以改宿主机的
elasticsearch.yml文件即可,添加如下内容
#添加如下内容
#http.cors.allow-headers: Authorization #这个配置改为下面的
http.cors.allow-headers: Authorization,X-Requested-With,Content-Length,Content-Type
xpack.security.enabled: true
xpack.security.transport.ssl.enabled: true
2.保存后,重启ES
docker restart es
- 设置用户密码
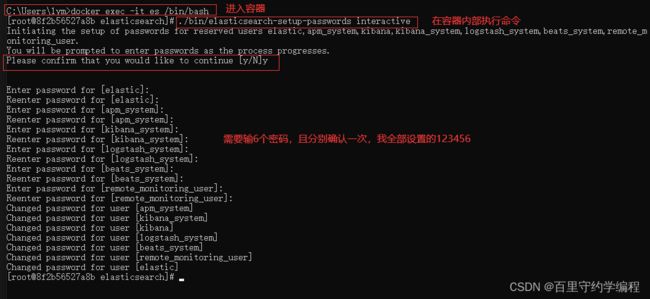
a. 上一步重启ES容器后,进入容器:
docker exec -it es /bin/bash
b. 进入容器后,执行以下命令
./bin/elasticsearch-setup-passwords interactive
出现:Initiating the setup of passwords for reserved users elastic,apm_system,kibana,logstash_system,beats_system,remote_monitoring_user.
You will be prompted to enter passwords as the process progresses.
Please confirm that you would like to continue [y/N]
上边英文大概的意思是:你如果确定开启密码的话,需要设置以下六种账户的密码(建议设置成一样的)
Please confirm that you would like to continue [y/N]y


Enter password for [elastic]:
Reenter password for [elastic]:
Enter password for [apm_system]:
Reenter password for [apm_system]:
Enter password for [kibana]:
Reenter password for [kibana]:
Enter password for [logstash_system]:
Reenter password for [logstash_system]:
Enter password for [beats_system]:

Reenter password for [beats_system]:
Enter password for [remote_monitoring_user]:
Reenter password for [remote_monitoring_user]:
Changed password for user [apm_system]
Changed password for user [kibana]
Changed password for user [logstash_system]
Changed password for user [beats_system]
Changed password for user [remote_monitoring_user]
Changed password for user [elastic]
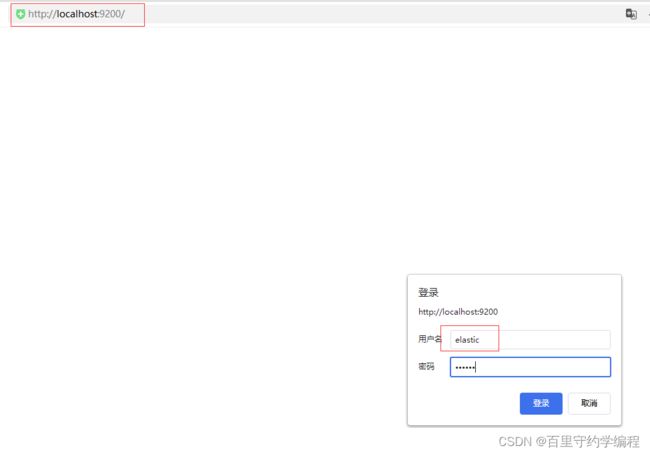
d. 验证
http://127.0.0.1:9200/
可以看到再次访问,就需要我们输入用户名和密码了,用户名是固定的elastic,密码则是我们自己设置的
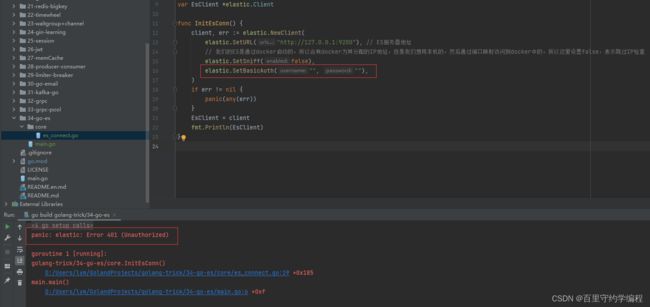
现在执行我们开始的连接代码,也会报错了,因为没有给用户名和密码
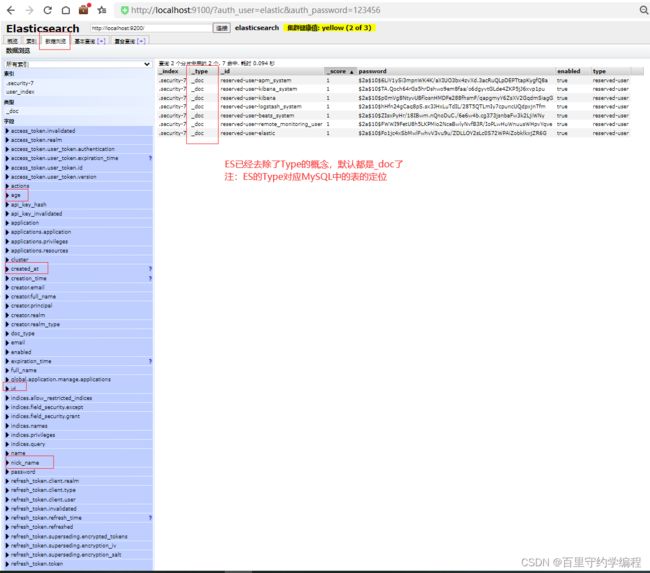
此外,使用ES-Head连接时,也需要改为http://localhost:9100/?auth_user=elastic&auth_password=123456,即需要带上用户名和密码了
三、索引的增删改查
首先我们创建一个结构体User,用于后续封装从ES中查询的出来的数据,并设置一个mapping(定义索引下的字段约束,其中properties表示的就是索引下文档的各字段)
user.go :类似MySQL中的Model,定义结构体,表名等。这里就是ES的Model,定义索引名和mapping等。
package model

import "time"

type User struct {
	Id       uint   `json:"id"`
	UserName string `json:"user_name"`
	NickName string `json:"nick_name"`
	//Age       int    `json:"age"`
	CreateAt string `json:"create_at"`
	Title    string    `json:"title"`
}

func (u *User) Index() string{
	return "user_index"
}

func (u *User) Mapping() string {
	return `
{
  "mappings": {
    "properties": {
      "nick_name": {
        "type": "text"
      },
      "user_name": {
        "type": "keyword" // 完整匹配
      },
      "age": {
        "type": "integer" // 完整匹配
      },
      "id": {
        "type": "integer"
      },
      "created_at":{
        "type": "date",
        "null_value": "null",
        "format": "[yyyy-MM-dd HH:mm:ss]"
      }
    }
  }
}
`
}
index.go :索引的创建、删除、判断索引是否已经存在
package indexs

import (
	"context"
	"fmt"
	"golang-trick/34-go-es/core"
	"golang-trick/34-go-es/model"
)

func CreateIndex(indexName string) error {
	// 索引不存在时,我们才创建,否则请求创建已经存在的索引会报错的
	if ExistsIndex(indexName) {
		// 删除已经存在的索引,然后新建索引
		err := DeleteIndex(indexName)
		if err != nil {
			return err
		}
	}

	index, err := core.EsClient.
		CreateIndex(indexName).                // 创建索引
		BodyString((&model.User{}).Mapping()). // 指定索引的mapping,类似mysql中的表各字段的一个类型和其他约束
		Do(context.Background())               // 执行

	if err != nil {
		fmt.Println(err)
		return err
	}

	fmt.Println(fmt.Printf("创建了索引,索引:%v", index))
	return nil
}

func ExistsIndex(indexName string) bool {
	exists, _ := core.EsClient.IndexExists(indexName).Do(context.Background())
	return exists
}

func DeleteIndex(indexName string) error {
	_, err := core.EsClient.DeleteIndex(indexName).Do(context.Background())
	fmt.Println("删除了索引")
	return err

}
运行:
package main

import (
	"golang-trick/34-go-es/core"
	"golang-trick/34-go-es/indexs"
)

func main() {
	core.InitEsConn()
	indexs.CreateIndex("user_index")
}
再次执行的话,会按我们的代码定义的方式,先删除原有的索引,然后创建新的索引
四、文档的增删改
创建单个文档
package docs

import (
	"context"
	"fmt"
	"golang-trick/34-go-es/core"
	"golang-trick/34-go-es/model"
	"time"
)

func CreateDoc() {
	user := &model.User{
		Id:       10,
		UserName: "lym",
		NickName: "夜空中最亮的星",
		CreateAt: time.Now().Format("2006-01-02 15:03:04"), // 需要按照mapping中的约束格式传,否则报错
		Title:    "学习创建索引",
	}
	indexResp, err := core.EsClient.
		Index().                 // 表明是要对索引进行操作
		Index(user.Index()).     // 指定要操作的索引
		BodyJson(user).          // 文档的内容,会将结构体给我们转为JSON字符串
		Do(context.Background()) // 执行

	if err != nil {
		fmt.Println(err)
		return
	}
	fmt.Printf("%#v\n", indexResp)
}
运行:
package main

import (
	"golang-trick/34-go-es/core"
	"golang-trick/34-go-es/docs"
)

func main() {
	core.InitEsConn()
	// indexs.CreateIndex("user_index")

	docs.CreateDoc()
}
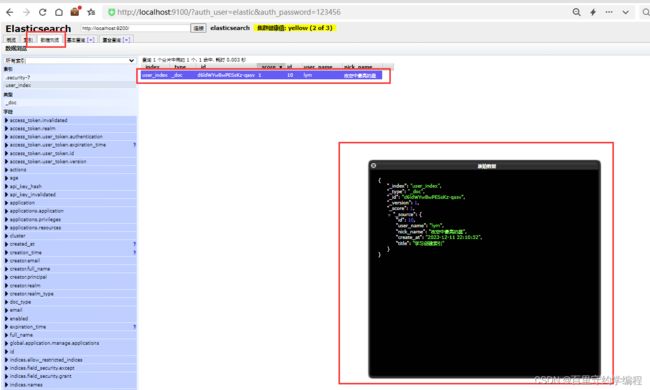
要注意的是,这样查看显示的数据是不全的,比如上面就没有显示title和create_at字段,可以点击文档,查看JSON样式的完整数据
如果是mapping里面没有的字段,文档也是可以创建成功的,并且会加上该字段,如上面的title字段在mapping中就是没有的,但是也保存到文档中成功了。
根据文档id删除文档
// 注意:这里的id是文档id,不是文档内容中的id字段
func DeleteDoc(id string) {
	deleteResp, err := core.EsClient.
		Delete().                       // 获取一个DeleteService对象
		Index((&model.User{}).Index()). // 指明索引
		Id(id).
		Refresh("true"). // 删除后,索引会过一会才刷新,这里传true,索引会立即刷新,删除操作我们一般都传true
		Do(context.Background())

	if err != nil { // 如果文档不存在,会报404错误
		fmt.Println(err)
		return
	}
	fmt.Printf("%#v\n", deleteResp)

}
执行:
package main

import (
	"golang-trick/34-go-es/core"
	"golang-trick/34-go-es/docs"
)

func main() {
	core.InitEsConn()
	// indexs.CreateIndex("user_index")

	//docs.CreateDoc()
	docs.DeleteDoc("d6ldWYwBwPESsKz-qasv")
}
批量删除文档
批量删除需要用到Bulk对象,将要操作的文档放入Bulk中,然后一次性提交给ES服务器执行
根据文档ID列表批量删除文档代码
// 注意:这里的id是文档id,不是文档内容中的id字段
// 传入文档id列表
func BatchDeleteDoc(ids []string) {
	bulkService := core.EsClient.Bulk(). // 获取BulkService对象
						Index((&model.User{}).Index()). // 指明要操作的索引
						Refresh("true")

	for _, id := range ids {
		bulk := elastic.NewBulkDeleteRequest().Id(id)
		bulkService.Add(bulk)
	}

	bulkResp, err := bulkService.Do(context.Background())
	if err != nil {
		fmt.Println(err)
		return
	}

	// 如果文档不存在,不会有错误,bulkResp.Succeeded()为空,否则就是删除成功的数量
	fmt.Printf("%#v\n", bulkResp.Succeeded())

}
执行:
package main

import (
	"golang-trick/34-go-es/core"
	"golang-trick/34-go-es/docs"
)

func main() {
	core.InitEsConn()
	// indexs.CreateIndex("user_index")

	//docs.CreateDoc()
	//docs.DeleteDoc("d6ldWYwBwPESsKz-qasv")

	docs.BatchDeleteDoc([]string{"eKmUWYwBwPESsKz-8qsp", "eamVWYwBwPESsKz-DKve"})
}
批量删除成功
批量创建文档
与批量删除类似,只是添加到BulkService对象中的对象变为了BulkCreateRequest
func BatchCreateDoc() {
	userList := []model.User{
		{
			Id:       11,
			UserName: "lym",
			NickName: "夜空中最亮的星",
			CreateAt: time.Now().Format("2006-01-02 15:04:05"),
		},
		{
			Id:       12,
			UserName: "lym",
			NickName: "夜空中最亮的星",
			CreateAt: time.Now().Format("2006-01-02 15:04:05"),
		},
	}

	bulkService := core.EsClient.Bulk(). // 获取BulkService对象
						Index((&model.User{}).Index()). // 指明要操作的索引
						Refresh("true")

	for _, user := range userList {
		// 与批量删除主要就是这一行不同
		bulk := elastic.NewBulkCreateRequest().Doc(user)
		bulkService.Add(bulk)
	}

	bulkResp, err := bulkService.Do(context.Background())
	if err != nil {
		fmt.Println(err)
		return
	}
	fmt.Printf("%#v\n", bulkResp)

}
执行:
package main

import (
	"golang-trick/34-go-es/core"
	"golang-trick/34-go-es/docs"
)

func main() {
	core.InitEsConn()
	// indexs.CreateIndex("user_index")

	//docs.CreateDoc()
	//docs.DeleteDoc("d6ldWYwBwPESsKz-qasv")

	// docs.BatchDeleteDoc([]string{"eKmUWYwBwPESsKz-8qsp", "eamVWYwBwPESsKz-DKve"})

	docs.BatchCreateDoc()
}
五、文档查询
列表查询
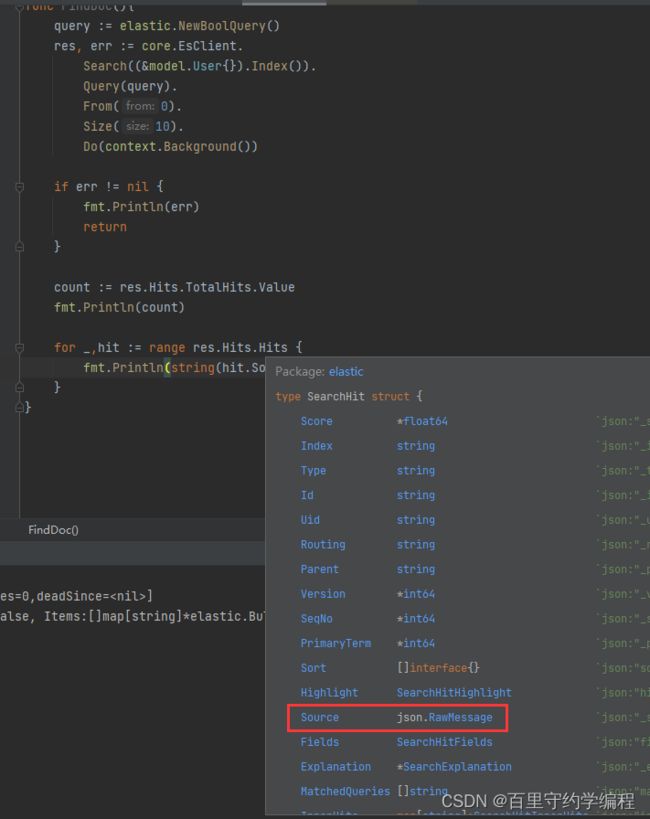
返回结构如下,主要是res.Hits.Hits中的一条记录,是SearchHit对象,里面的Source为我们的文档数据,json.RawMessage就是[]byte的别名而已,所以可以直接转为string,或者反序列化到我们的结构体对象中
代码如下:
func FindDoc() {
	query := elastic.NewBoolQuery()
	res, err := core.EsClient.
		Search((&model.User{}).Index()). // 指定索引,且表明是查询操作
		Query(query). // 查询条件
		From(0). // 分页操作
		Size(10).
		Do(context.Background())

	if err != nil {
		fmt.Println(err)
		return
	}

	count := res.Hits.TotalHits.Value
	fmt.Println(count)

	for _, hit := range res.Hits.Hits {
		fmt.Println(string(hit.Source))
	}
}
执行:
package main

import (
	"golang-trick/34-go-es/core"
	"golang-trick/34-go-es/docs"
)

func main() {
	core.InitEsConn()
	// indexs.CreateIndex("user_index")

	//docs.CreateDoc()
	//docs.DeleteDoc("d6ldWYwBwPESsKz-qasv")

	// docs.BatchDeleteDoc([]string{"eKmUWYwBwPESsKz-8qsp", "eamVWYwBwPESsKz-DKve"})

	// docs.BatchCreateDoc()

	docs.FindDoc()
}
精确匹配
精确匹配只能对mapping中定义为keyword的字段生效,比如下面我们只能对user_name使用精确匹配,对nick_name字段无法使用,所以在设计索引时,如果已知后面会对某个字段进行精确匹配,应该将其设置为keyword类型
代码:
func FindDoc() {

	limit := 10
	page := 1
	from := (page - 1) * limit

	//query := elastic.NewBoolQuery()
	query := elastic.NewTermQuery("user_name", "lym")

	res, err := core.EsClient.
		Search((&model.User{}).Index()). // 指定索引,且表明是查询操作
		Query(query).                    // 查询条件
		From(from).                      // 分页操作
		Size(limit).
		Do(context.Background())

	if err != nil {
		fmt.Println(err)
		return
	}

	count := res.Hits.TotalHits.Value
	fmt.Println(count)

	for _, hit := range res.Hits.Hits {
		fmt.Println(string(hit.Source))
	}
}
执行:

如果换成nick_name,即使写为了完全正确的夜空中最亮的星,也是匹配不到结果的,因为nick_name的type是text,不是keyword

模糊匹配
-
主要是查
text,也能查keyword -
模糊匹配
keyword字段,是需要查完整的 -
匹配
text字段则不用,搜完整的也会搜出很多
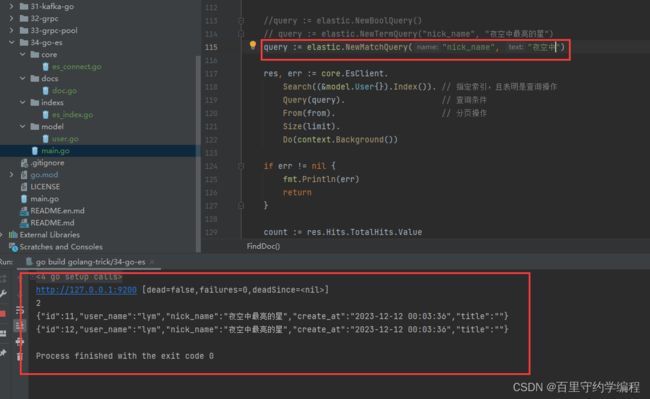
代码:
查询对象换为NewMatchQuery即可
嵌套字段的搜索
我们在创建索引时,并没有指定title字段的mapping,但是因为在插入文档时,带了title字段,es会自动帮我们将其加入到mapping中,且是一个嵌套类型,如下
"title": {
    "type": "text",
    "fields": {
        "keyword": {
            "type": "keyword",
            "ignore_above": 256
        }
    }
}
因为title是text类型,只能模糊匹配,但是需要精确匹配的时候,也能通过title.keyword的形式进行精确匹配,如下
query := elastic.NewTermQuery("title.keyword", "学习创建索引2") // 精确匹配
//query := elastic.NewMatchQuery("title", "学习")  // 模糊匹配
六、 更新文档
更新文档,我们一般都是已经知道文档id了,所以就是根据文档id进行更新,传入map即可
更新前
func UpdateDoc(id string) {
	res, err := core.EsClient.Update().Index((&model.User{}).Index()).
		Id(id).Doc(map[string]any{
		"user_name": "lymUpdate",
	}).Do(context.Background())
	if err != nil {
		fmt.Println(err)
		return
	}
	fmt.Printf("%#v\n", res)
}
执行:
package main

import (
	"golang-trick/34-go-es/core"
	"golang-trick/34-go-es/docs"
)

func main() {
	core.InitEsConn()
	// indexs.CreateIndex("user_index")

	//docs.CreateDoc()
	//docs.DeleteDoc("d6ldWYwBwPESsKz-qasv")

	// docs.BatchDeleteDoc([]string{"eKmUWYwBwPESsKz-8qsp", "eamVWYwBwPESsKz-DKve"})

	// docs.BatchCreateDoc()

	// docs.FindDoc()

	docs.UpdateDoc("eqmeWYwBwPESsKz-nasc")
}


