nest框架的token登录,以及token校验
1.搭建项目
- 项目初始化:
npm i -g @nestjs/cli
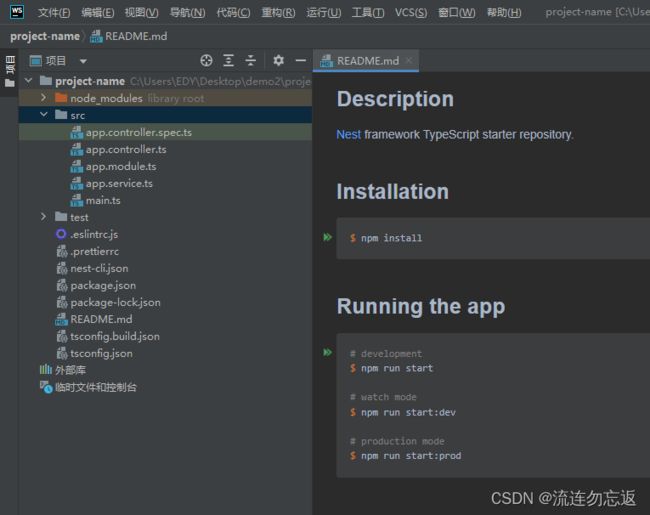
nest new project-name
- 在终端下执行这四个命令,生成两个新模块:
nest g module auth
nest g service auth
nest g module users
nest g service users
- 然后把这三个文件删掉,是没有用的:
UserModule
编写 UsersService:
import { Injectable } from '@nestjs/common';

interface User {
    userId: number;
    username: string;
    password: string;
}

@Injectable()
export class UsersService {
    private readonly users: User[];

    constructor() {
        // 这里把用户列表写死了. 在真正的应用程序中,用户列表应该从数据库获取
        this.users = [
            {
                userId: 1,
                username: 'john',
                password: 'riddle',
            },
            {
                userId: 2,
                username: 'chris',
                password: 'secret',
            },
            {
                userId: 3,
                username: 'maria',
                password: 'guess',
            },
        ];
    }

    async findOne(username: string) {
        return this.users.find((user) => user.username === username);
    }
}
在 UsersModule 中,将 UsersService 导出,供其他模块使用:
import { Module } from '@nestjs/common';
import { UsersService } from './users.service';

@Module({
    providers: [UsersService],
    exports: [UsersService], // 导出 UsersService
})
export class UsersModule {}
AuthModule
在 AuthModule 中导入 UserModule:
import { Module } from '@nestjs/common';
import { UsersModule } from 'src/users/users.module';
import { AuthService } from './auth.service';

@Module({
    imports: [UsersModule], // 导入 UsersModule
    providers: [AuthService],
})
export class AuthModule {}
编写 AuthService:
import { Injectable } from '@nestjs/common';
import { UsersService } from 'src/users/users.service';

@Injectable()
export class AuthService {
    constructor(private readonly usersService: UsersService) {}

    /* 检查用户是否已存在 + 校验密码 */
    async validateUser(username: string, pwd: string) {
        const user = await this.usersService.findOne(username); // 获取用户
        if (user && user.password === pwd) {
            const { password, ...result } = user; // 剔除 password
            return result; // 返回用户信息
        }
        return null; // 用户不存在 / 密码错误
    }
}
2.本地策略(这一步还不是jwt,这里只是做登录认证)
在终端上执行这两行代码:
npm i @nestjs/passport passport passport-local
npm i -D @types/passport-local
在 auth 目录下新增编写本地策略的配置文件 local.strategy.ts
import { Strategy } from 'passport-local';
import { PassportStrategy } from '@nestjs/passport';
import { Injectable, UnauthorizedException } from '@nestjs/common';
import { AuthService } from './auth.service';

@Injectable() // 通过 PassportStrategy 使用 local 策略
export class LocalStrategy extends PassportStrategy(Strategy) {
    constructor(private readonly authService: AuthService) {
        super();
    }

    async validate(username: string, password: string) {
        const user = await this.authService.validateUser(username, password);
        if (!user) {
            throw new UnauthorizedException(); // 返回 '未授权' 错误 (401)
        }
        return user; // 返回用户信息
    }
}
配置 AuthModule 来使用刚才定义的 Passport 特性:
import { Module } from '@nestjs/common';
import { PassportModule } from '@nestjs/passport/dist';
import { UsersModule } from 'src/users/users.module';
import { AuthService } from './auth.service';
import { LocalStrategy } from './local.strategy';

@Module({
    imports: [UsersModule, PassportModule], // 引入 PassportModule
    providers: [AuthService, LocalStrategy], // 注册 LocalStrategy
})
export class AuthModule {}
登录测试
现在就可以实现一个简单的 /login 路由,并应用内置的守卫来启动 Passport-local 流
import { Controller, Req, Post, UseGuards } from '@nestjs/common';
import { AuthGuard } from '@nestjs/passport/dist/auth.guard';
import { Request } from 'express';

@Controller()
export class AppController {
    @UseGuards(AuthGuard('local')) // 启用本地策略
    @Post('login')
    async getHello(@Req() request: Request) {
        // Passport 会根据 validate() 方法的返回值创建一个 user 对象
        // 并以 req.user 的形式分配给请求对象
        return request.user;
    }
}
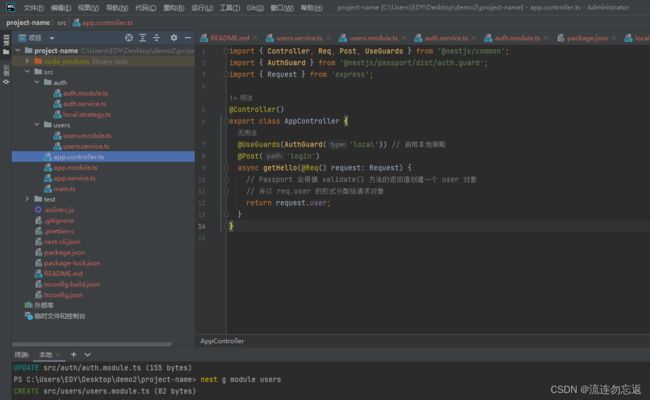
现在的项目结构:
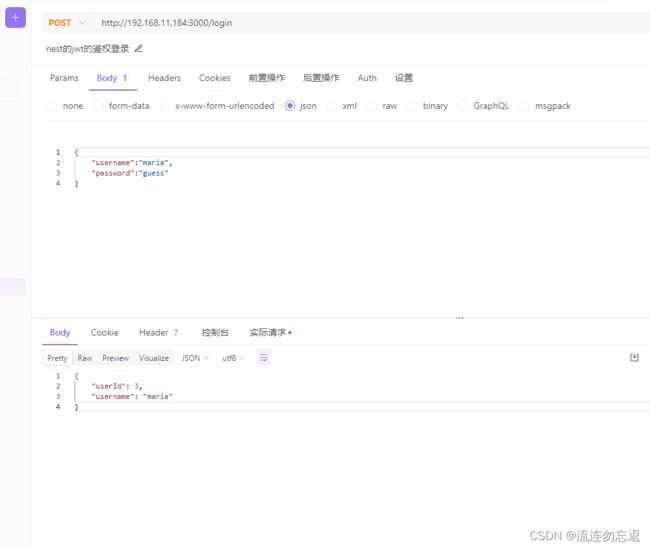
启动项目测试:
代码说明:
加入这个注解 @UseGuards(AuthGuard('local')) // 启用本地策略,那会在请求 '/login' 的时候,框架会先去执行 继承了 PassportStrategy 这个类的 validate方法
注意:如果这里没有写,那就是默认 local
PassportStrategy类的 本地策略 里面的 validate 方法的参数我个人是认为可变的,但是没实现出来,validate 方法完成之后,会把结果放到 request.user 里面
3.token策略
npm i @nestjs/jwt passport-jwt
npm i @types/passport-jwt -D
在 AuthModule 中引入 JwtModule:
import { Module } from '@nestjs/common';
import { JwtModule } from '@nestjs/jwt';
import { PassportModule } from '@nestjs/passport/dist';
import { UsersModule } from 'src/users/users.module';
import { AuthService } from './auth.service';
import { LocalStrategy } from './local.strategy';

@Module({
    imports: [UsersModule, PassportModule, JwtModule], // 引入 JwtModule
    providers: [AuthService, LocalStrategy],
})
export class AuthModule {}
编写 AuthService,添加 login() 方法:
import { Injectable } from '@nestjs/common';
import { JwtService } from '@nestjs/jwt/dist';
import { UsersService } from 'src/users/users.service';

@Injectable()
export class AuthService {
    constructor(
        private readonly usersService: UsersService,
        private readonly jwtService: JwtService,
    ) {}

    async validateUser(username: string, pwd: string) {
        const user = await this.usersService.findOne(username);
        if (user && user.password === pwd) {
            const { password, ...result } = user;
            return result;
        }
        return null;
    }

    async login(user: any) {
        const payload = { username: user.username, sub: user.userId };
        return {
            // 使用 jwtService.sign() 基于 payload 生成 token 字符串
            access_token: this.jwtService.sign(payload),
        };
    }
}
更新 auth.module.ts,对 JwtModule 进行配置,并导出 AuthService:
import { Module } from '@nestjs/common';
import { JwtModule } from '@nestjs/jwt';
import { PassportModule } from '@nestjs/passport/dist';
import { UsersModule } from 'src/users/users.module';
import { AuthService } from './auth.service';
import { LocalStrategy } from './local.strategy';

@Module({
  imports: [
    UsersModule,
    PassportModule,
    /* 配置 JwtModule */
    JwtModule.register({
      secret: 'ceshi', // 使用 token 签名密文,我在这里是写固定的,实际开发里面,不能这样
      signOptions: { expiresIn: '7d' }, // 设置 token 的有效期,七天
    }),
  ],
  providers: [AuthService, LocalStrategy],
  exports: [AuthService], // 导出 AuthService
})
export class AuthModule {}
有关 Nest JwtModule 的更多信息请参见 GitHub - @nestjs/jwt
有关可用配置选项的更多信息请参见 GitHub - node-jsonwebtoken
更新 /login 路由,返回 JWT:
import { Controller, Req, Post, UseGuards } from '@nestjs/common';
import { Request } from 'express';
import { AuthGuard } from '@nestjs/passport/dist/auth.guard';
import { AuthService } from './auth/auth.service';

@Controller()
export class AppController {
    constructor(private readonly authService: AuthService) {} // 依赖注入

    @UseGuards(AuthGuard('local'))
    @Post('login')
    async getHello(@Req() request: Request) {
        return this.authService.login(request.user); // 调用 login 方法
    }
}
检验 token
在 auth 目录下新增编写本地策略的配置文件 jwt.strategy.ts
import { ExtractJwt, Strategy } from 'passport-jwt';
import { PassportStrategy } from '@nestjs/passport';
import { Injectable } from '@nestjs/common';

@Injectable()
export class JwtStrategy extends PassportStrategy(Strategy) {
  constructor() {
    super({
      jwtFromRequest: ExtractJwt.fromHeader('token'),
      ignoreExpiration: false,
      secretOrKey: 'ceshi', // 使用 token 签名密文来解密,我在这里是写固定的,实际开发里面,不能这样
    });
  }

  async validate(payload: any) {
    return { userId: payload.sub, username: payload.username };
  }
}
3.1代码说明
在 AuthModule 中添加 JwtStrategy 作为提供者:
import { Module } from '@nestjs/common';
import { JwtModule } from '@nestjs/jwt';
import { PassportModule } from '@nestjs/passport/dist';
import { UsersModule } from 'src/users/users.module';
import { AuthService } from './auth.service';
import { JwtStrategy } from './jwt.strategy';
import { LocalStrategy } from './local.strategy';

@Module({
  imports: [
    UsersModule,
    PassportModule,
    JwtModule.register({
      secret: 'ceshi', // 使用 token 签名密文,我在这里是写固定的,实际开发里面,不能这样
      signOptions: { expiresIn: '7d' },
    }),
  ],
  providers: [AuthService, LocalStrategy, JwtStrategy], // 注册 JwtStrategy
  exports: [AuthService],
})
export class AuthModule {}
更新 app.controller.ts 文件,使用 JWT:
import { Controller, Req, Post, UseGuards, Get } from '@nestjs/common';
import { Request } from 'express';
import { AuthGuard } from '@nestjs/passport/dist/auth.guard';
import { AuthService } from './auth/auth.service';

@Controller()
export class AppController {
    constructor(private readonly authService: AuthService) {}

    @UseGuards(AuthGuard('local'))
    @Post('login')
    async getHello(@Req() request: Request) {
        return this.authService.login(request.user);
    }

    @UseGuards(AuthGuard('jwt')) // 使用 JWT 鉴权
    @Get('profile')
    getProfile(@Req() request: Request) {
        return request.user; // 返回用户信息
    }
}
默认策略
在 AppController 中,使用 @UseGuards(AuthGuard(XXX)) 装饰器需要传递策略的名称 XXX。我们可以声明一个默认策略,就不必再传入名称了。
import { Module } from '@nestjs/common';
import { JwtModule } from '@nestjs/jwt';
import { PassportModule } from '@nestjs/passport/dist';
import { UsersModule } from 'src/users/users.module';
import { AuthService } from './auth.service';
import { jwtConstants } from './constants';
import { JwtStrategy } from './jwt.strategy';
import { LocalStrategy } from './local.strategy';

@Module({
    imports: [
        UsersModule,
        PassportModule.register({ defaultStrategy: 'jwt' }), // 配置默认策略
        JwtModule.register({
            secret: jwtConstants.secret,
            signOptions: { expiresIn: '60s' },
        }),
    ],
    providers: [AuthService, LocalStrategy, JwtStrategy],
    exports: [AuthService],
})
export class AuthModule {}
示例代码:
可以从这里下载示例代码


