SpringAMQP 快速入门
SpringAMQP 快速入门
-
- 1. 创建项目
- 2. 快速入门
-
- 2.2.1 消息发送
- 2.2.2 消息接收
- 3. 交换机
-
- 3.1 Fanout Exchange(扇出交换机)
-
- 3.1.1 创建队列与交换机
- 3.1.2 消息接收
- 3.1.3 消息发送
- 3.2 Direct Exchange(直连交换机)
-
- 3.2.1 创建交换机与队列 绑定 Routing Key
- 3.2.2 消息接收
- 3.1.3 消息发送
- 3.3 Topic Exchange(主题交换机)
-
- 3.3.1 创建交换机与队列 绑定 Routing Key
- 3.3.2 消息接收
- 3.3.3 消息发送
- 4. 声明队列和交换机
-
- 4.1 声明队列
- 4.2 声明交换机
- 4.3 声明绑定关系
- 4.4 测试
- 4.5 基于注解声明
- 5. 消息转换器
-
- 5.1 测试默认消息转换器
- 5.2 配置JSON转换器
- 5.3 消息接收
相关文章:
消息队列 - RabbitMQ
RabbitMQ 如何保证消息可靠性
Spring AMQP(Advanced Message Queuing Protocol)是 Spring 框架的一个模块,用于简化在基于消息的应用程序中使用消息队列的开发。它建立在 AMQP 协议之上,提供了与消息中间件(如 RabbitMQ)集成的便捷方式。
以下是 Spring AMQP 的主要特点和概念:
- 简化的消息生产者和消费者: Spring AMQP 提供了简单的模板(
AmqpTemplate)用于发送和接收消息,大大简化了消息生产者和消费者的开发。 - 声明式的消息监听器容器: Spring AMQP 允许使用注解声明消息监听器,而不需要手动编写消息消费者。通过
@RabbitListener注解,可以将一个方法标识为消息监听器,以便在接收到消息时自动调用该方法。 - 消息转换: Spring AMQP 提供了灵活的消息转换机制,可以将消息从一种格式转换为另一种格式,以便与不同类型的消息队列进行集成。
- 声明式的队列、交换机和绑定: 使用 Spring AMQP,可以通过注解声明式地定义队列、交换机和绑定关系,而不需要在代码中显式创建这些对象。
- 事务支持: Spring AMQP 支持事务,可以在消息发送和接收过程中使用事务来确保消息的可靠性。
- 异常处理: 提供了丰富的异常体系,方便开发者处理在消息处理过程中可能发生的异常情况。
- 集成 Spring Boot: Spring AMQP 很好地集成到 Spring Boot 中,通过简单的配置即可快速搭建基于消息的应用。
- 并发性: 允许配置消息监听器容器的并发性,以便同时处理多个消息。
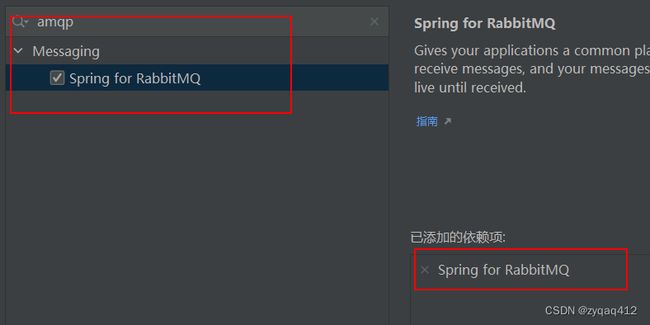
1. 创建项目
选择 AMQP 依赖
<project xmlns="http://maven.apache.org/POM/4.0.0" xmlns:xsi="http://www.w3.org/2001/XMLSchema-instance"
         xsi:schemaLocation="http://maven.apache.org/POM/4.0.0 https://maven.apache.org/xsd/maven-4.0.0.xsd">
    <modelVersion>4.0.0modelVersion>
    <parent>
        <groupId>org.springframework.bootgroupId>
        <artifactId>spring-boot-starter-parentartifactId>
        <version>2.7.0version>
        <relativePath/>
    parent>
    <groupId>com.hzygroupId>
    <artifactId>SpringAMQP-demoartifactId>
    <version>0.0.1-SNAPSHOTversion>
    <name>SpringAMQP-demoname>
    <description>SpringAMQP-demodescription>
    <properties>
        <java.version>8java.version>
    properties>
    <dependencies>
        <dependency>
            <groupId>org.springframework.bootgroupId>
            <artifactId>spring-boot-starter-amqpartifactId>
        dependency>

        <dependency>
            <groupId>org.springframework.bootgroupId>
            <artifactId>spring-boot-starter-testartifactId>
            <scope>testscope>
        dependency>
        <dependency>
            <groupId>org.springframework.amqpgroupId>
            <artifactId>spring-rabbit-testartifactId>
            <scope>testscope>
        dependency>
    dependencies>

    <build>
        <plugins>
            <plugin>
                <groupId>org.springframework.bootgroupId>
                <artifactId>spring-boot-maven-pluginartifactId>
            plugin>
        plugins>
    build>

project>
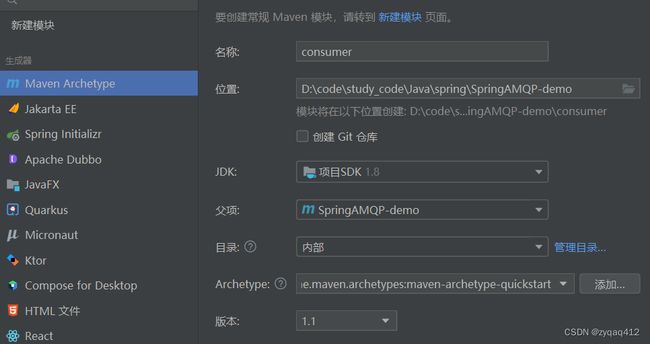
在SpringAMQP-demo中新建两个子模块 publisher、consumer
2. 快速入门
前面在消息队列 - RabbitMQ这篇博客中添加了一个 test 用户和 /test 虚拟主机,现在在 /test 中创建一个队列

2.2.1 消息发送
配置 publisher 的 application.yml 文件
spring:
  rabbitmq:
    host: 192.168.193.40
    port: 5672
    username: test
    password: test
    virtual-host: /test
然后在publisher中编写测试类SpringAmqpTest,并利用RabbitTemplate实现消息发送:
@SpringBootTest
public class SpringAmqpTest {
    @Autowired
    private RabbitTemplate rabbitTemplate;

    @Test
    public void testQueue1() {
        // 队列名称
        String queueName = "test.queue1";
        // 消息
        String message = "hello";
        // 发送消息
        rabbitTemplate.convertAndSend(queueName, message);
    }
}
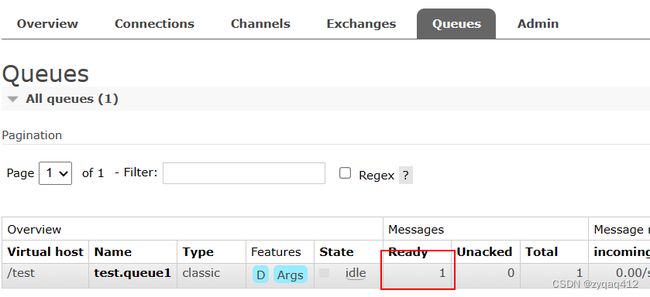
成功发送到 test.queue1 中
2.2.2 消息接收
在consumer的application.yml中添加配置:
spring:
  rabbitmq:
    host: 192.168.193.40
    port: 5672
    username: test
    password: test
    virtual-host: /test
新建一个类SpringRabbitListener 监听队列 test.queue1
@Component
public class SpringRabbitListener {
    // 利用RabbitListener来声明要监听的队列信息
    // 将来一旦监听的队列中有了消息,就会推送给当前服务,调用当前方法,处理消息。
    // 方法体中接收的就是消息体的内容
    @RabbitListener(queues = "test.queue1")
    public void listenTestQueueMessage(String msg) {
        System.out.println("spring 消费者接收到消息:【" + msg + "】");
    }
}
启动服务后就接收到了消息

队列中的消息被消费

3. 交换机
3.1 Fanout Exchange(扇出交换机)
扇出交换机将消息广播到与交换机绑定的所有队列,忽略路由键。适用于广播消息给多个消费者的场景,不关心消息的具体内容。
3.1.1 创建队列与交换机
创建队列
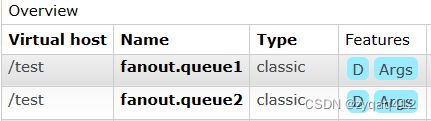
创建交换机
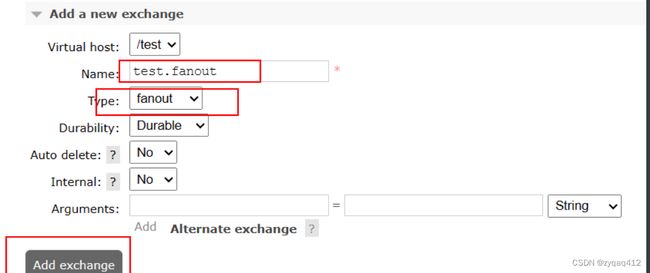
绑定队列到交换机
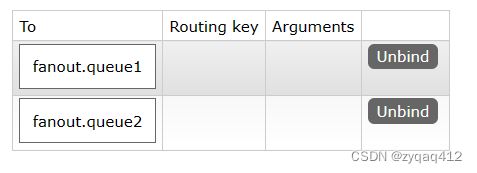
3.1.2 消息接收
在SpringRabbitListener中添加两个方法分别监听 fanout.queue1 和 fanout.queue2
    @RabbitListener(queues = "fanout.queue1")
    public void listenFanoutQueue1Message(String msg) {
        System.out.println("spring 消费者接收 fanout.queue1 消息:【" + msg + "】");
    }
    @RabbitListener(queues = "fanout.queue2")
    public void  listenFanoutQueue2Message(String msg) {
        System.out.println("spring 消费者接收 fanout.queue2 消息:【" + msg + "】");
    }
3.1.3 消息发送
在 SpringAmqpTest 中添加消息发送方法
    @Test
    public void SendFanoutExchange() {
        // 交换机名称
        String exchangeName = "test.fanout";
        // 消息
        String message = "hello, test.fanout";
        rabbitTemplate.convertAndSend(exchangeName, "", message);
    }
成功接收到消息

3.2 Direct Exchange(直连交换机)
直连交换机是最简单的交换机类型,它将消息路由到与消息中的路由键完全匹配的队列中,在消息生产者指定的路由键和队列的绑定键完全相同时,消息将被发送到相应的队列。
3.2.1 创建交换机与队列 绑定 Routing Key
创建队列
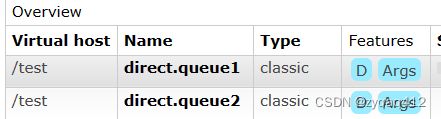
创建交换机
![]()
绑定 Routing Key
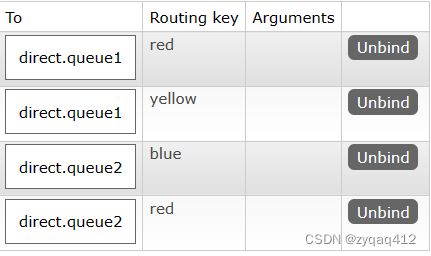
3.2.2 消息接收
在SpringRabbitListener中添加两个方法分别监听 fanout.queue1 和 fanout.queue2
    @RabbitListener(queues = "direct.queue1")
    public void listenDirectQueue1Message(String msg) {
        System.out.println("spring 消费者1接收 direct.queue1 消息:【" + msg + "】");
    }
    @RabbitListener(queues = "direct.queue2")
    public void  listenFanoutQueue2Message(String msg) {
        System.out.println("spring 消费者2接收 direct.queue2 消息:【" + msg + "】");
    }
3.1.3 消息发送
在 SpringAmqpTest 中添加消息发送方法
    @Test
    public void SendDirectExchange() {
        // 交换机名称
        String exchangeName = "test.direct";
        // 消息
        String message = "hello, red";
        rabbitTemplate.convertAndSend(exchangeName, "red", message);
    }
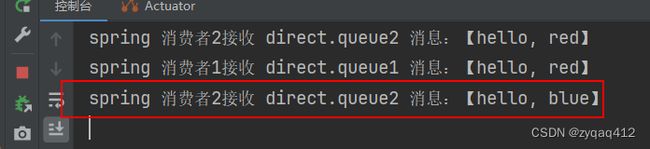
Routing Key 为 red时两个队列都能收到消息

修改 Routing Key 为 blue
    @Test
    public void SendDirectExchange() {
        // 交换机名称
        String exchangeName = "test.direct";
        // 消息
        String message = "hello, blue";
        rabbitTemplate.convertAndSend(exchangeName, "blue", message);
    }
只有 direct.queue2 能收到消息
3.3 Topic Exchange(主题交换机)
Topic Exchange 和 Direct Exchange 类似区别在于使用直连交换机时,消息的路由键(Routing Key)需要与队列绑定时指定的路由键完全匹配。使用主题交换机时,消息的路由键可以使用通配符进行模式匹配,支持更灵活的消息路由规则。
路由键中可以使用 *(匹配一个单词)和 #(匹配零个或多个单词)通配符。
适用于需要根据一定的模式匹配将消息路由到不同队列的场景,可以处理更复杂的消息路由需求。
3.3.1 创建交换机与队列 绑定 Routing Key
创建队列

创建交换机
![]()
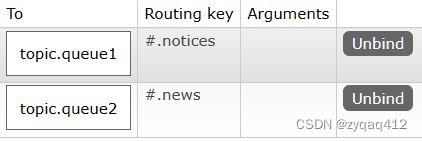
绑定 Routing Key
3.3.2 消息接收
在SpringRabbitListener中添加两个方法分别监听 topic.queue1 和 topic.queue2
    @RabbitListener(queues = "topic.queue1")
    public void listenTopicQueue1Message(String msg) {
        System.out.println("spring 消费者1接收 topic.queue1 消息:【" + msg + "】");
    }
    @RabbitListener(queues = "topic.queue2")
    public void  listenTopicQueue2Message(String msg) {
        System.out.println("spring 消费者2接收 topic.queue2 消息:【" + msg + "】");
    }
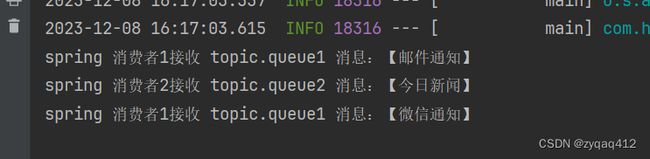
3.3.3 消息发送
在 SpringAmqpTest 中添加消息发送方法
    @Test
    public void SendTopicExchange() {
        // 交换机名称
        String exchangeName = "test.topic";
        // 消息
        String message = "邮件通知";
        rabbitTemplate.convertAndSend(exchangeName, "mail.notices", message);

        message = "微信通知";
        rabbitTemplate.convertAndSend(exchangeName, "wechat.notices", message);
        message = "今日新闻";
        rabbitTemplate.convertAndSend(exchangeName, "today.news", message);
    }
4. 声明队列和交换机
在 Spring AMQP 中,声明队列和交换机是连接到 RabbitMQ 之前的重要步骤。这些声明定义了你的消息传递系统的基础架构,包括队列和交换机的名称、类型以及与其相关的其他属性。
之前我们都是基于RabbitMQ控制台来创建队列、交换机。但是在实际开发时,队列和交换机是程序员定义的,将来项目上线,又要交给运维去创建。那么程序员就需要把程序中运行的所有队列和交换机都写下来,交给运维。在这个过程中是很容易出现错误的。
因此推荐的做法是由程序启动时检查队列和交换机是否存在,如果不存在自动创建。
Spring AMQP 提供了用来声明队列、交换机、及其绑定关系的的类:
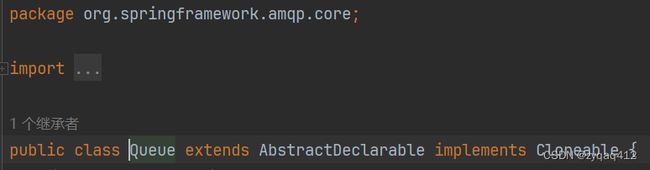
- Queue:用于声明队列,可以用工厂类QueueBuilder构建
- Exchange:用于声明交换机,可以用工厂类ExchangeBulider构建
- Binding:用于声明队列和交换机的绑定关系,可以用工厂类BindingBuilder构建
4.1 声明队列
创建 一个配置类 FanoutConfiguration
@Configuration
public class FanoutConfiguration {
}
SpringAMQP 提供了 Queue类用来创建队列
在配置类中添加方法
    @Bean
    public Queue fanoutQueue3(){
        // durable() 持久化队列
        QueueBuilder durable = QueueBuilder.durable("fanout.queue3");
        return durable.build();
    }
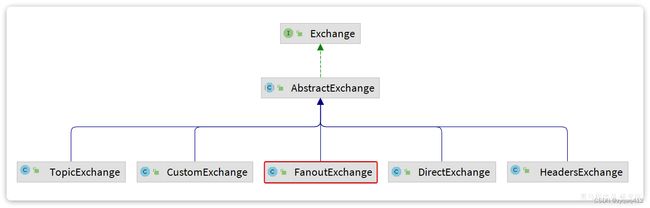
4.2 声明交换机
SpringAMQP提供了一个Exchange接口,来表示所有不同类型的交换机:
在配置类中添加方法
    @Bean
    public FanoutExchange fanoutExchange(){
        ExchangeBuilder exchangeBuilder = ExchangeBuilder.fanoutExchange("test.fanout2");
        return exchangeBuilder.build();
    }
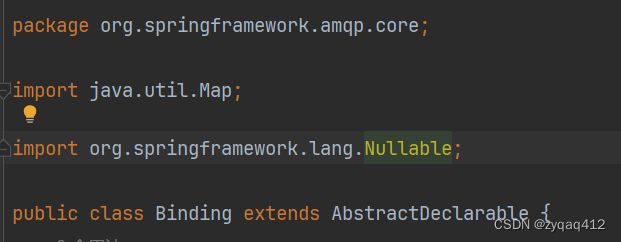
4.3 声明绑定关系
SpringAMQP 提供了 Binding 类 来绑定队列于交换机
在配置类中添加方法
    @Bean
    public Binding fanoutBinding3(FanoutExchange fanoutExchange,Queue fanoutQueue3){
        return BindingBuilder.bind(fanoutQueue3).to(fanoutExchange);
    }
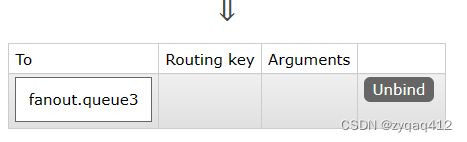
4.4 测试
启动服务,查看控制台可以看到队列、交换机、和绑定关系都成功创建。
![]()
![]()
4.5 基于注解声明
基于@Bean的方式声明队列和交换机比较麻烦,每添加一个队列、交换机、绑定关系都要写一个@Bean方法。Spring还提供了基于注解方式来声明。
使用注解方式声明 Fanout交换机与队列
    @RabbitListener(bindings = @QueueBinding(
            value = @Queue(value = "fanout.queue3", durable = "true"),
            exchange = @Exchange(value = "test.fanout2", type = "fanout")
    ))
    public void listenFanoutQueue3Message(String msg) {
        System.out.println("消费者 接收 fanout.queue3 消息:【" + msg + "】");
    }
使用注解方式声明Direct交换机与队列
    @RabbitListener(bindings = @QueueBinding(
            value = @Queue(value = "direct.queue1", durable = "true"),
            exchange = @Exchange(name = "test.direct", type = "direct"),
            key = {"red","blue"}
    ))
    public void listenDirectQueue1Message(String msg) {
        System.out.println("spring 消费者1接收 direct.queue1 消息:【" + msg + "】");
    }

    @RabbitListener(bindings = @QueueBinding(
            value = @Queue(value = "direct.queue2", durable = "true"),
            exchange = @Exchange(name = "test.direct", type = "direct"),
            key = {"red","yellow"}
    ))
    public void listenDirectQueue2Message(String msg) {
        System.out.println("spring 消费者2接收 direct.queue2 消息:【" + msg + "】");
    }
使用注解方式声明Topic交换机与队列
    @RabbitListener(bindings = @QueueBinding(
            value = @Queue(value = "topic.queue1", durable = "true"),
            exchange = @Exchange(name = "test.topic", type = ExchangeTypes.TOPIC),
            key = "#.notices"
    ))
    public void listenTopicQueue1Message(String msg) {
        System.out.println("spring 消费者1接收 topic.queue1 消息:【" + msg + "】");
    }


    @RabbitListener(bindings = @QueueBinding(
            value = @Queue(value = "topic.queue2", durable = "true"),
       		 //  type = ExchangeTypes.TOPIC 或者 "topic" 默认 "direct"
            exchange = @Exchange(name = "test.topic", type = ExchangeTypes.TOPIC),
            key = "#.news"
    ))
    public void listenTopicQueue2Message(String msg) {
        System.out.println("spring 消费者2接收 topic.queue2 消息:【" + msg + "】");
    }
可以看到使用@RabbitListener注解的方式比 @Bean 方式简单很多
5. 消息转换器
5.1 测试默认消息转换器
发送一个map集合
    @Test
    public void testSendMapQueue1() {
        // 队列名称
        String queueName = "test.queue1";
        // 消息
        Map<String,String> map = new HashMap<>();
        map.put("name","zs");
        // 发送消息
        rabbitTemplate.convertAndSend(queueName, map);
    }
在控制台查看消息
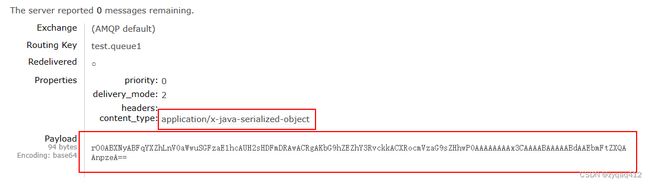
可以看到默认使用的序列化方式是JDK序列化,众所周知,JDK序列化存在下列问题:
- 数据体积过大
- 有安全漏洞
- 可读性差
使用我们需要使用可读性更高更轻量级的序列化方式:JSON
5.2 配置JSON转换器
显然,JDK序列化方式并不合适。我们希望消息体的体积更小、可读性更高,因此可以使用JSON方式来做序列化和反序列化。
在publisher和consumer两个服务中都引入依赖:
<dependency>
    <groupId>com.fasterxml.jackson.dataformatgroupId>
    <artifactId>jackson-dataformat-xmlartifactId>
    <version>2.9.10version>
dependency>
配置消息转换器,在publisher和consumer两个服务的启动类中添加一个Bean即可:
@Bean
public MessageConverter messageConverter(){
    // 1.定义消息转换器
    Jackson2JsonMessageConverter jackson2JsonMessageConverter = new Jackson2JsonMessageConverter();
    // 2.配置自动创建消息id,用于识别不同消息,也可以在业务中基于ID判断是否是重复消息
    jackson2JsonMessageConverter.setCreateMessageIds(true);
    return jackson2JsonMessageConverter;
}
再测试一次在控制台中查看

public void listenTestQueueMessage(Map<String, String> msg) {
System.out.println("消费者接收到test.queue1消息:【" + msg + "】");
}
