浅谈spring之IoC控制反转
以下学习资料来源于b站动力节点
spring: 出现是在2002左右,解决企业开发的难度。减轻对项目模块之间的管理,类和类之间的管理, 帮助开发人员创建对象,管理对象之间的关系。spring核心技术 ioc , aop 。能实现模块之间,类之间的解耦合。
类之间的解耦合传送门
spring
准备工作
spring的第一个核心功能ioc。
IoC (Inversion of Control) : 控制反转, 是一个理论,概念,思想。
描述的:把对象的创建,赋值,管理工作都交给代码之外的容器实现, 也就是对象的创建是由其它外部资源完成。控制: 创建对象,对象的属性赋值,对象之间的关系管理。
反转: 把原来的开发人员管理,创建对象的权限转移给代码之外的容器实现。 由容器代替开发人员管理对象。创建对象,给属性赋值。
那么正转是什么?
正转:由开发人员在代码中,使用new 构造方法创建对象, 开发人员主动管理对象。
public static void main(String args[]){
    Student student = new Student(); // 在代码中, 创建对象。--正转。
}
容器:是一个服务器软件, 一个框架(spring)
为什么要使用 ioc? : 目的就是减少对代码的改动, 也能实现不同的功能。 实现解耦合。
java中创建对象的方式有哪些?
- 构造方法 , new Student()
- 反射
- 序列化
- 克隆
- ioc :容器创建对象
- 动态代理
ioc的体现
servlet:
- 创建类继承HttpServlet
- 在web.xml注册servlet。
<servlet-name> myservlet </servlet-name>
<servelt-class>com.pingfan.controller.MyServlet1</servlet-class>
- 没有创建Servlet对象,为什么可以用?是被Tomcat容器创建的。(Tomcat也是个容器,里面存放的有Servlet对象,Listener,Filter对象)
IoC的技术实现
DI是ioc的技术实现。
DI(Dependency Injection):依赖注入,只需要在程序中提供要使用的对象名称就可以,至于对象如何在容器中创建,赋值,查找,都由容器内部实现。
传统的new对象
Student stu=new Student();
使用spring创建对象
Student stu=(Student)ac.getBean("student");//ac是spring容器,从容器中根据id拿到对象即可。
总结:spring是使用di实现了ioc的功能,spring底层创建对象,使用的是反射机制。(sring是一个容器,管理对象,给属性赋值,底层是反射创建对象。)
IOC控制反转
接下来进入正题spring的核心功能之一IOC。以下项目的实现以及代码的完成皆来自于文章开头的传送门建议结合b站视频进行学习。
创建一个简单的spring项目
实现步骤:
1.创建maven项目
2.加入maven的依赖
  spring的依赖,版本5.2.5版本
  junit依赖
3.创建类(接口和他的实现类)
  和没有使用框架一样, 就是普通的类。
4.创建spring需要使用的配置文件
  声明类的信息,这些类由spring创建和管理
5.测试spring创建的。
新建一个空工程,之后创建一个moudle,新建一个maven项目,选择quickstart。(建议初学者跟着视频走。本文只提供大致思路以及笔记)
初学者可能会有的疑问
- 为什么要创建一个空工程?
因为在空工程下可以有很多的模块,便于管理。比如你学习的spring全部放在spring工程下。学习springmvc则放在springmvc工程下。
- 使用单元测试有何好处?
首先使用单元测试需要加入junit依赖,其中在test包下的类叫做测试类。我们在开发过程中需要不停的测试自己的项目,而在test包下测试清晰明了,结构也很清楚,便于后续开发。
创建service包下接口SomeService。
package com.pingfan.service;
public interface SomeService {
    void doSome();
}
然后在service包下创建实现该接口的类。创建imp包下的类SomeServiceImpl
package com.pingfan.service.imp;
import com.pingfan.service.SomeService;
public class SomeServiceImpl implements SomeService {
    @Override
    public void doSome() {
        System.out.println("执行了someServiceImpl的doSome()方法");
    }
}
在test下创建MyTest进行测试
传统的创建对象的方式
@Test
public void test01(){//传统的方法
    SomeService service=new SomeServiceImpl();
    service.doSome();
}
现在通过spring来创建对象。
- 需要有spring的配置文件
beans.xml - 读取spring配置文件让spring帮我们管理对象。
首先在resource下创建spring的配置文件(xml下有一个Spring Config)(快捷键方式:点击resource,alt+fn+f12(联想电脑需要使用fn),搜索xml,下寻找spring config)
对spring配置文件分析:
<?xml version="1.0" encoding="UTF-8"?>
<beans xmlns="http://www.springframework.org/schema/beans"
       xmlns:xsi="http://www.w3.org/2001/XMLSchema-instance"
       xsi:schemaLocation="http://www.springframework.org/schema/beans
       http://www.springframework.org/schema/beans/spring-beans.xsd">\
    <!--告诉spring创建对象
        声明bean,就是告诉spring要创建某个类的对象
        id:对象的自定义名称,唯一值。spring通过这个名称找到对象
        class:类的全限定名称(不能是接口,因为spring是反射机制创建对象,必须使用类)
        spring就完成 SomeService someService=new SomeService()
        spring是把创建好的对象放入到map中,spring框架有一个map存放对象的。
            springMap.put(id的值,对象);
            例如:springMap.put("someService",new SomeServiceImpl());
            一个bean标签声明一个对象。
       -->
    <bean id="someService" class="com.pingfan.service.imp.SomeServiceImpl" ></bean>
</beans>
进行测试:
    @Test
    public  void test02(){//使用spring创建对象
        //1.指定spring配置文件的名称
        String config="beans.xml";
        //2.创建表示spring容器的对象,ApplicationContext
        //ApplicationContext就是表示spring容器,通过容器获取了对象
        //ClassPathXmlApplicationContext:表示从类路径中加载spring的配置文件
        ApplicationContext ac=new ClassPathXmlApplicationContext(config);
        //从容器中获取某个对象,你要调用对昂的方法
        //getBean("配置文件中的bean的id值")
        SomeService service= (SomeService) ac.getBean("someService");
        //使用spring创建好的对象
        service.doSome();
    }

    /*
    获取spring容器中java对象的信息
     */
    @Test
    public void test03(){
        String config="beans.xml";
        ApplicationContext ac=new ClassPathXmlApplicationContext(config);
        int nums=ac.getBeanDefinitionCount();
        System.out.println("容器中定义的对象数量:"+nums);
        //容器中定义对象的名称
        String names[]=ac.getBeanDefinitionNames();
        for(String name:names){
            System.out.println("对象名称:"+name);
        }
    }
总结:至此,完成了通过spring来创建对象,进而我们通过id来从spring容器拿到对象。接下来对spring创建执行的过程进行分析:首先我们需要创建spring容器对象ApplicationContext ac=new ClassPathXmlApplicationContext(config);在ClassPathXmlApplicationContext类的构造方法中会读取config这个配置文件,在该配置文件中,遇到bean标签时,spring会完成对象的创建工作,(通过反射机制来调用class属性中类的构造方法创建对象,对象的名字就是id的属性名,并把创建的对象放到map之中,因此对象就创建好了,这也解释了为什么从ac.getBean("id")就能拿到对象了。另外spring创建对象默认调用该对象的无参构造)到这,spring容器ac也创建好了,我们就可以通过这个容器拿到容器中的对象了。
spring创建一个非自定义类的对象
刚刚我们通过spring创建的是我们自己定义的类的对象,当然非自定义的对象也可以通过spring创建。
在beans.xml中配置
<?xml version="1.0" encoding="UTF-8"?>
<beans xmlns="http://www.springframework.org/schema/beans"
       xmlns:xsi="http://www.w3.org/2001/XMLSchema-instance"
       xsi:schemaLocation="http://www.springframework.org/schema/beans
       http://www.springframework.org/schema/beans/spring-beans.xsd">
    <!--
        spring能创建一个非自定义类的对象么,创建一个存在的某个类的对象
     -->
    <bean id="mydate" class="java.util.Date"></bean>
</beans>
进行测试
@Test
public void test04(){
    String config="beans.xml";
    ApplicationContext ac=new ClassPathXmlApplicationContext(config);
    Date mydate =(Date) ac.getBean("mydate");
    System.out.println("Date:"+mydate);
}
属性赋值
传统的的给属性赋值
学到这里,我们应该知道的是spring已经完成了对象的创建工作,那么,我们接下来关心的问题就是如何给对象的属性赋值,在这个问题之前,我们可以通过spring这个容器拿到这个对象,然后利用该对象的get和set方法对该对象进行赋值和取值。(是不是又走老套路了?别急,让你深入理解spring的创建对象,赋值的过程)
实现步骤:在之前项目的基础上,在com.pingfan包下新建model包(存放的是实体类),在model下新建Studnet实体类
Student.java
package com.pingfan.model;

public class Student {
    private int id;
    private String name;
    private String address;

    public int getId() {
        return id;
    }

    public void setId(int id) {
        this.id = id;
    }

    public String getName() {
        return name;
    }

    public void setName(String name) {
        this.name = name;
    }

    public String getAddress() {
        return address;
    }

    public void setAddress(String address) {
        this.address = address;
    }

    @Override
    public String toString() {
        return "Student{" +
                "id=" + id +
                ", name='" + name + '\'' +
                ", address='" + address + '\'' +
                '}';
    }
}
接下来进行测试:
在测试前记得在bean.xml中用bean标签声明该对象(目前为止学到的一种方法),由于本文篇幅过多,所以省略配置文件信息。相信可以举一反三,不声明该对象创建spring容器时,读取配置文件就不会创建Student对象,同样getBean("id")也拿不到该对象。
<bean id="student" class="com.pingfan.model.Student">bean>
@Test
    public void test05(){
        String config="beans.xml";
        ApplicationContext ac=new ClassPathXmlApplicationContext(config);
        Student stu=(Student) ac.getBean("student");
        stu.setId(1);
        stu.setName("张三");
        stu.setAddress("河南省");
        System.out.println(stu);
    }
结果:
Student{id=1, name='张三', address='河南省'}
总结:实践检验真理,相信有人刚学spring当他从spring容器中拿到对象时,再学习给对象赋值时,首先想到的方法肯定是调用该对象的set方法。=~=!接下里步入正题,两种方式为对象赋值分别是基于XML的DI(理解)和基于注解的DI(重点掌握),后期我们用到的都是基于注解的DI,在我一刷spring时xml方式快速略过,二刷时又重新复习了一遍。主要想深入理解其原理实现。
学习下面之前
DI的实现有两种:
- 在spring的配置文件中,使用标签和属性完成,叫做基于xml的di实现
- 使用spring中的注解,完成属性赋值,叫做基于注解的id实现。
考虑到笔记放代码过于冗余的原因,后面的篇幅只介绍具体功能的实现以及呈现部分的代码,当然可以跟着文章开头挂的传送门进行学习
基于XML的DI
DI(Dependency Injection):依赖注入,表示创建对象,给属性赋值。
如何直接复制一份项目
复制一份副本,修改自己的文件名。打开项目文件夹,把target目录和xxx.iml文件删除。打开pom.xml修改artifactId(最前边的坐标)为自己的项目名字。然后导入module,选择maven,修改下jdk点击ok即可。其中target目录是项目运行时才产生的目录。
注入分类
(1)set注入(掌握)
set注入(设置注入):spring调用类的set方法,在set方法可以实现属性的赋值。80%都是使用的set注入。接下来具体看实现。
简单类型
实体类:(因为只是赋值,所以仅仅用到了类的set方法)
package com.pingfan.bao01;
public class Student {
    String name;
    int age;
    public void setName(String name) {
        this.name = name;
    }
    public void setAge(int age) {
        this.age = age;
    }
    @Override
    public String toString() {
        return "Student{" +
                "name='" + name + '\'' +
                ", age=" + age +
                '}';
    }
}
配置文件:bao01/applicationContext.xml
<beans xmlns="http://www.springframework.org/schema/beans"
       xmlns:xsi="http://www.w3.org/2001/XMLSchema-instance"
       xsi:schemaLocation="http://www.springframework.org/schema/beans http://www.springframework.org/schema/beans/spring-beans.xsd">

    <bean id="myStudnet" class="com.pingfan.bao01.Student">
        <property name="name" value="李四">property>
        <property name="age" value="20">property>
    bean>
beans>
测试:
@Test
public void test02(){
    String config="bao01/applicationContext.xml";
    ApplicationContext ac=new ClassPathXmlApplicationContext(config);
    Student myStudnet =(Student) ac.getBean("myStudnet");
    System.out.println("Studnet对象="+myStudnet);
}
结果:
Studnet对象=Student{name='李四', age=20}
总结:学到这里,我们学会了通过标签bao01/applicationContext.xml而我们在test下写的config当然也得包括包名,resource下的所有文件夹以及文件最后都会被放到targect/classes目录下。所以读取配置文件时一定要记得写上包名。
引用类型
实体类:
package com.pingfan.bao02;
public class Student {
    String name;
    int age;
    //声明一个引用类型
    School school;
    public void setSchool(School school) {
        this.school = school;
    }
    public void setName(String name) {
        this.name = name;
    }
    public void setAge(int age) {
        this.age = age;
    }
    @Override
    public String toString() {
        return "Student{" +
                "name='" + name + '\'' +
                ", age=" + age +
                ", school=" + school +
                '}';
    }
}
package com.pingfan.bao02;
public class School {
    String name;
    String adress;
    public void setName(String name) {
        this.name = name;
    }
    public void setAdress(String adress) {
        this.adress = adress;
    }
    @Override
    public String toString() {
        return "School{" +
                "name='" + name + '\'' +
                ", adress='" + adress + '\'' +
                '}';
    }
}
配置文件:
<beans xmlns="http://www.springframework.org/schema/beans"
       xmlns:xsi="http://www.w3.org/2001/XMLSchema-instance"
       xsi:schemaLocation="http://www.springframework.org/schema/beans http://www.springframework.org/schema/beans/spring-beans.xsd">

    <bean id="myStudent" class="com.pingfan.bao02.Student">
        <property name="name" value="李四">property>
        <property name="age" value="20">property>
        <property name="school" ref="mySchool">property>
    bean>
    <bean id="mySchool" class="com.pingfan.bao02.School">
        <property name="name" value="北京大学">property>
        <property name="adress" value="四合院">property>
    bean>
beans>
测试:
@Test
public void test01(){
    String config="bao02/applicationContext.xml";
    ApplicationContext ac=new ClassPathXmlApplicationContext(config);
    //School sc=(School)ac.getBean("mySchool");
    Student stu=(Student) ac.getBean("myStudent");
    //System.out.println("School="+sc);
    System.out.println("student="+stu);
}
结果:
student=Student{name='李四', age=20, school=School{name='北京大学', adress='四合院'}}
总结:在这里我们用到了ref指定的是类型对象(也就是id),同时我们也需要创建School对象,因此也把他放到了spring容器中,在这里可能有人疑惑当读取spring配置文件时,如果Student在前,而ref指向的School对象在后面,肯定是先创建Student对象但是此时并没有创建School对象,会不会找不到?。对此,spring非常的智能,他会二次扫描该配置文件,在第一次扫描时,他会把对象都创建出来,当在执行过程中找不到ref对应的对象,会进行二次扫描并找到进行赋值。因此第二次ref指向肯定会调用set方法给引用对象赋值了。
(2)构造注入(理解)
构造注入,spring调用类的有参数构造方法,创建对象。在构造方法中完成赋值。
我们首先要知道spring默认调用的是无参构造,而这里我们通过有参构造对其赋值。
在Studnet类中只需增加有参构造即可:
public Student(String name, int age, School school) {
    this.name = name;
    this.age = age;
    this.school = school;
    System.out.println("有参构造方法");
}
配置文件:
name属性
<bean id="myStudent" class="com.pingfan.bao03.Student">
    <constructor-arg name="age" value="21">constructor-arg>
    <constructor-arg name="name" value="刘源">constructor-arg>
    <constructor-arg name="school" ref="mySchool">constructor-arg>
bean>
<bean id="mySchool" class="com.pingfan.bao03.School">
    <property name="name" value="北京大学">property>
    <property name="adress" value="四合院">property>
bean>
index属性:这里的下标是和类的有参构造参数保持一致的。
<bean id="myStudent2" class="com.pingfan.bao03.Student">
        <constructor-arg index="0" value="张三">constructor-arg>
        <constructor-arg index="1" value="20">constructor-arg>
        <constructor-arg index="2" ref="mySchool">constructor-arg>
    bean>
省略index属性:默认跟类的有参构造保持一致。
<bean id="myStudent2" class="com.pingfan.bao03.Student">
    <constructor-arg  value="张三">constructor-arg>
    <constructor-arg  value="20">constructor-arg>
    <constructor-arg  ref="mySchool">constructor-arg>
bean>
引用类型属性自动注入
(1)byName方式自动注入
java类中引用类型的属性名和spring配置文件bean标签id名称一样且数据类型一致,这样的容器中的bean,spring能够赋值给引用类型。
配置文件:
<bean id="myStudent" class="com.pingfan.bao04.Student" autowire="byName">
    <property name="name" value="李四">property>
    <property name="age" value="20">property>
bean>
<bean id="school" class="com.pingfan.bao04.School">
    <property name="name" value="北京大学">property>
    <property name="adress" value="四合院">property>
bean>
即该配置文件中的id属性名school和Studnet类中引用类型名称一样,那么spring会为我们自动注入。
(2)byType方式自动注入
java类中引用类型的数据类型和spring容器中(配置文件)bean的class属性是同源关系,这样的bean能够赋值给引用类型。
同源:
- java类中引用类型的数据类型和bean的class的值是一样的。
- java类中引用类型的数据类型和bean的class的值父子类关系的。
- java类中引用类型的数据类型和bean的class得值接口和实现类关系的。
第一种:
配置文件:
<bean id="myStudent" class="com.pingfan.bao05.Student" autowire="byType">
    <property name="name" value="李四">property>
    <property name="age" value="20">property>
bean>
<bean id="myschool" class="com.pingfan.bao05.School">
    <property name="name" value="清华大学">property>
    <property name="adress" value="四合院">property>
bean>
分析:当有byType时,他会在Studnet类中找到引用类型,然后根据这个引用类型在spring配置文件中找对应的class比较其类型一样就会进行注入。当然也存在问题,比如有好几种跟Studen类中的引用类型一样就会报错。
例如:
<bean id="myStudent" class="com.pingfan.bao05.Student" autowire="byType">
    <property name="name" value="李四">property>
    <property name="age" value="20">property>
bean>
<bean id="myschool" class="com.pingfan.bao05.School">
    <property name="name" value="清华大学">property>
    <property name="adress" value="四合院">property>
bean>
<bean id="school" class="com.pingfan.bao05.School">
    <property name="name" value="xx大学">property>
    <property name="adress" value="xxx">property>
bean>
其中有两个School类型。就会报错。所以在byType中,在xml配置文件中声明bean只能有一个符合条件的,多余一个就是错误的。
总结:至此使用配置文件给属性赋值结束,接下来学习注解给属性赋值,也是后续开发中常用的方式。
基于注解的DI
通过注解完成java对象创建,属性赋值.使用注解必须使用spring-aop依赖,而我们的项目在加入spring-context时就已经间接加入了spring-aop依赖。
使用注解的步骤:
- 加入maven的依赖spring-context,在你加入spring-context的同时,使用注解必须使用spring-apo依赖
- 在类中加入spring的注解(多个不同功能的注解)
- 在spring的配置文件中,加入一个组件扫描器的标签,说明注解在你的项目中的位置
通过spring的注解完成java对象的创建,属性。代替xml文件。
学习的注解:
1.@Component
2.@Respotory
3.@Service
4.@Controller
5.@Value
6.@Autowired
7.@Resource
定义Bean的注解@Component
在bao01中创建Student类
package com.pingfan.bao1;
import org.springframework.stereotype.Component;
/**
 * Component创建对象的
 * 属性:value 就是对象的名称,value值唯一
 */
@Component(value = "mystudent")
public class Student {
    private String name;
    private Integer age;
    public String getName() {
        return name;
    }
    public void setName(String name) {
        this.name = name;
    }
    @Override
    public String toString() {
        return "Student{" +
                "name='" + name + '\'' +
                ", age=" + age +
                '}';
    }
    public Integer getAge() {
        return age;
    }
    public void setAge(Integer age) {
        this.age = age;
    }
}
配置文件:applicationContext.xml
<beans xmlns="http://www.springframework.org/schema/beans"
       xmlns:xsi="http://www.w3.org/2001/XMLSchema-instance"
       xmlns:context="http://www.springframework.org/schema/context"
       xsi:schemaLocation="http://www.springframework.org/schema/beans http://www.springframework.org/schema/beans/spring-beans.xsd http://www.springframework.org/schema/context https://www.springframework.org/schema/context/spring-context.xsd">

    <context:component-scan base-package="com.pingfan.bao1;com.pingfan.bao2"/>
beans>
测试:
@Test
public  void test01(){
    String config="applicationContext.xml";
    ApplicationContext ctx=new ClassPathXmlApplicationContext(config);
    //从容器中获取对象
    Student stu= (Student) ctx.getBean("mystudent");
    System.out.println("student="+stu);
}
结果:
student=Student{name='null', age=null}
总结:分析用注解创建对象的过程,学到这里可以往前回顾一下xml方式创建对象的过程。=~=!
xml创建对象过程:首先读取spring配置文件,遇到bean标签那么根据反射机制把对象创建出来放到map中,我们通过getBean(“id”)拿到对象。
注解创建对象过程:首先也是读取配置文件,不过这回读取的是组件扫描器,那么根据base-packge找相应的包下类,找到注解@Component(value = “mystudent”)然后创建该类对象(value可省略)(默认调用类的无参构造)。创建完成即在spring容器中,我们就可以通过之前的方式拿到对象。
@Component:创建对象,等同于的功能。
属性:value就是对象的名称,也就是bean中的id
value的值是唯一的,创建的对象在整个spring容器中就一个。
位置:在类的上面。
@Component(value = “mystudent”)等同于
<bean id=myStudent class="com.pingfan.bao01.Studnet">bean>
简单类型属性注入@Value
实体类:
package com.pingfan.bao2;
import org.springframework.beans.factory.annotation.Value;
import org.springframework.stereotype.Component;
/**
 * Component创建对象的
 * 属性:value 就是对象的名称,value值唯一
 */
@Component("mystudent2")
public class Student2 {
    @Value(value = "李好")
    private String name;
    @Value(value = "20")
    private Integer age;
    @Override
    public String toString() {
        return "Student{" +
                "name='" + name + '\'' +
                ", age=" + age +
                '}';
    }
}
总结:其中value可省略,并且该方式也不需要set方法(当然如果有set方法@Value也可以放在set方法上同样可以实现属性赋值),简单明了。
byType自动注入@Autowired
学习前建议回顾xml中的byType
@Autowired:实现引用类型的赋值。
spring中通过注解给引用类型赋值,使用的是自动注入原理。默认使用的是byType自动注入
位置:
1.在属性定义的上面,无需set方法。推荐使用
2.在set方法的上面。
实体类:
Student
package com.pingfan.bao03;
import org.springframework.beans.factory.annotation.Autowired;
import org.springframework.beans.factory.annotation.Value;
import org.springframework.stereotype.Component;
@Component
public class Student {
    @Value(value = "李好")
    private String name;
    @Value(value = "20")
    private Integer age;
    @Autowired
    private School school;
    @Override
    public String toString() {
        return "Student{" +
                "name='" + name + '\'' +
                ", age=" + age +
                ", school=" + school +
                '}';
    }
}
School
package com.pingfan.bao03;
import org.springframework.beans.factory.annotation.Value;
import org.springframework.stereotype.Component;
@Component
public class School {
    @Value("家里蹲")
    String name;
    @Value("中国")
    String adress;
    @Override
    public String toString() {
        return "School{" +
                "name='" + name + '\'' +
                ", adress='" + adress + '\'' +
                '}';
    }
}
配置文件:applicationContext.xml
<beans xmlns="http://www.springframework.org/schema/beans"
       xmlns:xsi="http://www.w3.org/2001/XMLSchema-instance"
       xmlns:context="http://www.springframework.org/schema/context"
       xsi:schemaLocation="http://www.springframework.org/schema/beans http://www.springframework.org/schema/beans/spring-beans.xsd http://www.springframework.org/schema/context https://www.springframework.org/schema/context/spring-context.xsd">

    <context:component-scan base-package="com.pingfan.bao03"/>
beans>
测试:
@Test
public  void test01(){
    String config="applicationContext.xml";
    ApplicationContext ctx=new ClassPathXmlApplicationContext(config);
    //从容器中获取对象
    Student stu= (Student) ctx.getBean("student");
    System.out.println("student="+stu);
}
总结:这里将之前所学的注解创建对象,@Value注入都融入到这里了,可以看到配置文件中就有一个组件扫描器,然后根据base-package找相应的包下的类(即Student和School),看到该类有注解@Component就会创建该类对象,以及@Value也会注入,找到School,看到该属性上面有@Autowired,默认byType注入,那么就会找符合xml中介绍到的三种方式(这里符合第一种)进行注入。至此完成。
byName自动注入@Autowired
学习前建议回顾xml中的byName
如果使用byName方式:
1.在属性上加@Autowired
2.在属性上加@Qualifier(value=“bean的id”):
实体类:
Student
package com.pingfan.bao04;
import org.springframework.beans.factory.annotation.Autowired;
import org.springframework.beans.factory.annotation.Qualifier;
import org.springframework.beans.factory.annotation.Value;
import org.springframework.stereotype.Component;
@Component
public class Student {
    @Value(value = "李好")
    private String name;
    @Value(value = "20")
    private Integer age;
    @Autowired
    @Qualifier("school")
    private School school;
    @Override
    public String toString() {
        return "Student{" +
                "name='" + name + '\'' +
                ", age=" + age +
                ", school=" + school +
                '}';
    }
}
School
package com.pingfan.bao04;

import org.springframework.beans.factory.annotation.Value;
import org.springframework.stereotype.Component;
@Component
public class School {
    @Value("家里蹲")
    String name;
    @Value("中国")
    String adress;
    @Override
    public String toString() {
        return "School{" +
                "name='" + name + '\'' +
                ", adress='" + adress + '\'' +
                '}';
    }
}
总结:相比byType,byName多加了一个注解(指定引用类型的bean中id),可以看到很多都内容都简化了,@Component不在添加value那么默认就是类小写名称,以及@Value,在学习中可以检验自己是否真的掌握了这些东西。
JDK注解@Resource自动注入
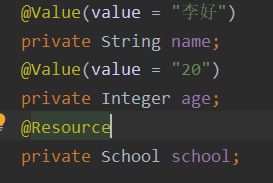
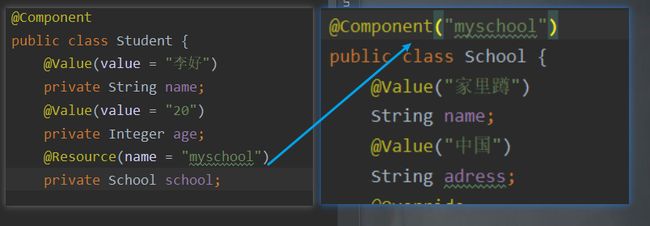
Spring提供了对jdk@Resource注解的支持。@Resource注解既可以按名称匹配Bean,也可以按类型匹配Bean。默认按名称注入。使用该注解,要求jdk必须是6及以上版本。@Resource可在属性或set方法上。
(1)byType注入引用类型属性
@Resource注解若不带任何参数,采用默认按名称的方式注入,按名称不能注入bean,则会按照类型进行Bean的匹配注入。
(2)byName注入引用类型属性
总结:可以看到默认是按名称,找不到则会按类型注入。
注解与XML的对比
XML
- 优点:代码和值是分开的,赋值都是在resource下的配置文件进行的,在这里修改完全不影响源代码,这种方式对需要经常被改的值是非常有效的。
- 缺点:代码量多、长。有点繁杂,开发效率较低
注解
- 优点:方便快捷,容易记忆,效率高
- 劣势:注解嵌在源代码里,结构复杂
总结:经常改变的值使用配置文件,不经常改变的值使用注解。


