IoTDB + Grafana 实现数据可视化(1)
@ MySQL + IoTDB + Grafana
文章目录
- 前言
- 一、IoTDB 简介
- 二、Grafana 简介
- 三、数据处理
-
- 1.数据来源
- 2.数据处理
- 2.数据分析
- 三、配置环境
-
-
- 由于网络上的教程很多,这一步略过
-
- 四、写入数据
-
- 4.1 idea 配置文件
- 4.2 idea 测试连接MySQL
- 4.3 idea 测试连接IoTDB
- 4.4 数据存取
- 五、数据可视化
-
- 5.1 下载 Grafana 插件
- 5.2 开启IoTDB服务
-
- 5.2.1 特别注意 IoTDB 版本不同可能导致失败
- 5.3 结果输出
- 六、总结
前言
实现 IoTDB + Grafana 单机版部署
将部署过程中遇到的问题进行描述,以及寻找解决方法
一、IoTDB 简介
Apache IoTDB 是专为物联网时序数据打造的数据库,提供数据采集、存储、分析的功能。IoTDB 提供端云一体化的解决方案,在云端,提供高性能的数据读写以及丰富的查询能力,针对物联网场景定制高效的目录组织结构,并与 Apache Hadoop、Spark、Flink 等大数据系统无缝打通;在边缘端,提供轻量化的 TsFile 管理能力,端上的数据写到本地 TsFile,并提供一定的基础查询能力,同时支持将 TsFile 数据同步到云端。
二、Grafana 简介
Grafana是一款用Go语言开发的开源数据可视化工具,可以做数据监控和数据统计,带有告警功能。目前使用grafana的公司有很多,如paypal、ebay、intel等
三、数据处理
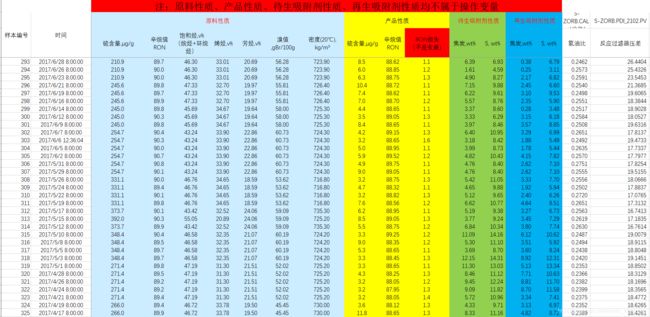
1.数据来源
本次实验,使用的是 2020年第十七届中国研究生数学建模竞赛B题 汽油辛烷值建模 的附件一当中的数据,大家可以自己在网上寻找下载,同时附上数据链接:
链接:https://pan.baidu.com/s/104PCHNqRwDUl8TZ8fdg4_Q
提取码:3tlv

2.数据处理
通过数据分析,可以看出,数据中的问题还是比较多的,所以使用python中的一些库对数据进行测试优化,由于数据的维度比较高,在IoTDB暂时中没有发现处理高维度数据的方法,利用PCA主成分分析…优化数据得到最终需要实现可视化的数据
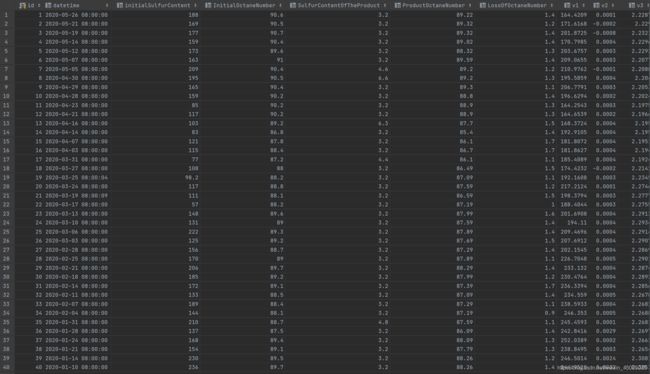
 将数据存入MySql数据库中,本次实验的目的之一也是尝试从MySQL中导入数据到IoTDB中。
2.数据分析
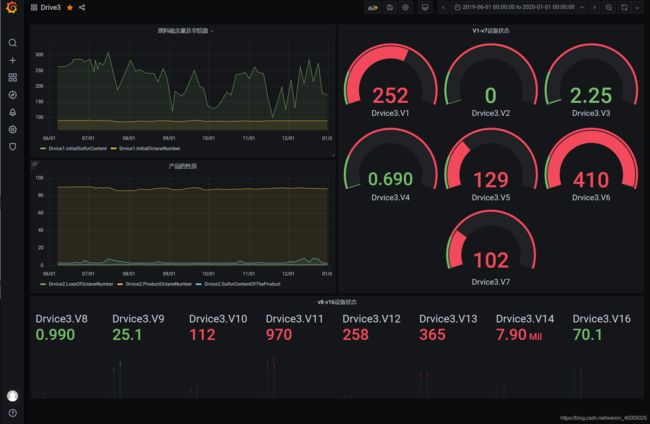
为了方便起见,假设有三台设备 Drvice1,Drvice2,Drvice3
-
Drvice1
- 原料状态下汽油的 辛烷含量 及 硫含量
-
Drvice2
- 产品状态下汽油的 辛烷含量 、 硫含量 及 比值
-
Drvice3
- 筛选出的设备测点 共十五个
三、配置环境
由于网络上的教程很多,这一步略过
- centos7 配置
- 安装 jdk 1.8
- 安装 IoTDB Grafana
四、写入数据
4.1 idea 配置文件
    <groupId>com.IoTDB.</groupId>
    <artifactId>IoTDB_DataWork</artifactId>
    <version>1.0-SNAPSHOT</version>

    <dependencies>
        <!-- iotdb jar -->
        <dependency>
            <groupId>org.apache.iotdb</groupId>
            <artifactId>iotdb-jdbc</artifactId>
            <version>0.11.2</version>
        </dependency>
        <!-- mysql -->
        <dependency>
            <groupId>mysql</groupId>
            <artifactId>mysql-connector-java</artifactId>
            <version>8.0.21</version>
        </dependency>
        <!-- jdbc -->
        <dependency>
            <groupId>org.springframework.boot</groupId>
            <artifactId>spring-boot-starter-jdbc</artifactId>
            <version>2.3.2.RELEASE</version>
        </dependency>
        <dependency>
            <groupId>org.junit.jupiter</groupId>
            <artifactId>junit-jupiter</artifactId>
            <version>RELEASE</version>
            <scope>test</scope>
        </dependency>
    </dependencies>
4.2 idea 测试连接MySQL
public class TestJdbc {
    @Test
    public  void test() {
        try {
            Class.forName("com.mysql.cj.jdbc.Driver");

            //创建连接
            String url = "jdbc:mysql://101.132.152.37:3306/data?iseSSL=false&serverTimezone=UTC";
            String username = "root";
            String password = "1yzc!YZC";

            Connection connection = DriverManager.getConnection(url, username, password);
            System.out.println(connection);
        }catch (SQLException e){
            e.printStackTrace();
        }catch (ClassNotFoundException e){
            e.printStackTrace();
        }
    }

    @Test
    public void testJdbc(){
        JDBCUtil jdbcUtil = new JDBCUtil();
        Connection conn = jdbcUtil.getConn();
        System.out.println(conn);
        jdbcUtil.closeConn(conn);
    }
}
4.3 idea 测试连接IoTDB
public class IoTDBUtil {
    public static Connection getConnection() {
        String IOTDB_DRIVER="org.apache.iotdb.jdbc.IoTDBDriver";
        String url = "jdbc:iotdb://192.168.238.101:6667/";

        String username = "root";
        String password = "root";

        Connection connection = null;
        try {
            // 加载驱动程序
            Class.forName(IOTDB_DRIVER);
            // 创建连接
            connection = DriverManager.getConnection(url, username, password);
        } catch (ClassNotFoundException | SQLException e) {
            e.printStackTrace();
        }
        return connection;
    }

}
    public static void main(String[] args) throws SQLException {
        com.iotdbDemo.Util.IoTDBUtil iotdbUtil = new com.iotdbDemo.Util.IoTDBUtil();
        Connection connection = iotdbUtil.getConnection();


        System.out.println(connection);

    }
Apache IoTDB 在虚拟机中运行时,作为新手,一定要注意端口是否打开,防火墙是否关闭 否则可能出现连接失败的问题
4.4 数据存取
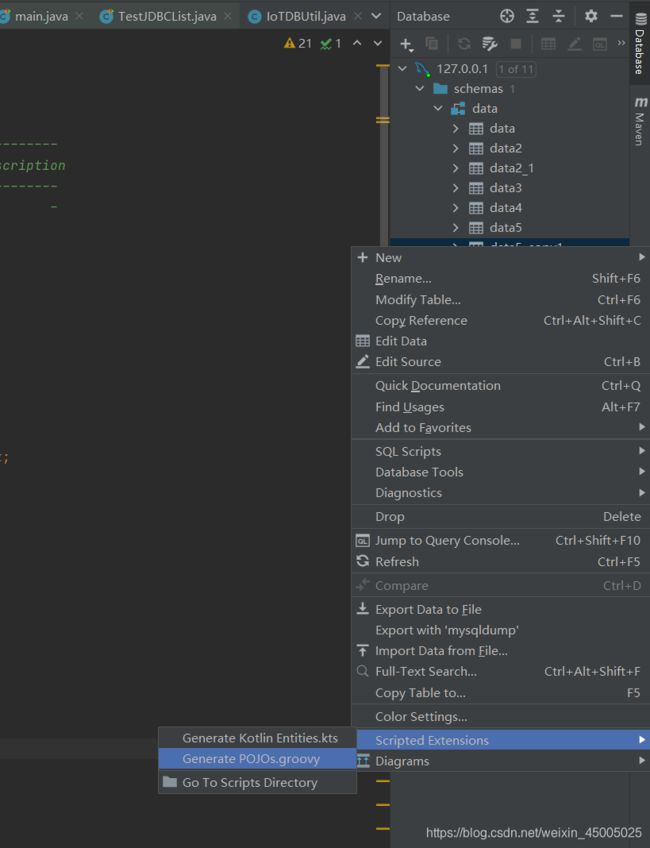
从MySQL中取出数据,这个很简单,直接创建数据的实体类,因为只有数据的主成分,所以不会存在数据溢出的问题,生成方法如图,很简单,不做过多赘述
 private JDBCUtil mJDBCUtil = new JDBCUtil();
    private IoTDBUtil mIoTDBUtil = new IoTDBUtil();

    /**
     * 提取mysql数据库中的数据
     * @return
     * @throws Exception
     */
    public List<DataEntity> getData() throws Exception{
        List<DataEntity> list = new ArrayList<>();
        try {
            Connection conn = mJDBCUtil.getConn();
            String sql = "select * from data.data5_copy1";
            PreparedStatement pstmt = conn.prepareStatement(sql);
            ResultSet rs = pstmt.executeQuery();

            while (rs.next()){
                DataEntity dataEntity = new DataEntity();
                long id = rs.getLong("id");
                /**
                 * 时间序列
                 */
                java.sql.Timestamp datetime = rs.getTimestamp("datetime");
                /**
                 * Drvice1
                 */
                double initialSulfurContent = rs.getDouble("initialSulfurContent");
                double initialOctaneNumber = rs.getDouble("initialOctaneNumber");
                /**
                 * Drvice2
                 */
                double sulfurContentOfTheProduct = rs.getDouble("sulfurContentOfTheProduct");
                double productOctaneNumber = rs.getDouble("productOctaneNumber");
                double lossOfOctaneNumber = rs.getDouble("lossOfOctaneNumber");
                /**
                 * Drvice3
                 */
                double v1  = rs.getDouble("V1");
                double v2 = rs.getDouble("V2");
                double v3 = rs.getDouble("V3");
                double v4 = rs.getDouble("V4");
                double v5 = rs.getDouble("V5");
                double v6 = rs.getDouble("V6");
                double v7 = rs.getDouble("V7");
                double v8 = rs.getDouble("V8");
                double v9 = rs.getDouble("V9");
                double v10 = rs.getDouble("V10");
                double v11 = rs.getDouble("V11");
                double v12 = rs.getDouble("V12");
                double v13 = rs.getDouble("V13");
                double v14 = rs.getDouble("V14");
                double v16 = rs.getDouble("V16");

                dataEntity.setId(id);
                dataEntity.setDatetime(datetime);
                dataEntity.setInitialSulfurContent(initialSulfurContent);
                dataEntity.setInitialOctaneNumber(initialOctaneNumber);
                dataEntity.setSulfurContentOfTheProduct(sulfurContentOfTheProduct);
                dataEntity.setProductOctaneNumber(productOctaneNumber);
                dataEntity.setLossOfOctaneNumber(lossOfOctaneNumber);
                dataEntity.setV1(v1);
                dataEntity.setV2(v2);
                dataEntity.setV3(v3);
                dataEntity.setV4(v4);
                dataEntity.setV5(v5);
                dataEntity.setV6(v6);
                dataEntity.setV7(v7);
                dataEntity.setV8(v8);
                dataEntity.setV9(v9);
                dataEntity.setV10(v10);
                dataEntity.setV11(v11);
                dataEntity.setV12(v12);
                dataEntity.setV13(v13);
                dataEntity.setV14(v14);
                dataEntity.setV16(v16);

                list.add(dataEntity);

            }
        }catch (SQLException e) {
            e.printStackTrace();
        }

        return list;
    }
将数据写入 IoTDB 前需要创建存储组,首先写一个方法来获取反馈信息
    private static void outputResult(ResultSet resultSet) throws SQLException {
        if (resultSet != null) {
            System.out.println("--------------------------");
            final ResultSetMetaData metaData = resultSet.getMetaData();
            final int columnCount = metaData.getColumnCount();
            for (int i = 0; i < columnCount; i++) {
                System.out.print(metaData.getColumnLabel(i + 1) + " ");
            }
            System.out.println();
            while (resultSet.next()) {
                for (int i = 1; ; i++) {
                    System.out.print(resultSet.getString(i));
                    if (i < columnCount) {
                        System.out.print(", ");
                    } else {
                        System.out.println();
                        break;
                    }
                }
            }
            System.out.println("--------------------------\n");
        }
    }
创建存储组,写入数据
 statement.execute("CREATE TIMESERIES root.Drvice2.LossOfOctaneNumber WITH DATATYPE=float,ENCODING=RLE;");
        //statement.executeQuery("SHOW timeseries root");
        //outputResult(statement.getResultSet());

        for(DataEntity dataEntity : list){
            Timestamp timestamp = dataEntity.getDatetime();
            double s = dataEntity.getLossOfOctaneNumber();
            String time = new SimpleDateFormat("yyyy-MM-dd HH:mm:ss").format(timestamp);

            statement.addBatch("insert into root.Drvice2(timestamp,LossOfOctaneNumber) values("+time+","+s+");");
        }

        statement.executeBatch();
        statement.executeQuery("select * from root.Drvice2");
        outputResult(statement.getResultSet());
        statement.clearBatch();
其他数据写入方法类似
五、数据可视化
5.1 下载 Grafana 插件
git clone https://github.com/grafana/simple-json-datasource.git
或者直接在官网下载
官网下载
注意 下载好的插件需要放在 Grafana 目录下的data/plugin 目录中
之后重启Grafana 就可以了
5.2 开启IoTDB服务
[root@localhost ~]# cd /software/iotdb/tools/grafana/
[root@localhost grafana]# ll
总用量 24928
-rw-r--r--. 1 root root     1593 2月   9 22:21 application.properties
-rw-r--r--. 1 root root 25519837 2月   9 22:21 iotdb-grafana.war
[root@localhost grafana]# java -jar iotdb-grafana.war
5.2.1 特别注意 IoTDB 版本不同可能导致失败
第一次使用的版本是 0.11.1 连接失败,第二次使用 升级后的 0.11.2 连接成功
5.3 结果输出
六、总结
作为一名学生, IoTDB 时序数据库在使用的过程中,可以明显的看到高效的查询速度,便捷的操作方式
文中若有不对的方式,请见谅


