Spring Boot整合Knife4j
Knife4j是一款集成Swagger生成API文档的增强解决方案,使用Knife4j可以省去了很多编写API文档的时间。以下就了解一下SpringBoot中整合Knife4j的简易demo。其中包括2.0.4以及2.0.9的配置。
            com.github.xiaoymin
            knife4j-spring-boot-starter
            2.0.4
首先就是在POM中添加依赖,之前吃过贸然升级knife4j的亏,所以暂时先讲一下2.0.4的配置。
/**
* Swagger基础配置
*/
public abstract class BaseSwaggerConfig {

    @Bean
    public Docket createRestApi() {
        SwaggerProperties swaggerProperties = swaggerProperties();
        Docket docket = new Docket(DocumentationType.SWAGGER_2)
                .apiInfo(apiInfo(swaggerProperties))
                .select()
                .apis(RequestHandlerSelectors.basePackage(swaggerProperties.getApiBasePackage()))
                .paths(PathSelectors.any())
                .build();
        if (swaggerProperties.isEnableSecurity()) {
            docket.securitySchemes(securitySchemes()).securityContexts(securityContexts());
        }
        return docket;
    }

    private ApiInfo apiInfo(SwaggerProperties swaggerProperties) {
        return new ApiInfoBuilder()
                .title(swaggerProperties.getTitle())
                .description(swaggerProperties.getDescription())
                .contact(new Contact(swaggerProperties.getContactName(), swaggerProperties.getContactUrl(), swaggerProperties.getContactEmail()))
                .version(swaggerProperties.getVersion())
                .build();
    }

    private List securitySchemes() {
        //设置请求头信息
        List result = new ArrayList<>();
        ApiKey apiKey = new ApiKey("Authorization", "Authorization", "header");
        result.add(apiKey);
        return result;
    }

    private List securityContexts() {
        //设置需要登录认证的路径
        List result = new ArrayList<>();
        result.add(getContextByPath("/*/.*"));
        return result;
    }

    private SecurityContext getContextByPath(String pathRegex) {
        return SecurityContext.builder()
                .securityReferences(defaultAuth())
                .forPaths(PathSelectors.regex(pathRegex))
                .build();
    }

    private List defaultAuth() {
        List result = new ArrayList<>();
        AuthorizationScope authorizationScope = new AuthorizationScope("global", "accessEverything");
        AuthorizationScope[] authorizationScopes = new AuthorizationScope[1];
        authorizationScopes[0] = authorizationScope;
        result.add(new SecurityReference("Authorization", authorizationScopes));
        return result;
    }

    /**
     * 自定义Swagger配置
     */
    public abstract SwaggerProperties swaggerProperties();
}
@Configuration
@EnableSwagger2
public class SwaggerConfig extends BaseSwaggerConfig {
@Override
public SwaggerProperties swaggerProperties() {
return SwaggerProperties.builder()
.apiBasePackage("com.gw")//生成API接口文档的包名
.title("标题")
.description("文档")
.version("1.0")
.enableSecurity(true)
.build();
}
}通过以上两个配置类就完成了Knife4j的配置,之后就是常规的一些注解使用
@Slf4j
@Controller
@Api(tags = "信息发布")
@RequestMapping("/news/publish")
public class NewsController extends BaseController {
    @ResponseBody
    @ApiOperation(value = "发布信息",notes = "非管理员用户则进入审核流程")
    @RequestMapping(value = "/release",method = RequestMethod.POST)
    public JSONObject releaseNews(HttpServletRequest request, String id, Integer isAgree){
        ...
    }

    @ResponseBody
    @ApiOperation("获取信息")
    @RequestMapping(value = "/list",method = RequestMethod.GET)
    public JSONObject list(HttpServletRequest request, ModelNewsData inData){
        ...
    }
}
@Data
public class ModelNewsData {
@ApiModelProperty(value = "分页size")
private Integer limit;
@ApiModelProperty(value = "分页num")
private Integer offset;
@ApiModelProperty(value = "查询关键字")
private String search;
@ApiModelProperty(value = "信息类型")
private Integer type;
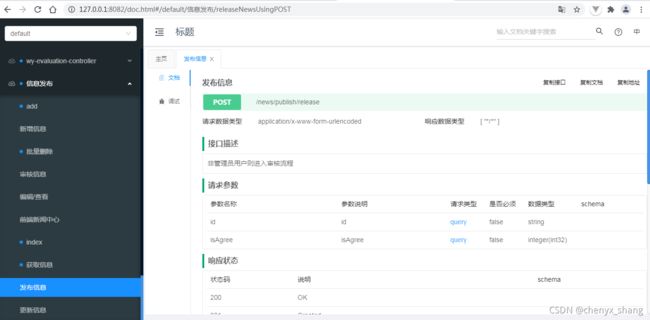
}添加了Api的一些注解之后在网页中打开http://ip:port/doc.html即可查看文档了,还是蛮方便的。
其中还有对接口的调试功能,便于后端人员对接口的一些调试,也就不需要使用PostMan等一些软件去调试接口。
之后因为一些需求导致不得不对Knife进行升级,然后发现出现了各种问题,升级后的版本是2.0.9,这个就不是单纯的从4改成9就能好的。
            com.github.xiaoymin
            knife4j-spring-boot-starter
            2.0.9
首先,之前的两个配置类可以移除掉了,然后在application.yml中添加配置,具体可参考
knife4j官方文档
knife4j:
  enable: true
  setting:
    enableDocumentManage: true
    enableSwaggerModels: true
    enableHomeCustom: true
@Configuration
@EnableSwagger2WebMvc
public class Knife4jConfiguration {
@Bean("defaultApi2")
public Docket defaultApi2(){
Docket docket = new Docket(DocumentationType.SWAGGER_2)
.apiInfo(new ApiInfoBuilder()
.description("描述")
.version("1.0")
.build())
.groupName("1.0版本")
.select()
.apis(RequestHandlerSelectors.basePackage("com.gw.frontstage.visual"))
.paths(PathSelectors.any())
.build();
return docket;
}
}在yml中配置后,再通过配置类配置包名等一些信息,用浏览器打开doc.html就OK啦,当然常规的API等注解还是不用变的,正常添加即可。
他的一些版本信息可以从官方文档中去了解各版本的差异,至于我这从2.0.4到现在的2.0.9为什么配置差异这么大,按照官方来说是从2.0.6版本开始变更的。
所以小伙伴们如果使用knife4j的话还是注意一下它的版本和配置信息,根据版本去设置它的配置,防止出现一些不必要的bug。毕竟“一遇BUG深似海,从此时间是路人”。


